
Zero-Entry Workstation Access: The Hidden Side of RDP in Win 11
Zero-Entry Workstation Access: The Hidden Side of RDP in Win 11
Remote Desktop connections let two computers share data and applications online. It’s handy for accessing files and programs from afar. Although security measures often require passwords. But what if you could connect to your remote desktop without it? This article explains how to connect to a remote desktop without a password in Windows 11.
1. Using Group Policy
A group policy editor is a tool administrators use to set user access control policies. You can use this feature to disable passwords. Make sure you are running Windows Pro, Enterprise, or Education Edition.
Note that Windows Home Edition does not support Group Policy because it is a non-domain system. However, you can enable Local Group Policy Editor on your Windows Home device.
To allow remote desktop connections without passwords, follow these steps:
- Press Win + R on your keyboard to open the Run dialogue box .
- Type gpedit.msc in the text field box and hit Enter. The Local Group Policy Editor will open as a result.
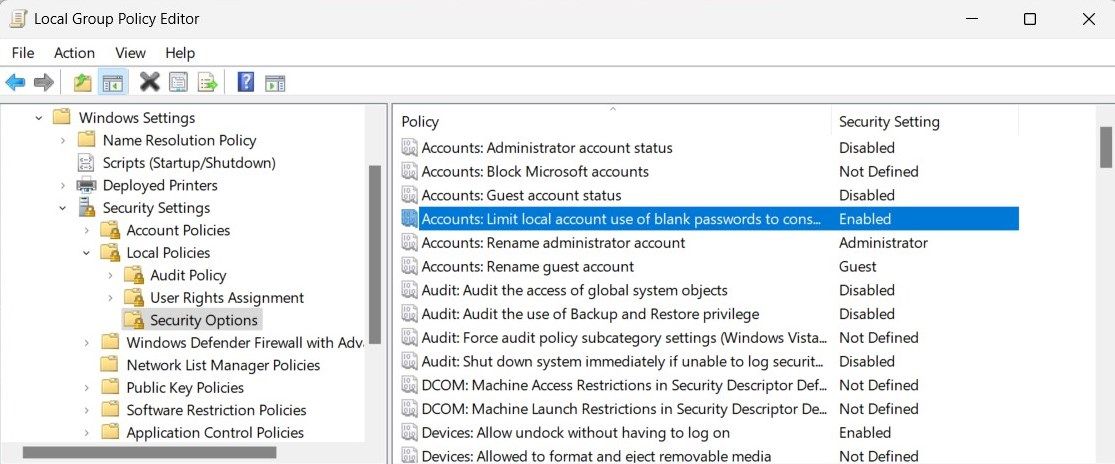
- In the left-hand navigation pane, expand the Computer Configuration policy sets.
- Then navigate to the following folders:
Windows Settings > Security Settings > Local Policies > Security Options - In the right panel, double-click on Accounts: Limit local account use of blank passwords to console logon only. The Properties window will pop up.

- Choose Disabled and click OK to save the changes.
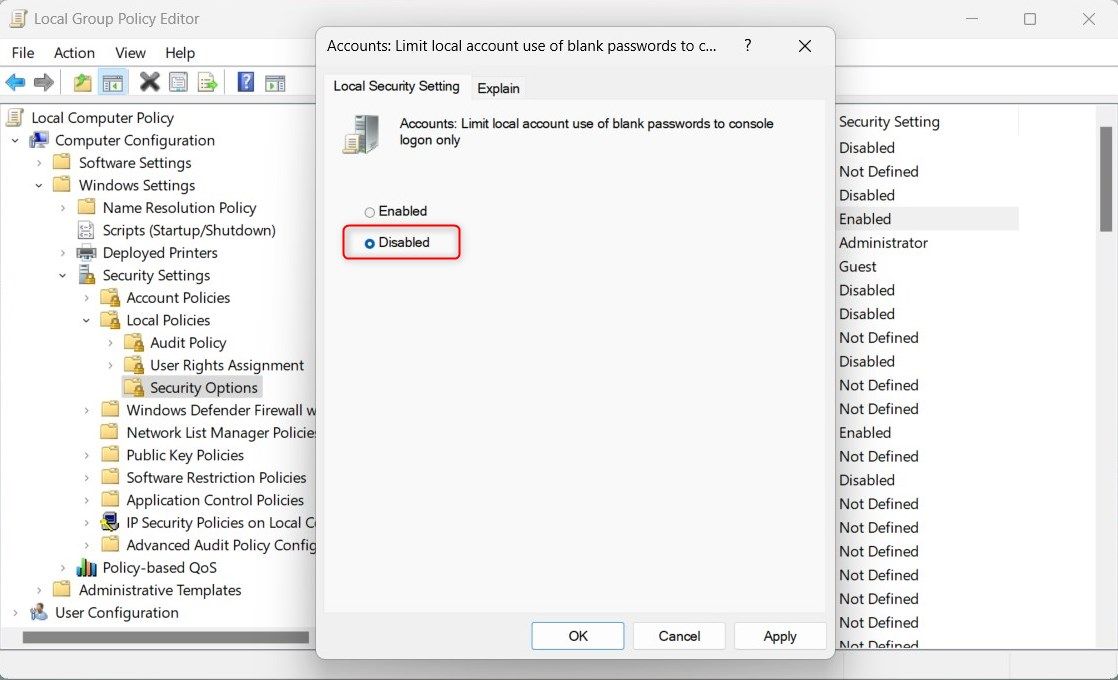
This will allow users to connect remotely without using a password. If you want to enable the password prompt again, just follow the same steps and select Enabled instead of Disabled in the last step.

company, user or members of the same household. Action! - screen and game recorder</a>
2. Using Security Policy
Security policies are another way to connect remotely without passwords. This tool is similar to the group policy editor but specific to the local computer. This means any changes you make to the local security policy will only apply to the local computer while group policies are domain-wide.
To make passwordless remote connections using a security policy, follow these steps:
- Press Win + S on your keyboard to open the Windows Search.
- Type secpol.msc in the search bar and hit Enter.
- Select the result from the top of the list to open the Local Security Policy.
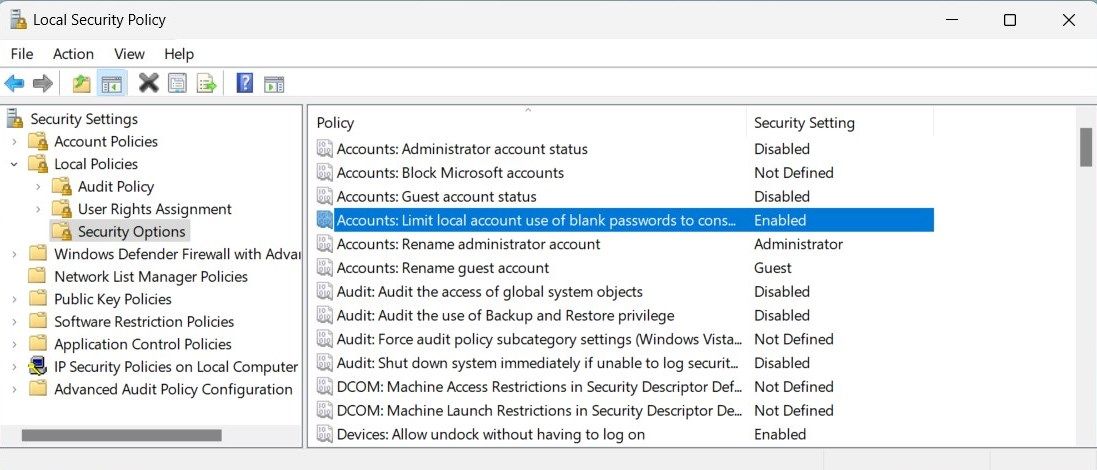
- In the left-hand navigation pane, navigate to the following folders:
Security Settings > Local Policies > Security Options - Now move to the right panel and double-click on Accounts: Limit local account use of blank passwords to console logon only. This will open the Properties window for this policy.
- Select Disabled and click on Apply > OK to save changes.
Once you save this setting, remote connections are possible without passwords.
To enable the password prompt again, go through the same steps and double-click on the policy. When the Properties window opens, select Enabled. Click Apply > OK to save the changes.
3. Using Registry Editor
When running Windows Home, use the registry editor instead of the group policy editor. The registry editor is a hierarchical database that stores system configuration and settings.
However, be careful when using it as one mistake can permanently damage your system and cause data loss. Therefore, you always back up your registry before making changes.
To make remote desktop connections without a password on Windows Home, follow these steps:
- Click on Start and type regedit in the search box.
- Select the Registry Editor option from the results list.
- If UAC (User Account Control) pops up, click on Yes to grant permission. This will open the Registry Editor on your screen.
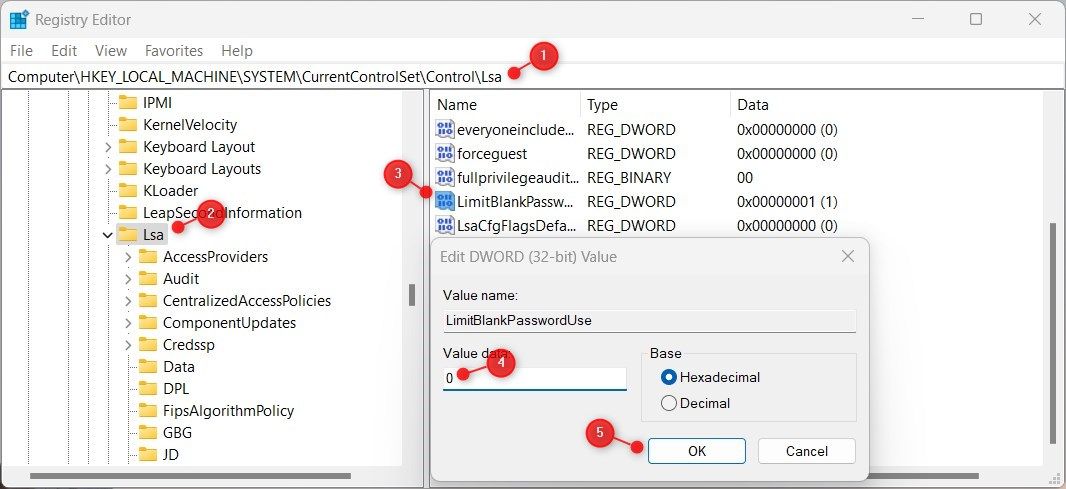
- In the left-hand sidebar, navigate to the following registry key:
HKEY_LOCAL_MACHINE\SYSTEM\CurrentControlSet\Control\Lsa - In the right panel, double-click on LimitBlankPasswordUse. The Edit DWORD window will pop up.
- Change the Value data field to 0 and click OK to save changes.

This will prevent Windows from requiring a password when connecting remotely.
If you ever want to re-enable the password prompt, navigate back to the same registry key and change the value data field to 1. Now close the Registry Editor and you are ready to connect remotely without a password.

4. Using Command Prompt
If you prefer the command line over graphical tools, try this method. It works the same way as the registry editor but is done through the command prompt. Since this could be difficult for novice users, double-check each step. This ensures you don’t make mistakes and damage your system.
To enable passwordless remote connections using the command prompt, follow these steps:
- Right-click on Start and select Run from the menu.
- Type cmd in the text field and press Ctrl + Shift + Enter simultaneously.
- If the UAC dialog box pops up, click Yes to grant permission. This will open the Command Prompt with administrative privileges.
EaseText Audio to Text Converter for Windows (Personal Edition) - An intelligent tool to transcribe & convert audio to text freely
- Now type the following command and hit Enter.
Reg add “HKEY_LOCAL_MACHINE\SYSTEM\CurrentControlSet\Control\Lsa” /v LimitBlankPasswordUse /t REG_DWORD /d 0 /f

Running this command will change the value data field to 0 and disable the remote password prompt.
If you ever want to re-enable the password prompt, run the same command but replace the 0 at the end with a 1. This way the command will look like this.
Reg add “HKEY_LOCAL_MACHINE\SYSTEM\CurrentControlSet\Control\Lsa” /v LimitBlankPasswordUse /t REG_DWORD /d 1 /f
5. Using a Reg File
If you’re not good at editing with the registry editor, create a .reg file instead. The .reg files are basically text files with predefined instructions. When executed, they change the registry and apply settings automatically.
To create a .reg file, follow these steps:
- Open Notepad (see how to open Notepad for methods).
- Copy and paste the following:
`Windows Registry Editor Version 5.00
HKEY_LOCAL_MACHINE\SYSTEM\CurrentControlSet\Control\Lsa
“LimitBlankPasswordUse”=dword:00000000`
3. Now click File > Save as and set the file type to All files.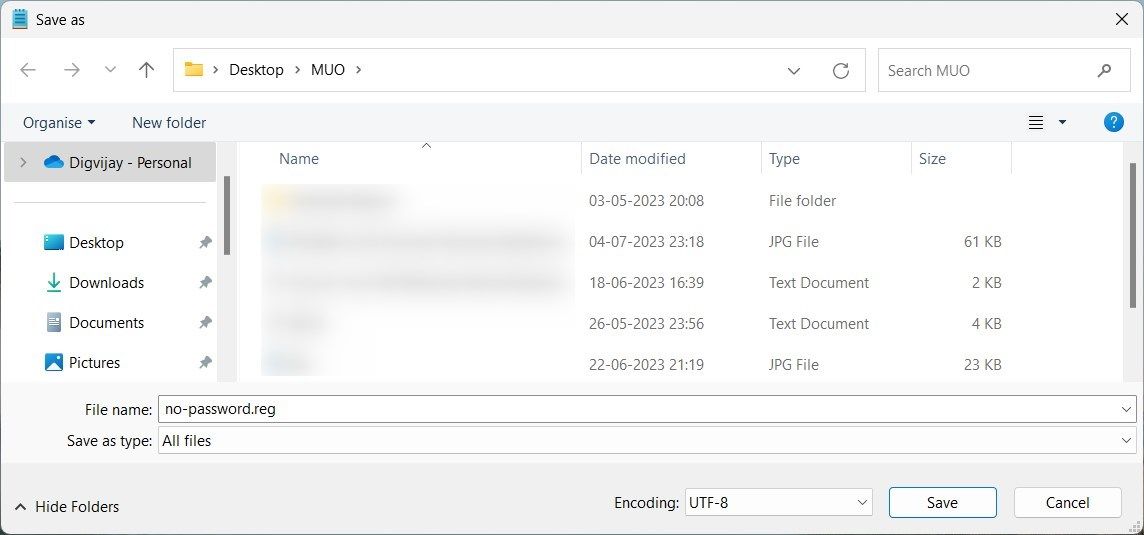
4. Name the file no-password.reg and save it to your desktop.
5. Double-click on the file to execute it and apply the settings automatically.
Your remote connections will now run without passwords. To re-enable the password prompt, create another text file with the following code:
`Windows Registry Editor Version 5.00
HKEY_LOCAL_MACHINE\SYSTEM\CurrentControlSet\Control\Lsa
“LimitBlankPasswordUse”=dword:00000001`
Now save the file as enabled_password.reg and double-click it to apply the changes.
 /a>
/a>Enjoy Password-Free Remote Access
Read this guide to access remote desktop without remembering and entering passwords each time. This creates a password-free experience, making it easier to connect with coworkers or friends whenever required.
- Title: Zero-Entry Workstation Access: The Hidden Side of RDP in Win 11
- Author: David
- Created at : 2024-08-15 23:34:49
- Updated at : 2024-08-16 23:34:49
- Link: https://win11.techidaily.com/zero-entry-workstation-access-the-hidden-side-of-rdp-in-win-11/
- License: This work is licensed under CC BY-NC-SA 4.0.