
Unraveling the Cause Behind Error 0X80370102 in WSL Distribution
Unraveling the Cause Behind Error 0X80370102 in WSL Distribution
The 0x80370102 error occurs when the users attempt to install and run a Linux distribution using the ‘Windows Subsystem for Linux’ feature. In several cases, the error is caused when the users try to install both Linux and Debian distros and is typically related to problems with the hardware Virtualization feature in BIOS.
Below, we take a look at the causes of this issue and the troubleshooting methods that will help you resolve the problem in no time.
What Causes the Error 0x80370102 in Windows?
The error at hand can be caused by a number of reasons, especially hardware issues. Here is a list of the most common reasons behind this issue:
- Hyper-V and other relevant settings are disabled - Hyper-V, which is Microsoft’s hardware virtualization product, lets you create and run the virtual machine. This service and other relevant services like the Virtualization setting should be enabled from the BIOS for you to be able to install and run distros.
- You are using Windows Insider Preview build - If you are not using a completely developed version of Windows, you are also likely to run into errors like the one at hand.
- The Lxssmanager.exe service is corrupt - the Lxssmanager.exe service manages the launch of new WSL instances. If this service is corrupt or just not working properly, you will not be able to install a Linux distribution to access via Windows Subsystem for Linux 2.
Now that we know about the causes of this problem let’s have a look at the solutions that will hopefully fix the problem for good. However, before we proceed, we recommend that you double-check if your computer supports hardware virtualization .
In case you are using an Insider Build of Windows, consider installing a stable Windows version, since a version under development is prone to errors like this one.
1. Enable Hyper-V
The first thing that we recommend doing is making sure that all the relevant services like Hyper-V and Virtualization are enabled. In this method, we will be enabling the Hyper-V feature using the Control Panel. We will also use the Task Manager utility to check if the Virtualization feature is working fine.
Here is how you can enable Hyper-V on your PC:
- Press theWin + R keys together to open a Run dialog.
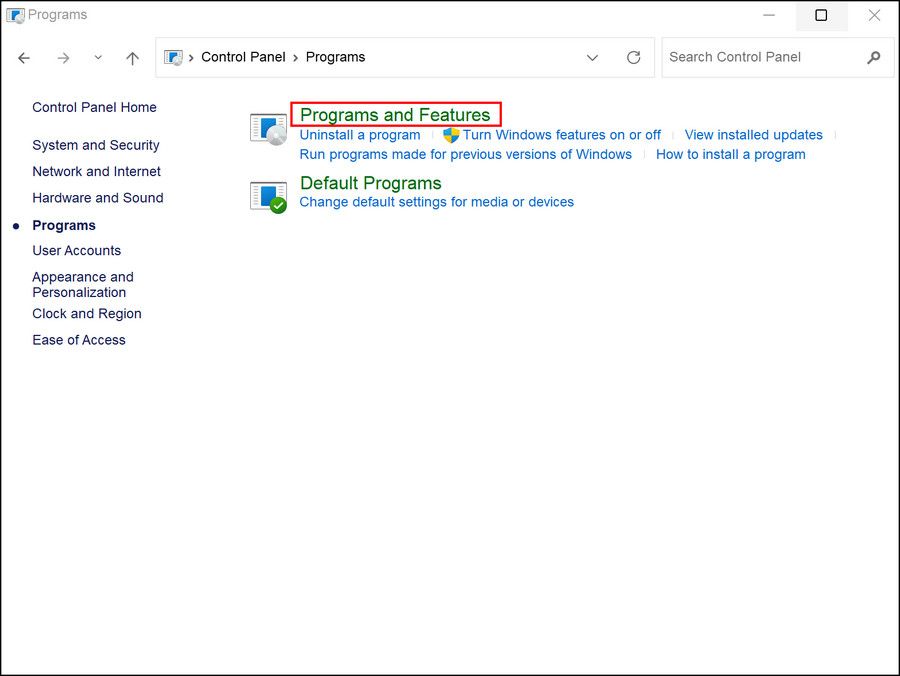
- Choose thePrograms option and then click onProgram and Features .
 NeoDownloader - Fast and fully automatic image/video/music downloader.
 - Click onTurn Windows Feature on or off in the left pane.
- In the following dialog, checkmark the box associated withHyper-V and clickOK .
- Once done, restart your computer and check if the issue is resolved. While you are at it, we also recommend checking if the Virtual Machine Platform feature is enabled by following the same steps. If it is disabled, enabling it should help you fix the issue as well.
 NeoDownloader - Fast and fully automatic image/video/music downloader.
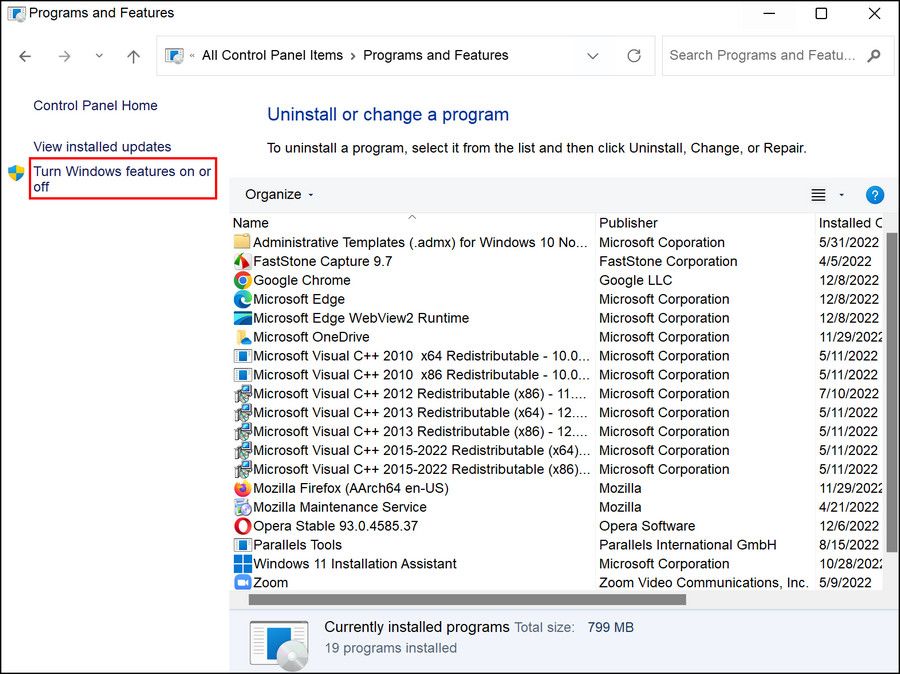


Next, we will check if Virtualization is enabled on the device. In most devices, it is disabled by default. Follow the steps below to proceed:
- Press theCtrl + Shift + Esc keys together to open Task Manager,
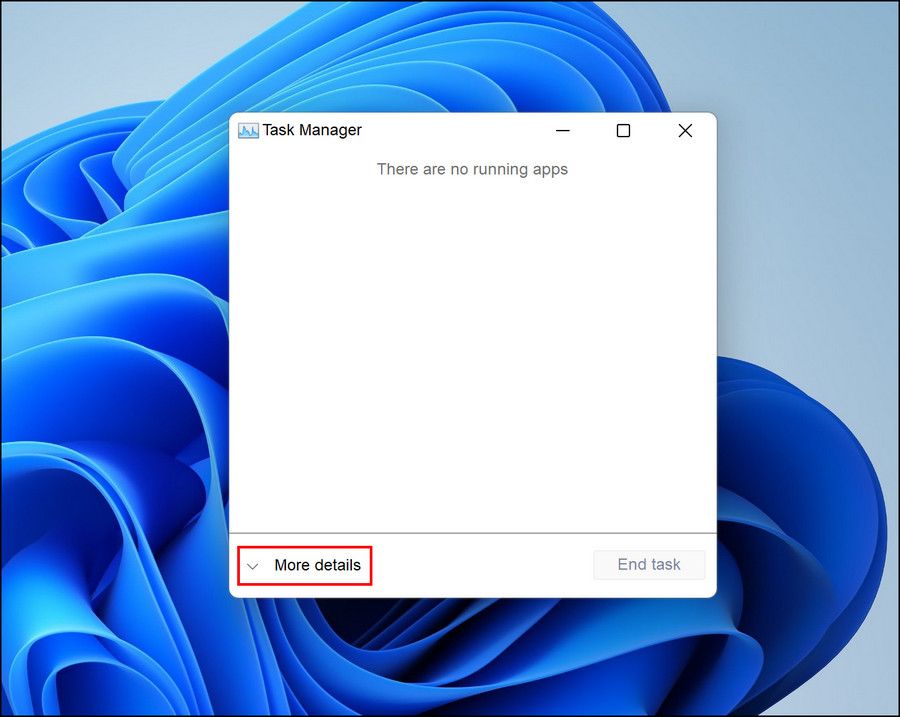
- Click on theMore details button to expand the Task Manager window.
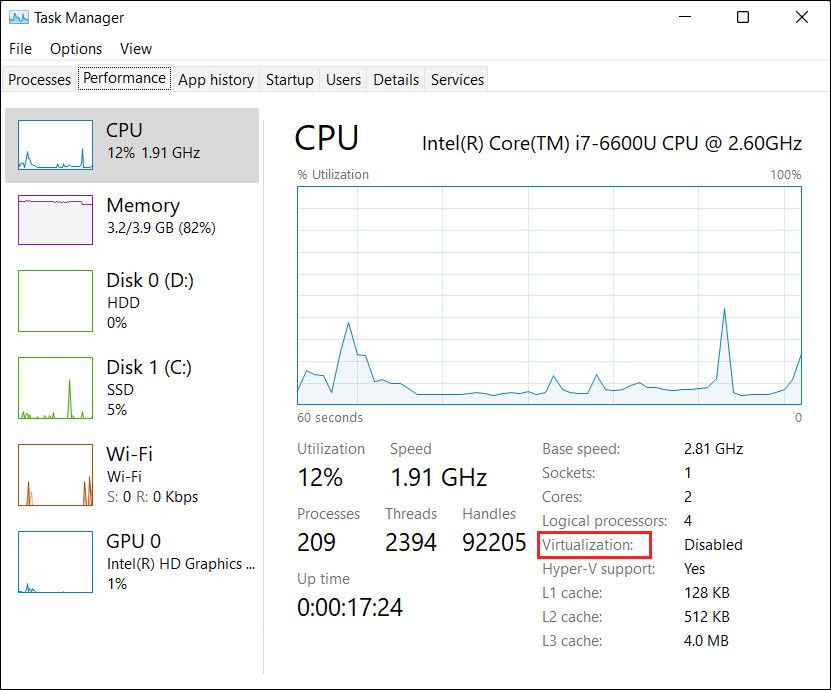
- Head over to thePerformance tab and click on CPU.
- Under the CPU graph on the right side, check the status forVirtualization . In case you are not sure if your PC supports virtualization, view the Hyper-V support section in the same window. If it says Yes, then it implies that you can make use of hardware virtualization on your computer.
- Alternatively, open Run by pressing theWin + R keys together.
- Type cmd in the text field and pressCtrl + Shift + Enter to open Command Prompt as admin.
- ClickYes in the User Account Control Prompt.
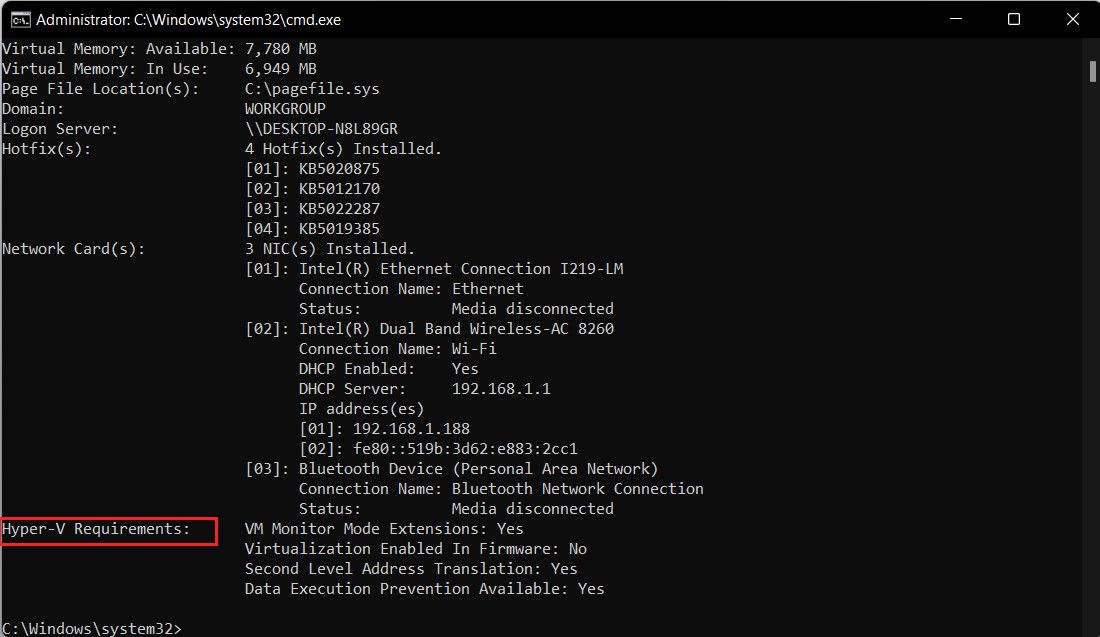
- Type systeminfo in Command Prompt and hit Enter.
- Wait for the command to execute, and then head over to theHyper-V requirements section. You should be able to see if the Virtualization is enabled from there.
With Screensaver Wonder you can easily make a screensaver from your own pictures and video files. Create screensavers for your own computer or create standalone, self-installing screensavers for easy sharing with your friends. Together with its sister product Screensaver Factory, Screensaver Wonder is one of the most popular screensaver software products in the world, helping thousands of users decorate their computer screens quickly and easily.
 With Screensaver Wonder you can easily make a screensaver from your own pictures and video files. Create screensavers for your own computer or create standalone, self-installing screensavers for easy sharing with your friends. Together with its sister product Screensaver Factory, Screensaver Wonder is one of the most popular screensaver software products in the world, helping thousands of users decorate their computer screens quickly and easily.
If the service is disabled,enabling the Hyper-V technology on Windows should fix the problem for you.
2. Restart the LxssManager Service
As we mentioned earlier, the LxssManager service should be working properly for you to install the Linux distribution and run it.
If a service is acting up, the easiest way to fix it is by restarting it. In this method, we will use the Windows Services utility to make these changes.
Here is how you can do that:
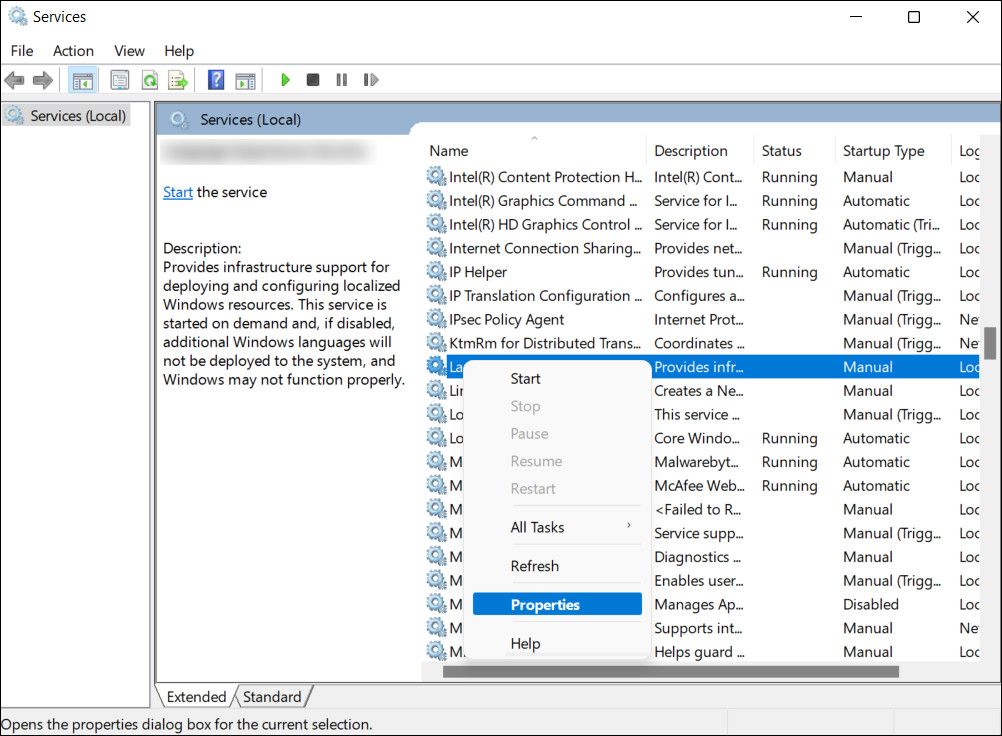
- Press theWin + R keys together to open a Run dialog.
- Type services.msc in Run and clickOK .
- In the following window, look for theLxssManager service and right-click on it.
- ChooseProperties from the context menu.
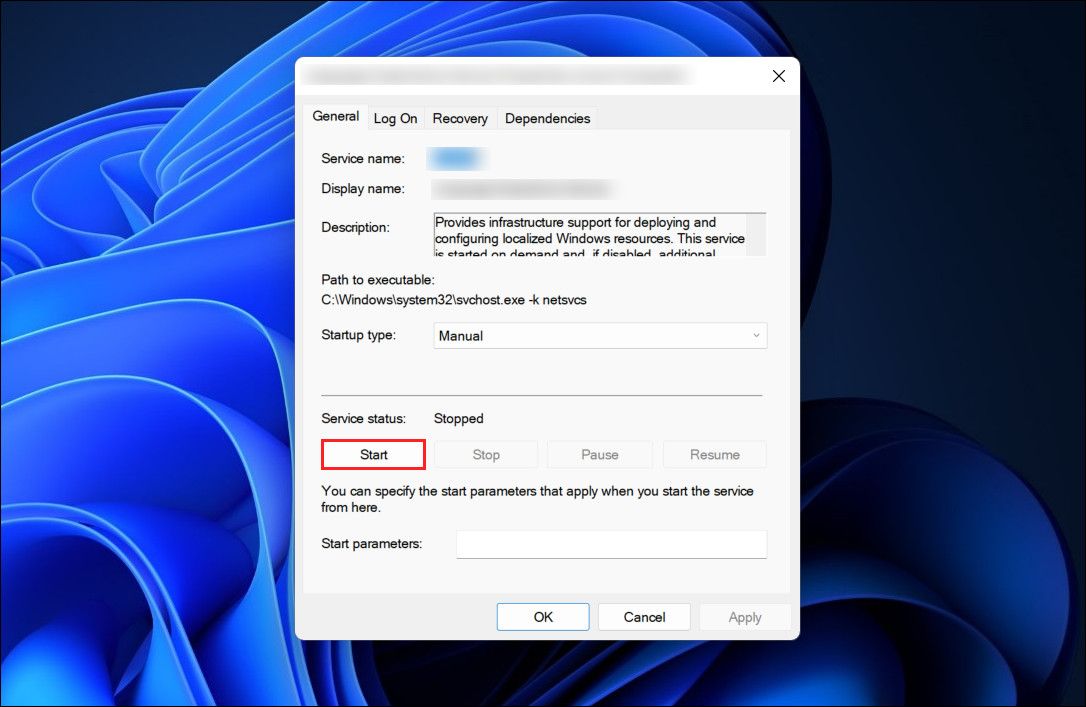
- Now, click on theStop button, wait for a few seconds, and then hitStart .
- Once the service is restarted, check if the issue is resolved.

3. Enable Nested Virtualization and Change the RAM Settings
Another fix that worked for users was enabling Nested virtualization, a feature that enables you to run Hyper-V inside a Hyper-V virtual machine. If this feature is disabled on your computer, enabling it will hopefully resolve the problem for you.
Here is how you can proceed:
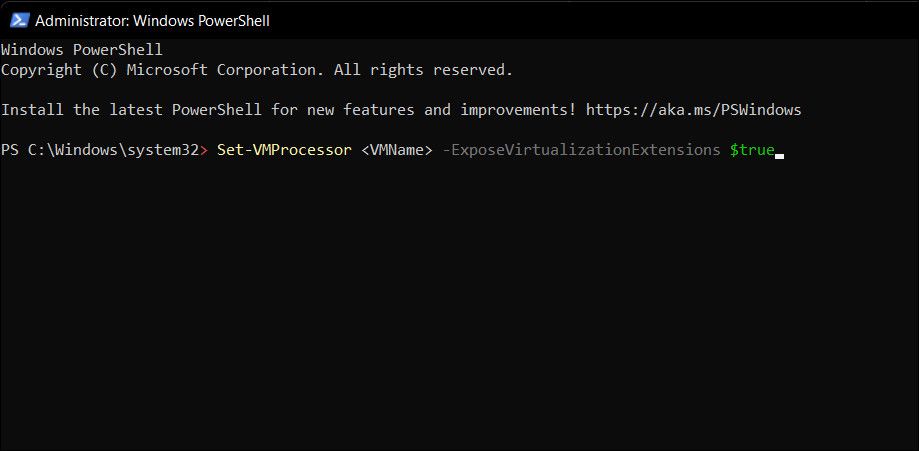
- Type Powershell in Windows search and click onRun as administrator .
- ClickYes in the User Account Control prompt.
- Type the following command in the Powershell window and click Enter to execute it.
Set-VMProcessor-ExposeVirtualizationExtensions $true - Now, launch the Hyper-V manager and right-click on the virtual machine.
- ChooseSettings from the context menu.
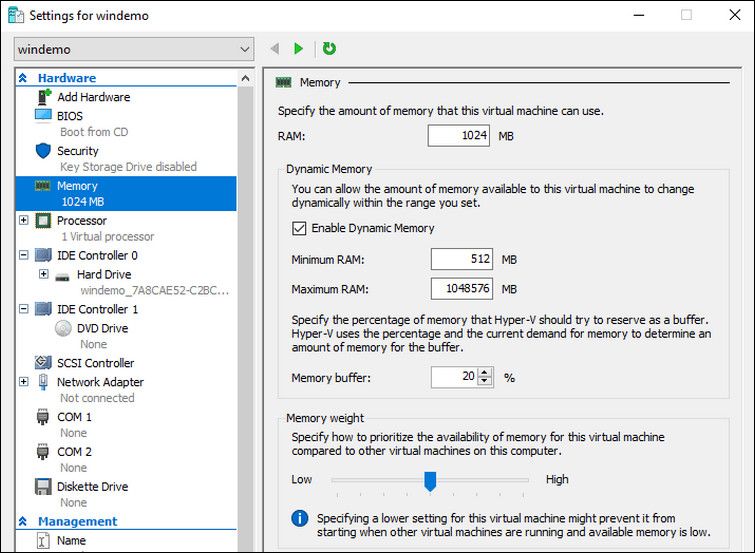
- Click onMemory in the left pane.
- Now, increase the Startup RAM value by double and uncheck the box forEnable Dynamic Memory .
- ClickApply >OK to save the changes.
- Now, right-click on your virtual machine again and chooseConnect .
- Let the system restart and try installing/running Ubuntu again.
The WslRegisterDistribution Error, Fixed
Accessing Windows Subsystem for Linux is quite simple, but there are times when you can run into installation or functioning errors. The methods above should help you fix the WslRegisterDistribution error successfully. You can also contact the Microsoft support team if the error appears again to identify the real cause of the problem in your case and implement a relevant solution.
- Title: Unraveling the Cause Behind Error 0X80370102 in WSL Distribution
- Author: David
- Created at : 2024-08-16 00:37:06
- Updated at : 2024-08-17 00:37:06
- Link: https://win11.techidaily.com/unraveling-the-cause-behind-error-0x80370102-in-wsl-distribution/
- License: This work is licensed under CC BY-NC-SA 4.0.