Unlocking Windows: Cure for Hyper-V Error Code 0X8009030E

Unlocking Windows: Cure for Hyper-V Error Code 0X8009030E
The Hyper-V error 0x8009030E occurs during an authentication failure when trying to establish a connection between the Hyper-V host and the virtual machine. It is often associated with incorrect or mismatched security credentials.
Below, we walk you through the different solutions you can try to resolve the error for good. However, before proceeding, we recommend that you thoroughly verify the credentials you are utilizing to establish a connection with the Hyper-V host. This precautionary measure ensures that the error is not stemming from incorrect or mismatched credentials on your end.
1. Run the Hyper-V Manager as an Admin
Several actions in Hyper-V, such as modifying the settings, creating virtual networks, or accessing configuration options require administrative access to the tool. In some cases, encountering the error 0x8009030E may indicate that you lack the necessary privileges.
This is why, we recommend starting the troubleshooting by ensuring that you have the appropriate permissions required to execute the targeted task.
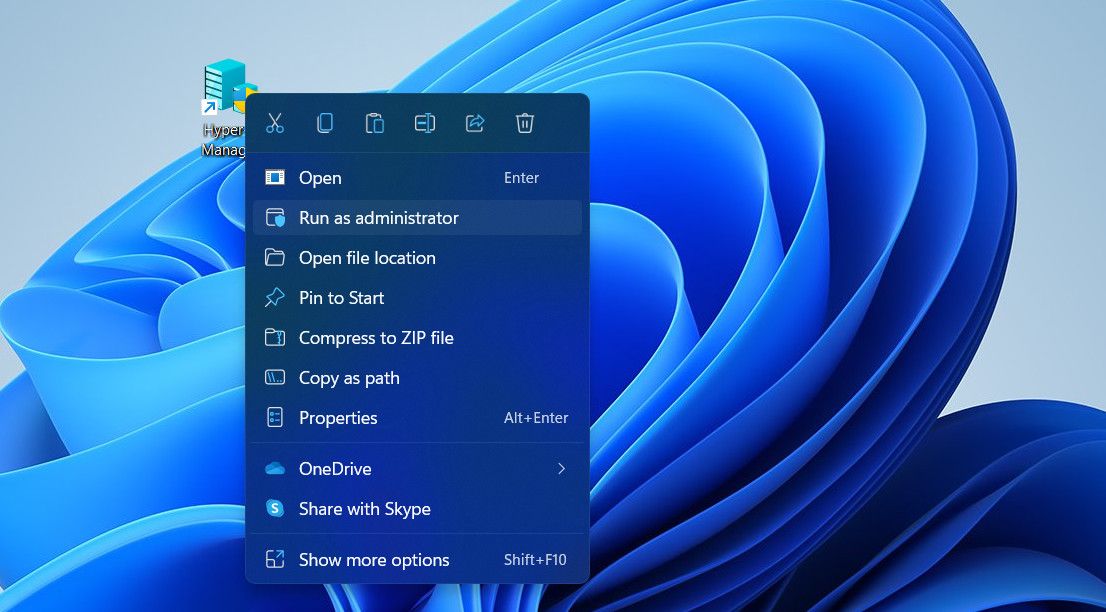
You can do this by first logging into Windows as an administrator if you are currently using a standard account (standard vs. administrator Windows account ). After the boot, right-click on the Hyper-V Manager shortcut and choose Run as administrator from the context menu.

Confirm your action in the User Account Control prompt and check if the issue is resolved.
2. Set Up Kerberos Delegation
If lack of administrative access was not causing the problem, our next course of action will be to address authentication-related issues.
For this, we will configure Kerberos delegation, which is a feature that allows a program to use the security credentials of a client when needed, on behalf of the client. If the correct Kerberos Constrained Delegation is absent, it can lead to several authentication errors like the one at hand.
In this method, we will first access the list of all the services and resources to which the computer account is allowed to delegate credentials. If the services that are relevant to Hyper-V aren’t included in the output section, it will imply that Kerberos Delegation may be missing or not properly configured.
In that case, we will proceed to enable and configure it, before testing the connection again.
Follow these steps to proceed:
- Press the Win + S keys together to open the Windows Search utility.
- Type “Powershell” and click on Run as administrator to launch Powershell with administrative rights.
- Click Yes in the User Account Control prompt.
- Once you are inside the Powershell window, execute the command below. Replace ComputerAccount with the name of the computer account you want to check for Kerberos Delegation.
Get-ADComputer -Identity [ComputerAccount] -Properties msDS-AllowedToDelegateTo | Select-Object -ExpandProperty msDS-AllowedToDelegateTo - This command will display the list of services or resources to which the selected account is allowed to delegate credentials. Review the output to see if the services relevant to Hyper-V are included. If it doesn’t include those services, Kerberos Delegation is likely to be missing or improperly configured.
- In that case, launch the Active Directory Users and Computers management console.
- Locate the targeted computer account and right-click on it.
- Choose Properties from the context menu.
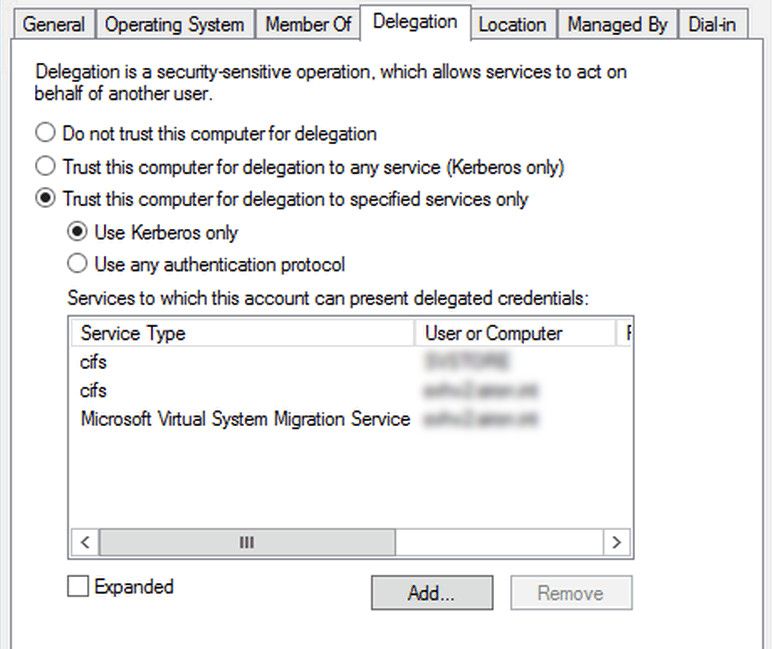
- Now, head over to the Delegation tab and enable the Trust this computer for delegation to specified services only option.
- Turn the Use Kerberos only option too.

- Click Apply > OK to save the changes and repeat the steps for the host computer.
- Once done, test the connection to see if the issue is now resolved.
3. Change Account Options
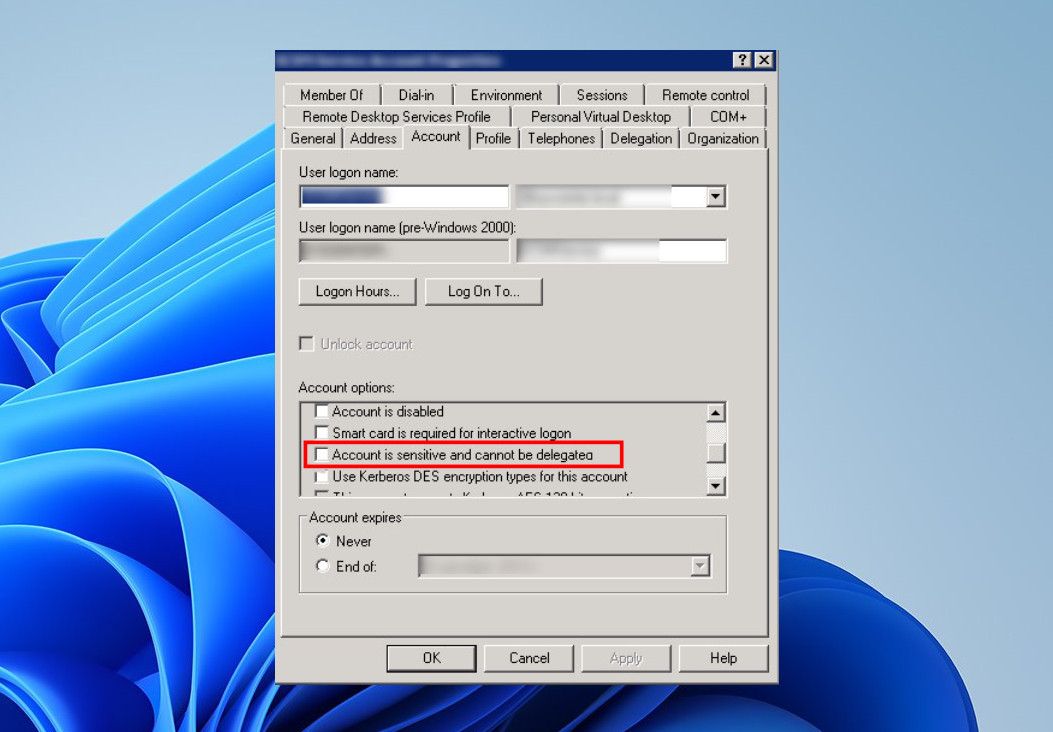
You might also be facing the problem if the ‘Account is sensitive and cannot be delegated’ option is enabled in the properties of the targeted account.
Here is how you can check if this feature is causing the problem and disable it:
- Access the properties of the targeted account by following the steps we have described above.
- In the Properties dialog, head over to the Account tab and move to the “Account options” section.
- Uncheck the Account is sensitive and cannot be delegated option and click Apply > OK to save the changes.

4. Check Firewall and Antivirus Settings

Firewall and antivirus programs are known to potentially disrupt communication between various components and services, and this may also be the case with the Hyper-V error you’re experiencing.
To address this issue, it is important to review the configuration of your firewall and antivirus software. These programs could be blocking the essential network traffic required for proper authentication and communication between the Hyper-V host and other components.
It is, however, important to note that the specific steps to check these settings will vary, depending on the security program you are using. You can refer to the official documentation provided by the developer, or reach out to the official team for assistance.
If you cannot locate these settings, you can also try to temporarily disable Windows Security and then perform the action that was initially triggering the error. If the issue does not appear after disabling the security program, consider whitelisting Hyper-V and its components in the application to avoid such issues in the future.
5. Update Hyper-V Integration Components
Integration components are a set of drivers and services that help establish seamless communication and functionality between virtual machines (VMs) and the Hyper-V host.
It is worth updating these services to ensure they are functioning properly and not contributing to the problem at hand.
Here is how you can do that:
- Launch Hyper-V Manager and select the VM for which you want to update these components.
- Right-click on the VM and choose Connect.
- Now, head over to the Action menu and choose Insert Integration Services Setup Disk.
- Navigate to the setup file and follow the on-screen instructions to proceed.
- Once the installation is complete, restart the VM and check if the problem is fixed.
Hyper-V Error 0x8009030E Resolved
Resolving the Hyper-V error 0x8009030E is critical for maintaining a secure virtualization environment, and the solutions listed above should help you resolve the problem once and for all.
If the error persists, you can check for any event logs related to the problem, which will provide further insights into the cause of the issue. You can then contact the official Microsoft support team and provide them with this information. Hopefully, they will be able to identify the exact cause of the problem and provide a relevant solution.
Below, we walk you through the different solutions you can try to resolve the error for good. However, before proceeding, we recommend that you thoroughly verify the credentials you are utilizing to establish a connection with the Hyper-V host. This precautionary measure ensures that the error is not stemming from incorrect or mismatched credentials on your end.
Also read:
- [Updated] 2024 Approved How to Upload a Video to Instagram From a Desktop
- Disable Met Not Achieved Indicator on Windows 11
- Effortless Guide to Downloading Newest Drivers for Your DELL D3100
- How to Fix Gray Zone Warfare (GZW) Crashing on PC
- In 2024, 2 Ways to Monitor Samsung Galaxy A34 5G Activity | Dr.fone
- In 2024, Master Class on Cutting Unwanted Backdrops
- In 2024, Streamline Your Strategy with Aspect Ratio Mastery on YouTube
- Maintaining Integrity of Windows Time Settings
- Mastering the Art of Fixing Microsoft's Email Error (0X800713F)
- Mastering the Art of Unauthorized Sign-In Bypassing in Windows
- Mending Connections: Addressing Windows and EA Server Linkage
- Overcoming Connectivity Woes: Expert Tips for When Your USB Mouse Fails to Work
- Take Control of Discord Dialogues Advanced Techniques for Pins
- Windows Authentication Breakdown: Standard vs Microsoft User Access Explored
- Title: Unlocking Windows: Cure for Hyper-V Error Code 0X8009030E
- Author: David
- Created at : 2025-01-12 16:08:07
- Updated at : 2025-01-18 18:02:55
- Link: https://win11.techidaily.com/unlocking-windows-cure-for-hyper-v-error-code-0x8009030e/
- License: This work is licensed under CC BY-NC-SA 4.0.

