Tutorial: Restoring Original Input Layout on Windows 11 PCs

Tutorial: Restoring Original Input Layout on Windows 11 PCs
Are you using a Windows touchscreen device and experiencing keyboard issues? This often occurs when certain keys are difficult to use or scrolling becomes tricky because the keyboard pops up in the wrong spot.
To help with this issue, we’ll explain two methods to reset the default opening position of your touch keyboard in Windows 11. The first method requires running a batch file, while the second involves tweaking the Windows Registry Editor.
Let’s explore each one.
Disclaimer: This post includes affiliate links
If you click on a link and make a purchase, I may receive a commission at no extra cost to you.
1. Tweak Registry Editor to Reset Touch Keyboard Default Open Position
The Registry Editor is an advanced tool and requires caution when editing. But if you want to reset the default opening position of the touch keyboard efficiently, this is the method to use. However, as I have said before, you have to be especially careful when editing the Registry Editor as any mistake could cause serious damage.
It is always a good idea tocreate a system restore point or to take abackup of the registry editor before starting. This can help if something goes wrong. It is now time to reset the default open position of the touch keyboard. To do so, follow these steps:
- PressWin + R on your keyboard to open the Run dialog box.
- Typeregedit in the text box and press Enter. This will launch the Registry Editor.
- ClickYes if the UAC (User Account Control) window asks for permission.
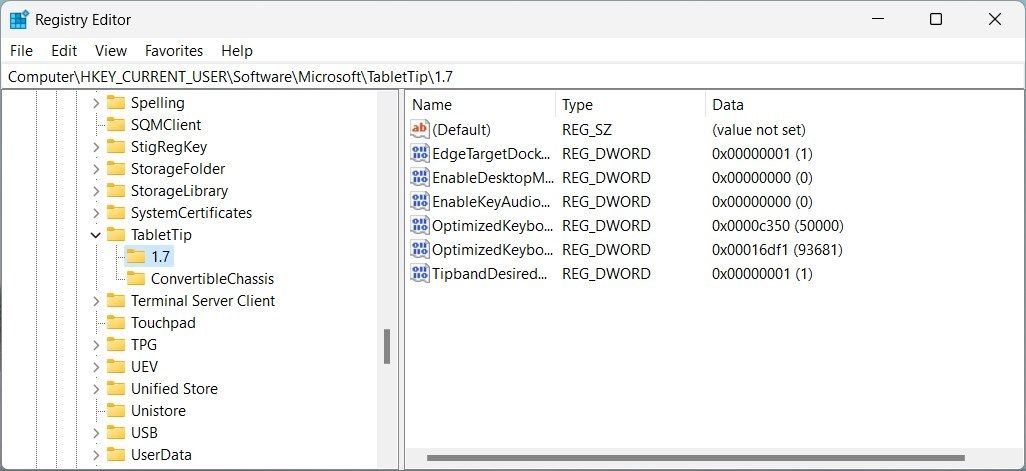
- Once you’re in the Registry Editor, navigate to this location:
HKEY_CURRENT_USER\Software\Microsoft\TabletTip\1.7
Alternatively, you can copy and paste the given path into the Registry Editor’s address bar. This will take you to the specified location. - On the left side of the menu, select the1.7 folder.

- Then go to its corresponding right pane, where you will find theOptimizedKeyboardRelativeXPositionOnScreen REG_DOWRD value. Right-click on the key and delete it.
- Similarly, delete theOptimizedKeyboardRelativeYPositionOnScreen key value in the same folder.
After deleting both values, close the Registry Editor and restart your PC to apply the changes. Now, when you open the touch keyboard, it will start showing up at the default opening position.
2. Run a Batch File to Reset the Touch Keyboard’s Default Open Position
Resetting the default opening position of your touch keyboard can be done quickly and easily by running a batch file. This method is especially useful if you prefer to automate the reset process instead of manually tweaking the registry editor. Here is how to do it.
To get started, you first need to open the Notepad application. For this, you can type “Notepad” in either Windows Search or the Run dialog box and pressEnter .
Once you’re in Notepad, copy and paste the following code into it:
@echo off REG Delete "HKCU\SOFTWARE\Microsoft\TabletTip\1.7" /V OptimizedKeyboardRelativeXPositionOnScreen /F REG Delete "HKCU\SOFTWARE\Microsoft\TabletTip\1.7" /V OptimizedKeyboardRelativeYPositionOnScreen /F taskkill /f /im explorer.exe start explorer.exe
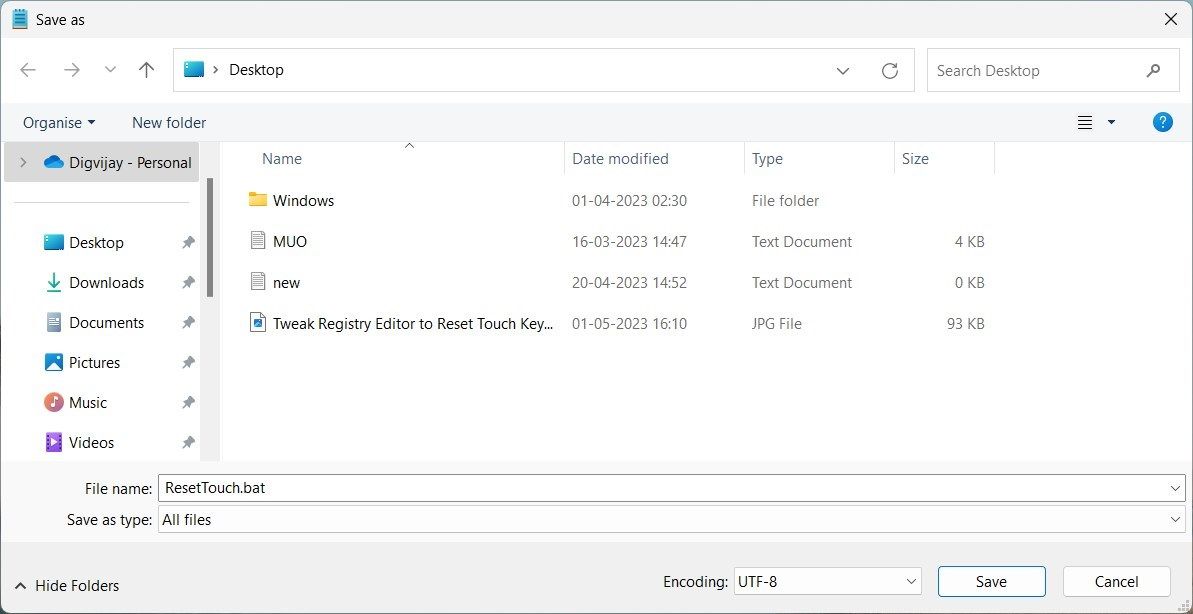
Now clickFile in the upper-left corner and selectSave As from the menu list.

In the File name field, type “ResetTouch.bat”, and chooseAll Files from the Save as type. After that, select Desktop from the left-hand side and clickSave .
Once the batch file is saved, close the Notepad window. Next, double-clickResetTouch.bat on your Desktop to run it. This should reset your touch keyboard’s default open position.
Resetting the Default Position of the Touch Keyboard
If you’re using a Windows touchscreen device, typing with a touch keyboard can be easy. However, you might have noticed an inconvenience where the keyboard opens in an awkward position.
This can make typing on specific keys difficult, especially if you’re used to accessing the keyboard from a certain spot. To fix this issue, refer to this guide on resetting the default open position of your touch keyboard.
Also read:
- [New] 2024 Approved DataSafe Experts Assessment
- [New] Your Top Tools for Facebook Video Retrieval Revealed
- 2024 Approved Top Tips for Creating Instagrammable Unboxing Highlights
- Effortlessly Create a Mobile Internet Access Point with Windows 11
- Essential App Fixes to Perfect Your Windows Experience
- Exploring Windows N Editions: IT Perspective
- Full Guide to Catch 100 IV Pokémon Using a Map On Xiaomi 14 | Dr.fone
- How To Fix a Non-Functional Hotspot on Windows 11 Devices
- How to Show Wi-Fi Password on Honor 80 Pro Straight Screen Edition
- In 2024, Pokemon Go Error 12 Failed to Detect Location On Vivo Y28 5G? | Dr.fone
- In 2024, Thorough Examination of DJI Inspire 1
- Jumpstart Your Frozen WoW 6.3 Patch
- Key Methods to Change Music Speedplay on Spotify for 2024
- Per-Screen Prowess: Custom Themes for Every Monitor in WIN 10/11
- Quick Guide: Initiating Mouse Gestures in Microsoft Edge, Windows 11
- Steps to Change Ebooks in Audible .aa Format Into a Playable MP3 Version
- Three Ways to Sim Unlock Oppo A58 4G
- Unlocking Your PC's Control Center on Windows 11
- Vintage Visuals Redefined: Employing RetroArch’s Modern Shaders
- Title: Tutorial: Restoring Original Input Layout on Windows 11 PCs
- Author: David
- Created at : 2024-10-06 04:18:58
- Updated at : 2024-10-09 10:06:40
- Link: https://win11.techidaily.com/tutorial-restoring-original-input-layout-on-windows-11-pcs/
- License: This work is licensed under CC BY-NC-SA 4.0.
