Troubleshooting Windows 11'S Unresponsive Wi-Fi Hotspot

Troubleshooting Windows 11’S Unresponsive Wi-Fi Hotspot
A mobile hotspot is a great way to keep your devices connected while you are on the go or when other connections are not available to you. It provides reliable and secure connections to the internet. Although, as with any technology, there can sometimes be issues and you may encounter connectivity problems.
If you’re having trouble getting your Windows device to connect via a mobile hotspot, don’t worry - this guide will help you troubleshoot and resolve the issue.
Disclaimer: This post includes affiliate links
If you click on a link and make a purchase, I may receive a commission at no extra cost to you.
What Causes My Mobile Hotspot to Stop Working?
If you find that your mobile hotspot is not working, it could be due to a number of reasons. The most common cause of a non-functioning mobile hotspot is an outdated network adapter driver.
If the network adapter driver does not have the latest updates, the connection may become unstable or even disconnect unexpectedly. To ensure that your mobile hotspot functions correctly, make sure that all drivers are updated regularly.
1. Troubleshoot Network Adapter
If you are having mobile hotspot problems in Windows 11, the first step should always be to run the Network Adapter Troubleshooter. This built-in utility can easily identify and resolve a variety of network connection issues that may be causing your mobile hotspot not to work properly.
To access this tool, follow these steps:
- PressWin + I on your keyboard to open the Settings menu.
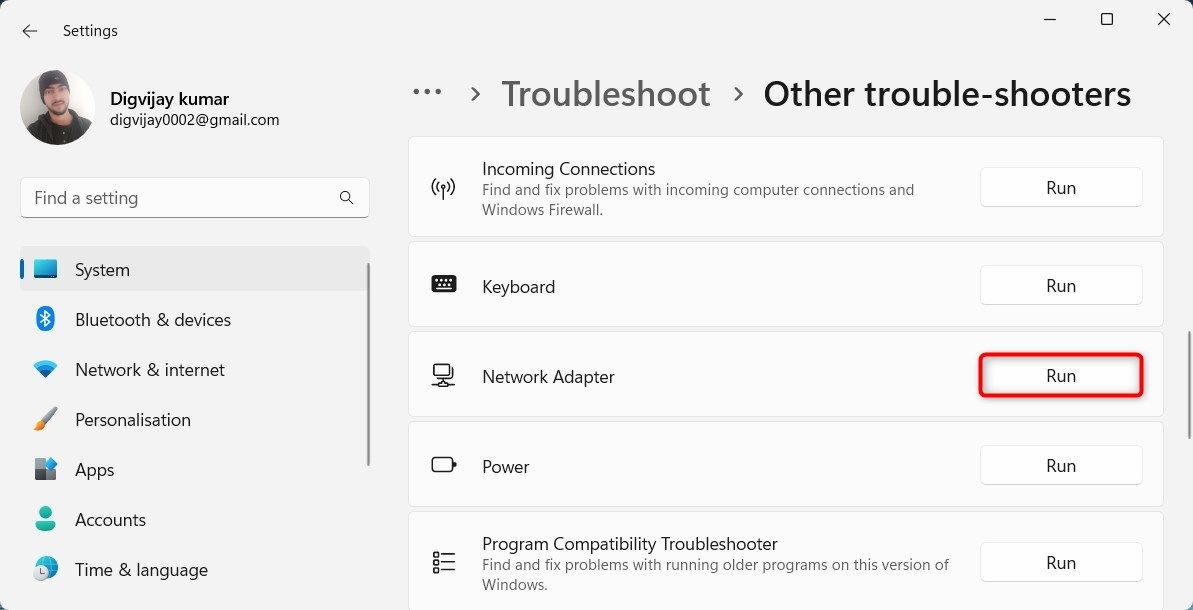
- From there, navigate toSystem > Troubleshoot > Other troubleshooters .
- On the next page, scroll down toNetwork Adapter .
- Finally, click theRun button to begin the process.

The troubleshooter will scan for any potential issues and then provide some advice on how to resolve them. It may even automatically fix some of these problems if possible, which could potentially save you time over manually trying to diagnose them yourself.
2. Update Your Network Adapter
When running the Network Adapter Troubleshooter does not resolve the issue, you should then check your Wi-Fi driver. If it’s out of date, updating it may solve the problem. To do this, follow these steps:
- Right-click on Start and selectDevice Manager .
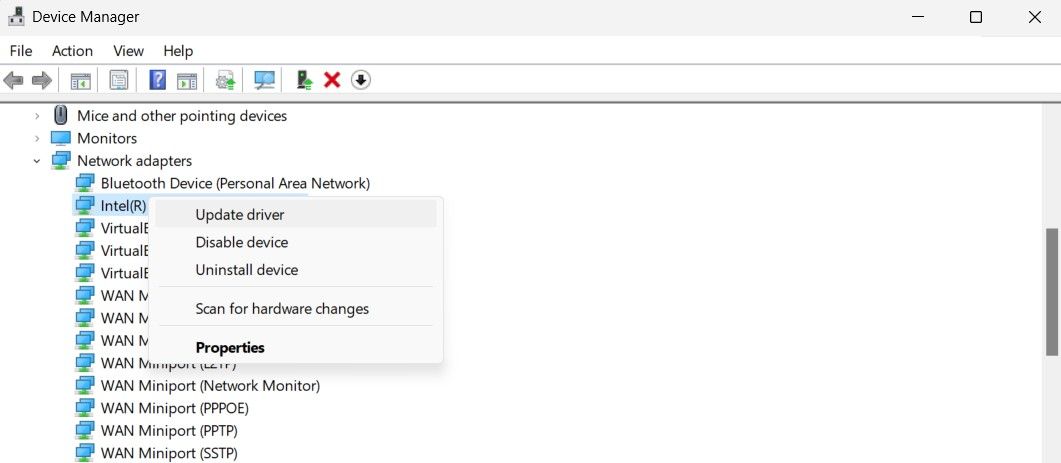
- In Device Manager, expandNetwork adapters .
- Right-click on your Wi-Fi driver and chooseUpdate driver .

- On the next screen, selectSearch automatically for drivers .
After that, wait for the process to finish then restart your computer.
Sometimes, Device Manager has some issues finding the most recent drivers. If Windows finds nothing and you want a second opinion, check out thebest driver updaters for Windows for some other tools you can try.
3. Modify the Adapter Settings
Another tactic is to configure the settings of your wireless adapter to ensure that it is working optimally with your mobile hotspot. Here’s how to do this:
- Right-click on Start and selectSettings . You can also pressWin + I on your keyboard to open the tool directly.
- ClickNetwork & internet on the left panel of Settings.
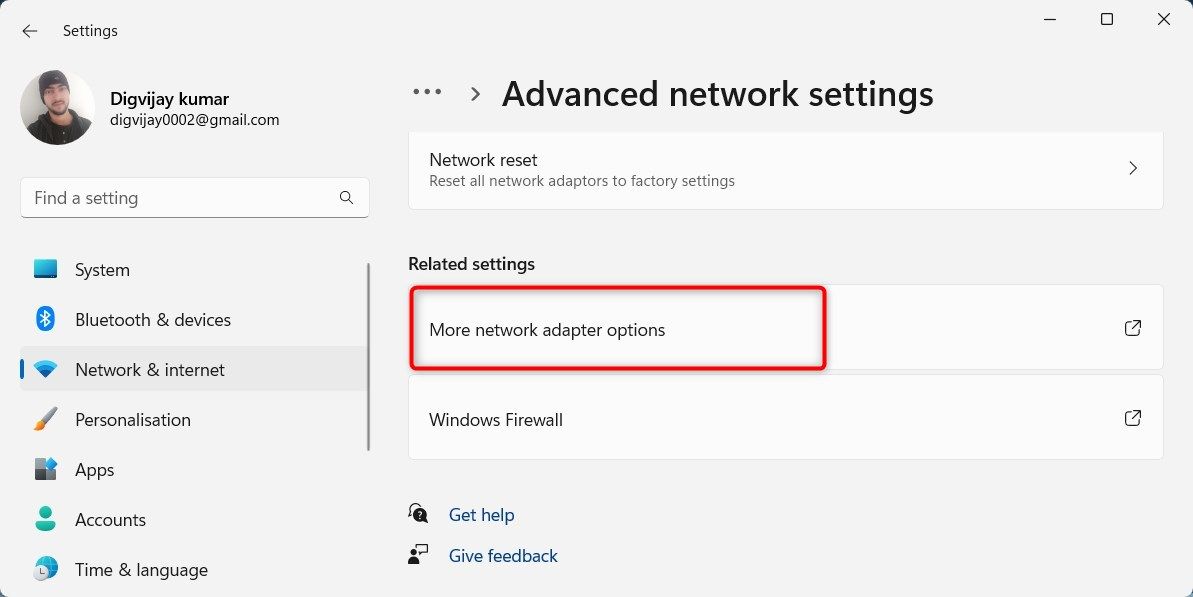
- On the right, selectAdvanced network settings .
- Under Related settings, clickMore network adapter options . This will open the classic Network Connections window.

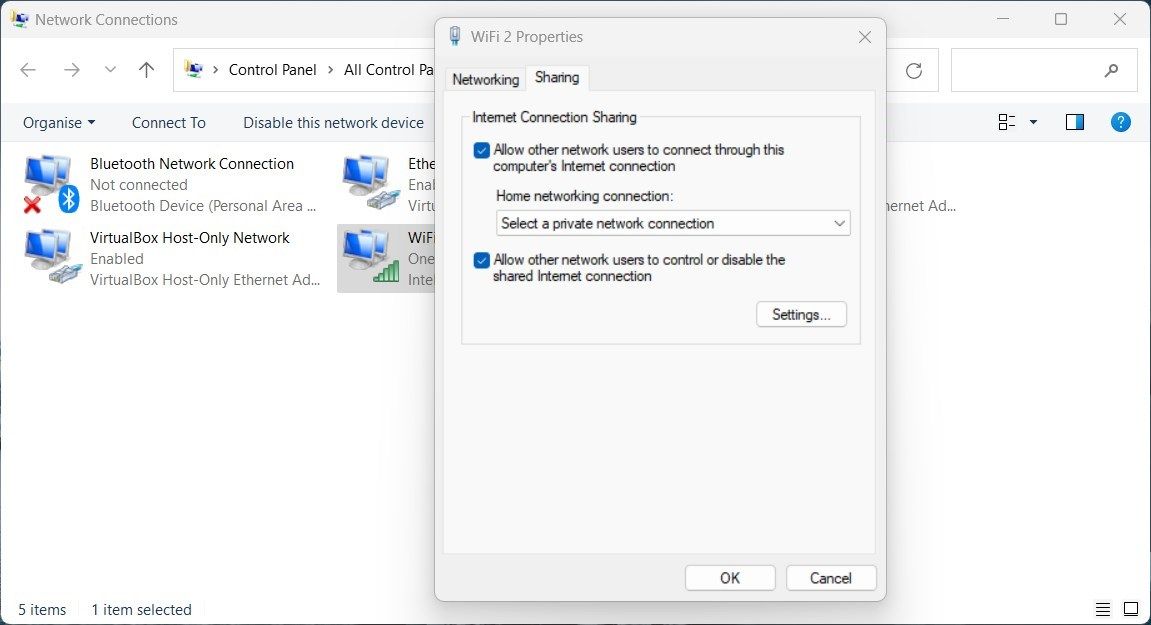
- Right-click your Wi-Fi adapter and selectProperties from the context menu
- In the Properties window, switch to theSharing tab.
- Then check the box next to Allow other network users to connect through this computer’s Internet connection .

- ClickOK to save the changes.
After performing the above steps, see whether you can now use the hotspot feature on your Windows device.
4. Tweak Registry Editor
If you’re still having problems connecting to your Windows mobile hotspot, it’s likely that some changes need to be made to the registry on your computer.
The Registry Editor contains information about user settings, hardware configurations, software programs, file types, as well as other critical parts of the Windows operating system. Making a tweak to your registry can help fix this issue with the mobile hotspot.
To get started, go through these steps:
- PressWin + R on your keyboard to open the Run dialog box. You can also use one of the otherways to open Run on Windows .
- Type “regedit” into the text box and hit Enter.
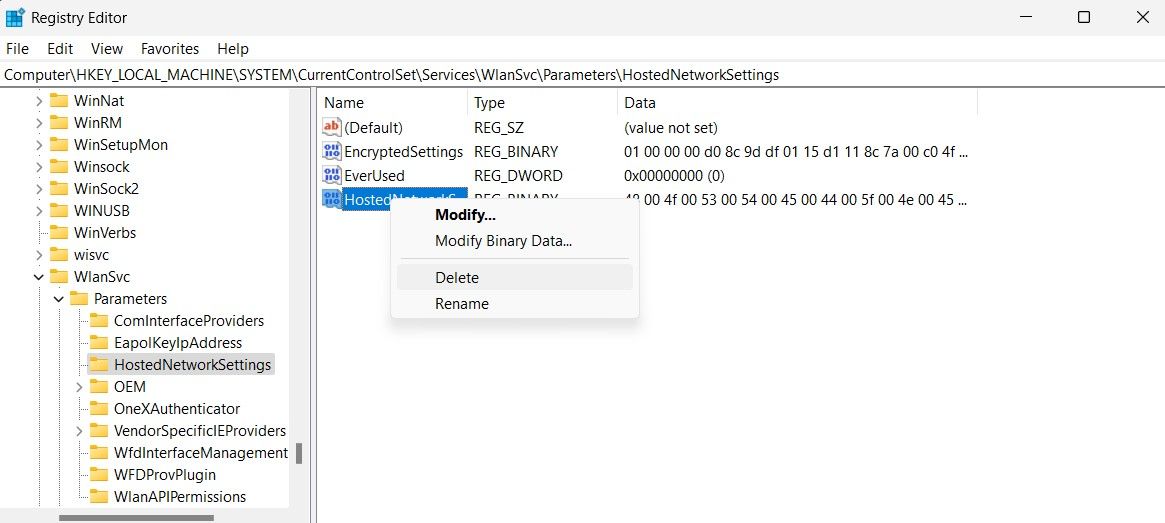
- In the Registry Editor, go to the following location.
HKEY_LOCAL_MACHINE\SYSTEM\CurrentControlSet\Services\WlanSvc\Parameters\HostedNetworkSettings\ - On the right pane, right-clickHostedNetworkSettings and selectDelete .

- The confirmation window will appear on the screen. ClickYes to continue.
The next thing you need to do is restart your computer and then try using your mobile hotspot again.
5. Reset Network Settings
If you have tried all the solutions above but are still experiencing issues, it’s time to reset the network settings. Resetting your network settings can help restore connectivity if any configuration problems have occurred.
- Open System Settings (seehow to open System Settings on Windows for more information).
- From the left pane, select theNetwork & internet tab.
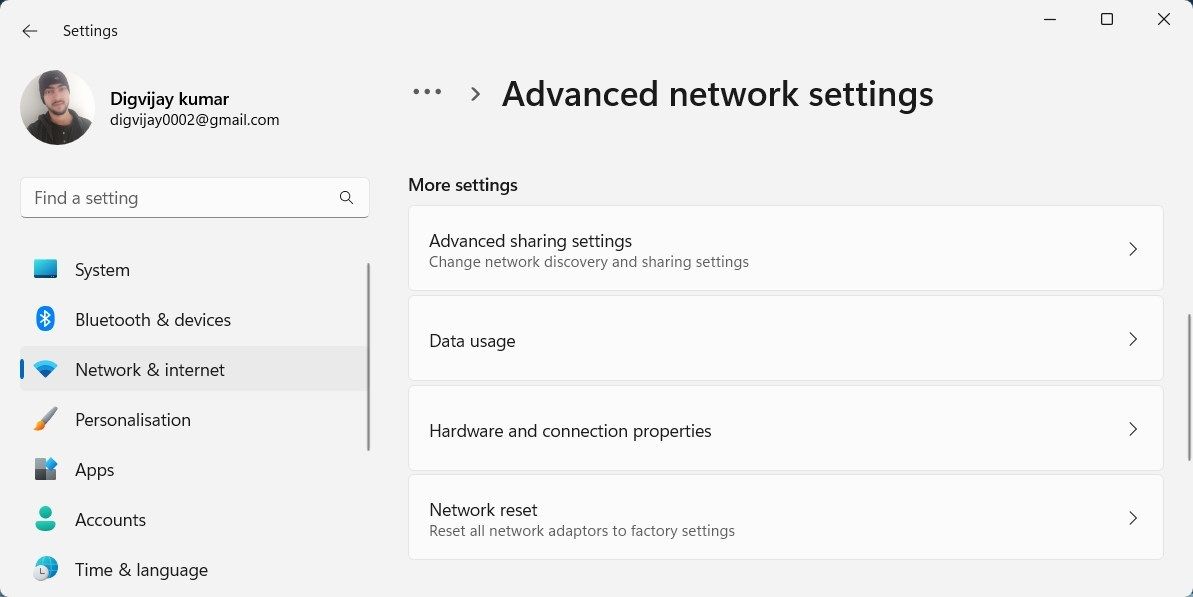
- Then clickAdvanced network settings on the right.
- Under theMore settings section, click onNetwork reset .

- Next, clickReset now next to Network reset.
- ClickYes in the confirmation window when it appears.

Restart your computer after you have reset the network, and check if the problem has been resolved.
6. Troubleshoot the Problem in a Clean Boot State
Chances are you have third-party software installed on your computer that interferes with your hotspot. In such a case, you may need to perform a clean boot, leaving only essential services running. In this way, you won’t have to worry about non-essential services interfering with your device’s normal operation.
Press theWin + R keyboard shortcut to start the Run program.
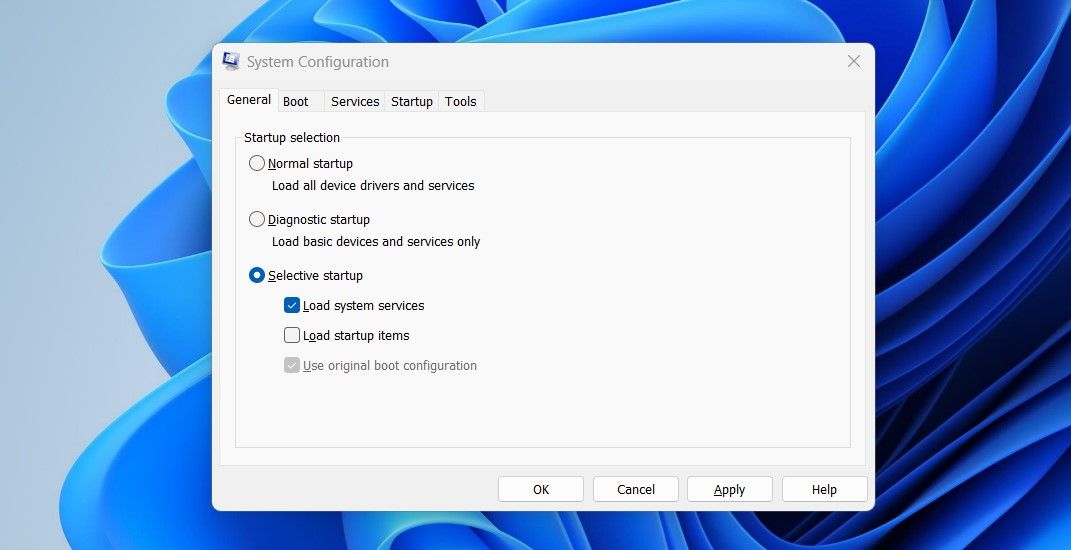
Type “msconfig” in the dialog box, then press Enter.
In the System Configuration window, click theGeneral tab.
Put a checkmark next toSelective startup .
Uncheck theLoad startup items box.

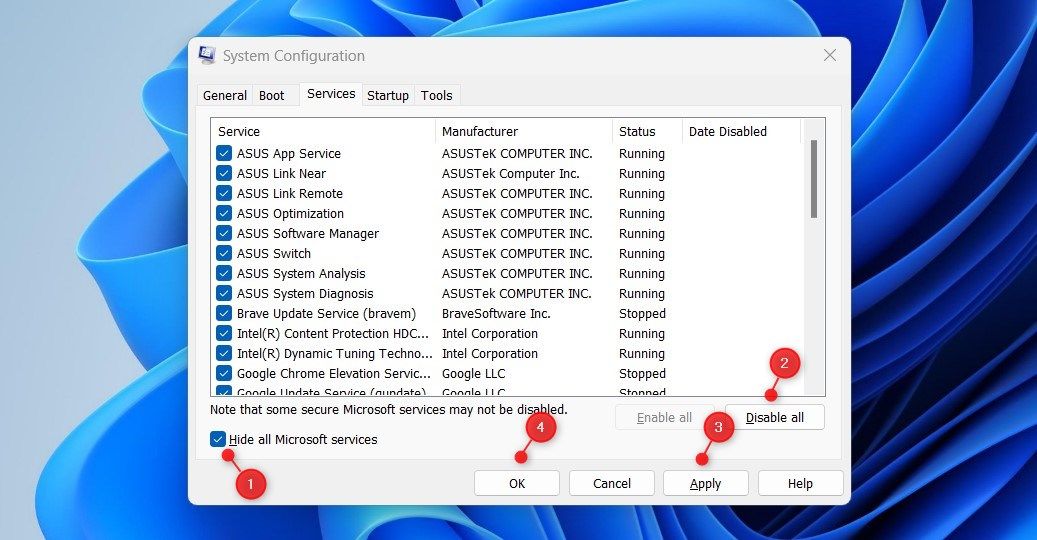
Go to theServices tab now.
SelectHide all Microsoft services , then clickDisable all .
To save the changes, click theApply button.

Switch to theStartup tab and selectOpen Task Manager .
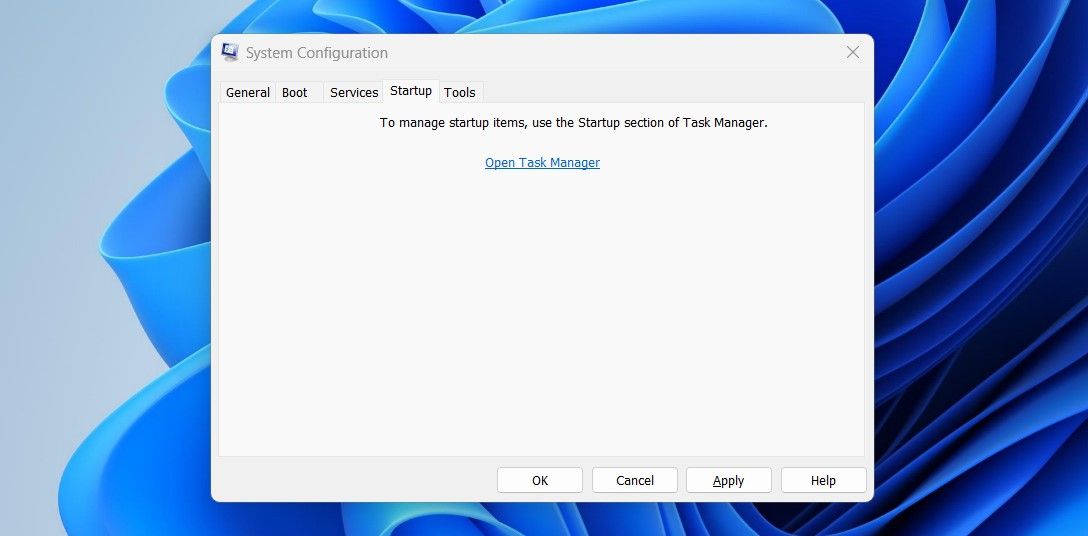
5. On the Startup tab, right-click each service and disable it.
6. ClickOK when you’re done editing System Configuration.
Once done, check if the mobile hotspot is working properly and then enable one service at a time until it causes the same issue again.
Get Your Mobile Hotspot Up and Running
There are quite a few things you can do in order to fix your mobile hotspot not working in Windows 11. The solutions provided here can help you diagnose and fix any problems that may be preventing your mobile hotspot from connecting.
However, you should always restart your computer and check for updates before trying to troubleshoot a problem.
Also read:
- [New] Boosting Revenue with YouTube Short Videos – A Complete Plan
- [New] Skin Care Secrets Unveiled for 2024
- [Updated] 2024 Approved Camera Kings Collide SJ6 Powerhouse Vs. Yi 4K Masterpiece
- Delving Into the Past: Accessing Windows 11'S History
- DXVK Explained: Enhancing Gaming on Windows
- Explore Glyphs in Your Digital Keyboard Hub
- How to Choose a Browser That Uses Less RAM & CPU Across Operating Systems?
- How to Get Your Powerless PS4 Controller Back in Action
- In 2024, How to Transfer Apps from Vivo S18e to Another | Dr.fone
- In 2024, Whats Hot on the App Store Top iPhone Apps , Ranked
- Leverage Tags A Step-by-Step YouTube Tactical Guide
- Leveraging Windows 11 for Effective Error Insights
- Mastery: Controlling Data Metering for Your Wi-Fi Connection
- Quit Side-by-Side Tech Showdown: AI Differences Explored
- Revolutionizing Reality Top VR Peripherals for 2024
- Strategies for Fixing Windows Store Error Code 0X80073cf3
- Troubleshooting Tips: Overcoming Common BattlEye Service Installation Errors
- Unleash Your Artistic Potential with Top 7 Win 11 Tools
- Unveiling the Secret Behind Effective Application of LAV Filters in Windows
- Title: Troubleshooting Windows 11'S Unresponsive Wi-Fi Hotspot
- Author: David
- Created at : 2024-12-07 07:57:08
- Updated at : 2024-12-13 13:22:13
- Link: https://win11.techidaily.com/troubleshooting-windows-11s-unresponsive-wi-fi-hotspot/
- License: This work is licensed under CC BY-NC-SA 4.0.
