
Tips & Tricks: Reinstating Automatic Voice for Textual Narration on Windows' Word

Tips & Tricks: Reinstating Automatic Voice for Textual Narration on Windows’ Word
Read Aloud is a great productivity feature, especially when you want to give your eyes a break. You can have Word read the document for you starting from your cursor and even pause or skip forward and backward to re-listen to important parts.
So it’s definitely inconvenient when Word’s Read Aloud feature stops working. If this happened to you, there’s no need to fret. We’ve put together a quick guide that will help you fix the issue.
Disclaimer: This post includes affiliate links
If you click on a link and make a purchase, I may receive a commission at no extra cost to you.
1. Restart Microsoft Word
As always, when dealing with a program malfunction, you should restart it. If there’s a temporary glitch, closing and re-launching Microsoft Word might be enough to fix the issue. Once you close Microsoft Word, make sure there’s no background process still running.
Press Ctrl + Shift + Esc to bring up the Task Manager. There, right-click Microsoft Word and select End task.
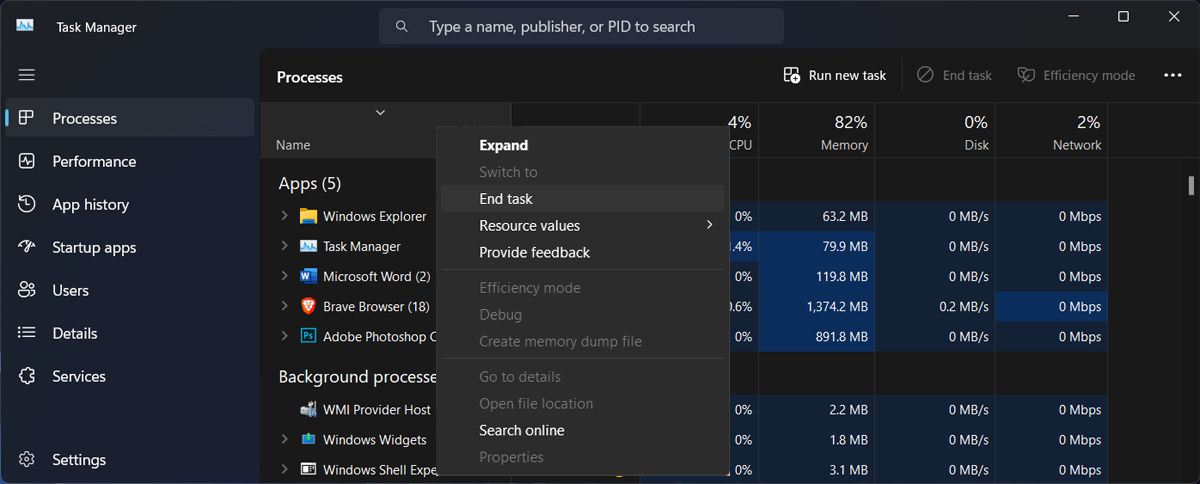
Open Word and check if the problem is now solved.
2. Enable the Read Aloud Feature
You can also have Word read the document for you by pressing Ctrl + Alt + Space. If nothing happens when using this keyboard shortcut and Read Aloud seems to be missing from the Ribbon menu, you should enable the feature. Here’s how you can do it:
- Launch Microsoft Word.
- Head to File > Options.
- From the left pane, click on Customize Ribbon.
- Open the Choose command from the drop-down menu and select Main Tabs.
- Expand the Review list.
- Choose Speech.
- Click the Add button.
- Click OK to save the new Word settings.
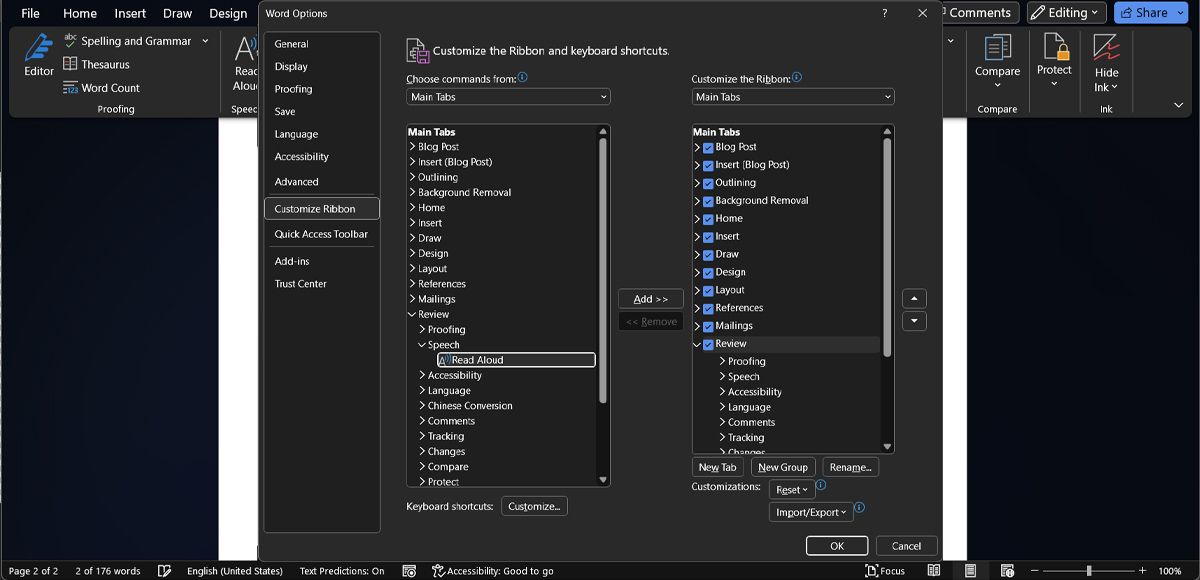
Now, the Read Aloud feature should be available in the Review tab, within the Speech menu.
3. Check Volume Mixer Settings
There’s a chance you can’t hear Word Read Aloud feature due to incorrect Volume Mixer settings. As you may know, Windows’ Volume Mixer allows you to set different volume levels for different applications or change the output device for each running app.
To check the settings, right-click the Speaker icon in the taskbar and select Open Volume Mixer. There, head to the Apps list and check the volume slider for Microsoft Word. Also, click on the app and check the selected output device.

If there’s nothing wrong with the Volume Mixer settings, move on to the next solutions.
4. Update Microsoft 365
If restarting Microsoft Word wasn’t enough to fix the glitch, you should update Microsoft 365. If you’re running an outdated version or something went wrong during the latest update installation, you’ll encounter all sorts of issues. Including Word’s inability to read the documents for you.
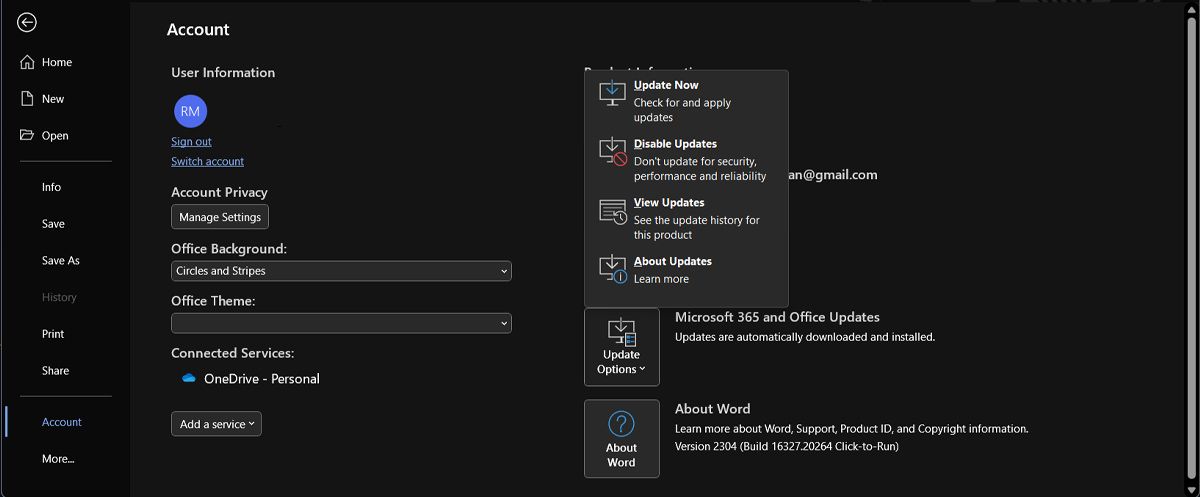
To update Microsoft 365, open Microsoft Word and go to File > Account. There, click Update options and select Update now. If you can’t update it, check out our guide on how to fix Microsoft 365 installation errors in Windows .
5. Repair the Word Doc
If you notice the Read Aloud issue is limited to an individual document, there’s a chance you’re dealing with a corrupted Word doc. If possible, re-download the document or ask the sender for a different version.
Alternatively, you can try using Microsoft Word’s built-in repair option.
- Open the File menu.
- Click Open and browse to the doc’s location.
- Extend the Tools menu and select Open and Repair.

Microsoft Word will now search and automatically fix any detected issues.
6. Repair Microsoft 365
Windows has plenty of built-in repair tools to help you when running into a problem. So if Word is still giving you the silent treatment, go through the steps below:
- Press Windows key + I to bring up the Settings menu.
- Go to Apps > Installed apps.
- Locate Microsoft 365 and click the three-dot icon next to it.
- Select Modify.
- Click the Repair button.
- Select Quick Repair and click Repair to start the process.
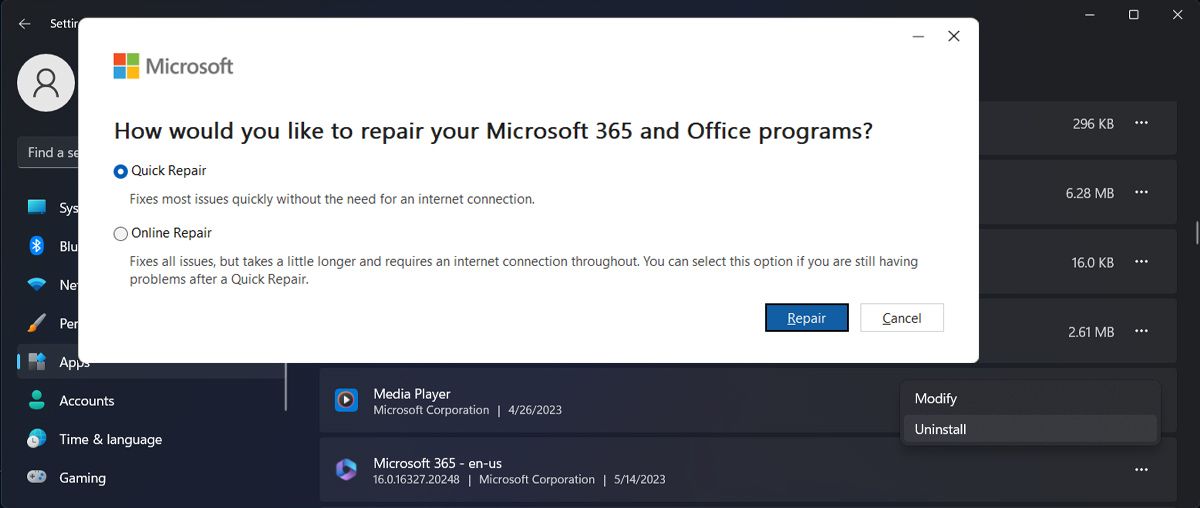
If the Read Aloudfeature is still not working, go through the steps again and select Online Repair.
7. Launch Word in Safe Mode
Sometimes, add-ins might interfere with Word’s functionality and stop Read Aloud from working. To check if you’re dealing with a problematic add-in, launch Word in Safe Mode. Press Windows key + R to launch a Run dialog, type winword / safe and press Enter. Word will now open without any add-ins.
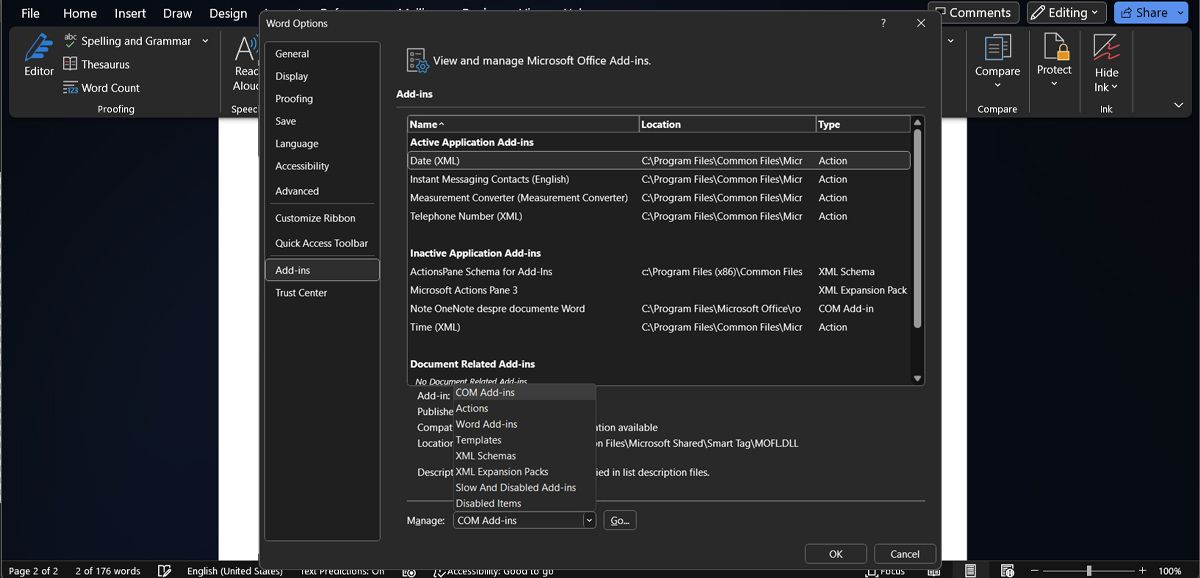
If the Read Aloud feature works in Safe Mode, you’ll have to identify the conflictual add-in. Here’s how you can do it:
- Click File > Options.
- From the left-hand menu, select Add-ins.
- Set Manage to COM Add-ins and click Go.
- Uncheck every add-in and click OK.
- Then, re-enable the add-in one by one to identify which one is causing the issue.
Get Word Reading Your Docs Aloud
Hopefully, one or more of the fixes above helped you fix the problem. If you’re facing the same issue, it might be time to reinstall Microsoft 365 or contact Microsoft support and let them know about the problem.
Now, to keep Word working at its best, don’t miss out on any updates. Also, you might have no chance of fixing Word’s Read Aloud feature if you’re using a pirated version.
So it’s definitely inconvenient when Word’s Read Aloud feature stops working. If this happened to you, there’s no need to fret. We’ve put together a quick guide that will help you fix the issue.
Also read:
- [Updated] The Ultimate Guide to Converting YouTube to AVI Videos for 2024
- Effective Techniques for Disabling WSL
- How to Resume Print Spooler on Windows Systems After a Hiccup
- How to Smoothly Manipulate Video Speed in Snapchat
- In 2024, Conveniently Record Your Favorite Streams Top 5 Grabber Apps
- In 2024, From Lurkers to Leaders Top 30 Strategies for Facebook Pros
- IPhone 15 Unveiled: Discovering the Key Differences Between Pro and Pro Max Models
- Stepwise Guide to Managing User Groups on WIN11/10 Home Editions
- TSファイルを無料でGIFに変換: Movaviの簡単な方法
- Ultimate List for Pen Tablet Users on Windows OS
- Ultimate Troubleshooting Tips for Fixing Windows 11 Update Error 0Xc1900208
- Vanishing Act: Hide Windows 11 Search From Taskbar
- Video Not Showing? Follow These Simple Steps to Solve the Problem!
- Win11's BSOD Interrupt Fix: A Step-by-Step Guide
- Title: Tips & Tricks: Reinstating Automatic Voice for Textual Narration on Windows' Word
- Author: David
- Created at : 2024-12-06 18:12:10
- Updated at : 2024-12-13 05:55:09
- Link: https://win11.techidaily.com/tips-and-tricks-reinstating-automatic-voice-for-textual-narration-on-windows-word/
- License: This work is licensed under CC BY-NC-SA 4.0.