The Winning Strategy: Configuring Active Hours for a Smooth Windows Experience

The Winning Strategy: Configuring Active Hours for a Smooth Windows Experience
Typically, the installation of Windows updates necessitates a system restart, which can cause disruptions during critical work sessions. However, by configuring active hours, you can define the specific times during which you generally use your computer for work. Once you do, Windows will schedule update installations to occur outside of these active hours, ensuring that your work sessions remain uninterrupted.
You can set active hours in Windows via the Settings app, the Group Policy Editor, or the Registry Editor. Let’s go through each of these methods in detail.
Disclaimer: This post includes affiliate links
If you click on a link and make a purchase, I may receive a commission at no extra cost to you.
1. How to Set Active Hours Manually via the Settings App
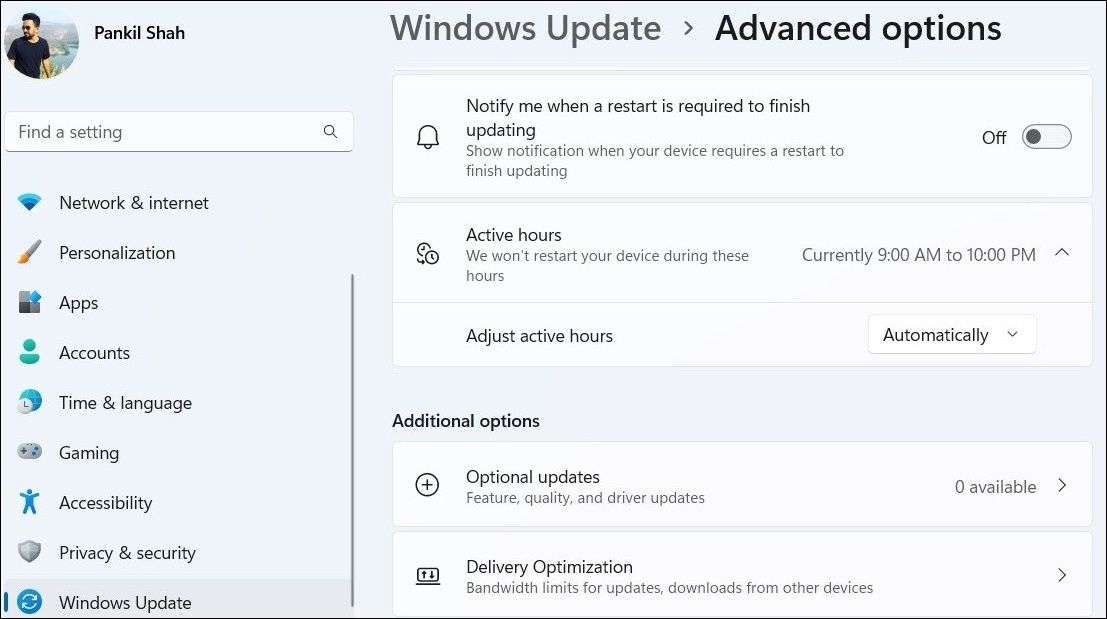
The Settings app in Windows gives you several options for managing the installation of Windows updates. Here’s how you can use it to set active hours on Windows 11.
- Press Win + I to open the Settings app.
- Navigate to the Windows Update tab using the left sidebar.
- Select Advanced options.
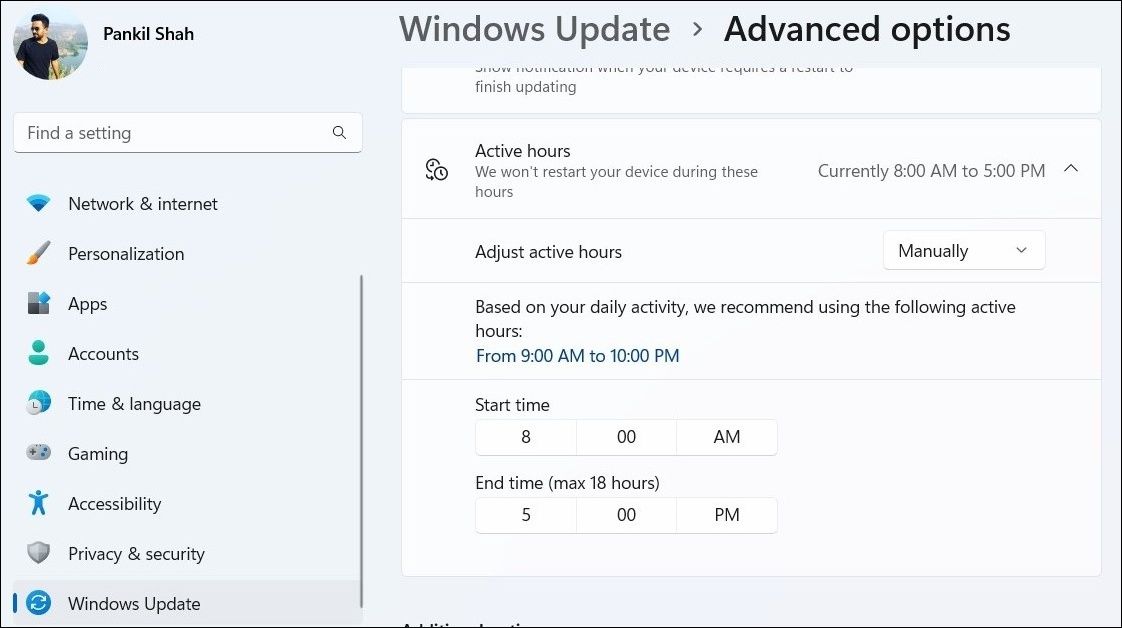
- Click on Active hours to expand it.
- Use the drop-down menu next to Adjust active hours to select Manually.
- In the Start time and End time fields, specify the hours during which you typically use your device.

2. How to Set Active Hours Manually Using the Group Policy Editor
Although the Group Policy Editor on Windows is commonly used to manage advanced system-level settings, you can also use it to set active hours on your computer.
Note that Group Policy Editor is only available on Professional, Education, and Enterprise editions of Windows. If you use Windows Home, check our guide on how to access Group Policy Editor on Windows Home before proceeding.
Follow these steps to set active hours on Windows using the Group Policy Editor.
- Press Win + R to open the Run dialog box.
- Type gpedit.msc in the box and press Enter.
- Use the left pane to navigate to Computer Configuration > Administrative Templates > Windows Update > Manage end user experience.
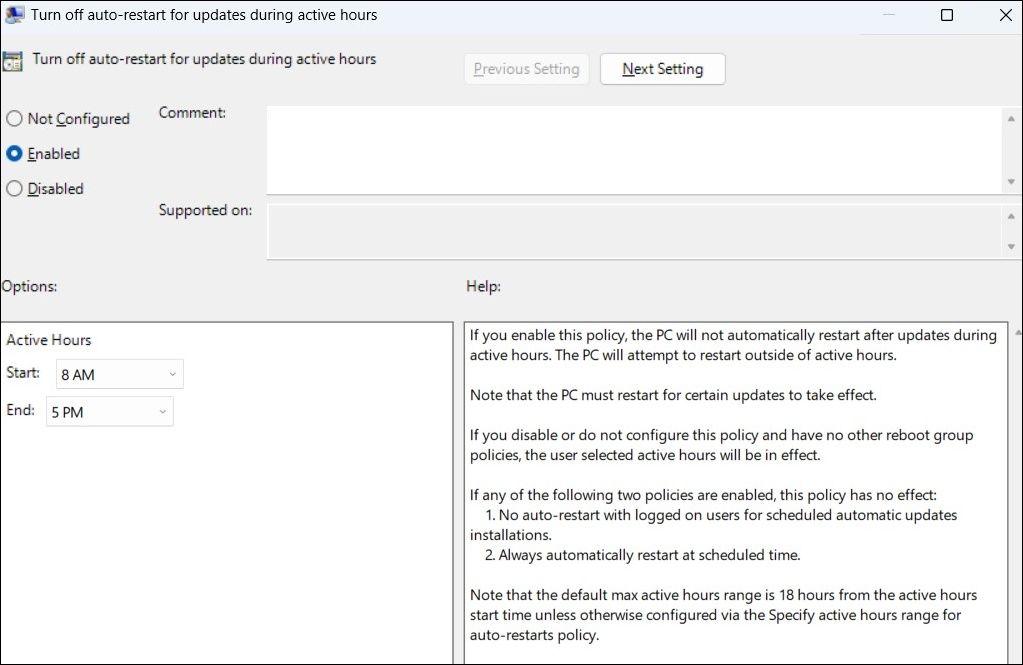
- Double-click the Turn off auto-restart for updates during active hours policy on your right.
- Select the Enabled option.
- Under Options, use the drop-down menus next to Start and End to specify your active hours.
- Hit Apply followed by OK.

3. How to Set Active Hours Manually With the Registry Editor
Another method for setting active hours involves tweaking the Windows Registry.
Although setting active hours via the Registry Editor is a straightforward process, it’s important to be cautious, as incorrect changes made to registry files can render your PC inoperable. If you opt for this method, make sure you either back up all the registry files or create a restore point before proceeding.
- Press Win + S to access the search menu.
- Type registry editor in the text box and press Enter.
- Select Yes when the User Account Control (UAC) prompt appears.
- Use the left pane to navigate to HKEY_LOCAL_MACHINE > SOFTWARE > Microsoft > WindowsUpdate > UX > Settings.
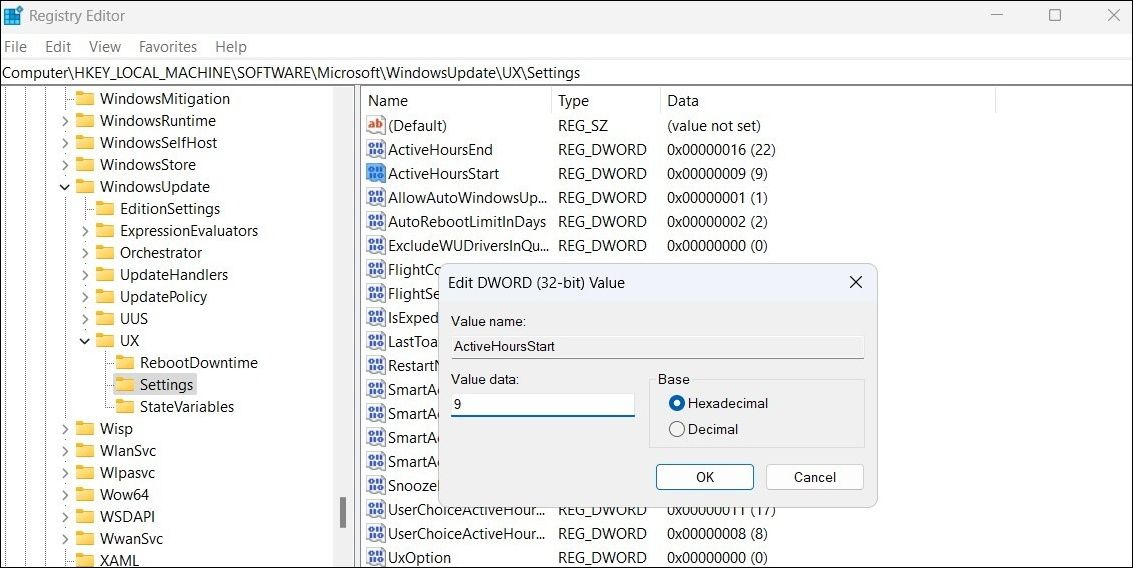
- Double-click the ActiveHoursStart entry.
- In the Value data field, enter the desired value for the start time of your active hours in a 24-hour format. If you were to set the start time to 9:00 AM, for instance, you would enter 9 in the text box.
- Click OK to save the value.

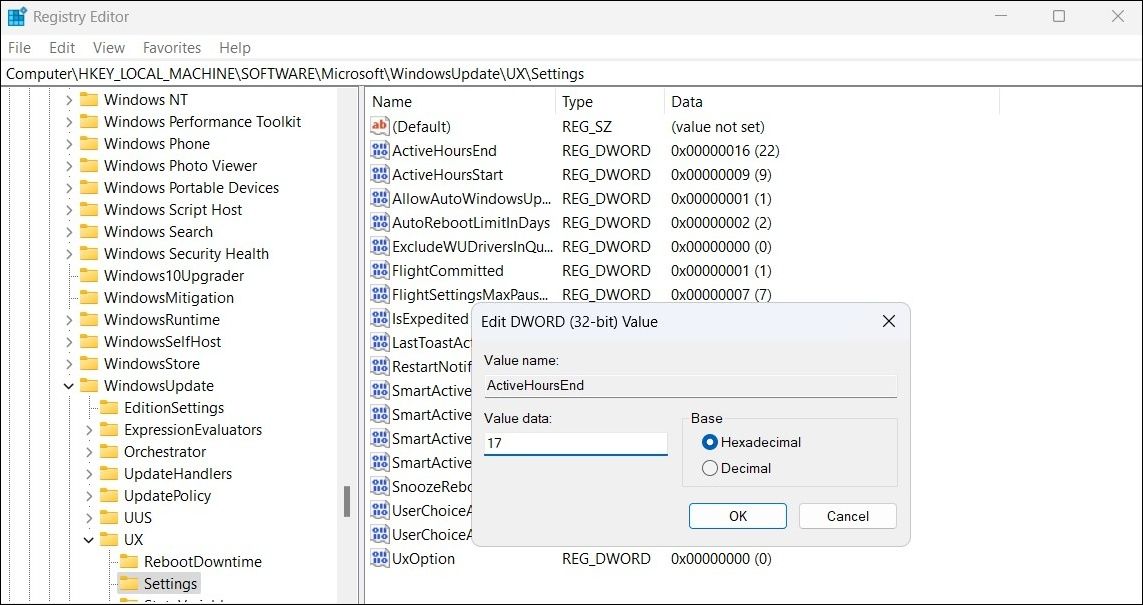
- Double-click the ActiveHoursEnd entry to set the end time of your active hours in the 24-hour format. For instance, if you want to set the end time to 5:00 PM, type 17 in the Value data field and click OK.
- Exit the Registry Editor window.

4. How to Configure Windows to Set Active Hours Automatically
You can also configure Windows to set active hours automatically. Doing so will allow Windows to analyze your usage patterns and automatically adjust the active hours accordingly.
To configure Windows to set active hours automatically:
- Use one of the many ways to open the Settings app .
- Navigate to Windows Update > Advanced options > Active hours.
- Click the drop-down menu next to Adjust active hours and select Automatically.

Setting Active Hours on Windows Is Easy
Once you set the active hours using one of the above methods, Windows will avoid initiating automatic restarts for updates during the specified period. As a result, you won’t be interrupted by sudden reboots during your work hours.
You can set active hours in Windows via the Settings app, the Group Policy Editor, or the Registry Editor. Let’s go through each of these methods in detail.
Also read:
- [New] Become a Pro Downloading & Setting Up VRecord for 2024
- [New] Choosing Platforms YouTube Shorts Vs. TikTok – Best for Minis for 2024
- [New] In 2024, Unlocking the Secrets of Successful Instagram Posts Through Hashtags
- Decoding T-Series' Online Earnings Stream for 2024
- Does Clearing Faceprint Database Affect Security Measures for FB Users?
- In 2024, How to Turn Off Google Location to Stop Tracking You on ZTE Axon 40 Lite | Dr.fone
- Masterful Moments: Immediate Administrator Access to Terminal
- Mastering the Art of Eradicating 0X800700E9 From Xbox Game Pass, Windows 11
- Microsoft Family Safety: Features and Benefits
- Navigate Keyboard Settings in Windows Easily
- Resolving Windows 11'S Keyboard Issues - Zerox Error Explained
- Title: The Winning Strategy: Configuring Active Hours for a Smooth Windows Experience
- Author: David
- Created at : 2024-12-05 22:38:57
- Updated at : 2024-12-13 13:14:49
- Link: https://win11.techidaily.com/the-winning-strategy-configuring-active-hours-for-a-smooth-windows-experience/
- License: This work is licensed under CC BY-NC-SA 4.0.
