The Ultimate Guide to Purging Windows Drives' Partition Units

The Ultimate Guide to Purging Windows Drives’ Partition Units
Your Windows computer provides several options for deleting unwanted drive partitions, whether you are looking to consolidate space, restructure data allocation, or simply start over. However, before you do that, make sure to backup or move any important data on the partition, as the process removes all the data on the drive.
This guide will show you how to delete a drive partition using the Settings app, Disk Management tool, Command Prompt, and PowerShell.
1. How to Delete a Drive Partition on Windows Using the Settings App
The Windows Settings app makes it easy to manage drive partitions and perform advanced storage-related tasks. It also provides the most straightforward way to delete a drive partition on Windows.To delete a drive partition via the Settings app:
- Press Win + I to open the Settings app.
- In the System tab, click on Storage.
- Expand Advanced storage settings and click Disks & volumes.
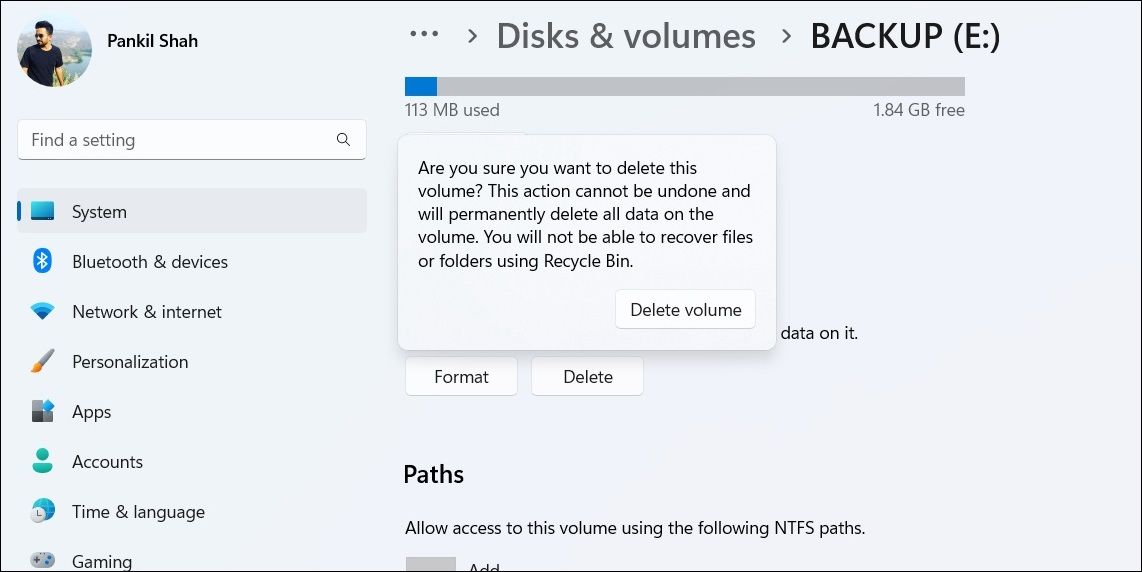
- Click the Properties button next to the drive you wish to delete.
- Under the Format section, click the Delete button.
- Select Delete volume to confirm.

Once you complete the steps, the partition and everything on it will be gone.
2. How to Delete a Drive Partition on Windows Using the Disk Management Utility
Another way to delete a drive partition on Windows is via the Disk Management tool. If you want to use that, follow these steps:
- Press Win + R to open the Run dialog box.
- Type diskmgmt.msc in the text field and press Enter.
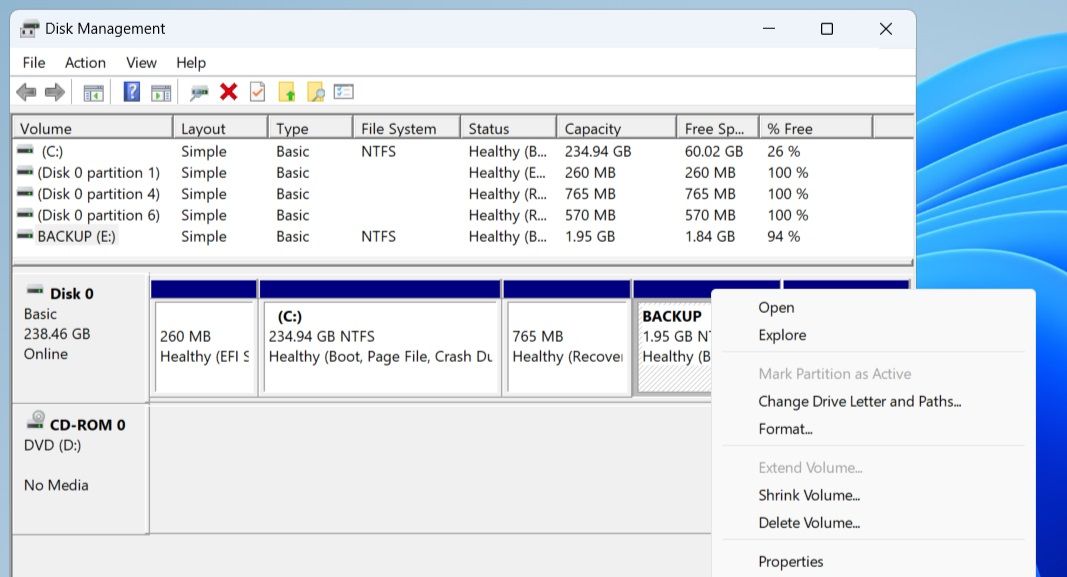
- In the Disk Management window, right-click the unwanted partition and click the Delete Volume option.
- Select Yes to confirm.

Don’t want to get rid of a drive altogether? You can also choose to hide the drive on Windows using the Disk Management tool.
3. How to Delete a Drive Partition on Windows With the Command Prompt
Not a fan of GUI? No problem. Windows also lets you delete a drive partition using the Command Prompt. Here are the steps for the same.
- Right-click on the Start icon and select Terminal (Admin) from the menu that appears.
- Select Yes when the User Account Control (UAC) prompt shows up.
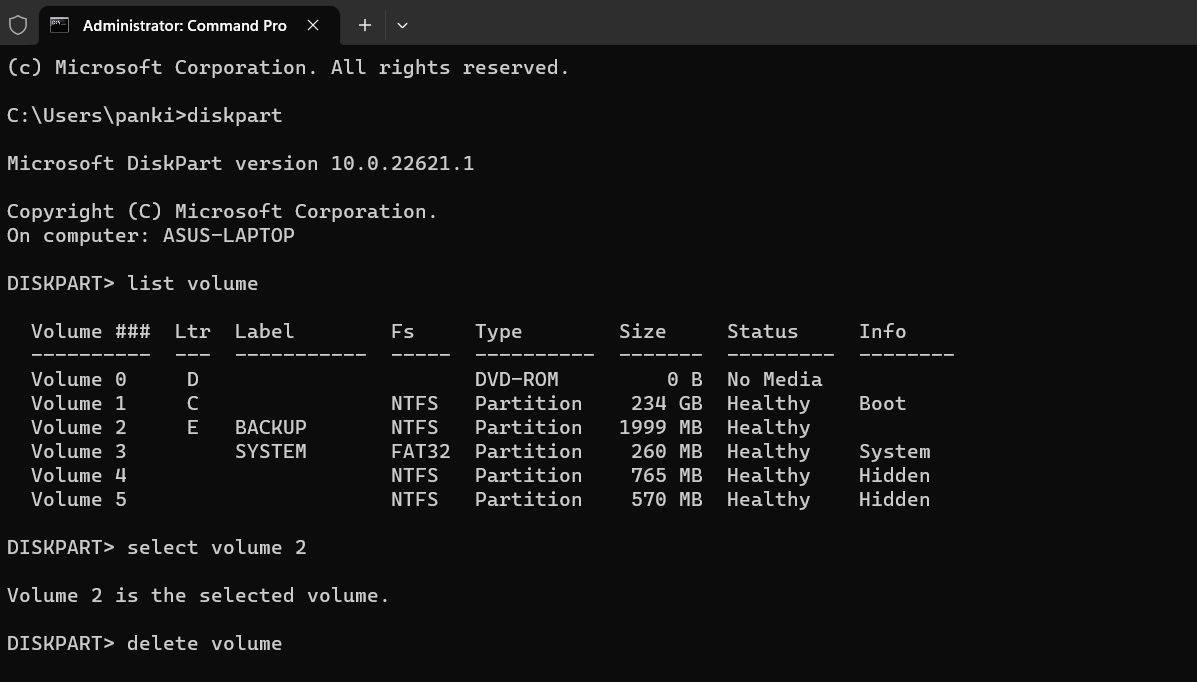
- In the console, run the following commands to view a list of drives connected to your system.
diskpart list volume - Note down the number associated with the drive you want to delete in the Volume column.
- Type the following command and press Enter to select the volume. Make sure you replace N in the command with the drive number noted earlier.
select volume N - Copy and paste the following command and press Enter to delete the partition.
delete volume
Enjoy working with the Command Prompt? If so, you will surely love our guide on customizing the Command Prompt on Windows .
4. How to Delete a Drive Partition on Windows via PowerShell
Windows PowerShell is another command-line tool that you can use to delete a disk partition. Here are the steps you need to follow.
- Press Win + S to open the search menu.
- Type in Windows PowerShell and select Run as administrator.
- Select Yes when the User Account Control (UAC) prompt appears to open PowerShell with admin rights .
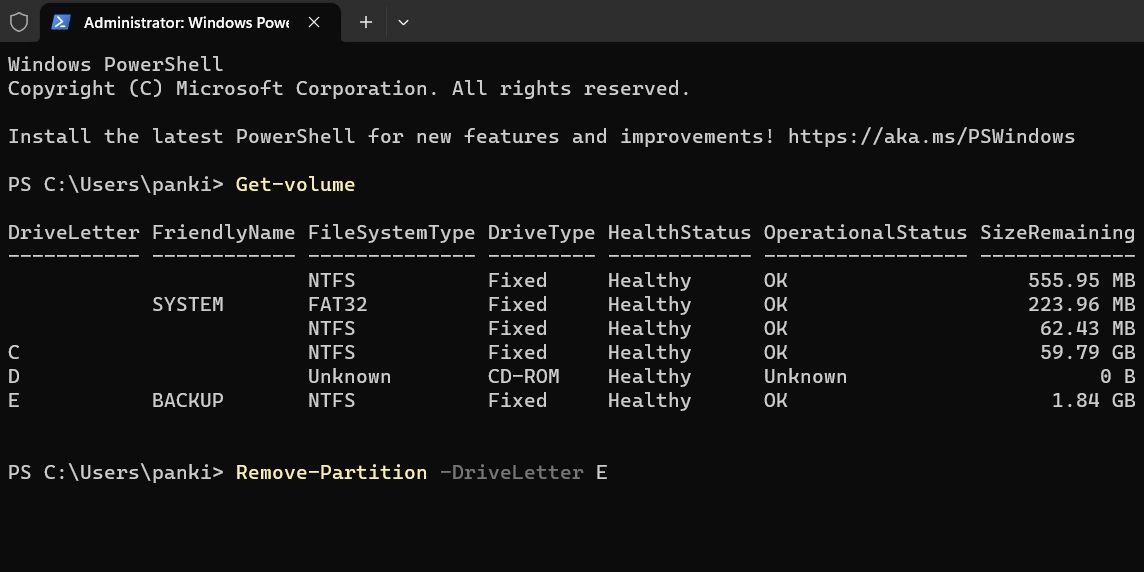
- Run the following command to view a list of drives on your PC:
Get-volume - Note down the letter assigned to the drive you want to delete in the DriveLetter column.
- Copy and paste the following command to delete the partition. Replace X in the command with the actual drive letter noted in the previous step.
Remove-Partition -DriveLetter X - Type Y and press Enter to confirm.

Once you run the above commands, PowerShell will delete the specified partition.
There Are Many Ways to Delete Drive Partitions on Windows
As we just saw, deleting a drive partition on Windows is a simple process, regardless of the method you use. Once you delete a partition, the space on that drive will be unallocated. You can then create a new partition on the empty space or use the space to expand an existing partition.
This guide will show you how to delete a drive partition using the Settings app, Disk Management tool, Command Prompt, and PowerShell.
Also read:
- [New] In 2024, Google Meet on YouTube Streaming Made Easy, Step by Step
- [New] Transforming Hobby Footage Into Professional Vlogs
- [New] Unleash Potential 10 Top Motivational Gems
- [Updated] Choosing Your Soundtrack The Podcast Vs. YouTube Showdown for 2024
- Compre Written Guide for Windows Error Code: 0Xc00000f
- Error: Unable to Locate Webpage – Encountered a Missing Page Issue
- Exploring Gaming Worlds: Windows Directories Unlocked
- Great Image Quality Overshadowed by Confusing A10 Interface
- Master Technique for USB-Mouse Driver Revival in Win10/11
- Mastering MsStore Troubleshooting for Error Code 0X0 Failure
- Preserving Top-Level Calculator in Windows
- Rapid Restoration: Regaining Razer's Control on PCs
- Reviving Your Window's Inactive Start Button
- Streamlining File Handling with PowerShell Expertise
- The Convenient HP Stream 11 Notebook for Simple, On-the-Move Internet Use
- Troubleshooting 0XC000003E Application Initiation Faults on PCs
- Unveiling the Secrets to Superior Gaming Recordings for 2024
- USB Boot Media Creation – Windows 11 Tutorial in Three Parts
- Watch Your Favorite Games for Free: 2024'S Premier Streaming Options
- Title: The Ultimate Guide to Purging Windows Drives' Partition Units
- Author: David
- Created at : 2024-11-29 16:53:03
- Updated at : 2024-12-06 23:40:11
- Link: https://win11.techidaily.com/the-ultimate-guide-to-purging-windows-drives-partition-units/
- License: This work is licensed under CC BY-NC-SA 4.0.
