The Ultimate Guide to Correctly Printing From Microsoft PowerPoint in Windows

The Ultimate Guide to Correctly Printing From Microsoft PowerPoint in Windows
Is your PowerPoint printout not coming out right? Whether it’s distorted, blurry, or doesn’t match what you see on your screen, there’s no need to waste valuable time or paper.
We’ll go through some easy fixes that should get Microsoft PowerPoint to print correctly on your Windows 10 or 11 computer.
1. Configure the Print Options in PowerPoint
Like other Office apps, Microsoft PowerPoint offers a number of options for customizing the printing process. For example, you can use these options to configure PowerPoint to print inserted objects, such as Excel charts or Word documents, at the printer’s resolution.
Or, you can set PowerPoint to convert TrueType fonts into graphics, ensuring that the printed text appears exactly as it does on the screen.
To configure print options in PowerPoint:
- Open PowerPoint and head to File > Options.
- Select the Advanced tab.
- Scroll down to the Print section and use the checkboxes to enable or disable your preferred options.
- Click OK to save the changes.

After you have configured the above options in PowerPoint, your prints should come out as you intended.
2. Modify Print Layout
The Print dialog in Microsoft PowerPoint provides you with a variety of options for getting the desired print output. You must go through these options and ensure that they are set up appropriately.
Open your PowerPoint presentation and press Ctrl + P to access the Print dialog. Select your preferred print layout. For instance, if you are looking to print your presentation with notes , you will need to select the Notes Pages layout. Additionally, if your printed PowerPoint slides are cut off, select the Scale to Fit Paper option.

After selecting your preferred options, print a test page and see if PowerPoint prints correctly.
3. Print the Presentation in Other Formats
Another thing you can do is save your PowerPoint presentation as a PDF and then try to print it. This is more of a workaround you can use if you are in a rush and don’t have time to figure out what’s causing the problem.
To save a PowerPoint file as a PDF:
- Open your PowerPoint presentation and press F12 to bring up the Save As dialog box.
- Use the Save as type drop-down menu to select PDF.
- Enter a file name and set your preferred location.
- Click Save.

After saving your presentation as a PDF, open it, and see if it prints correctly.
4. Open PowerPoint in Safe Mode
Starting PowerPoint in safe mode enables you to run the program without any add-ins interfering. This can help you determine if a faulty add-in is causing problems with PowerPoint’s printing process.
To launch Microsoft PowerPoint in safe mode, press Win + R to open the Run tool. Type PowerPnt /safe in the text field and press Enter.
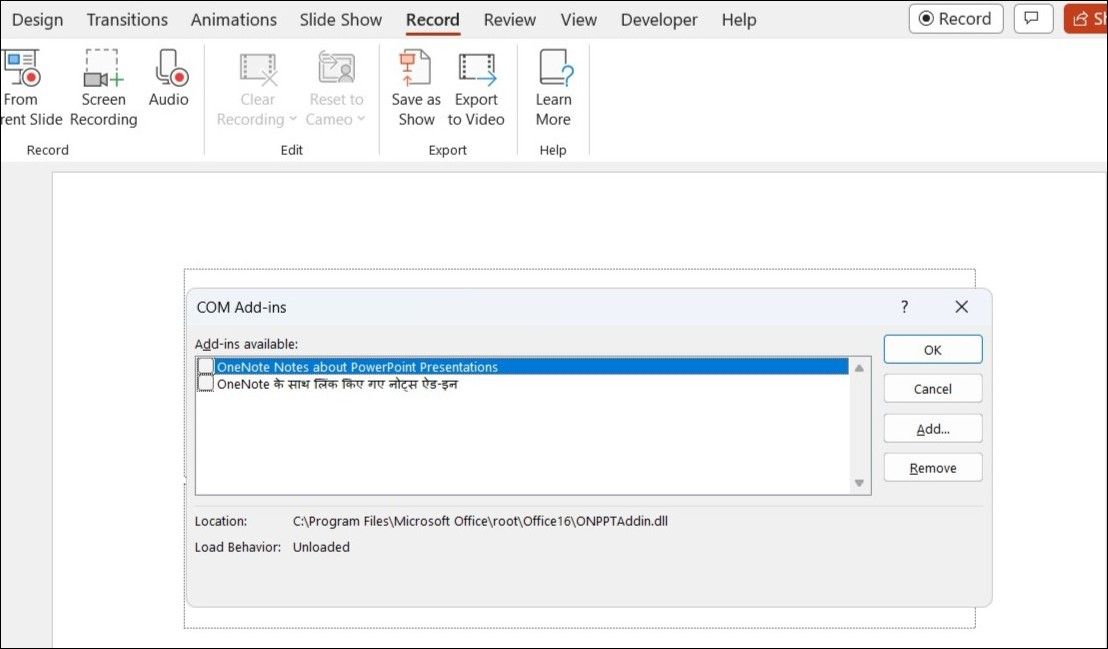
After that, try printing a slide and see if it prints correctly. If it does, it means one of your add-ins is to blame for printing issues. To identify it, you will need to disable all of your add-ins and then re-enable them one at a time. Here are the steps for the same.
- In PowerPoint, click the File menu in the top left corner.
- Click Options in the left pane.
- In the PowerPoint Options window, navigate to the Add-ins tab.
- Click the drop-down menu next to Manage and select COM Add-ins.
- Click the Go button.
- Clear all the checkboxes to disable add-ins.
- Click OK.

Restart PowerPoint after completing the above steps, and then enable your add-ins one at a time. You will need to print a test slide after enabling each add-in until the issue occurs again. Once you find the faulty add-in, consider removing it.
5. Repair Your PowerPoint File
If the PowerPoint is failing to print only in a specific presentation, it may be corrupted. You can use the built-in file repair option in PowerPoint to fix the presentation. To do so, use these steps:
- Open PowerPoint and head to File > Open > Browse.
- Locate and select your PowerPoint file.
- Click the downward arrow next to Open to select Open and Repair.

PowerPoint will open the presentation after repairing it. After that, you should be able to print it without any issues.
6. Run the Printer Troubleshooter
The built-in troubleshooters on your Windows 10 or 11 computer can be helpful when programs like PowerPoint are not printing correctly or at all. In this case, you can run the printer troubleshooter to see if it finds and resolves the issue.
To run the printer troubleshooter on Windows:
- Press Win + I to open the Settings app.
- In the System tab, click on Troubleshoot.
- Select Other troubleshooters.
- Click the Run button next to the Printer.

Wait for the troubleshooter to do its thing and check if the issue is still there.
7. Update Microsoft PowerPoint
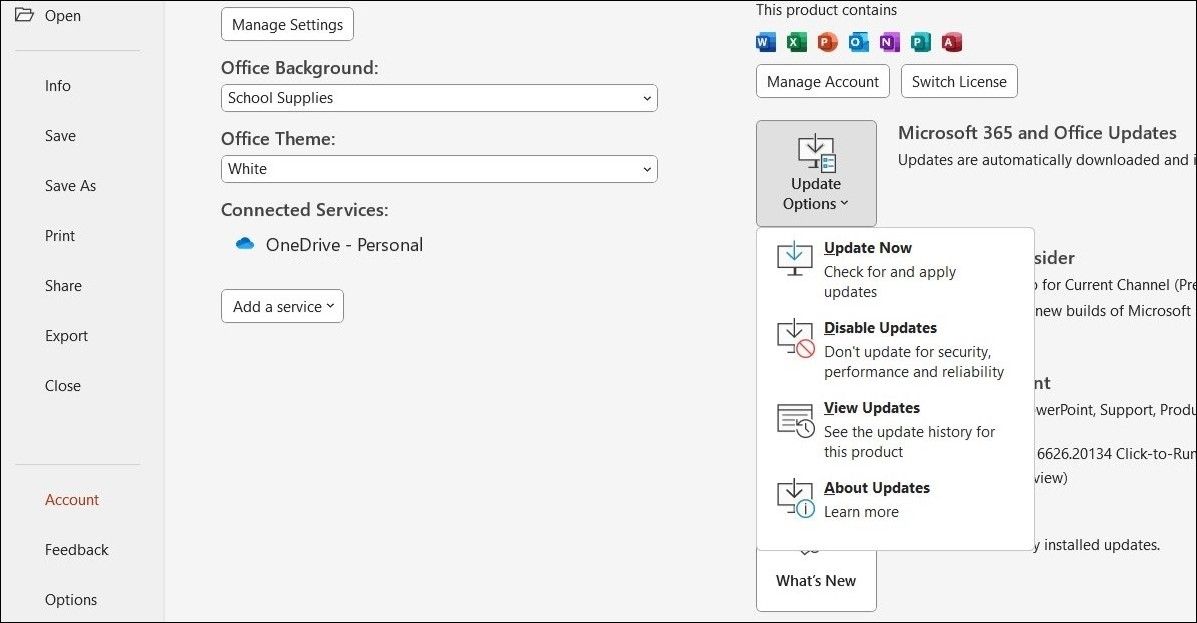
It’s possible that printing issues in Microsoft PowerPoint are because you are using an outdated version of the program. Hence, it’s a good idea to ensure that you are using the most recent version of PowerPoint, especially if you have turned off automatic updates for Office apps .
In PowerPoint, head to File > Account > Update Options and select Update Now to install pending updates.

8. Run the Office Repair Tool
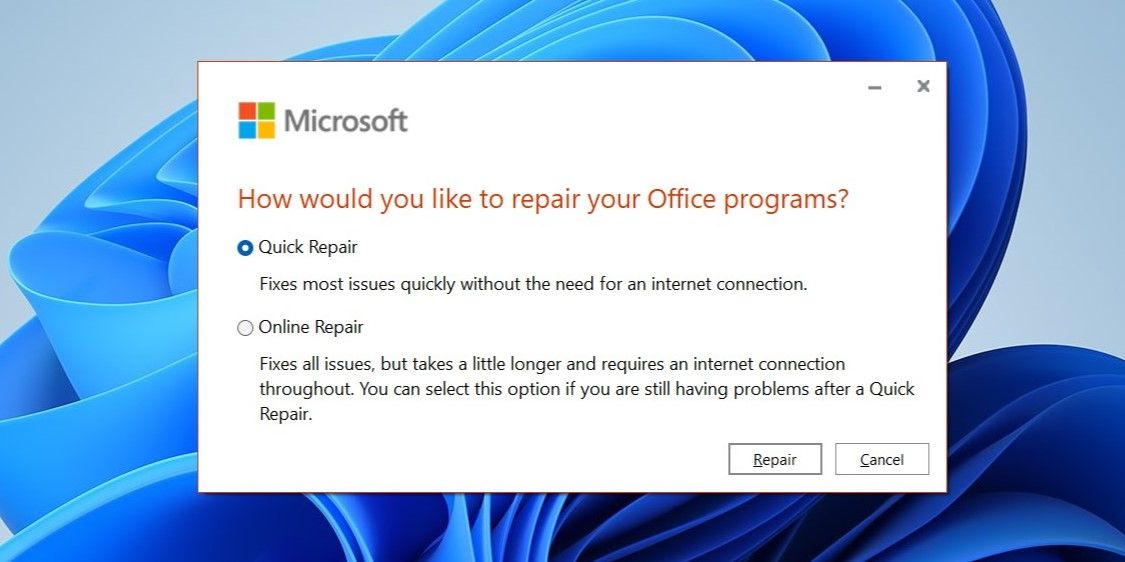
If you are experiencing similar printing issues in Excel , Word, and other Office apps, there may be an issue with the Office installation. In that case, you can run the Office repair tool to fix the problem. Here are the steps for the same.
- Press Win + S to open the search menu.
- Type control panel in the text box and press Enter.
- Click on Programs and Features.
- Locate the Microsoft Office suite on the list. Right-click on it and select Change.
- Select the Online Repair option and hit the Repair button.

Wait for the process to complete and then check if the issue still occurs.
9. Fix Issues With Your Printer
If the above solutions do not work, the problem may be with your printer rather than PowerPoint. To resolve the issue, you can try the following tips:
- Update the Printer Driver: Outdated or corrupt printer drivers can cause printing problems in PowerPoint. Go ahead and update the outdated drivers for your printer and see if that helps.
- Remove and Reinstall the Printer: Another thing you can do is remove your printer from Windows and set it up from scratch. This should help resolve any issues caused by improper setup or misconfigured settings.
No More Printing Problems in PowerPoint for Windows
It can be frustrating when PowerPoint does not print correctly, especially when you are short on time. Hopefully, one or more of the above suggestions have helped you resolve the issue and Microsoft PowerPoint is now printing correctly on your Windows computer.
We’ll go through some easy fixes that should get Microsoft PowerPoint to print correctly on your Windows 10 or 11 computer.
Also read:
- [Updated] 2024 Approved Unleash the Full Potential of Your Live Streams Using OneStream
- [Updated] A-List Makeup Tutorials Who to Watch ?
- [Updated] Cutting-Edge Innovation Best 8 Cameras for Live Broadcasting for 2024
- [Updated] Uniting Choreography with Crafted Audio in Instagram
- 2024 Approved Turning Vimeo Video Into Reusable MP3 Chunks
- Connect Without Passwords: Advanced RDP Tips for Windows 11
- Elevate Your Workspace with Artistry in Win 11 Devices
- Expert Tips for Eliminating Common Windows Blue Screens
- How to Correctly Address the Xerox Update Issue Causing Error 0X800F020B in Windows
- In 2024, Expert Tips for Dealing With YouTube Copyright Notifications
- In 2024, Pattern Locks Are Unsafe Secure Your Infinix Note 30 Pro Phone Now with These Tips
- Mastering UEFI Boot: How To Set Up an EFI Partition on Windows 11 and Safeguard Your Data With Backup Procedures
- Step-by-Step Guide to Unlocking Tabbing Capabilities of Windows 11
- Streamlining Host System's CPU Usage
- The Legacy Lives On: Seven Windows 10/11 Features From the Past
- Top 5 Non-Procreate Drawing Software for PC Users
- Troubleshooting: Ignored Windows Start Menu Click
- Title: The Ultimate Guide to Correctly Printing From Microsoft PowerPoint in Windows
- Author: David
- Created at : 2024-11-23 22:58:24
- Updated at : 2024-11-28 02:12:00
- Link: https://win11.techidaily.com/the-ultimate-guide-to-correctly-printing-from-microsoft-powerpoint-in-windows/
- License: This work is licensed under CC BY-NC-SA 4.0.


