The Photographer’s Shield: Preventing Windows Camera Problems

The Photographer’s Shield: Preventing Windows Camera Problems
As Windows continues to receive buggy updates sometimes, it’s not uncommon for you to encounter issues with the Windows Camera app. Whether it’s the camera not detecting at all or the app refusing to launch, these disruptions can stop you from clicking pictures or shooting videos with the Camera app.
So, how can you fix all such troubling issues on your Windows device?
Don’t worry; in this article, we’ll walk through all the common fixes for camera app-related problems on Windows 10 and 11.
Disclaimer: This post includes affiliate links
If you click on a link and make a purchase, I may receive a commission at no extra cost to you.
1. Try Some General Fixes First
Before taking you to the troubleshooting methods, we recommend trying out these quick and eassy tips:
- As a first step, if you’re using a webcam, please remove the lid (privacy shutter). Sometimes, in a hurry, we just forget to slide the lid and so, we see a completely black screen in the Camera app for obvious reasons.
- Try restarting your PC and check for any available Windows updates after the restart.
- If you’re using a third-party webcam, try unplugging its USB cable connector and plug it back in.
- Launch the Microsoft Store and ensure that the Camera app is updated.
- Some manufacturers such as Logitech, Razer, and Creative provide dedicated setup applications for their webcams. We recommend visiting their official website and downloading the appropriate setup software for installation.
Trying the above-listed quick tips may resolve many minor camera app glitches. But, if you’re still unable to use the Camera app, let’s see some troubleshooting methods to fix that.
2. Adjust the Camera Privacy Settings
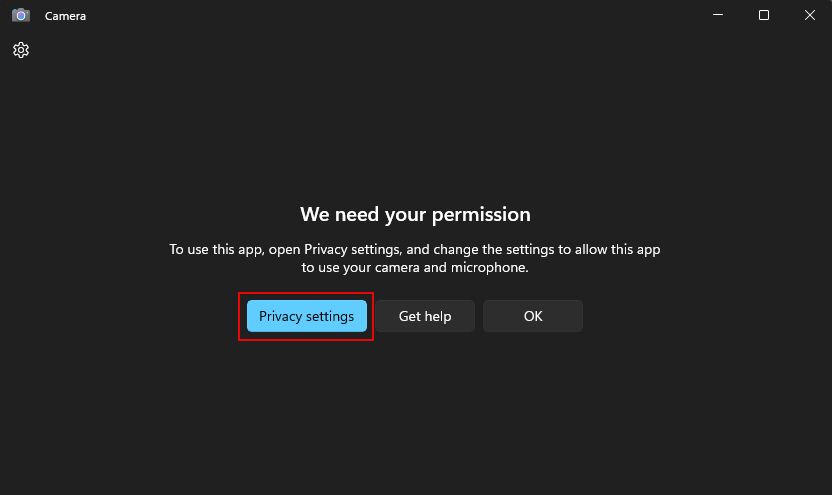
Issues launching the camera often arise from incorrect privacy permissions. We believe you may have mistakenly denied permission for the Camera app, when your system asked you for it, first. In this case, you’ll see an error saying “We need your permission“.
Here’s how you can adjust the Camera privacy settings back to normal on Windows:
- Open the Camera app and click on the Privacy settings button. If this button is not on your screen, search Camera privacy settings on Windows search and click on the first best match.

- Toggle on or enable the Camera access and then, Camera options to resolve the permission issue.
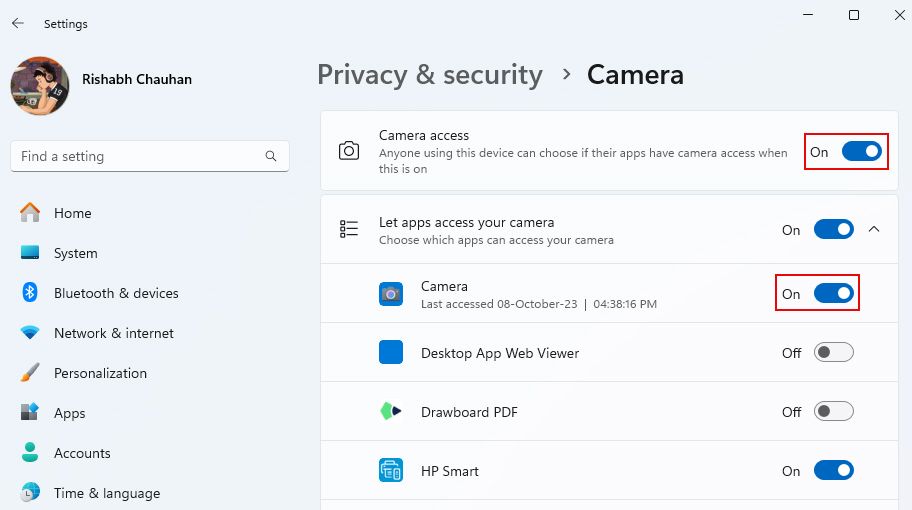
3. Once you grant the permission, re-open the Camera app.
This should work for you if the Camera app is opening properly but asking for permission. Besides the Camera app, you can toggle permission on any other trusted apps you want to use your camera in.
3. Restart or Enable the Camera-Related Windows Services
Windows includes many different services that help the system run properly. When one or more Windows services stop working, some features may malfunction at once. This is the case with the Camera app too.
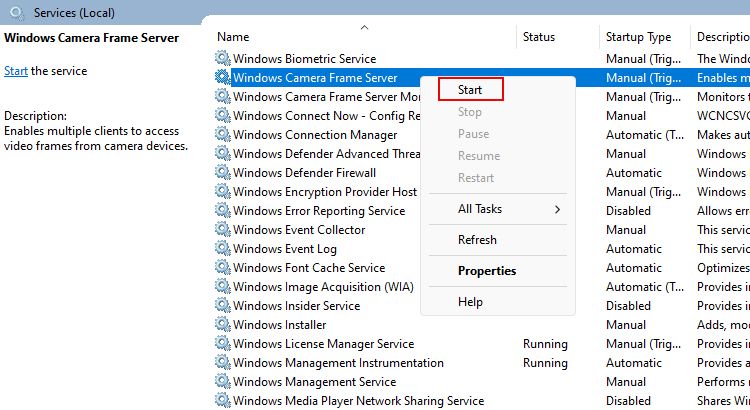
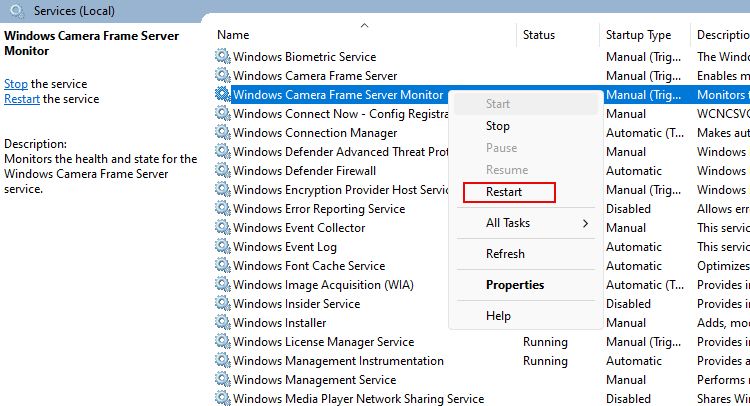
Services like Windows Camera Frame Server, Windows Camera Frame Server Monitor, and Windows Image Acquisition power the camera backend in Windows. sO, let’s see how to restart the mentioned camera-related services with the below steps:
- Start or launch the Windows Services app first.
- You’ll see a long list of services in the app. Scroll a bit and find the Windows Camera Frame Server service.
- Right-click on the service name and click on Start. If that service is already running, then choose the Restart option.

- Repeat the same steps to restart the Windows Camera Frame Server Monitor as well as the Windows Image Acquisition (WIA) service.

- After you start all the given services, restart your computer.
Hopefully, now the Camera app should work as normally it would. You can try clicking a picture or recording a quick video for testing.
Sometimes after a reset, the app may find difficulty in connecting to your webcam and throw an error. To fix that issue, check how to fix the “We Can’t Find Your Camera” error .
4. Install or Update a Compatible Camera Driver
As mentioned previously, some manufacturers provide setup utilities for their webcams. Once a buyer purchases the webcam, he/she can download the appropriate version of the setup utility. Once you install the required software, the drivers will install automatically.
Alternatively, you can try using Driver Booster, a free software to make driver updating easy. We’ve got a dedicated guide on how to use Driver Booster on Windows to help you further.
Outdated, or no drivers frequently disrupt the camera and so, the Camera app refuses to open. But, once you update the drivers, it can clear up many camera problems caused by buggy drivers.
5. Modify the Group Policy Settings
If you’ve used some kind of Windows tweaking tool recently, like O&O ShutUp10++, chances are the Group Policy settings are modified too. This may be the major reason why the Camera app is showing you a blank screen.
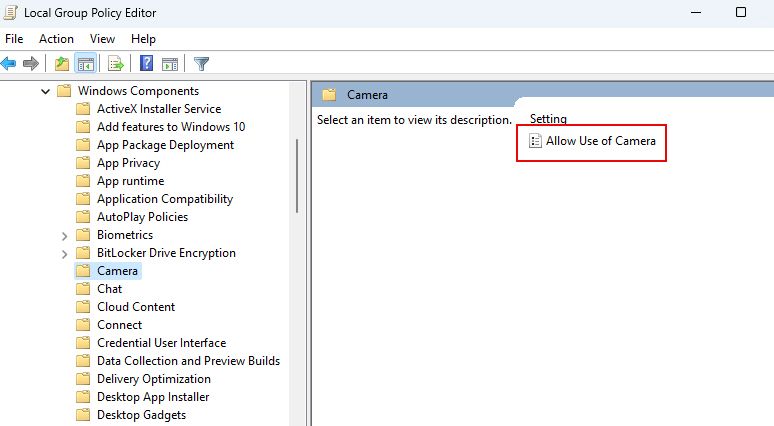
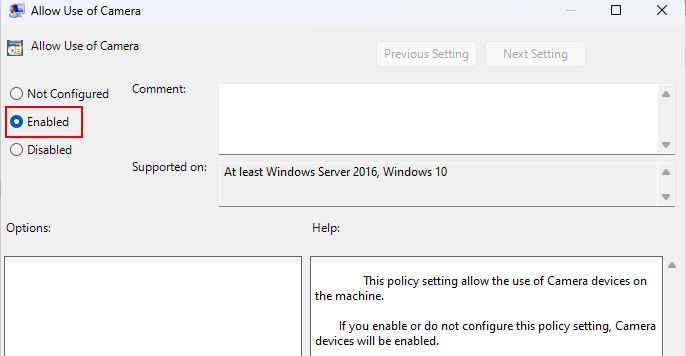
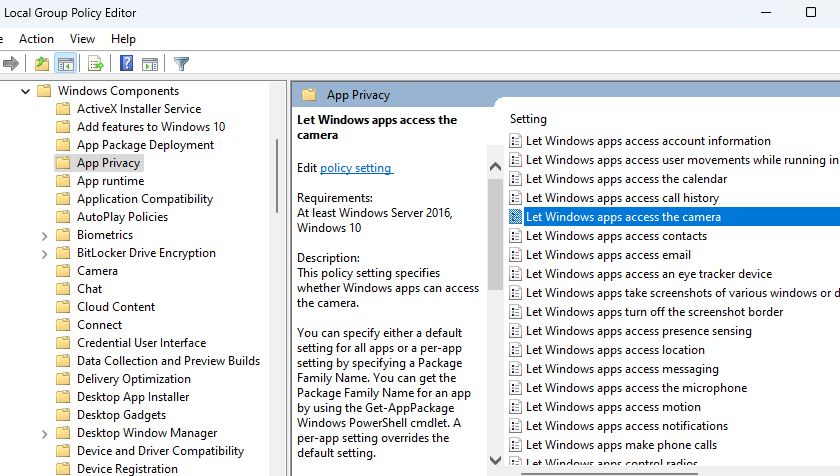
If you don’t know, two Group Policy settings are tied to camera functionality in Windows: Allow Use of Camera and Let Windows apps access the camera. You need to re-enable both of them with the below steps:
- Open the Group Policy Editor on your PC.
- From your left-hand sidebar, go to Computer Configuration > Administrative Templates > Camera.
- Double-click on the Allow use of Camera setting.

- Then choose the Enabled option and click on OK to apply the selected settings.

- Similarly, go to App Privacy under Windows Components and enable the Let Windows apps access the camera setting.
6. Use the “Get Help” App for Troubleshooting
From the Windows 10th edition, Microsoft introduced a new app named Get Help. This app is a one-stop-hub for everyone who wants to troubleshoot any Windows-related issue.
If the Get Help app is not preinstalled on your computer, download it from the Microsoft Store page first.
To get started with Get Help, follow these steps:
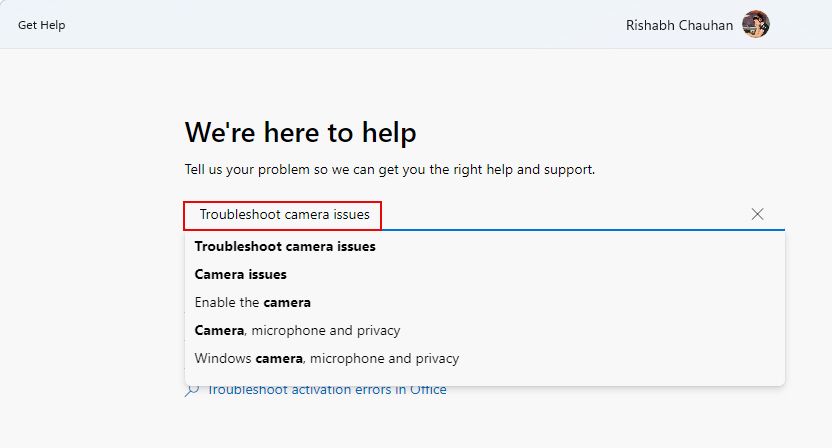
- Open the Get Help app first and search for Troubleshoot camera issues in the Window Search box.

- Once done, it will walk you through some automated steps to fix your camera problems. You need to click on any one option that you consider the best.
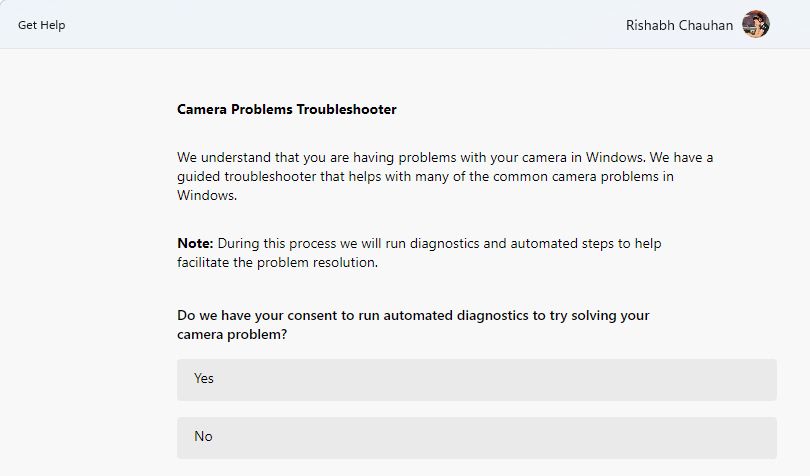
3. After the last question, restart your computer.
The best thing about Get Help is that it automatically performs the required troubleshooting measures. You need not do anything technical on your own. Besides the camera app issue, learn what you can do with the Get Help app .
7. Repair or Reset the Windows Camera App
If the camera app issues persist, another thing you can try is repairing (or resetting) the app using a Windows setting.
Follow the below-given steps to repair the Windows camera app on your device:
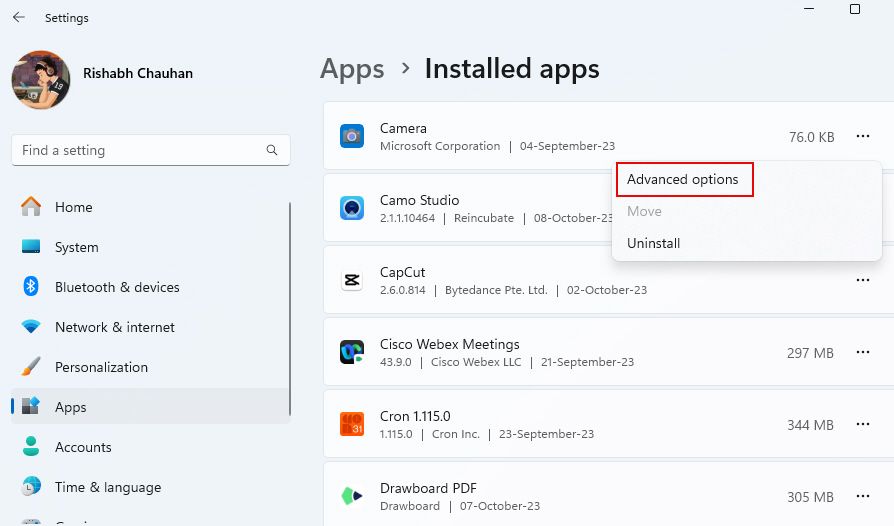
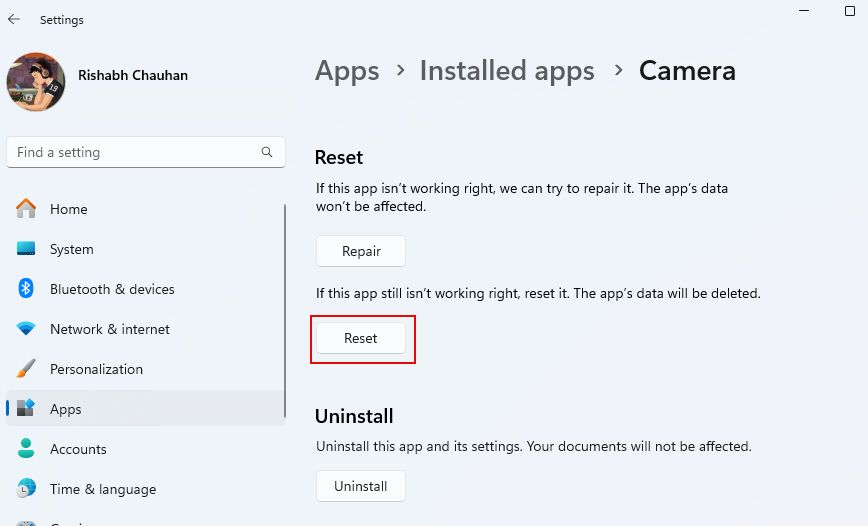
- Open the Windows Settings app (Win + I) and navigate to Apps > Installed apps section.
- From the list, find the Camera app. Next to the Camera app, click the three horizontal dots and then Advanced options.

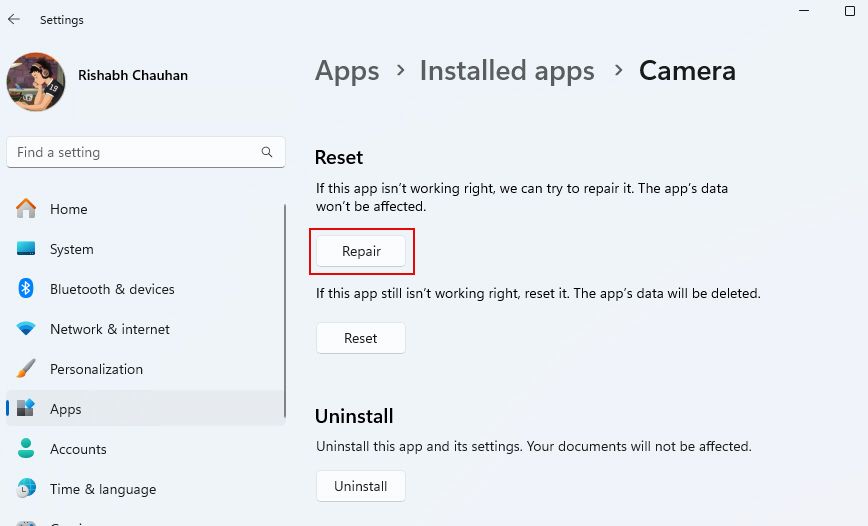
- Scroll till the end and click the Repair option.

- Once you see the tick or check mark, click on Reset to reinstall a fresh copy of the app and wipe all previous data and settings.

- After a reset, reopen the Camera app and check for the issue you were facing earlier.
The Camera app is good for taking casual pictures and recording short videos. But, if you need more than just the basic features, try out any of the best webcam apps for Windows .
8. Set Up Your Smartphone as a Camera
If you’ve tried the previous methods and the camera still won’t work, it may be a hardware issue with your webcam. Here, we suggest either getting the webcam repaired, buying a new webcam, or using a clever trick to use the camera feature.
If you need a webcam for an urgent meeting, you can easily set up your phone as a webcam. For the majority, you can use your Android device as your computer’s webcam . If you don’t have an Android phone, we’ve got a guide on how to use an iPhone as a webcam instead.
Once you set up your device with your computer, you should be able to use the Camera app for all the camera-related tasks. Though, as mentioned earlier, it’s a temporary method so, you may surely require a good quality webcam for your computer in the future for the long run.
All Your Windows Camera Troubles, Solved
After following our guide, you should hopefully get the Camera app working again. Remember that the Camera app relies on a working webcam, so make sure to take care of your webcam properly. Also, consider upgrading your webcam if you face screen freezing issues with your current one.
So, how can you fix all such troubling issues on your Windows device?
Don’t worry; in this article, we’ll walk through all the common fixes for camera app-related problems on Windows 10 and 11.
Also read:
- [New] 2024 Approved The Definitive List of Tools for Computer & Microphone Capture
- [New] Cultivating Patience with YouTube Disapproval for 2024
- [Updated] Snap Your Next Podcast Pick for Sharing
- Effortless Image and Video Integration Microsoft Teams Snap Camera for 2024
- Go Above and Beyond With These Non-Windows Applications
- Guide to Fix Windows Operation Failure X709
- How to Fix Unfortunately, Contacts Has Stopped Error on Oppo Reno 11 Pro 5G | Dr.fone
- How To Restore Missing Call Logs from Poco C55
- In 2024, Navigating the Nuances of Mukbang Filmmaking Techniques
- Mastering Insta-Ready Videos: Three Simple Techniques to Perfectly Crop Your Content
- Overcoming Sluggishness: Printing at Full Speed with Windows
- Quick Remedies for PlayStation Connectivity Woes in Windows
- RetroArc Mastery: Shader Techniques to Restore Classic Games
- Revive Missing File Images in Windows 11’S User Interface
- Schlucke MacX DVD-Ripper Professional Für Windows Mit Sonderangebot Kaufen!
- Ultimate Edit Suite for Mobile App Devices for 2024
- Uncover & Purge Windows 11 User Journey Data
- Unravel CPU Overuse: System Stability Through Windows' RM Insights
- Win11: Fixing the 'Printer Offline' Conundrum
- Title: The Photographer’s Shield: Preventing Windows Camera Problems
- Author: David
- Created at : 2024-12-05 17:31:01
- Updated at : 2024-12-07 07:23:09
- Link: https://win11.techidaily.com/the-photographers-shield-preventing-windows-camera-problems/
- License: This work is licensed under CC BY-NC-SA 4.0.
