Taking Charge of Your Saved Games with Epic Launcher

Taking Charge of Your Saved Games with Epic Launcher
Many players install and launch Windows games with Epic Games Launcher. Sometimes players need to reinstall games installed with Epic Games for troubleshooting purposes or when they get new PCs to play them on. The biggest concern players usually have about reinstalling games is losing saved game data.
Fortunately, there are two ways you can back up saved game data for games installed with Epic Games Launcher. Doing so will enable you to reinstall Epic Games titles without losing your saved progress. This is how you can back up saved data for Windows 11/10 games installed via Epic Games Launcher.
Disclaimer: This post includes affiliate links
If you click on a link and make a purchase, I may receive a commission at no extra cost to you.
How to Enable Cloud Saves in Epic Games Launcher
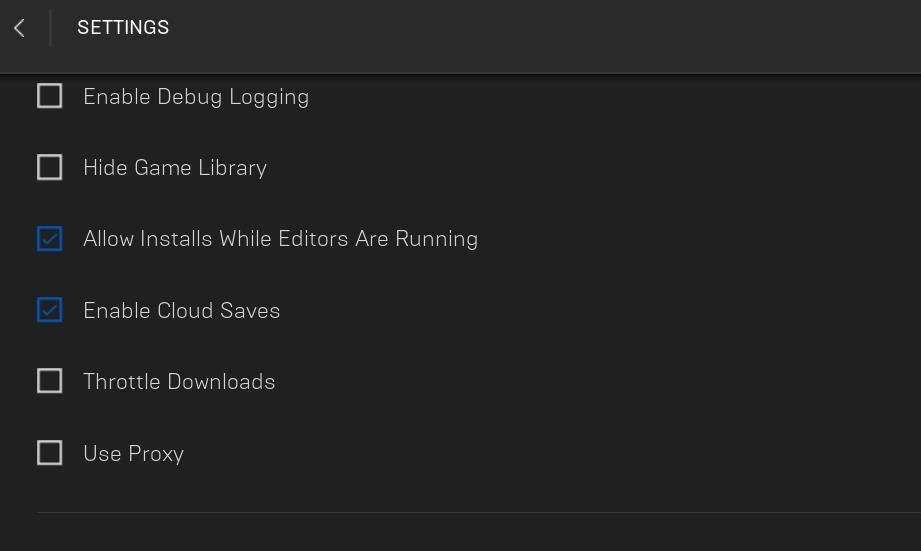
Epic Games Launcher has a Cloud Save feature with which you can back up saved data. That feature automatically backs up saved game progress to Epic’s online cloud service. Then all your saved progress will be preserved so that you can continue playing from where you left off after reinstalling a game. You can enable that Cloud Save feature in Epic Games Launcher like this:
- Open your Epic Games Launcher client software.
- Click on the user profile button near the top-right corner of the Epic Games window.
- Select Settings to access the options for Epic Games Launcher.

- Then click the checkbox labeled Enable Cloud Saves to select that option.

Now your game will start cloud saving when you play it so long as it supports that feature. You don’t have to do anything to restore data backed up to Epic’s cloud service after reinstalling a game.
How to Check if a Game Supports Cloud Sync
After selecting the Enable Cloud Saves setting, you must also check if a game you need to reinstall supports that feature. Many games installed with Epic Games don’t support its Cloud Saves feature. This is how you can check if a Windows game supports Epic’s cloud synchronization:
- Bring up the Epic Games Launcher window.
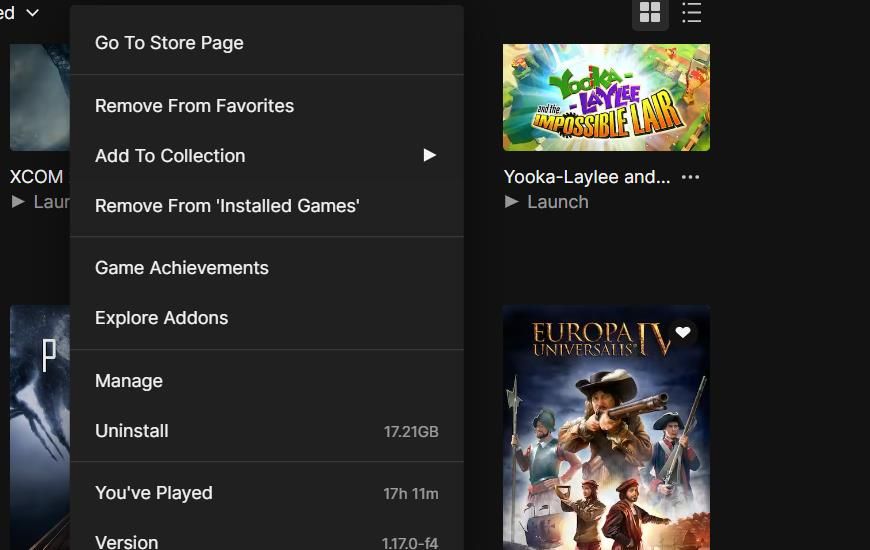
- Click Library to view all the titles you’ve installed with Epic Games.
- Next, right-click the cover image thumbnail for the game you want to check and select Manage.

- You should see a Cloud Saves setting in the management options. Toggle on the Cloud Saves option if it’s off (but it shouldn’t be if you’ve already selected Enable Cloud Saves).
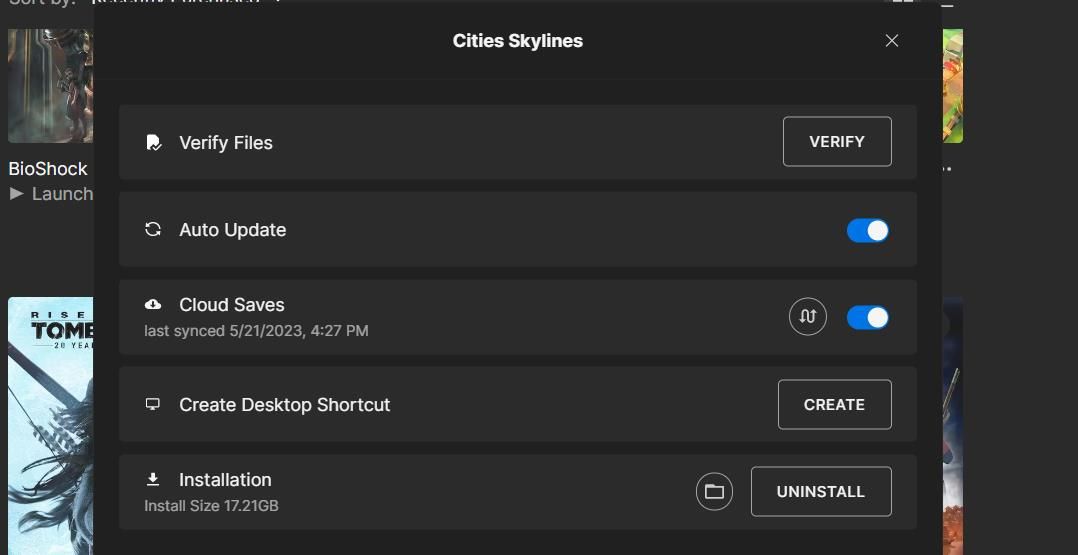
You’ll also see the last synced (backed up) date below the Cloud Saves option. Click the round Sync Data Now button to manually initiate a cloud sync backup. Then you can reinstall the game safe in the knowledge that your saved progress for it has been recently cloud synced.
If a Cloud Save option isn’t available there, your saved game data for that title will not be backed up to Epic’s cloud service. So, you’ll need to back up your saved game data with the alternative method covered below.
How to Handle a Cloud Save Conflict
Sometimes you might see Cloud Save conflict error messages when you select to start games with Epic Games. That error prompts you to select an Upload to Cloud or Download to Machine option with newer or older files. Always select the newer file option when a Cloud Save conflict arises to ensure you retain your latest saves.
How to Manually Back Up Saved Data for Games in Your Epic Library
You’ll probably find some titles in your Epic Games library don’t support the Cloud Save feature. Those are games for which you’ll need to manually back up game saves. To do that, you’ll need to find out where those games store saved data and copy and paste the data in Windows to another location before reinstalling.
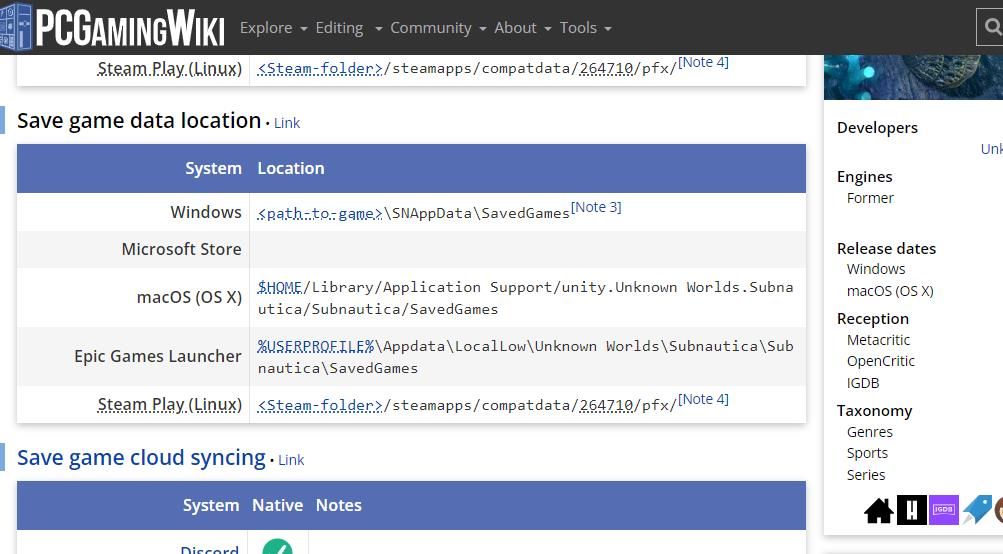
Where exactly games save progress on PCs can vary between titles. The PCGamingWiki website includes a large database of games and provides details about where each game saves its data. So, you can find info for where your games store saved data at that site and manually back up those files as follows:
Open the PCGamingWiki website.
Then input a game title you need to back up data for within that site’s search box and press Enter.
Scroll down the game’s page to the saved game data location details. You can find the saved game data at the Windows or Epic Games Launcher paths specified there.

Launch File Explorer to open the Windows or Epic Games Launcher saved data path specified for your game on its PCGamingWiki page.
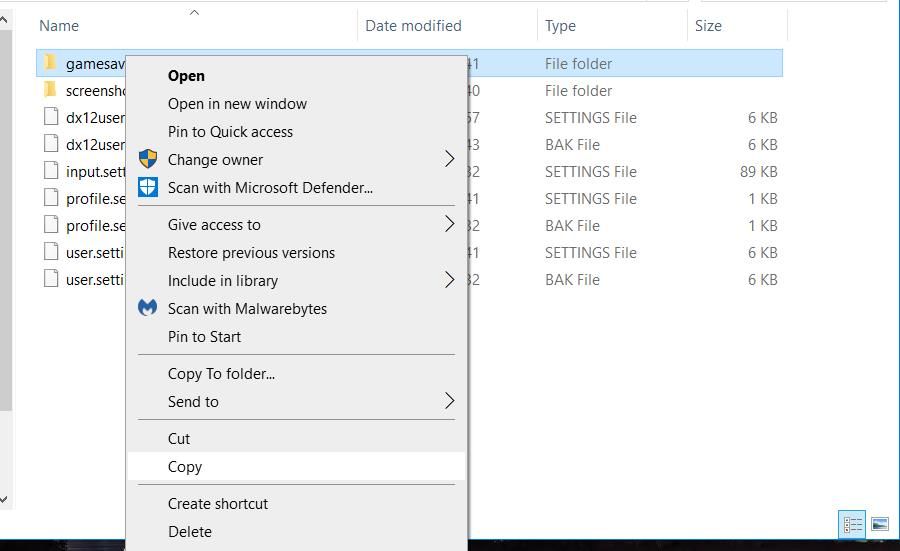
Right-click the game’s saved game folder and select Copy.

Open another directory to paste the folder in and press Ctrl + V.
You will now have a secondary copy of a game’s game saves folder. If you’re going to install the game on another PC, paste the copied game saves folder onto a portable USB drive. Then you can copy the game saves over to your alternative desktop or laptop from that USB drive.
Reinstall the game after you’ve backed up your saved progress. To restore the game saves, you’ll need to copy and paste the backed-up folder into the Windows or Epic Games Launcher path specified for the title’s game saves on the PCGamingWiki website. You can do that with one of the methods included within our how-to copy and paste in Windows 11 guide .
However, you may not need to restore saved data after reinstalling a game title on the same computer if the game saves progress to a Windows folder outside its installation directory. For example, some games save progress to your user Documents folder. The directory path for that folder is:
<%USERPROFILE%\Documents\The Witcher 3\gamesaves\
Nevertheless, it’s still recommended to manually back up game saves in that directory before reinstalling titles just in case. Then launch your game to check if you can load all previously saved progress after reinstalling it. If not, you can restore the lost game saves by moving the backed-up data into the required folder.
Secure Saved Gaming Progress for Your Epic Games Library
Now you can ensure you don’t lose any saved gaming progress before reinstalling Epic Games titles or because of data corruption by backing up game save files with the methods above.
Enable and utilize the more automated Cloud Saves feature if you can. Or manually back up saved game files with the second method for games that don’t support that feature.
Fortunately, there are two ways you can back up saved game data for games installed with Epic Games Launcher. Doing so will enable you to reinstall Epic Games titles without losing your saved progress. This is how you can back up saved data for Windows 11/10 games installed via Epic Games Launcher.
Also read:
- [New] 20 Popular TikTok Country Songs to Take a Relax and Dance To
- [Updated] In 2024, The Secrets Behind Compelling Captions for Captivating TikTok Content
- Conversations with the Z’s, Book One | Free Book
- Expert Tips & Tricks for Efficient Application Management with WPM
- Image Integration Seamless Video Content Creation for 2024
- In 2024, Methods to Change GPS Location On Samsung Galaxy S23 | Dr.fone
- Is It Safe to Delete the Windows ~BT Folder?
- Mastering Windows Transition: Implementing Win11 in VMware Platform
- Professional Photoshop Tips: How to Cut Out Unwanted Areas
- Quick Fixes to Rectify Error 0X800700E1 on Windows 11 PCs
- Resolving Non-Start Warnings in Windows Search Service
- Screen Recording on MacOS Ahead with Bandicam or Camtasia, In 2024
- Solving the OneDrive Tag Validity Problem in Windows Filesystem
- Steps to Toggle SmartScreen Filters in Windows 11
- Taking Your Videos to the Next Level Expert PC Methods for YouTubers for 2024
- The Essentials of Python Server Use for Windows File Exchange
- Transform Your Ryzen 9 9950X - Supercharge at 6 GHz, Reap +27% in Multi-Core Geekbench Results
- What Is VK?: Essential Facts on Russia’s Social Network
- Why Opt for DXVK in Windows' Gaming Scene?
- Title: Taking Charge of Your Saved Games with Epic Launcher
- Author: David
- Created at : 2024-11-15 08:33:27
- Updated at : 2024-11-18 04:02:16
- Link: https://win11.techidaily.com/taking-charge-of-your-saved-games-with-epic-launcher/
- License: This work is licensed under CC BY-NC-SA 4.0.

