
Tailor Windows Screenshot Feature to Suit Your Preferences
Tailor Windows Screenshot Feature to Suit Your Preferences
With the Windows Spotlight feature enabled, your lock screen gets updated every day with spectacular images from Bing. That said, not everyone may like seeing a different lock screen background daily.
In any case, it’s fairly simple to enable or disable spotlight images on your Windows lock screen. Here’s how you can go about it.
1. How to Enable or Disable Windows Spotlight Images Using the Settings App
The Settings app in Windows gives you several options for customizing the lock screen , including the ability to enable or disable spotlight images. It is also the quickest method for turning spotlight images on or off on Windows. Here are the steps you can follow.
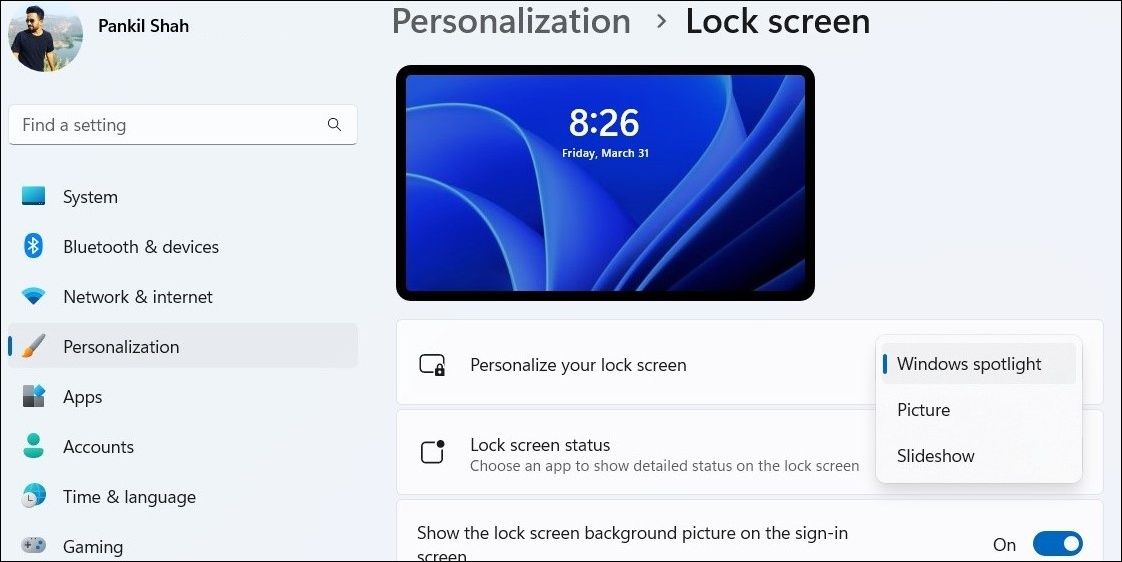
- Right-click on theStart icon and selectSettings from the list.
- SelectPersonalization from the left pane.
- Click onLock screen .
- Click the drop-down menu next toPersonalize your lock screen and selectWindows spotlight to enable the feature. If you want to disable spotlight images, selectPicture orSlideshow instead.

 PaperScan Professional: PaperScan Scanner Software is a powerful TWAIN & WIA scanning application centered on one idea: making document acquisition an unparalleled easy task for anyone.
2. How to Enable or Disable Windows Spotlight Images via the Group Policy Editor
The Group Policy Editor is a useful tool for implementing system-level changes on Windows. If you have the Education, Enterprise, or Professional edition of Windows, you can enable or disable spotlight images on the lock screen via the Group Policy Editor. If you use Windows Home, however, check our guide on how to access the Group Policy Editor in Windows Home before proceeding.
To enable or disable Windows spotlight images on your lock screen, use these steps:
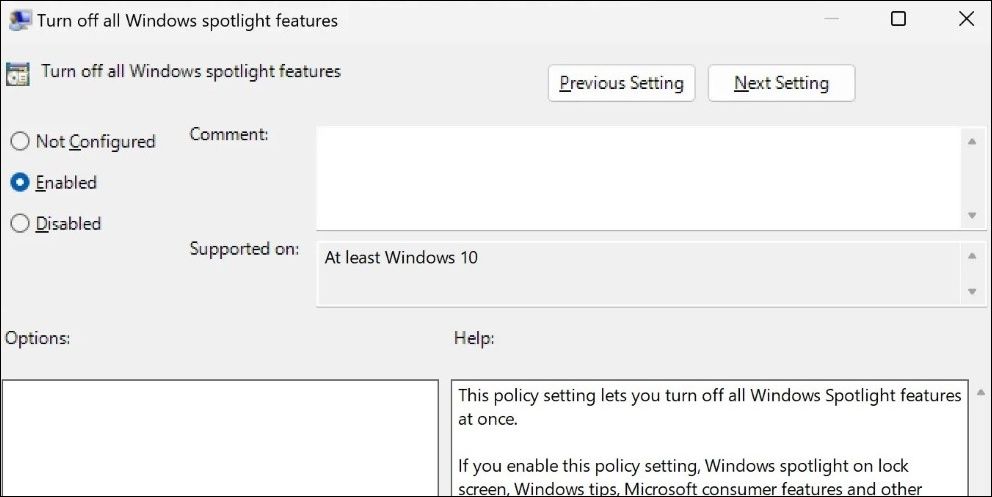
- PressWin + S to open the search menu.
- Typegpedit.msc in the box and select the first result that appears. This will open the Local Group Policy Editor.
- Use the left pane to navigate to User Configuration > Administrative Templates > Windows Components > Cloud Content .
- Double-click theTurn off all Windows spotlight features policy in the right pane.
- SelectEnabled to get spotlight images on the lock screen. If you want to turn them off, selectNot Configured orDisabled .
- ClickApply followed byOK .
PCDJ DEX 3 for Windows & MAC is the total entertainment DJ software solution, offering audio, video, and karaoke mixing ability. Automatic beat-sync, smart looping, 4 decks, DJ MIDI controller support, Karaoke Streaming and much more.
DEX 3 meets the demands of today’s versatile DJ, without compromise!
DEX 3 (Audio, Video and Karaoke Mixing Software for Windows/MAC | 3 Activations and Free Updates)
 PCDJ DEX 3 for Windows & MAC is the total entertainment DJ software solution, offering audio, video, and karaoke mixing ability. Automatic beat-sync, smart looping, 4 decks, DJ MIDI controller support, Karaoke Streaming and much more.
 vMix 4K - Software based live production. vMix 4K includes everything in vMix HD plus 4K support, PTZ control, External/Fullscreen output, 4 Virtual Outputs, 1 Replay, 4 vMix Call, and 2 Recorders.
3. How to Enable or Disable Windows Spotlight Images With the Registry Editor
Registry Editor in Windows provides yet another way to enable or disable spotlight images on the lock screen. However, this method may not be suitable for everyone, especially those who are not familiar with the Registry Editor.
If you decide to use this method, make sure you back up the Windows registry or create a restore point before proceeding. Once you’ve done that, use the following steps to enable or disable spotlight images via the Registry Editor.
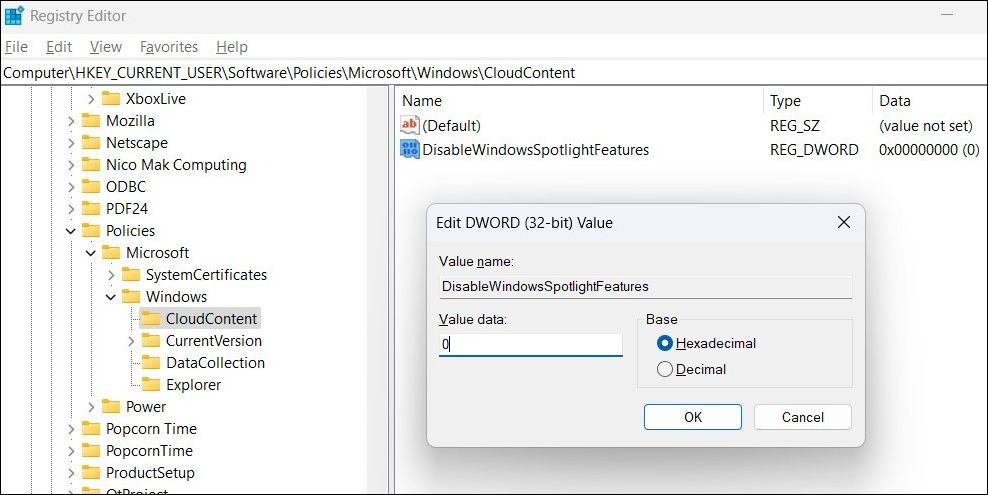
- PressWin + R to open the Run dialog.
- Typeregedit in the text box and pressEnter to open the Registry Editor.
- SelectYes when the User Account Control (UAC) prompt appears.
- Use the left pane to navigate to HKEY_CURRENT_USER > Software > Policies > Microsoft > Windows > CloudContent .
- Right-click on theCloudContent key and selectNew > DWORD (32-bit) Value . Rename the DWORD toDisableWindowsSpotlightFeatures .
- Double-click on the newly created DWORD to edit it.
- Enter1 in the Value data field to disable spotlight images. If you want to enable them, enter0 instead.
- ClickOK .
Exit the Registry Editor and restart your PC to apply the changes.
Get a New View Every Day With Windows Spotlight
As we just saw, you can enable or disable Windows spotlight images on the lock screen via the Settings app, Group Policy Editor, or Registry Editor. No matter which method you opt for, turning Windows spotlight images on or off should not take long.
Since Windows stores all the spotlight images locally on your computer, you can even save them and use them as your desktop wallpaper if you want.
- Title: Tailor Windows Screenshot Feature to Suit Your Preferences
- Author: David
- Created at : 2024-08-16 00:11:19
- Updated at : 2024-08-17 00:11:19
- Link: https://win11.techidaily.com/tailor-windows-screenshot-feature-to-suit-your-preferences/
- License: This work is licensed under CC BY-NC-SA 4.0.