
Tackle Windows GeForce Failures Head-On Today
Tackle Windows GeForce Failures Head-On Today
If you’re into PC gaming, you may know about GeForce Experience. It is an all-in-one tool for NVIDIA graphics card users. This software allows you to one-click optimize all your games from its dashboard.
If, for some reason, you’re unable to find your games in GeForce Experience, don’t worry. Keep reading to learn how to fix the GeForce Experience scanning failed error on Windows.
What Causes the GeForce Experience Scanning Issue?
There are many reasons why your game isn’t visible in GeForce Experience. Some of the major causes contributing to this error include outdated NVIDIA graphics card drivers, corrupted game files, insufficient permissions, etc.
Regardless of the reason, this issue deprives you of squeezing the full potential of your graphics card! Thus, we recommend you try out the below-mentioned fixes immediately.
1. Add the Game or App Manually
The program relies on a database of NVIDIA GeForce Experience-supported games for scanning. GeForce Experience can only optimize the games that are officially supported.
When the app fails to find your currently installed game in its database, it returns a “Scanning Failed” error. Thankfully, you can manually add the game or app to GeForce Experience to resolve this.
Follow these steps to add a game or app for optimization manually:
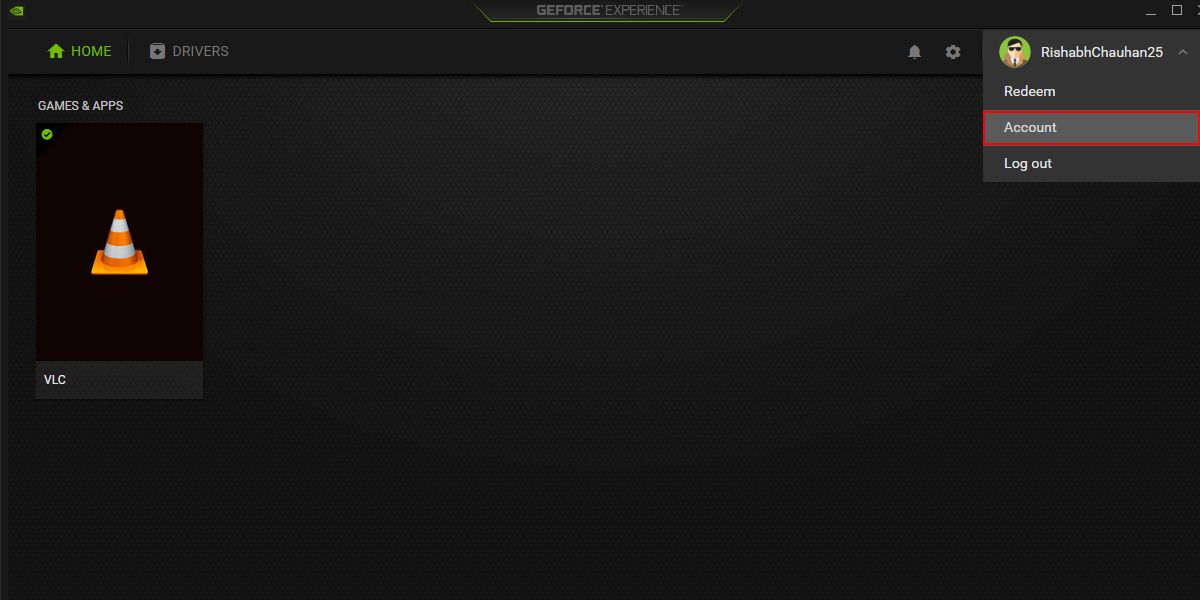
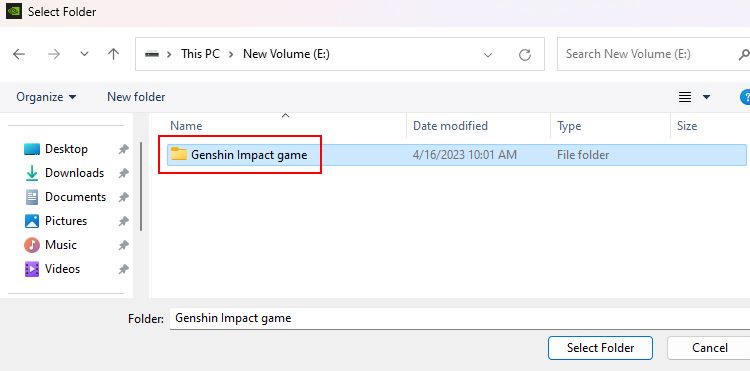
- Click the toggle next to your account name and selectAccount .

- ClickGAMES & APPS > ADD to open the Windows File Explorer.
- Select the folder where you’ve installed the game or app and clickSelect Folder .
- ClickSCAN NOW to let GeForce Experience add your selected game to its dashboard.

This is a simple and quick way to add your games to GeForce Experience manually. If this method doesn’t work for you, consider the advanced solutions below.
2. Restart the NVIDIA Service
You can understand the GeForce Experience service as an essential process (or task) that helps the program to run correctly. When this service fails or gets disabled, you may not be able to use most of its features properly.
To fix this, you can restart the services related to GeForce Experience. This will allow the related services to make a fresh start and solve any issue that may have been causing the error.
Here are some steps to help you restart the GeForce Experience Service on Windows:
- Press theWin + R key combination to open theRun dialog box.
- Typeservices.msc in the dialog box and pressEnter . This will open the Services app, where you can restart/enable/disable the services and do much more.
- Locate theNVIDIA Display Container LS service in the list of services.
- Right-click on it and select theRestart option from the context menu.
- Do the same process, i.e., restart the service withNVIDIA LocalSystem Container andCryptographic Services .
- Once done, make sure to restart your PC once.

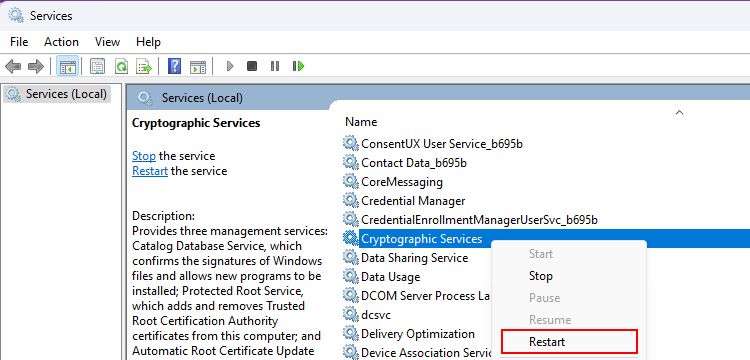
That’s it. This will force all the required services to restart and fix runtime errors.
Please note that restarting the Windows services is not the only fix! If you’re still struggling to scan your game, move forward to try some advanced troubleshooting measures.
 Easy GIF Animator is a powerful animated GIF editor and the top tool for creating animated pictures, banners, buttons and GIF videos. You get extensive animation editing features, animation effects, unmatched image quality and optimization for the web. No other GIF animation software matches our features and ease of use, that’s why Easy GIF Animator is so popular.
3. Run GeForce Experience as an Administrator
Running GeForce Experience as an administrator can help you fix scanning-related issues. Running an application in administrator mode allows a program to run with system-level permissions and access the necessary system resources without restrictions.
Find theGeForce Experience shortcut on your desktop and right-click it. Click theRun as administrator option from the context menu to launch it as a power user.

Note that you’ve to exercise caution while running programs as an administrator. This could cause security issues if the program is affected by any malware.
We never recommend running all programs in administrator mode! This is to avoid giving administrative privileges to programs that may misuse the permissions and affect your system.
4. Repair Missing or Broken Registry Entries
In some cases, missing registry entries can also cause GeForce Experience scanning to fail.
If you’ve never heard of registry entries before, tweaking them can be quite risky. As a precautionary measure, we strongly advise creating a restore point on Windows before attempting any registry modifications. A restore point will come in handy if you want to revert the modifications you’ve made to the system.
Now that you have a restore point set up, check out how to fix broken Windows registry items . Remember to follow the provided guidance carefully and always double-check what you do to avoid any issues.

5. Delete the NVIDIA AppData Folder
On Windows, there is a folder called AppData that stores your specific data related to applications, such as settings, temporary files, and caches.
If any Windows program is causing problems, then deleting its AppData folder may help you. This is because outdated or corrupted data within the folder can disrupt the regular operation of the application.
Here’s how you can delete NVIDIA’s AppData folder on Windows:
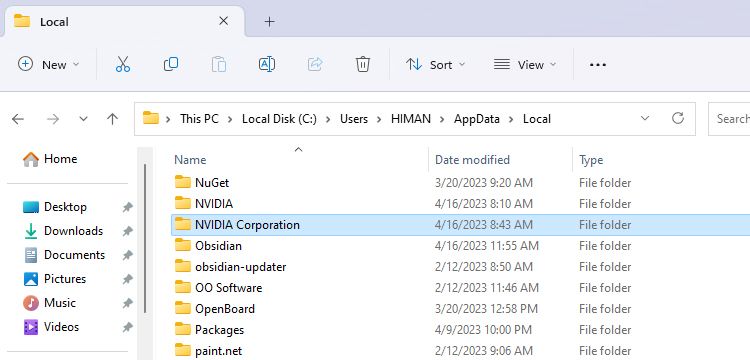
- Press theWin + E keyboard shortcut to bring up the Windows File Explorer.
- Type**%LocalAppData%** on its navigation bar and pressEnter .
- Search for theNVIDIA Corporation folder and delete it. You can selectNVIDIA Corporation and pressShift + Del to delete the folder permanently.
- Once you delete the folder, open GeForce Experience and check for scanning issues.


We advise you to be very careful while deleting files from the AppData folder. Deleting the wrong file can lead to other problems that may leave you in trouble.
6. Reinstall GeForce Experience on Your Desktop
No matter how big the Windows issue is, reinstalling the affected program works most of the time.
You can try reinstalling GeForce Experience and check for the scanning issues thereon. Reinstalling the program will replace any damaged or missing files with a fresh copy, which can often resolve scanning issues.
Here are the steps you need to follow to reinstall GeForce Experience:
- Before reinstalling it, we advise you to uninstall GeForce Experience properly. You can use one of the ways to uninstall software on Windows .
- Go to the official NVIDIA GeForce Experience website and click theDownload Now button.
- Double-click the installer file you just downloaded.
- On theNVIDIA Installer window, clickAGREE AND INSTALL .
- Follow the on-screen instructions to set up the program on your desktop.
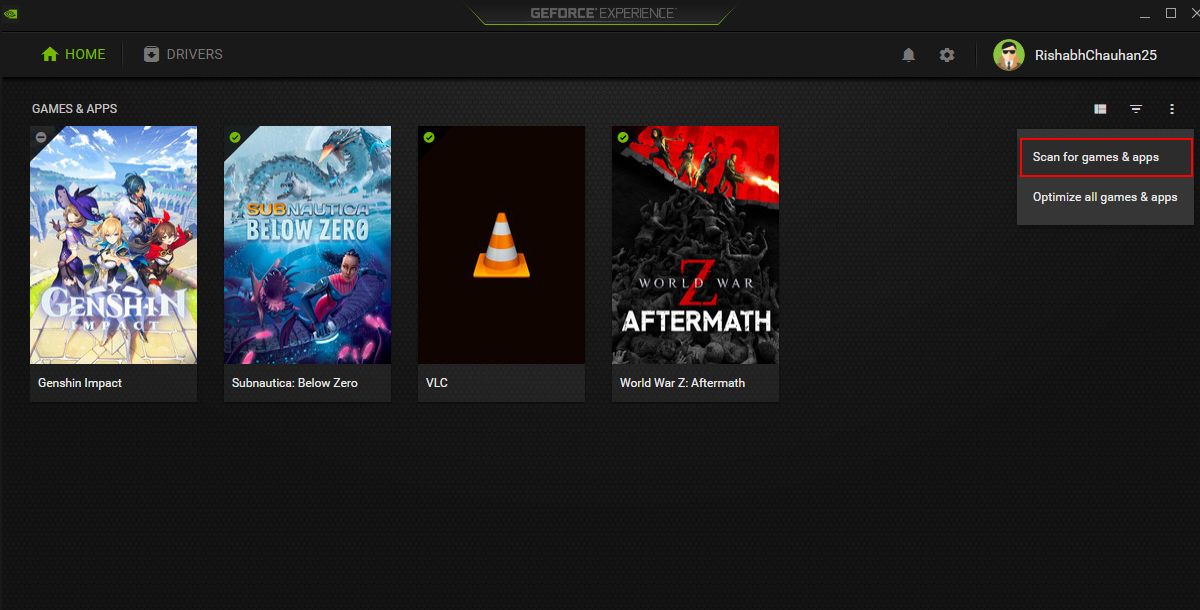
- Once the setup is over, you can click the three-dot menu and thenScan for games & apps . This will scan your entire Windows system for installed games or apps for optimization.
PaperScan Professional: PaperScan Scanner Software is a powerful TWAIN & WIA scanning application centered on one idea: making document acquisition an unparalleled easy task for anyone.

 PaperScan Professional: PaperScan Scanner Software is a powerful TWAIN & WIA scanning application centered on one idea: making document acquisition an unparalleled easy task for anyone.
If the scanning issue was related to the corrupted software files, this reinstallation process should resolve.

Get Back to Scanning in GeForce Experience
Fixing the scanning issue is undoubtedly crucial, as, without scanning, you can no longer optimize the games. And, when the games will remain unoptimized, there’s no way you can experience that extra FPS in games.
Hopefully, all the mentioned methods should help you regain the scanning feature in one go. Once you are ready for scanning, you will love its ease-of-optimization capabilities for sure.
- Title: Tackle Windows GeForce Failures Head-On Today
- Author: David
- Created at : 2024-08-16 00:00:05
- Updated at : 2024-08-17 00:00:05
- Link: https://win11.techidaily.com/tackle-windows-geforce-failures-head-on-today/
- License: This work is licensed under CC BY-NC-SA 4.0.