
Swift Access to Safe Mode on Your Windows 11 PC
Swift Access to Safe Mode on Your Windows 11 PC
Key Takeaways
- Boot into safe mode using System Configuration for easy setup and boot customization.
- Access safe mode via the Settings app for a straightforward method to reboot in safe mode.
- To boot into safe mode from the lock screen, restart your PC and navigate through the Windows Recovery Environment.
In safe mode, Windows starts with a basic set of drivers and files essential to run the system. Everything else, including start-up apps, networking, and Command Prompt, is disabled in safe mode. This helps you determine if an external hardware driver or program conflict is causing your system to malfunction.
There are different types of safe modes and many ways to access them. If you need to diagnose your PC, here is how to boot into safe mode in Windows 11 on a working or non-booting computer.
The Different Types of Safe Mode and When to Use Them
There are three types of safe mode options available in advanced boot options:
- Safe Mode: Windows starts with a minimal set of drivers and files and disables everything else.
- Safe Mode with Networking: Windows starts with a basic set of drivers in addition to the network drivers necessary to connect to a network or the Internet. Wi-Fi connectivity is not available in this mode.
- Safe Mode with Command Prompt: For advanced users who want to access the Command Prompt in safe mode and don’t need the Windows graphical interface.
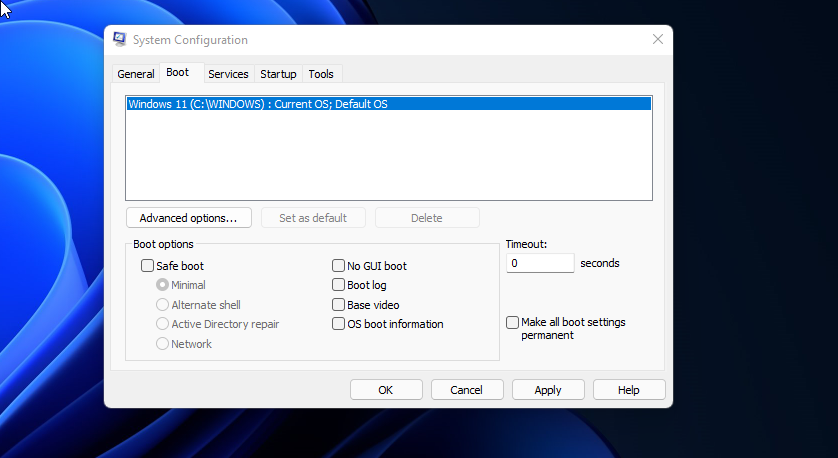
1. Boot into Safe Mode Using the Microsoft System Configuration Utility
You can boot into safe mode using the System Configuration utility, which is less intimidating than other methods. Another advantage is that it allows you to configure your desired safe mode (Standard, Networking, Command Prompt) before restarting and also automatically set your computer to boot into safe mode on the next restart.
To boot into safe mode using the System Configuration utility:
- Press Win + R to open Run, type msconfig and click OK. Alternatively, click Start, type System Configuration and open the best matching result.
- In the System Configuration window, open the Boot tab.

- Under Boot options, select Safe boot. By default, the default mode is set to Minimal. Depending on your requirements, you can switch between Alternate Shell (Command Prompt), Network or Active Directory repair options.
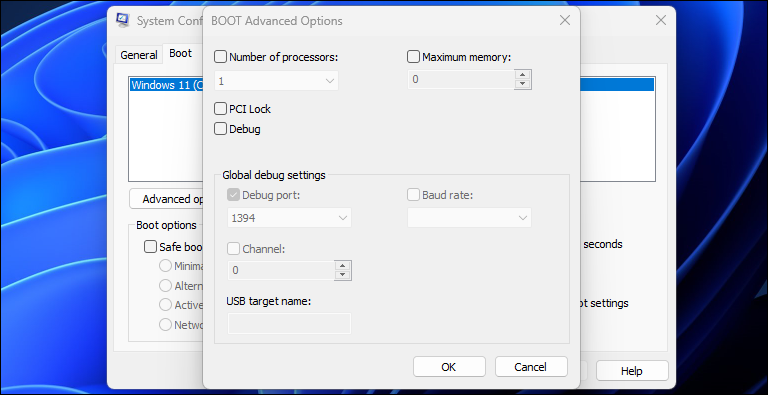
- The Advanced options dialog offers more granular control over the processor and memory usage. Leave it as default if you don’t know what you are doing.
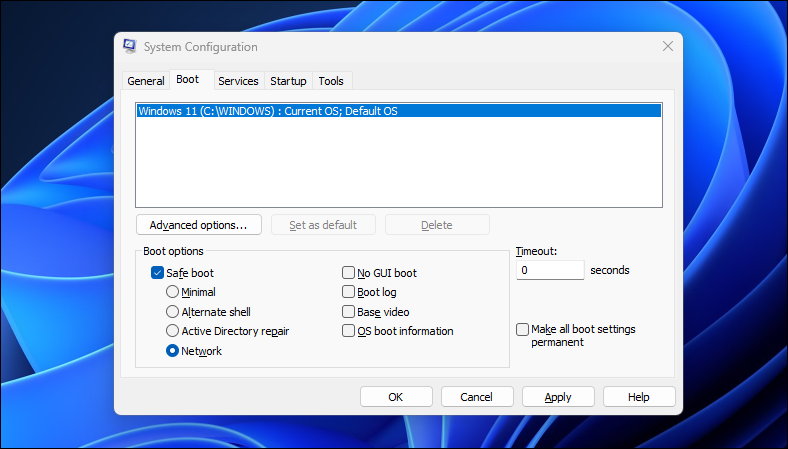
- Once done, click OK and Apply to save the changes.
- Restart your computer to boot into safe mode.
2. How to Boot Into Safe Mode Using the Settings App
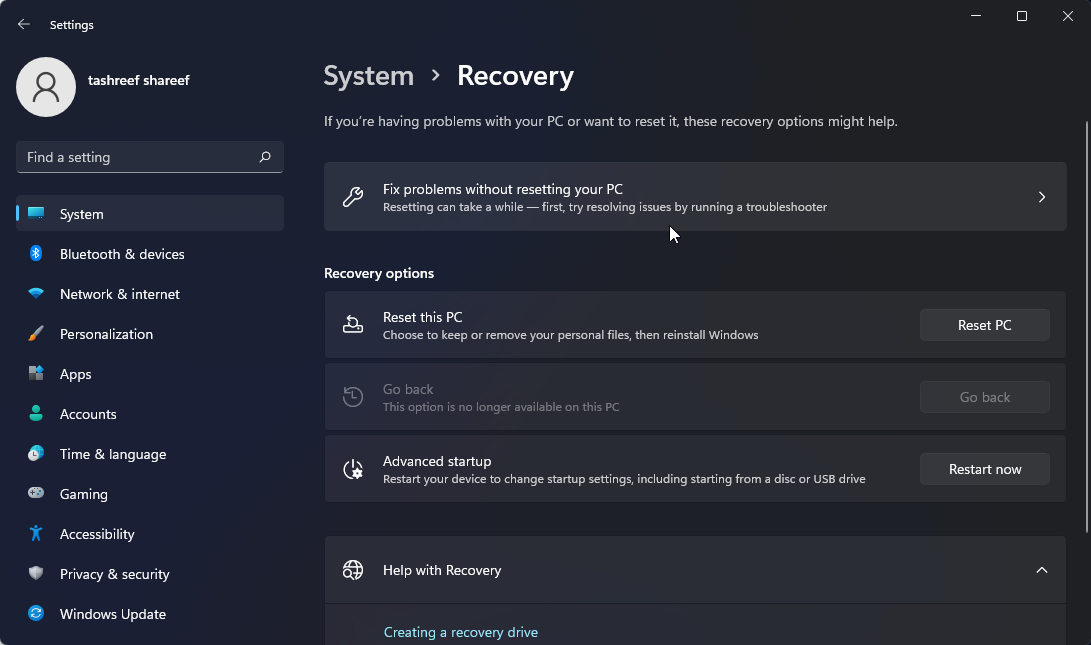
Another way to boot into safe mode is via the Settings app. You can use the Recovery option to access the Advanced Start-up settings and then boot into safe mode. Here’s how to do it:
- Press Win + I to open Settings.
- In the System tab, scroll down and click on the Recovery option.
- Click the Restart now button for Advanced startup.
- Click the Restart now button to confirm the action.
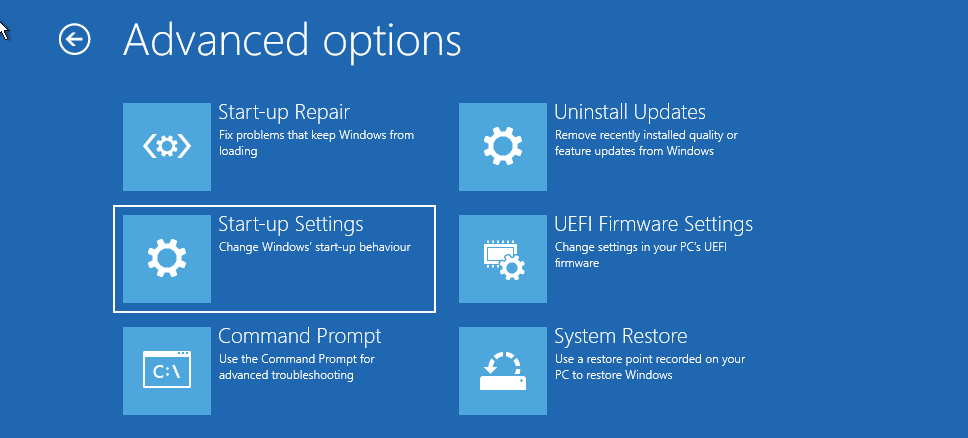
- In the Choose an option screen, click Troubleshoot.
- Next, click Advanced options.
- Click Start-up settings under Advanced options.
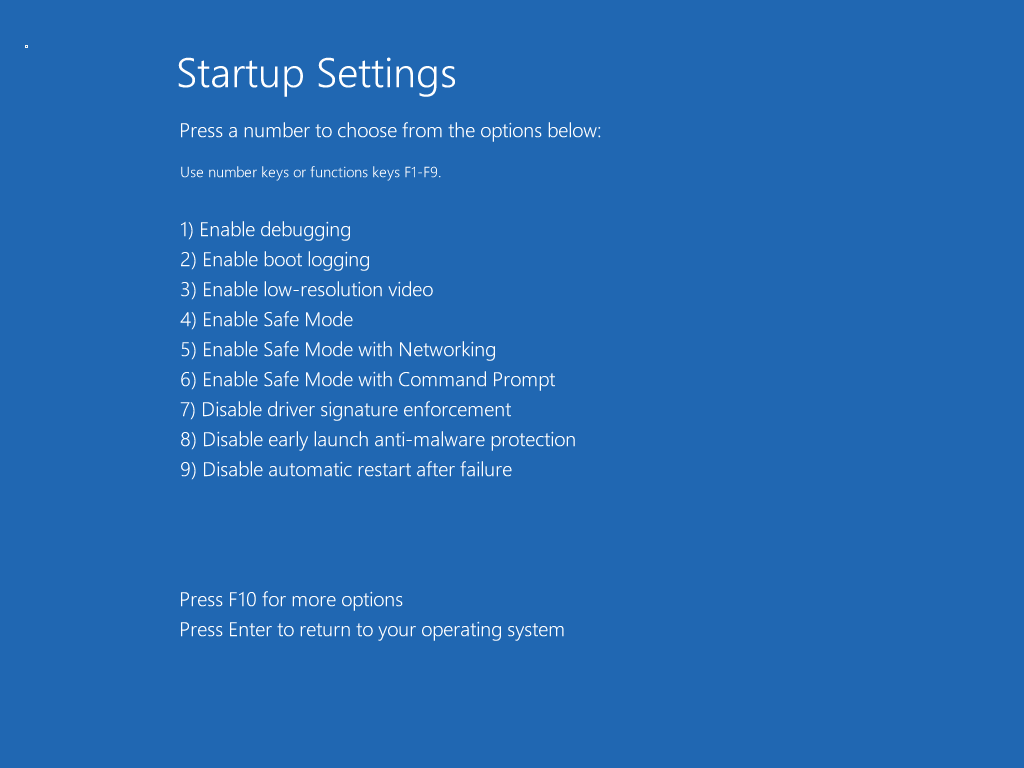
- Click the Restart button to confirm and open the start-up-up settings. Windows will populate your screen with multiple numbered options.
- Press 4, 5 or 6 depending on the safe mode type you want to boot into. Windows will now restart and boot into safe mode.


To exit safe mode, restart your PC and Windows will boot normally.
3. How to Boot Into Safe Mode From the Lock-Screen

If you have forgotten your Windows password or can’t log in, you can boot into safe mode from the lock screen itself. Here’s how to do it:
- Restart your PC.
- When at the lock screen, press any key to see your logon screen.
- Click the Power/Shutdown button. Then, press and hold the Shift key and click Restart. If prompted for confirmation, click Restart anyway.
- Your computer will restart and show the Windows Recovery Environment. From here, go to Troubleshoot > Advanced Options > Start-up settings > Restart.
- Press 4 to restart and boot into safe mode.
Alternatively, you also do this from the desktop**. Click Start > Power** and while holding the Shift key, click Restart.
4. Boot Into Safe Mode Using Command Prompt and WinRE
In addition to the above steps, you can use Command Prompt to restart your computer with advanced options enabled. Once in Windows RE, you can navigate to Startup Settings and access safe mode. Here’s how to do it.
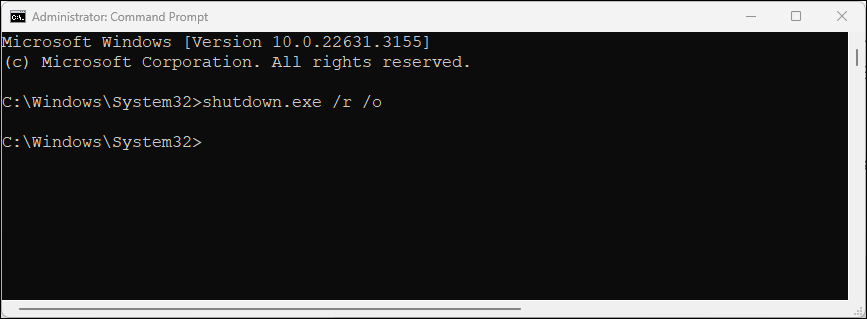
- Press the Win key, type cmd, then right-click on Command Prompt and choose Run as administrator.
- In the Command Prompt window, type the following command and press Enter to execute:
shutdown.exe /r /o - Click the Close button when a pop-up dialog appears.
- That’s it. Windows will restart in one minute. So, wait till the PC restarts and boots into the Windows Recovery Environment.
- In Windows RE, go to Troubleshoot > Advanced Options > Start-up settings > Restart.
- After the restart, press the appropriate key to boot into safe mode.
5. Boot Into Safe Mode When Windows is Not Booting
If Windows is not booting , or you can’t see the login screen, you can still access safe mode using the advanced boot option by triggering the Windows Recovery Environment.
While you can press the F8 key repeatedly during the boot process to access advanced boot options, it doesn’t always work. Instead, you can force Windows to boot into the Windows Recovery Environment by deliberately force shutting down your computer a few times during startup.
After two consecutive failed attempts, Windows will automatically start WinRE and give access to advanced boot options. To do this:
- Shut down your computer.
- Press the Power button to power on your PC.
- When it starts loading, press and hold the Power button to force a shutdown. Repeat the steps to abruptly shut down your computer again.
- At the third attempt, press the power button and let Windows load and boot into Windows Recovery Environment.
- Under Choose an option, click Troubleshoot.
- Then go to Advanced options > Start-up settings > Restart.
- After the restart, press 4,5 or 6 to boot into safe mode with different options.
6. Perform a Safe Boot Using a Bootable USB Drive and Command Prompt
If your computer is experiencing a critical system failure or startup issues and cannot boot normally, you can perform a safe boot using a bootable USB drive.
If you don’t have installation media, follow our guide to create a Windows 11 bootable USB drive . Once you’ve created got a bootable drive, continue with the steps below:
Connect the bootable USB drive to your computer.
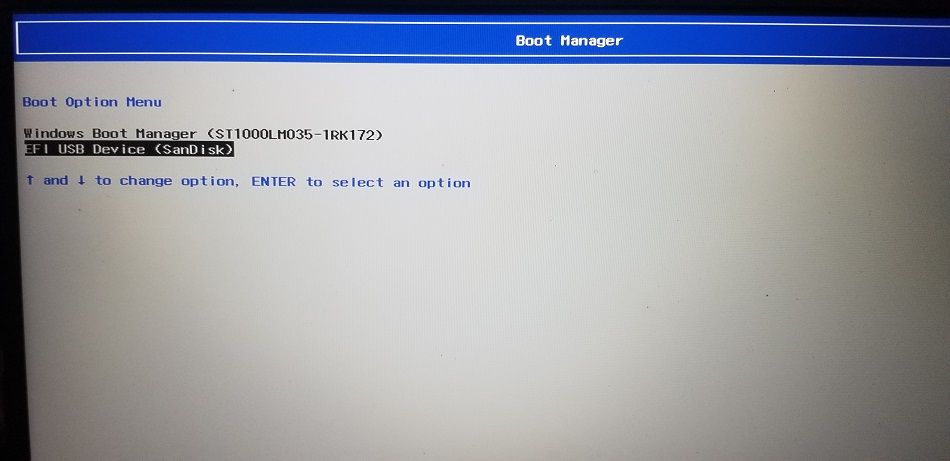
Press the Power button and start pressing the F9 key on an HP laptop or F2 on a Lenovo laptop to bring up the Boot Manager. The Boot Manager key can vary depending on your laptop/motherboard manufacturer.
In the Boot Manager, use the arrow keys to select the bootable USB drive as the boot device. Press Enter to select the option to open the Windows Setup wizard.
In the Windows Setup wizard, click on Next.
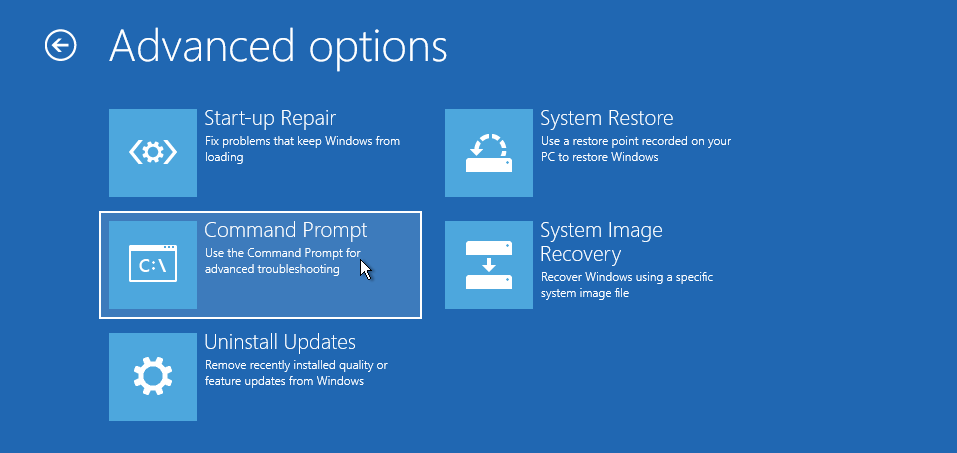
Then, click on Repair your computer in the bottom left corner to enter Windows RE.
Under Choose an option, go to Troubleshoot > Command Prompt.
In the Command Prompt window, type the following command and press enter to change Boot Configuration Data (BCD) file.
bcdedit /set {default} safeboot minimalAlternatively, to enable safe boot with networking, type the following command:
bcdedit /set {default} safeboot networkIf successful, you will see the operation completed successfully message.
Type exit and press Enter to close Command Prompt.
In Windows RE, click Continue. Windows will now restart in safe boot mode.


How to Exit Safe Mode in Windows 11
To exit safe mode, restart your PC and wait for it to restart normally. However, if your computer continues to boot into safe mode, follow these steps to exit safe mode manually.
- Press Win + R to open Run.
- Type msconfig and click OK to open the System Configuration.
- In the Boot tab, uncheck the Safe boot option.
- Click Apply and OK to save the changes. Restart your PC, and it should start normally.
Safe mode is a handy diagnostic space in Windows. It allows you to access critical drivers and is ideal for diagnosing your system for hardware issues. However, if you want to troubleshoot third-party vendor software-related issues, try a clean boot on Windows . It lets you load your system with a minimal set of drivers and startup apps to isolate the cause triggering the conflict.
In safe mode, Windows starts with a basic set of drivers and files essential to run the system. Everything else, including start-up apps, networking, and Command Prompt, is disabled in safe mode. This helps you determine if an external hardware driver or program conflict is causing your system to malfunction.
There are different types of safe modes and many ways to access them. If you need to diagnose your PC, here is how to boot into safe mode in Windows 11 on a working or non-booting computer.
The Different Types of Safe Mode and When to Use Them
There are three types of safe mode options available in advanced boot options:
- Safe Mode: Windows starts with a minimal set of drivers and files and disables everything else.
- Safe Mode with Networking: Windows starts with a basic set of drivers in addition to the network drivers necessary to connect to a network or the Internet. Wi-Fi connectivity is not available in this mode.
- Safe Mode with Command Prompt: For advanced users who want to access the Command Prompt in safe mode and don’t need the Windows graphical interface.
1. Boot into Safe Mode Using the Microsoft System Configuration Utility
You can boot into safe mode using the System Configuration utility, which is less intimidating than other methods. Another advantage is that it allows you to configure your desired safe mode (Standard, Networking, Command Prompt) before restarting and also automatically set your computer to boot into safe mode on the next restart.
To boot into safe mode using the System Configuration utility:
- Press Win + R to open Run, type msconfig and click OK. Alternatively, click Start, type System Configuration and open the best matching result.
- In the System Configuration window, open the Boot tab.
- Under Boot options, select Safe boot. By default, the default mode is set to Minimal. Depending on your requirements, you can switch between Alternate Shell (Command Prompt), Network or Active Directory repair options.
- The Advanced options dialog offers more granular control over the processor and memory usage. Leave it as default if you don’t know what you are doing.
- Once done, click OK and Apply to save the changes.
- Restart your computer to boot into safe mode.
2. How to Boot Into Safe Mode Using the Settings App
Another way to boot into safe mode is via the Settings app. You can use the Recovery option to access the Advanced Start-up settings and then boot into safe mode. Here’s how to do it:
- Press Win + I to open Settings.
- In the System tab, scroll down and click on the Recovery option.
- Click the Restart now button for Advanced startup.
- Click the Restart now button to confirm the action.
- In the Choose an option screen, click Troubleshoot.
- Next, click Advanced options.
- Click Start-up settings under Advanced options.
- Click the Restart button to confirm and open the start-up-up settings. Windows will populate your screen with multiple numbered options.
- Press 4, 5 or 6 depending on the safe mode type you want to boot into. Windows will now restart and boot into safe mode.
To exit safe mode, restart your PC and Windows will boot normally.
3. How to Boot Into Safe Mode From the Lock-Screen
If you have forgotten your Windows password or can’t log in, you can boot into safe mode from the lock screen itself. Here’s how to do it:
- Restart your PC.
- When at the lock screen, press any key to see your logon screen.
- Click the Power/Shutdown button. Then, press and hold the Shift key and click Restart. If prompted for confirmation, click Restart anyway.
- Your computer will restart and show the Windows Recovery Environment. From here, go to Troubleshoot > Advanced Options > Start-up settings > Restart.
- Press 4 to restart and boot into safe mode.
Alternatively, you also do this from the desktop**. Click Start > Power** and while holding the Shift key, click Restart.
4. Boot Into Safe Mode Using Command Prompt and WinRE
In addition to the above steps, you can use Command Prompt to restart your computer with advanced options enabled. Once in Windows RE, you can navigate to Startup Settings and access safe mode. Here’s how to do it.
- Press the Win key, type cmd, then right-click on Command Prompt and choose Run as administrator.
- In the Command Prompt window, type the following command and press Enter to execute:
shutdown.exe /r /o
3. Click the Close button when a pop-up dialog appears.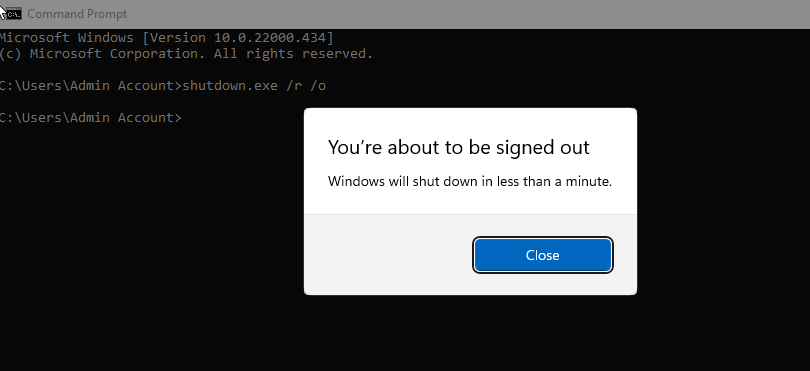
4. That’s it. Windows will restart in one minute. So, wait till the PC restarts and boots into the Windows Recovery Environment.
5. In Windows RE, go to Troubleshoot > Advanced Options > Start-up settings > Restart.
6. After the restart, press the appropriate key to boot into safe mode.
5. Boot Into Safe Mode When Windows is Not Booting
If Windows is not booting , or you can’t see the login screen, you can still access safe mode using the advanced boot option by triggering the Windows Recovery Environment.
While you can press the F8 key repeatedly during the boot process to access advanced boot options, it doesn’t always work. Instead, you can force Windows to boot into the Windows Recovery Environment by deliberately force shutting down your computer a few times during startup.
After two consecutive failed attempts, Windows will automatically start WinRE and give access to advanced boot options. To do this:
- Shut down your computer.
- Press the Power button to power on your PC.
- When it starts loading, press and hold the Power button to force a shutdown. Repeat the steps to abruptly shut down your computer again.
- At the third attempt, press the power button and let Windows load and boot into Windows Recovery Environment.
- Under Choose an option, click Troubleshoot.
- Then go to Advanced options > Start-up settings > Restart.
- After the restart, press 4,5 or 6 to boot into safe mode with different options.
6. Perform a Safe Boot Using a Bootable USB Drive and Command Prompt
If your computer is experiencing a critical system failure or startup issues and cannot boot normally, you can perform a safe boot using a bootable USB drive.
If you don’t have installation media, follow our guide to create a Windows 11 bootable USB drive . Once you’ve created got a bootable drive, continue with the steps below:
Connect the bootable USB drive to your computer.
Press the Power button and start pressing the F9 key on an HP laptop or F2 on a Lenovo laptop to bring up the Boot Manager. The Boot Manager key can vary depending on your laptop/motherboard manufacturer.
In the Boot Manager, use the arrow keys to select the bootable USB drive as the boot device. Press Enter to select the option to open the Windows Setup wizard.
In the Windows Setup wizard, click on Next.
Then, click on Repair your computer in the bottom left corner to enter Windows RE.
Under Choose an option, go to Troubleshoot > Command Prompt.
In the Command Prompt window, type the following command and press enter to change Boot Configuration Data (BCD) file.
bcdedit /set {default} safeboot minimalAlternatively, to enable safe boot with networking, type the following command:
bcdedit /set {default} safeboot networkIf successful, you will see the operation completed successfully message.
Type exit and press Enter to close Command Prompt.
In Windows RE, click Continue. Windows will now restart in safe boot mode.
How to Exit Safe Mode in Windows 11
To exit safe mode, restart your PC and wait for it to restart normally. However, if your computer continues to boot into safe mode, follow these steps to exit safe mode manually.
- Press Win + R to open Run.
- Type msconfig and click OK to open the System Configuration.
- In the Boot tab, uncheck the Safe boot option.
- Click Apply and OK to save the changes. Restart your PC, and it should start normally.
Safe mode is a handy diagnostic space in Windows. It allows you to access critical drivers and is ideal for diagnosing your system for hardware issues. However, if you want to troubleshoot third-party vendor software-related issues, try a clean boot on Windows . It lets you load your system with a minimal set of drivers and startup apps to isolate the cause triggering the conflict.
In safe mode, Windows starts with a basic set of drivers and files essential to run the system. Everything else, including start-up apps, networking, and Command Prompt, is disabled in safe mode. This helps you determine if an external hardware driver or program conflict is causing your system to malfunction.
There are different types of safe modes and many ways to access them. If you need to diagnose your PC, here is how to boot into safe mode in Windows 11 on a working or non-booting computer.
The Different Types of Safe Mode and When to Use Them
There are three types of safe mode options available in advanced boot options:
- Safe Mode: Windows starts with a minimal set of drivers and files and disables everything else.
- Safe Mode with Networking: Windows starts with a basic set of drivers in addition to the network drivers necessary to connect to a network or the Internet. Wi-Fi connectivity is not available in this mode.
- Safe Mode with Command Prompt: For advanced users who want to access the Command Prompt in safe mode and don’t need the Windows graphical interface.
1. Boot into Safe Mode Using the Microsoft System Configuration Utility
You can boot into safe mode using the System Configuration utility, which is less intimidating than other methods. Another advantage is that it allows you to configure your desired safe mode (Standard, Networking, Command Prompt) before restarting and also automatically set your computer to boot into safe mode on the next restart.
To boot into safe mode using the System Configuration utility:
- Press Win + R to open Run, type msconfig and click OK. Alternatively, click Start, type System Configuration and open the best matching result.
- In the System Configuration window, open the Boot tab.
- Under Boot options, select Safe boot. By default, the default mode is set to Minimal. Depending on your requirements, you can switch between Alternate Shell (Command Prompt), Network or Active Directory repair options.
- The Advanced options dialog offers more granular control over the processor and memory usage. Leave it as default if you don’t know what you are doing.
- Once done, click OK and Apply to save the changes.
- Restart your computer to boot into safe mode.
2. How to Boot Into Safe Mode Using the Settings App
Another way to boot into safe mode is via the Settings app. You can use the Recovery option to access the Advanced Start-up settings and then boot into safe mode. Here’s how to do it:
- Press Win + I to open Settings.
- In the System tab, scroll down and click on the Recovery option.
- Click the Restart now button for Advanced startup.
- Click the Restart now button to confirm the action.
- In the Choose an option screen, click Troubleshoot.
- Next, click Advanced options.
- Click Start-up settings under Advanced options.
- Click the Restart button to confirm and open the start-up-up settings. Windows will populate your screen with multiple numbered options.
- Press 4, 5 or 6 depending on the safe mode type you want to boot into. Windows will now restart and boot into safe mode.
To exit safe mode, restart your PC and Windows will boot normally.
3. How to Boot Into Safe Mode From the Lock-Screen
If you have forgotten your Windows password or can’t log in, you can boot into safe mode from the lock screen itself. Here’s how to do it:
- Restart your PC.
- When at the lock screen, press any key to see your logon screen.
- Click the Power/Shutdown button. Then, press and hold the Shift key and click Restart. If prompted for confirmation, click Restart anyway.
- Your computer will restart and show the Windows Recovery Environment. From here, go to Troubleshoot > Advanced Options > Start-up settings > Restart.
- Press 4 to restart and boot into safe mode.
Alternatively, you also do this from the desktop**. Click Start > Power** and while holding the Shift key, click Restart.
4. Boot Into Safe Mode Using Command Prompt and WinRE
In addition to the above steps, you can use Command Prompt to restart your computer with advanced options enabled. Once in Windows RE, you can navigate to Startup Settings and access safe mode. Here’s how to do it.
- Press the Win key, type cmd, then right-click on Command Prompt and choose Run as administrator.
- In the Command Prompt window, type the following command and press Enter to execute:
shutdown.exe /r /o - Click the Close button when a pop-up dialog appears.
- That’s it. Windows will restart in one minute. So, wait till the PC restarts and boots into the Windows Recovery Environment.
- In Windows RE, go to Troubleshoot > Advanced Options > Start-up settings > Restart.
- After the restart, press the appropriate key to boot into safe mode.
5. Boot Into Safe Mode When Windows is Not Booting
If Windows is not booting , or you can’t see the login screen, you can still access safe mode using the advanced boot option by triggering the Windows Recovery Environment.
While you can press the F8 key repeatedly during the boot process to access advanced boot options, it doesn’t always work. Instead, you can force Windows to boot into the Windows Recovery Environment by deliberately force shutting down your computer a few times during startup.
After two consecutive failed attempts, Windows will automatically start WinRE and give access to advanced boot options. To do this:
- Shut down your computer.
- Press the Power button to power on your PC.
- When it starts loading, press and hold the Power button to force a shutdown. Repeat the steps to abruptly shut down your computer again.
- At the third attempt, press the power button and let Windows load and boot into Windows Recovery Environment.
- Under Choose an option, click Troubleshoot.
- Then go to Advanced options > Start-up settings > Restart.
- After the restart, press 4,5 or 6 to boot into safe mode with different options.
6. Perform a Safe Boot Using a Bootable USB Drive and Command Prompt
If your computer is experiencing a critical system failure or startup issues and cannot boot normally, you can perform a safe boot using a bootable USB drive.
If you don’t have installation media, follow our guide to create a Windows 11 bootable USB drive . Once you’ve created got a bootable drive, continue with the steps below:
Connect the bootable USB drive to your computer.
Press the Power button and start pressing the F9 key on an HP laptop or F2 on a Lenovo laptop to bring up the Boot Manager. The Boot Manager key can vary depending on your laptop/motherboard manufacturer.
In the Boot Manager, use the arrow keys to select the bootable USB drive as the boot device. Press Enter to select the option to open the Windows Setup wizard.
In the Windows Setup wizard, click on Next.
Then, click on Repair your computer in the bottom left corner to enter Windows RE.
Under Choose an option, go to Troubleshoot > Command Prompt.
In the Command Prompt window, type the following command and press enter to change Boot Configuration Data (BCD) file.
bcdedit /set {default} safeboot minimalAlternatively, to enable safe boot with networking, type the following command:
bcdedit /set {default} safeboot networkIf successful, you will see the operation completed successfully message.
Type exit and press Enter to close Command Prompt.
In Windows RE, click Continue. Windows will now restart in safe boot mode.
How to Exit Safe Mode in Windows 11
To exit safe mode, restart your PC and wait for it to restart normally. However, if your computer continues to boot into safe mode, follow these steps to exit safe mode manually.
- Press Win + R to open Run.
- Type msconfig and click OK to open the System Configuration.
- In the Boot tab, uncheck the Safe boot option.
- Click Apply and OK to save the changes. Restart your PC, and it should start normally.
Safe mode is a handy diagnostic space in Windows. It allows you to access critical drivers and is ideal for diagnosing your system for hardware issues. However, if you want to troubleshoot third-party vendor software-related issues, try a clean boot on Windows . It lets you load your system with a minimal set of drivers and startup apps to isolate the cause triggering the conflict.
Also read:
- [New] In 2024, Essential Screen-Snapping Tips to Enhance Your Gaming Experience
- [New] In 2024, Premium Webcast Systems & Applications
- [New] In 2024, Quick Guide to Finding Exceptional Pexels Visuals
- [Updated] 2024 Approved The Economical Enthusiast's Guide to Game Recording
- [Updated] Investigating How T-Series Earns From YouTube Viewership
- Bypass 'Audacity Cannot Open Device' Challenge - Discover 5 Reliable Fixes
- Deciphering the Subtitle Conundrums on Prime Video for Windows 11 Users
- Fixing Saving Errors: Microsoft OS Guide
- In 2024, How to Migrate Android Data From Xiaomi Redmi 13C to New Android Phone? | Dr.fone
- In-Depth Review Xiaomi MI Drone 4K Capabilities for 2024
- Innovate Your Photos: Creating Stellar Slideshows & Image Fixes Using Win11 Photos App
- Mastering Troubleshooting: A Step-by-Step Guide to Making Windows 11 Speakers Functional
- Methodologies for Correcting Error 0X800700E1 on Windows 11
- Overcoming Quick Access: Use OneDrive First in Windows
- Play Store Stuck on Downloading Of Xiaomi Mix Fold 3? 7 Ways to Resolve | Dr.fone
- Red Alert! Purple Windows - Fixed in a Flash with These Tips
- Renewal Guide for Reinstating Apps From the Microsoft Store
- Step-by-Step Guide to Utilizing Windows 11’S Devs Space
- Techniques to Block Spotify's Auto-Play on PC
- Title: Swift Access to Safe Mode on Your Windows 11 PC
- Author: David
- Created at : 2025-01-01 19:23:40
- Updated at : 2025-01-06 16:52:27
- Link: https://win11.techidaily.com/swift-access-to-safe-mode-on-your-windows-11-pc/
- License: This work is licensed under CC BY-NC-SA 4.0.