Steps to Correct Nvidia Display Error Message

Steps to Correct Nvidia Display Error Message
The NVIDIA Control Panel is a quiet but powerful software that ships with your NVIDIA graphics card. It’s a fantastic tool to have when customizing your gaming experience, offering several graphics settings and customization options.
However, you may sometimes run into the “NVIDIA Display settings are not available” error message when trying to use it. When this happens, it’s a sign that your PC could be suffering from one of several issues native to the NVIDIA graphics card. Luckily, this article highlights some proven methods of getting your NVIDIA Control Panel app working again.
Disclaimer: This post includes affiliate links
If you click on a link and make a purchase, I may receive a commission at no extra cost to you.
What Is the NVIDIA Control Panel?
The NVIDIA Control Panel is a handy utility software used to access vital features of an NVIDIA graphics card. It provides several sliders, checkboxes, and dropdowns that allow you to configure the rendering of any 3D application compatible with your graphics card.
This software functions quite similarly to NVIDIA GeForce Experience, allowing you to customize graphics settings. In fact, most gamers prefer to use the lightweight GeForce Experience. However, the control panel is a more powerful alternative with much more advanced features.
Experienced gamers and people working with 3D applications like Houdini or Autodesk Maya find the most use of the NVIDIA Control Panel. It allows them to customize every single aspect of rendering, including VSync, antialiasing, texture sampling, raytracing, and other configurations.
In addition to rendering, the NVIDIA Control Panel allows you to customize the behavior of the NVIDIA PhysX physics engine . This feature allows you to achieve the perfect balance between the accuracy of the physics simulation and optimum performance on your Windows PC.
6 Methods to Fix the NVIDIA Control Panel
The benefits of using the NVIDIA Control Panel to improve your gaming experience on Windows can not be overstated. To that end, here are six methods of fixing “NVIDIA Display settings are not available” or any other issues you have with this software.
1. Check the Display Connection
Your PC generally has two types of display ports; Intel Integrated graphics and NVIDIA graphics hardware. If your monitor is connected to the wrong display port, the NVIDIA Control Panel will fail to detect the graphics card.
Before trying out software solutions, you should first identify the display ports and connect your monitor’s display adapter to the NVIDIA graphics hardware (discrete) port. Restart your computer after fixing the connection and check to see that it works.
2. Use VGA to HDMI Converter on Your Graphics Card
If the problem persists after connecting your display cable to the appropriate slot, you can try using a converter or changing the display adapter. One of the more popular converters is VGA to HDMI, which allows you to use one of the HDMI ports on your computer.
3. Update/Reinstall Graphics Card Drivers
Various factors can cause your graphics card drivers to stop working, preventing Windows from detecting the graphics card hardware. The drivers could be outdated, corrupted, or uninstalled. Moreover, third-party programs and Windows updates can also affect your drivers.
There are several methods of updating your graphics card driver. However, the easiest method is to use the GeForce Experience app. You could also go to NVIDIA’s official driver web page, but this method may require you to search for your graphics card driver manually.
To update your drivers, open GeForce Experience and switch to the drivers menu. Click the check for updates button to get the latest drivers for your graphics card. After checking for updates, download the most recent driver and follow the instructions to install it on your PC.
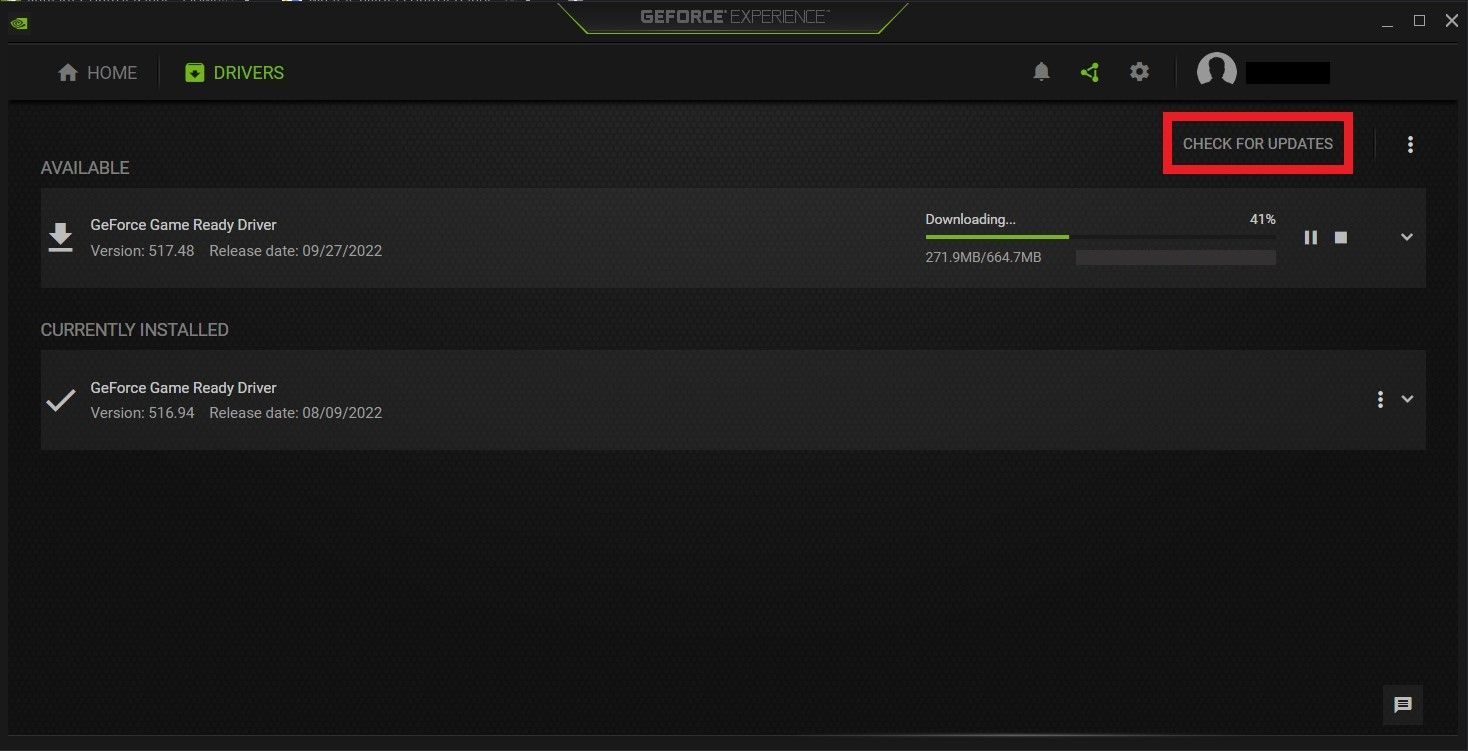
If you have the latest driver for your graphics card, the GeForce Experience app gives you the option to reinstall the driver and fix any problems with the current installation.
4. Enable All NVIDIA Services
NVIDIA has several services running on your computer that manage your display driver and ensure its smooth operation. They serve as an intermediary between your graphics card hardware and the Windows operating system.
If one or more of them stop working, your PC, and by extension, the NVIDIA control panel, will not detect the graphics card. To fix this problem, you must enable or restart all NVIDIA services. These services include:
- NVIDIA Display Container LS
- NVIDIA Telemetry Container
- NVIDIA LocalSystem Container
- NVIDIA NetworkService Container
In order to enable these services, press Win + R to open the Run program, then type services.msc in the search bar and hit Enter. Find any of the services mentioned earlier, right-click, and select properties.

Find the Startup type drop box in the properties window and set it to Automatic. If the service is running, click the Stop button, wait a few minutes, and click Start. Next, click Apply then OK to save your changes. Repeat these steps for all the NVIDIA services and check that the NVIDIA control panel is now working.
5. Disable and Re-enable the Graphics Card
Windows updates or third-party software can disable, uninstall or corrupt your NVIDIA graphics card. Consequently, the control panel may not be able to display NVIDIA settings.
To try this method of fixing the control panel, press the Windows key and type Device Manager in the search bar. After opening the device manager, expand the display adapters section and look for your NVIDIA graphics card. Right-click on it and select Disable device.
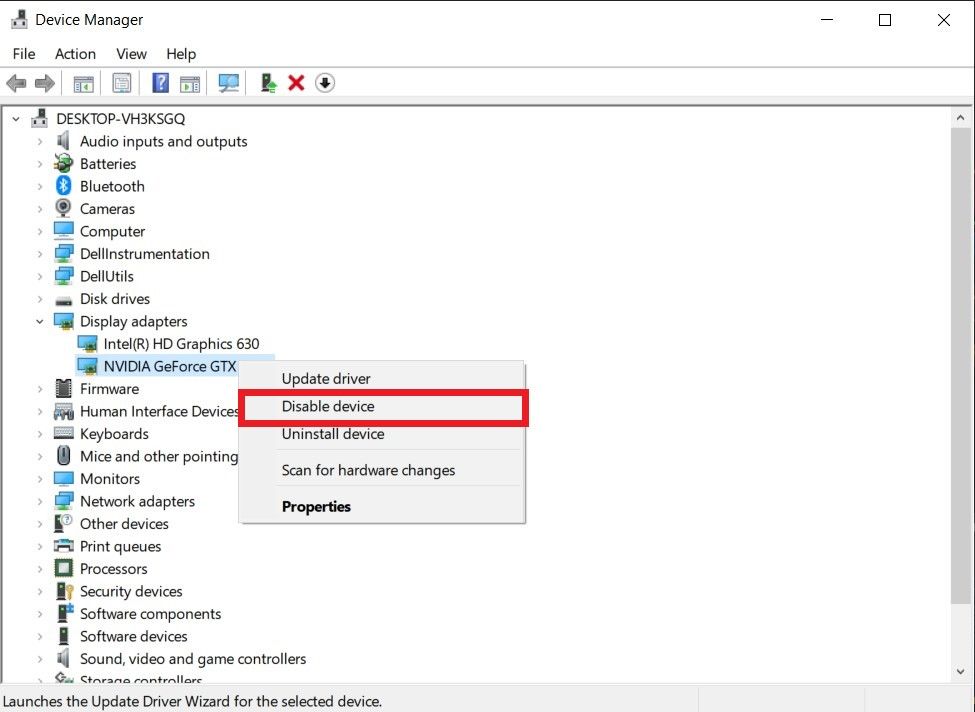
Restart your PC and open the device manager . Then, right-click on your graphics card and select Enable device. Restart your computer again to save your changes.
6. Reinstall the NVIDIA Graphics Drivers and the Control Panel
If all else fails, you can uninstall all NVIDIA apps and services from your Windows PC and reinstall them. Doing so will reinstall the NVIDIA Control Panel on your computer.
First off, you need to boot your Windows PC into safe mode . Next, open the device manager, right-click on your NVIDIA graphics card, and select Uninstall.
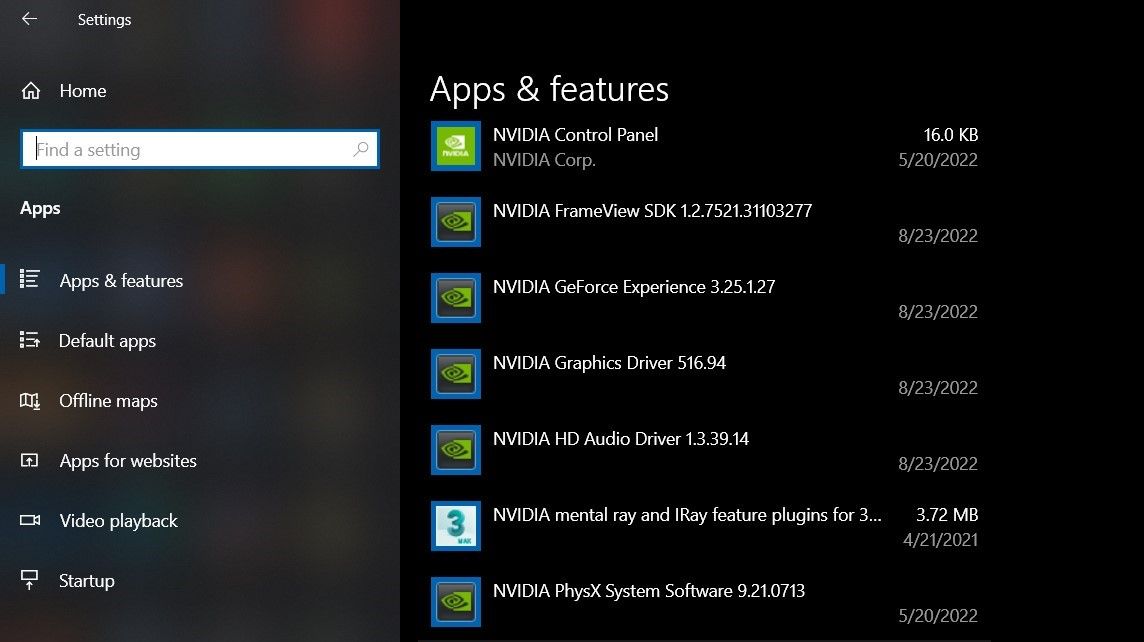
After uninstalling the graphics card, navigate to Settings > Apps > Apps and features and uninstall all apps from NVIDIA corporation. Restart your PC and go to the official GeForce drivers webpage to download a driver for your graphics card.
Run the driver installer and select the Custom installation option. Ensure you tick the Perform a clean installation checkbox to override any previous NVIDIA settings. This setup will install all the necessary apps and services NVIDIA needs to manage your graphics card properly.
How to Get the Most Out of the NVIDIA Control Panel
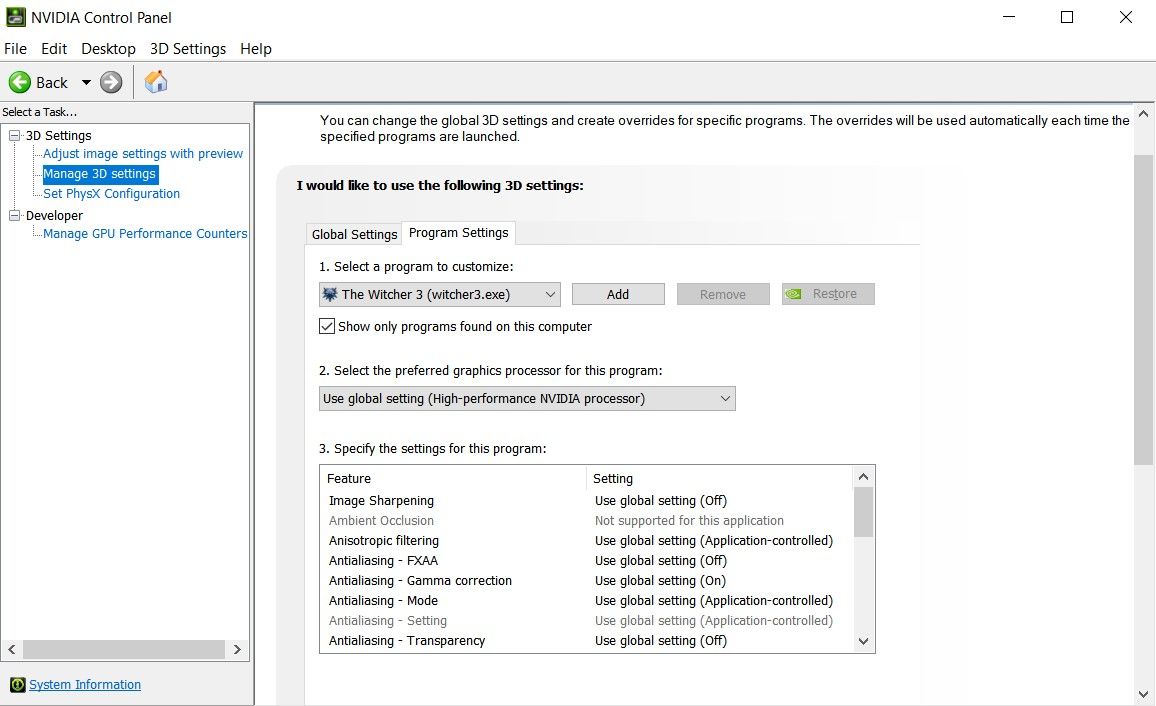
Before using the NVIDIA Control Panel to customize your graphic settings , you must ensure it is properly installed on your computer. You can right-click on an empty portion of your desktop and select NVIDIA Control Panel in the pop-up menu. Alternatively, press the Win key and search for the NVIDIA Control panel.
If you can’t find this software using either method, you can follow our guide on how to fix a missing NVIDIA Control Panel .
Opening the NVIDIA Control Panel for the first time presents you with a quick settings menu that allows you to balance performance and quality using a slider control. If you want finer-grained control of your graphics settings, navigate to the Manage 3D settings section.
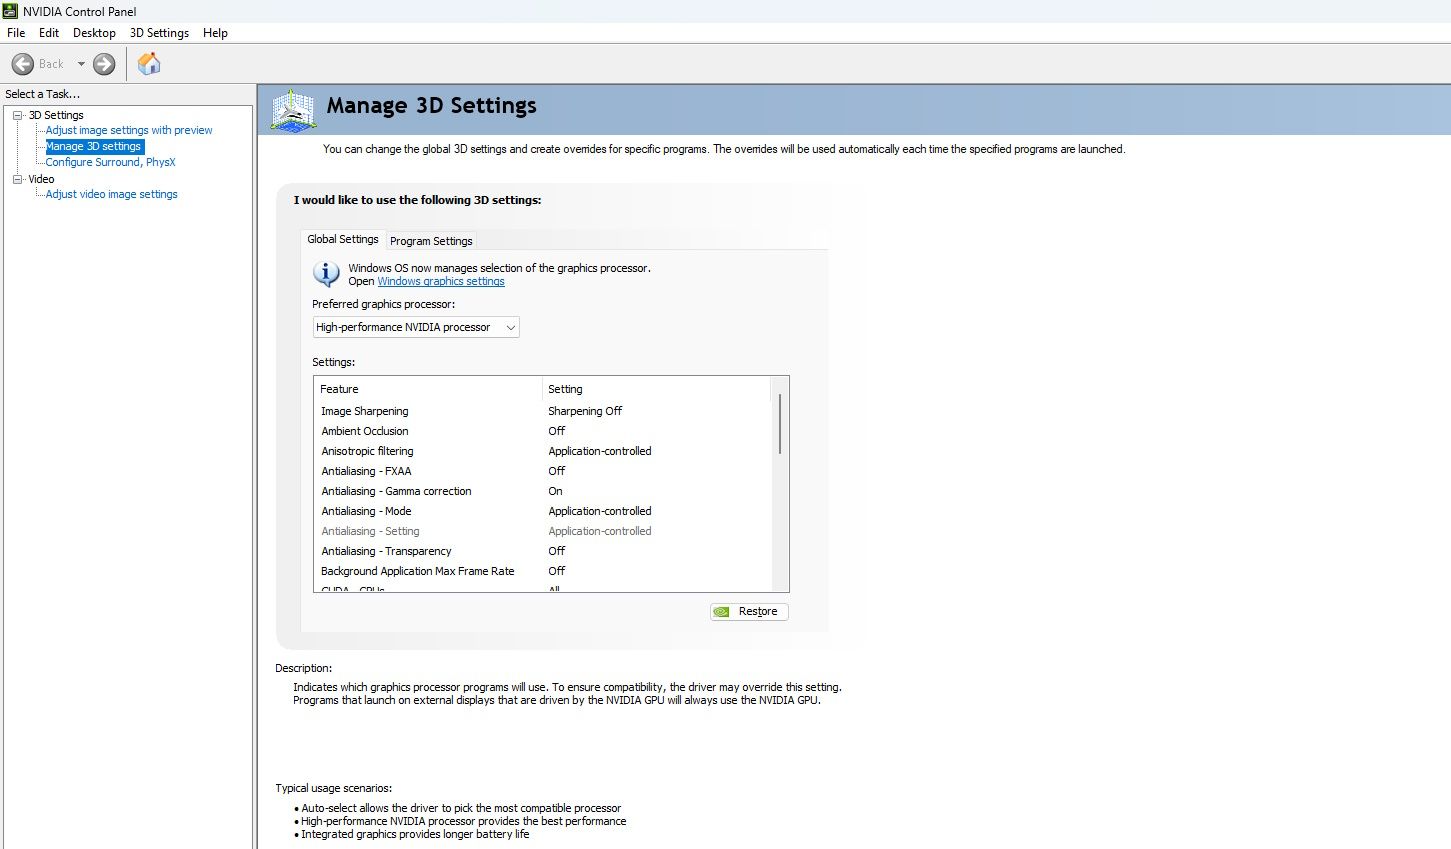
While the graphics quality of most applications largely depends on the hardware, the NVIDIA Control Panel helps to improve resolution and provide better picture quality. You can tweak anisotropic filtering or DLSS to get sharper images and much higher resolutions than the application supports.
These settings can be applied globally or customized for individual applications. You can also choose your preferred graphics processor or let the PC decide based on available power and application requirements.
The Future of Gaming Graphics
The NVIDIA control panel is important for any serious gamer that wants a competitive advantage over their contemporaries. Hence, you must ensure that it works correctly on your Windows PC. Luckily, we have outlined several methods you can try to fix any problems with this software.
If you’re still not convinced of the usefulness of the NVIDIA control panel, perhaps NVIDIA’s DLSS will sway you. Similar to AMD’s FSR, this software promises to revolutionize gaming graphics. It employs artificial intelligence and other software solutions to generate high-quality frames from low-quality input.
If your graphics card supports DLSS, you can use GeForce Experience or NVIDIA Control Panel to customize its settings.
The NVIDIA Control Panel is a quiet but powerful software that ships with your NVIDIA graphics card. It’s a fantastic tool to have when customizing your gaming experience, offering several graphics settings and customization options.
However, you may sometimes run into the “NVIDIA Display settings are not available” error message when trying to use it. When this happens, it’s a sign that your PC could be suffering from one of several issues native to the NVIDIA graphics card. Luckily, this article highlights some proven methods of getting your NVIDIA Control Panel app working again.
Also read:
- [New] Flawless Illustration From Photographs Cross-Platform Compatibility for 2024
- [New] Harmonizing Your Spotify Queue with YouTube Music Catalogs for 2024
- Curb the Rogue Cursor: Fixes for Windows 11 Glitches
- Decoding Windows Error 0X8007251D: Effective Fixes
- Discover the Hidden Powers of Windows 11'S God Mode
- Epic's Easy Routine to Keep Your Gaming Successes Safe
- Exploring the Ultimate Gamer Smartphones of 2N - Insights & Rankings by ZDNet
- Guide to Overcoming OBS Recording Problem on New Windows Version
- In 2024, Why Your WhatsApp Location is Not Updating and How to Fix On Itel P55+ | Dr.fone
- Preemptive Steps: Make Windows Ready for VBox
- Remedying 'Could Not Start' Speech Recognition Errors Windows
- Showcase Splendor Best Cover Apps for iPhones & Android for 2024
- Silent Mac No More – Expert Tips for Boosting Your Computer's Speakers Back to Life
- The Ultimate Guide to Bypassing iCloud Activation Lock on iPhone 15 Pro
- Troubleshooting Tips: What to Do When Your Amazon Fire TV Remote Fails
- Uncovering Signs: 7 Windows Tasks that May Infect
- Why does the pokemon go battle league not available On Xiaomi Redmi A2 | Dr.fone
- Title: Steps to Correct Nvidia Display Error Message
- Author: David
- Created at : 2024-11-02 16:40:53
- Updated at : 2024-11-07 17:18:26
- Link: https://win11.techidaily.com/steps-to-correct-nvidia-display-error-message/
- License: This work is licensed under CC BY-NC-SA 4.0.