Step-by-Step: How to Tweak Power Settings in Windows

Step-by-Step: How to Tweak Power Settings in Windows
Your Windows laptop features a handy battery saver mode that allows you to stretch your device’s battery life. Windows archives this by lowering the screen brightness, limiting background processes, and disabling certain visual effects and animations.
Here we show you how to enable or disable battery saver mode on your Windows 10 or 11 laptop.
Disclaimer: This post includes affiliate links
If you click on a link and make a purchase, I may receive a commission at no extra cost to you.
1. How to Enable or Disable Battery Saver Mode Using Quick Settings
TheQuick Settings panel in Windows provides access to frequently used features such as Wi-Fi, Bluetooth, Airplane Mode, and others. You can also access this panel to turn the battery saver mode on or off quickly.
Simply pressWin + A to open the Quick Settings panel, and then click theBattery saver icon to enable or disable it.
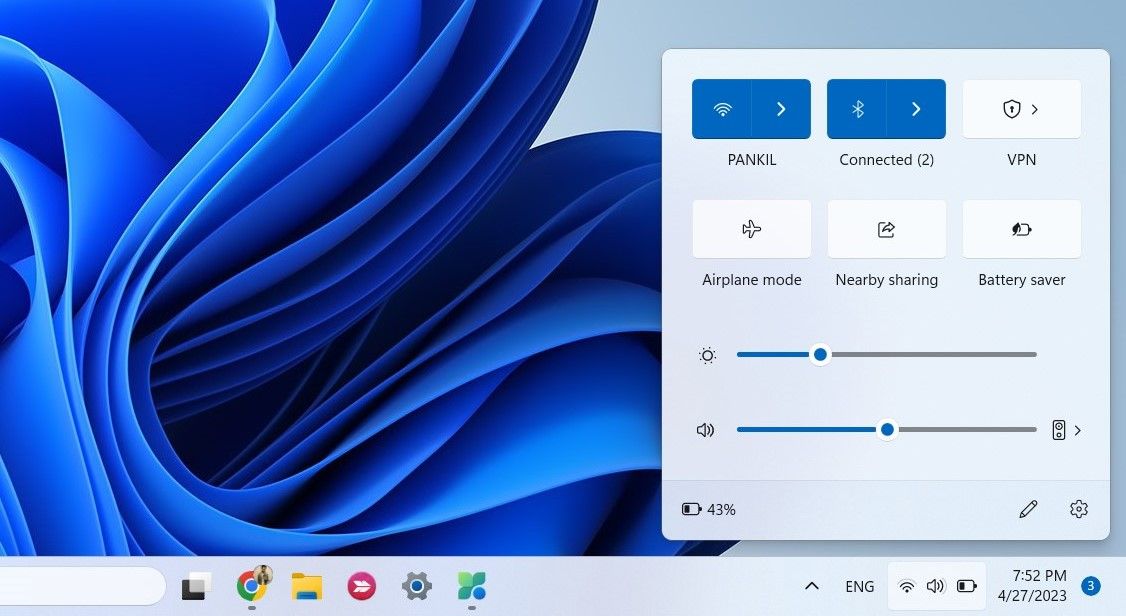
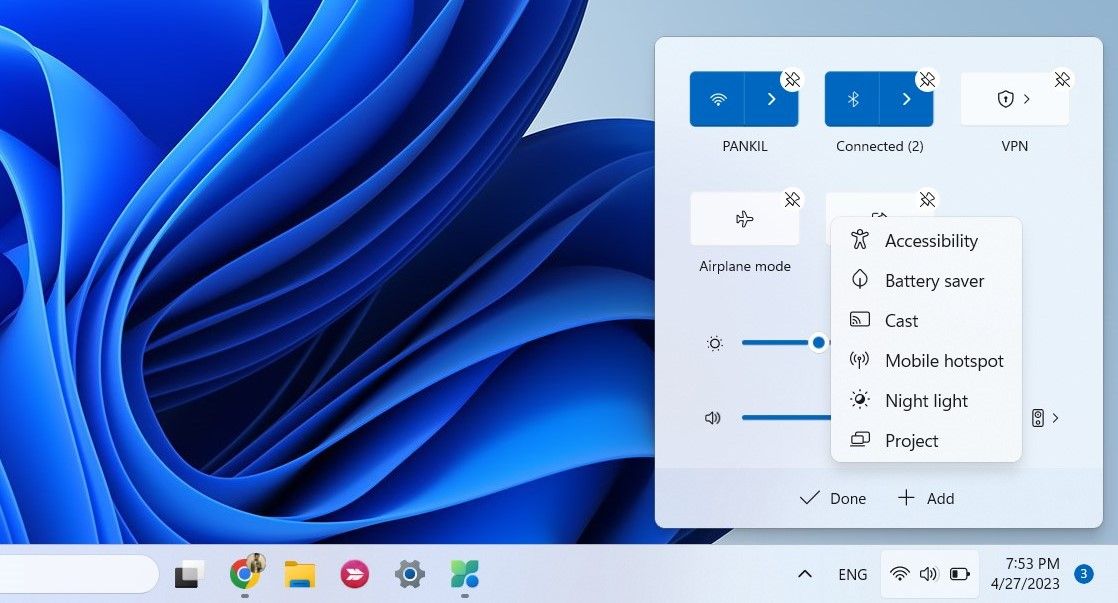
In case the Battery saver icon is missing, you can add it manually. Click thepencil icon at the bottom, and then selectAdd > Battery saver .
2. How to Enable or Disable Battery Saver Mode Using the Settings App
Another way to turn the battery saver mode on or off in Windows is via the Settings app. To do so, use these steps:
- Right-click on theStart icon and selectSettings from the list.
- In theSystem tab, click onPower & battery .
- UnderBattery , click onBattery saver to expand it.
- Click theTurn on now button to enable battery saver mode.

If the battery saver mode is on, you will see theTurn off now button instead. Further, plugging your laptop into a power outlet will also disable the battery saver mode.
3. How to Configure the Battery Saver Mode to Turn On Automatically on Windows
Don’t want to enable the battery saver mode manually all the time? No problem. You can configure Windows to activate battery saver mode automatically whenever the battery level drops below a specific percentage. To do so, you can use the Windows Settings app. Here are the steps you can follow.
- PressWin + I to open the Settings app.
- Navigate toSystem > Power & battery .
- Click onBattery saver to expand it.
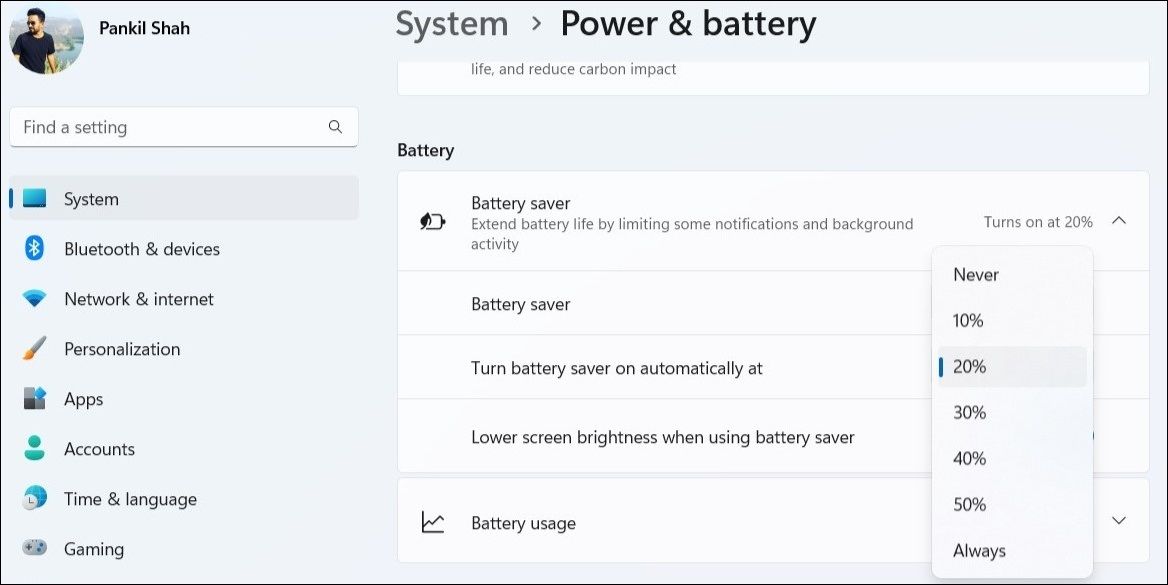
- Click the drop-down menu next toTurn battery saver on automatically at and select your preferred battery level.

You can also prevent Windows from enabling battery saver mode on its own by selectingNever . Alternatively, if you want the battery saver mode to be enabled at all times, chooseAlways instead.
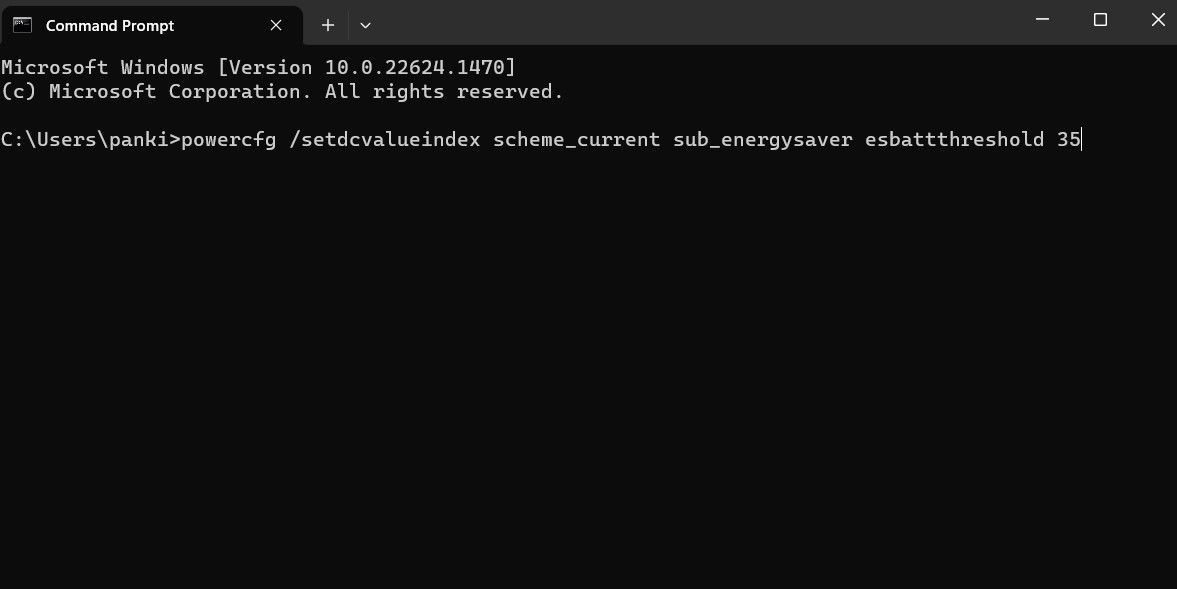
Although the Settings app is the most commonly used method for configuring the battery saver mode in Windows, it’s not the only option available. You can also use a command-line tool like Command Prompt or Windows PowerShell to configure the battery saver mode to turn on automatically. Here are the steps for the same.
- Use one of themany ways to open Command Prompt or PowerShell on your PC.
- Type the following command in the console and pressEnter .
powercfg /setdcvalueindex scheme_current sub_energysaver esbattthreshold <BatteryPercentage>
Replace**
While PowerShell and Windows Terminal may look similar, they act very differently. Check our detailed guide to learnthe differences between PowerShell and Windows Terminal .
Easily Enable or Disable Battery Saver Mode on Windows
Battery saver mode in Windows can come in handy when you’re away from a power source. However, it’s important to note that leaving battery saver mode on all the time can impact certain features, such as notifications and background app sync. Hence, it’s best to enable battery saver mode only when necessary.
Also read:
- [New] 7 Top-Rated Free Mobile Apps for Video Downloads
- [New] In 2024, Unlocking the Power of High Dynamic Range in Photography
- [New] Maximizing iPhone HDR Quality with Post-Production Tricks in Premiere Pro
- [Updated] M1 Pro Vs. M1 Max A Detailed Comparison of Apple Chipsets for 2024
- Easy Drag & Drop File Upload Feature
- Ensure Your Windows Device Works Seamlessly with Updated Zebra Printer Drivers - Here's Where to Get Them
- How To Unlock Infinix Note 30 Pro Phone Without Password?
- In 2024, Precision Meetings Sharpen Your Screens in MSTEAM
- Simultaneously Opening Two Excel 2013 Workbooks on Different Screens
- Step-by-Step Guide: Changing Cell Orientations and Text Directions in Excel Spreadsheets
- Step-by-Step Guide: Combining Columns Effectively in Microsoft Excel
- Step-by-Step Guide: Constructing a Location-Based Geographic Visualization with Excel
- Step-by-Step Guide: Crafting Custom Chart Templates in Excel
- Step-by-Step Guide: Turning Off AutoFill Feature in Microsoft Excel
- Steps to Locate External Workbook Links Within Microsoft Excel
- Strategies for Effective Household Budget Planning Using Microsoft Excel
- Troubleshooting and Solving the Problem of Arrow Button Navigation in Microsoft Excel
- Unleashing Audio Delights The Art of Apple Podcast Download for 2024
- Why Your WhatsApp Live Location is Not Updating and How to Fix on your Infinix Hot 40 Pro | Dr.fone
- Title: Step-by-Step: How to Tweak Power Settings in Windows
- Author: David
- Created at : 2024-11-26 01:55:22
- Updated at : 2024-11-28 01:42:01
- Link: https://win11.techidaily.com/step-by-step-how-to-tweak-power-settings-in-windows/
- License: This work is licensed under CC BY-NC-SA 4.0.

