
Step-by-Step Guide: Tallying Selections with Excel's Formulas

Step-by-Step Guide: Tallying Selections with Excel’s Formulas
Quick Links
Key Takeaways
First, designate cells to hold “True” or “False” results based on the state of each checkbox. You can then count up the checkboxes by using Excel’s COUNTIF function to count the number of “TRUE” results.
If you use Excel to create a checklist , you may want to count the number of checked or unchecked boxes. With a simple formula, you can tally them in a cell that adjusts as more boxes are marked or unmarked.
Designate Cells for the Checkbox Controls
When you check a box in Excel, the result of the check is True. For unchecked boxes, the result is False.
So, before you create the formula to count your checkboxes , you’ll need to designate cells to hold the True or False result. You’ll then use that result in your formula.
Related: How to Count Checkboxes in Google Sheets
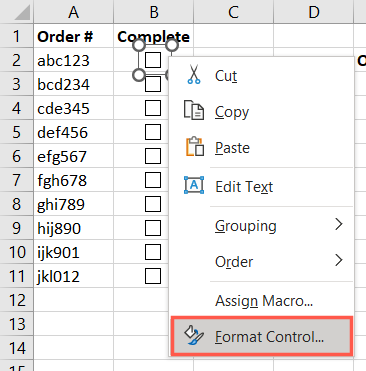
Right-click your first checkbox and select “Format Control” in the shortcut menu.
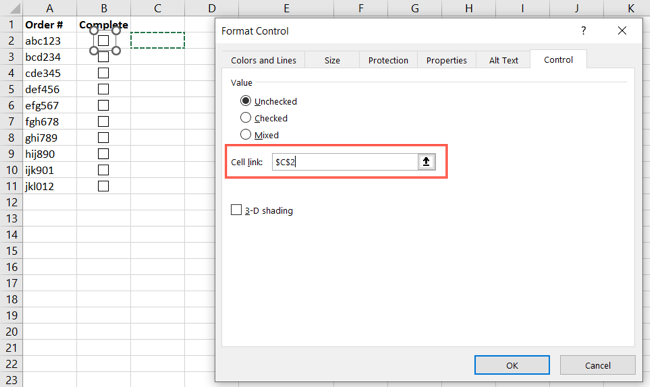
In the Format Control box that appears, go to the Control tab. In the Cell Link box, enter the cell where you want to display the True or False result. You can also select the cell in your sheet to populate that box.
Click “OK” to save the change.
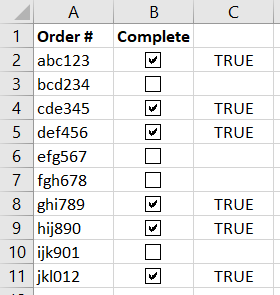
Follow the same process for the other checkboxes that you want to count in your sheet.
You should then see the True result for checked boxes and False for unchecked boxes in the designated cells.
If you set the default Value for the checkbox as Unchecked, it won’t display False unless you check the box and then uncheck it.
Use the COUNTIF Function
Once you have the checkboxes set up , go to the cell where you want to display the count.
You’ll then enter a formula for the COUNTIF function that displays a count for either True or False, depending on which you want to count.
Related: How to Use the COUNT Function in Microsoft Excel
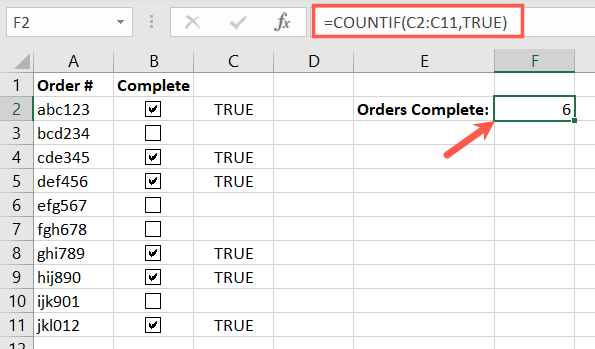
As an example, we are counting the checked boxes in cells B2 through B11 using their results in cells C2 through C11. So, you’ll use the result cells in your formula as follows:
=COUNTIF(C2:C11,TRUE)
You can see that we received the correct count of 6 for our checked boxes.
To count the unchecked boxes instead, simply replace True with False in the formula:
=COUNTIF(C2:C11,FALSE)
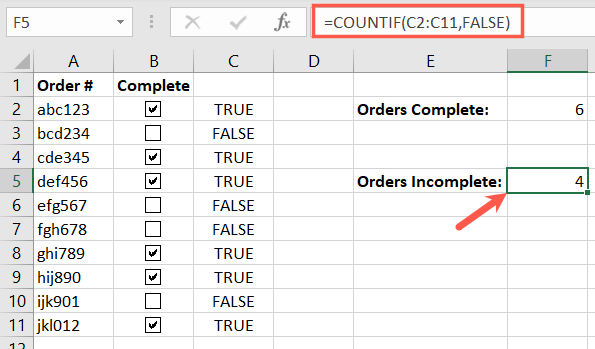
If you set the default Value for the checkbox as Mixed, it will not count toward the True or False result. It displays as #N/A until the box is checked or unchecked.
Optional: Hide the Result Cells
It may not be ideal to display the True and False results in your sheet. It might be distracting from the data you want to see.
If you have the results in a single column or row without any other data you need, you can simply hide the column or row .
Related: How to Hide Cells, Rows, and Columns in Excel
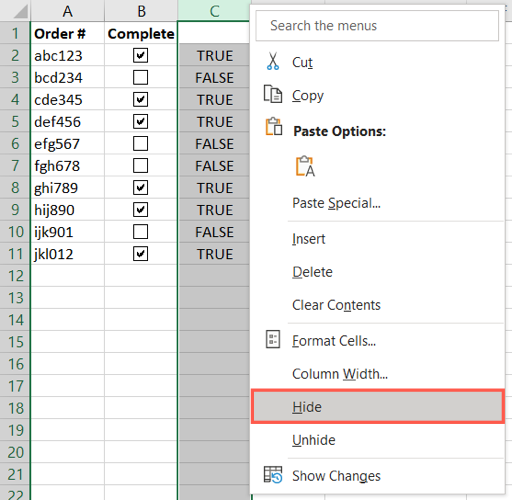
Right-click the column or row and pick “Hide” in the shortcut menu.
The formula for the checked or unchecked boxes will work just the same with the results hidden.
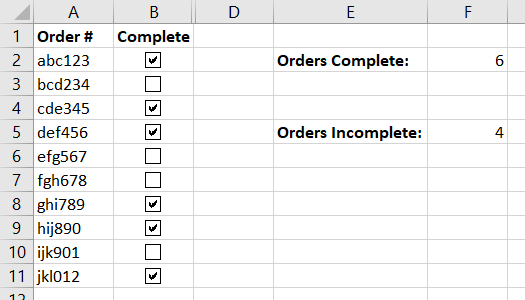
Counting the number of completed tasks, incomplete orders, or something similar is easy to do with the COUNTIF function and a bit of checkbox manipulation in Excel.
For more, check out how to use checkboxes in your Word documents too.
Also read:
- [New] Beyond the Screen VR's Creative Applications
- [New] In 2024, Capture YouTube's Iconic Icons Online Tools, Desktop Software & Commands
- [Updated] 2024 Approved Unraveling Video Opposites A Comprehensible Guide for InstaVids
- [Updated] Top-Rated WebCam Recorder Applications Demystified
- 2024 Approved Mastering Facebook Livestreams Four Easy Steps
- Easy Fixes to Lower Desktop Window Manager's Power Use
- Enhancing Windows Security: Lock & Sleep Timer
- How to Fix the Mobile Hotspot Not Working in Windows 11
- In 2024, How to Reset Apple ID and Apple Password On Apple iPhone 14 Pro Max
- Mastering GPU Settings in Windows 11 & 11
- Step-By-Step: Setting up Windows Hello for Sign In
- Strategies for Overcoming Verified App Issues in Windows
- Strategies to Fix Roblox's Error 403 in a Windows Sphere
- Taming Closed Caption Glitches: A Win 10 Solution
- The Old Girls' Book of Dreams | Free Book
- Tom's Computer Gear: Ultimate Guide
- Unlock Your Samsung Galaxy M54 5Gs Potential The Top 20 Lock Screen Apps You Need to Try
- Title: Step-by-Step Guide: Tallying Selections with Excel's Formulas
- Author: David
- Created at : 2025-01-04 17:20:15
- Updated at : 2025-01-06 16:53:57
- Link: https://win11.techidaily.com/step-by-step-guide-tallying-selections-with-excels-formulas/
- License: This work is licensed under CC BY-NC-SA 4.0.