Seamless Linux Access via Windows Subsystem

Seamless Linux Access via Windows Subsystem
Disclaimer: This post includes affiliate links
If you click on a link and make a purchase, I may receive a commission at no extra cost to you.
Key Takeaways
- You must enable Windows Subsystem for Linux (WSL) before you can install a Linux distribution on a Windows PC.
- Not all Windows 10 versions are compatible with WSL, but all Windows 11 versions are.
- The updated WSL2 is more convenient and gives better performance, but you can switch to WSL1 to suit specific needs.
If you want to run a Linux terminal on Windows, your best bet would be to enable Windows Subsystem for Linux (WSL), a gateway opener that allows you to install a Linux bash shell on a Windows OS. Once you’ve enabled WSL, you can install a Linux distro.
Requirements for Running WSL on Windows 10
Before you enable Windows Subsystem for Linux, you should know of the minimum requirements needed to run WSL.
According to Microsoft , you should be running Windows 10 (64-bit) version 2004 or higher with Build 19041 or higher.
All Windows 11 versions can run WSL.
If you’re not sure of your Windows 10 flavor, it’s easy to check which version of Windows 10 you have installed .
Some older versions of Windows 10 can also work, but you’ll have to manually install WSL.
How to Enable Windows Subsystem for Linux
In order to install the Linux bash shell on Windows 10, you first have to enable Windows Subsystem for Linux.
You’ll know if WSL isn’t enabled because you’ll run into the error: “The Windows Subsystem for Linux optional component is not enabled. Please enable it and try again.”
Here’s how to enable WSL in Windows 10:
You first need to get into Windows Programs and Features.
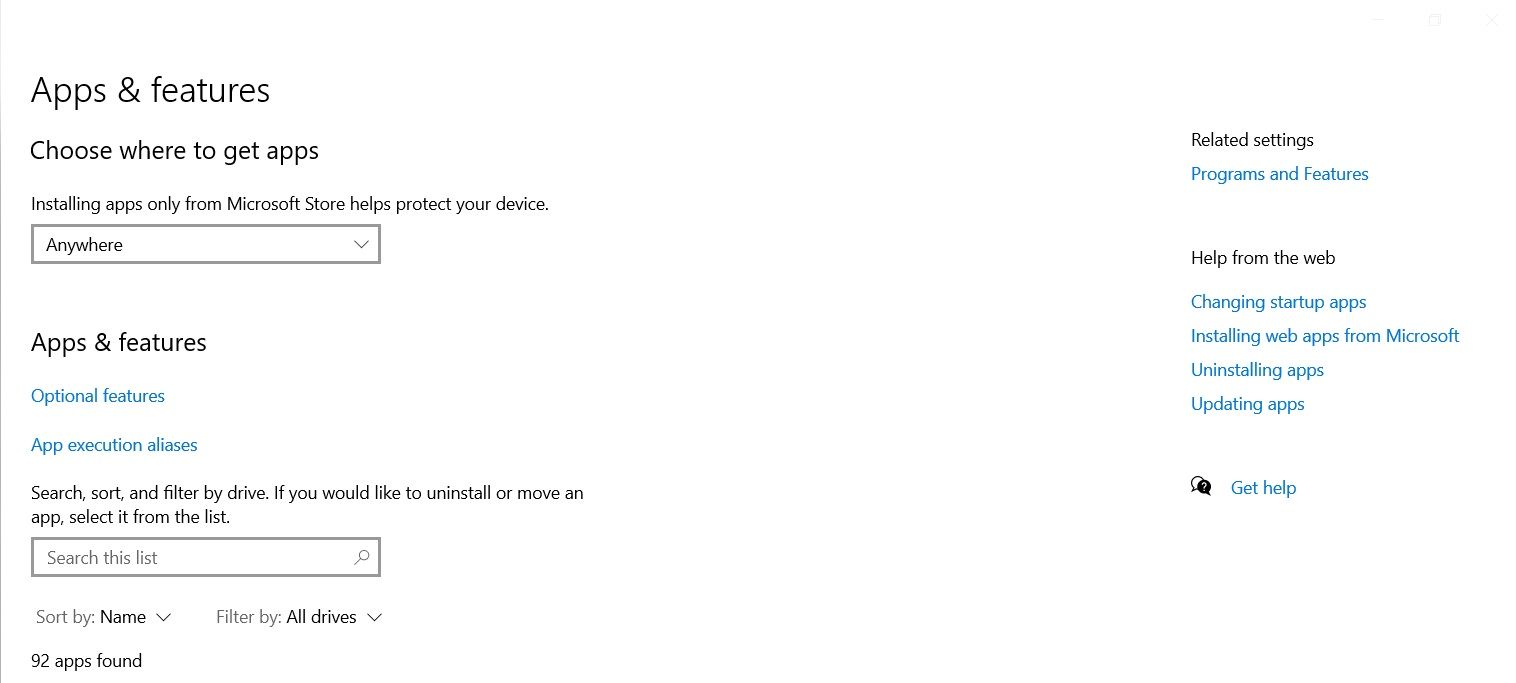
- Open Windows 10 Settings and select Apps.
- On the right side of the window, under Related settings, click on Programs and Features.

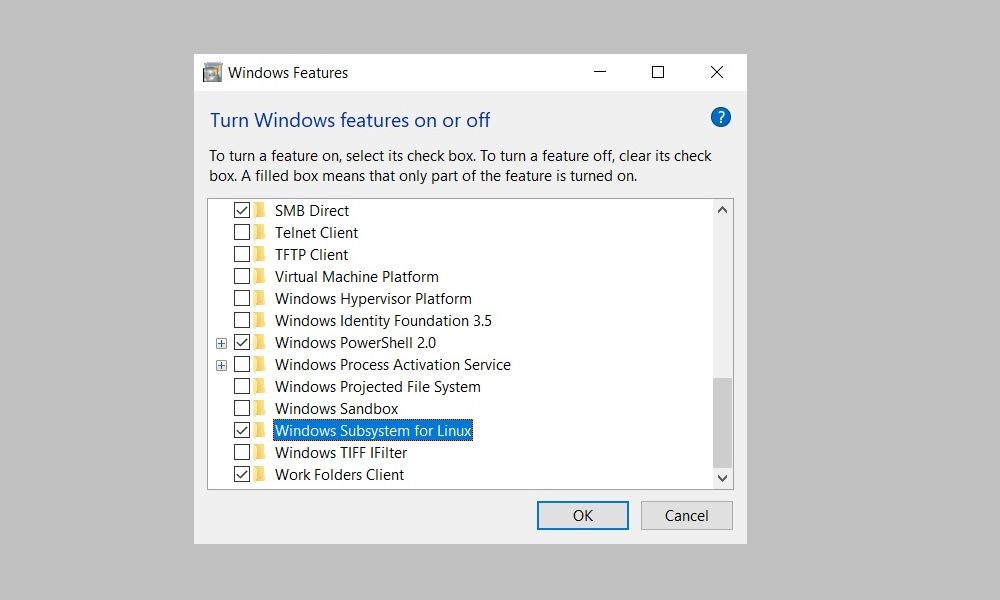
Once you’re in, click on Turn Windows features on or off on the left panel. Then scroll down and check the corresponding box to enable Windows Subsystem for Linux.

Click OK to save your changes and hit Restart now to finish the process.
Installing WSL on a Windows Machine
With WSL enabled on your Windows device, you can install Windows Subsystem for Linux . After that, you can install any supported Linux distro right inside your Windows PC. Choosing a small, lightweight Linux distro might be helpful.
You can also install a Linux desktop in Windows that gives you a graphical UI to work with.
WSL1 or WSL2: Which Is Better For You?
WSL2 is an upgraded version of Windows Subsystem for Linux and is now the default when installing a Linux distribution in Windows. It works with Windows 11 or Windows 10, Version 1903, Build 18362 or higher.
There are a few differences between the two versions of WSL; chiefly, WSL2 offers better performance in addition to support for full system call compatibility and IPv6 support. Also, WSL2 uses a full Linux kernel inside a managed virtual machine (VM), so you don’t have to set up and manage a VM to run a Linux distro.
Reasons to Switch to WSL1
While the latest version of WSL offers better performance and a wider range of support, there are reasons you may want to use the older version. This is because WSL1 runs with older versions of VMware and VirtualBox—and WSL2 does not, although it is compatible with the latest versions of VirtualBox and VMware, which both support Hyper-V.
The main reason to use WSL1 instead of WSL2 is that it offers better performance across OS file systems—a hurdle that can be overcome by creating your project files in the Linux file system.
With WSL enabled and a Linux distro installed, you’ll be on your way to executing commands.
If you want to run a Linux terminal on Windows, your best bet would be to enable Windows Subsystem for Linux (WSL), a gateway opener that allows you to install a Linux bash shell on a Windows OS. Once you’ve enabled WSL, you can install a Linux distro.
Also read:
- [Updated] Effortlessly Post TikTok Videos on Twitter for 2024
- [Updated] Iconic 2 Written By Jake Simonson | Date March 14, 2023
- [Updated] Premiere Pro Vanishing Art
- Crafting Co-Exclusive Brands and YouTube Experiences
- Decoding the Meaning of Office Error 0X80041015
- Free Online Transformation of MPEG Videos to MP4 - Seamless Editing with Movavi's Tools
- How to Disable Automatic Playback for Spotify
- How to Exit Android Factory Mode On Vivo V27e? | Dr.fone
- In 2024, How to Unlock Samsung Galaxy A25 5G Phone with Broken Screen
- Overcoming Share Failures in NVIDIA’s Windows Application
- Revitalize Your Lenovo Yoga 300/720/710: A Guide to Three Key Reset Strategies for Free
- Reviving the Unseen: Effective Tactics for Off-Screen Windows in Win10/Win11
- Tackling Windows Media Non-Playability Issue
- The Essentials of Windows-Based Call Logging
- The Power of Pushbuttons: Managing Apps on Taskbar & Tray
- Top 15 Augmented Reality Games Like Pokémon GO To Play On Xiaomi 13 Ultra | Dr.fone
- Top 7 Tips: Resolving Windows 11 Low Signal Issues
- Troubleshooting Admin Access in CMD: Steps for Resolution
- Why Isn't My WoW Voice Chat Functioning? Expert Advice on Getting Back Online Communication.
- Title: Seamless Linux Access via Windows Subsystem
- Author: David
- Created at : 2024-10-26 19:06:04
- Updated at : 2024-11-01 19:35:08
- Link: https://win11.techidaily.com/seamless-linux-access-via-windows-subsystem/
- License: This work is licensed under CC BY-NC-SA 4.0.