
Rotate Window Viewing Angle Windows-Style
Rotate Window Viewing Angle Windows-Style
While the default landscape orientation on your Windows computer is suitable for most tasks, there can be times when you need to change it. Whether it’s for work, creative endeavors, or simply personal preference, rotating the display on your Windows computer is quick and easy.
Here, we share three methods for changing the display orientation on your Windows computer.
1. Change Windows Display Orientation via the Settings App
The Display section in the Windows Settings app makes it easy for you to modify things like screen brightness , color, layout, scale, and more. Additionally, it also offers the option to change the display orientation on your Windows 10 or 11 computer.
Use the following steps:
- Press Win + I or use one of the many ways to open the Settings app .
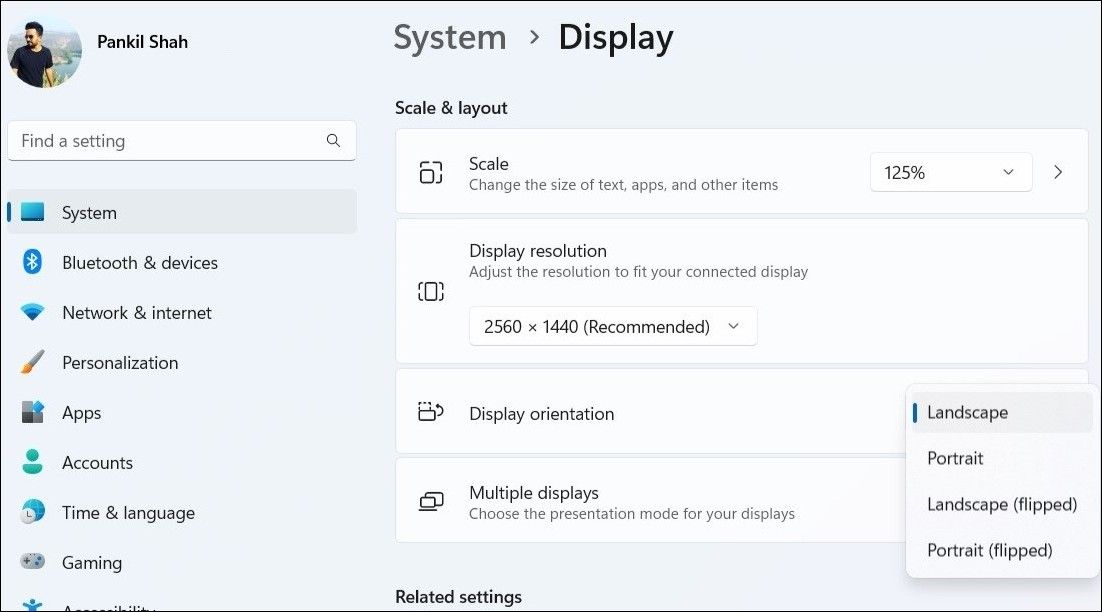
- Head over to System > Display.
- Click the drop-down menu next to Display orientation to select from the available options: Landscape, Portrait, Landscape (flipped), and Portrait (flipped).
- Click the Keep changes button to confirm.

Once you have completed the above steps, Windows will rotate your screen 90 degrees, 180 degrees, or 270 degrees, depending on the option you select.
2. Change Windows Display Orientation via the Graphics Control Panel
Apart from the system settings, you can also use the built-in graphics control panel to change the display orientation on Windows. However, the exact steps for doing so will depend on the type of graphics card installed on your PC .
Here’s how you can rotate your screen using the Intel Graphics Command Center and the NVIDIA Control Panel.
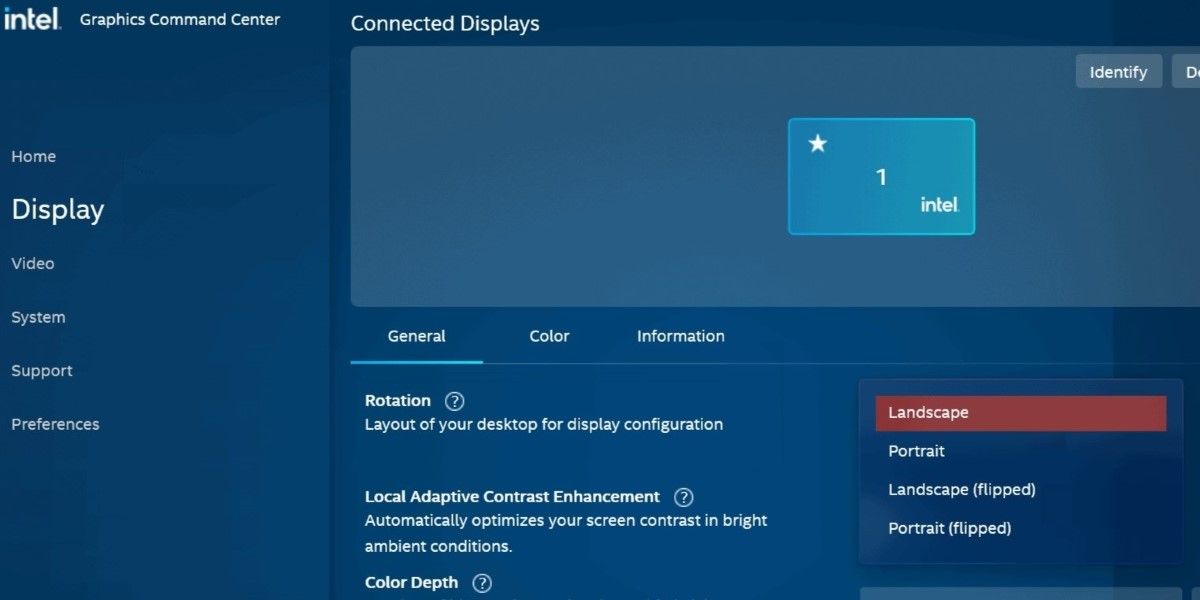
Change the Display Orientation Using the Intel Graphics Command Center
- Click the magnifying icon on the taskbar or use the Win + S keyboard shortcut to open the search menu.
- Type Intel Graphics Command Center in the box and press Enter.
- Select the Display tab from the left pane.
- Under the General tab, click the drop-down menu next to Rotation to select your preferred display orientation.
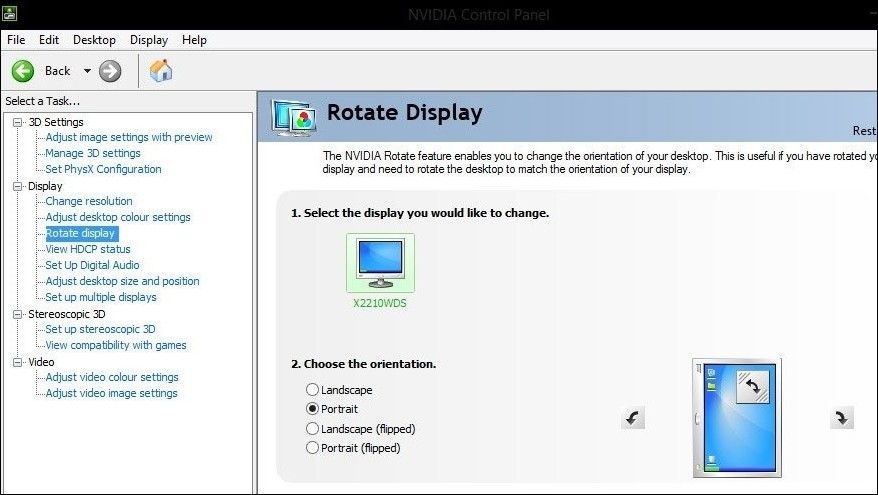
Change the Display Orientation Using the NVIDIA Control Panel
- Open the NVIDIA Control Panel using the search menu.
- Double-click the Display menu in the left pane to expand it.
- Click the Rotate display option.
- Select your preferred orientation in the right pane.
- Click the Apply button to save the changes.
3. Change Windows Display Orientation With Keyboard Shortcuts
Another quick way to rotate your Windows computer’s screen is to use keyboard shortcuts. This method can be especially useful if you frequently need to switch between different display orientations.
Here are the keyboard shortcuts you can use to rotate your computer screen.
- Ctrl + Alt + Right arrow: Rotates your screen clockwise by 90 degrees (portrait-flipped).
- Ctrl + Alt + Left arrow: Rotates your screen counterclockwise by 90 degrees (portrait).
- Ctrl + Alt + Down arrow: Rotates your screen 180 degrees (landscape-flipped).
- Ctrl + Alt + Up arrow: Resets your screen to its original orientation (landscape).
It’s important to note that the above keyboard shortcuts may not work on all Windows computers. If they do not work on your PC, you can use the Settings app or the built-in Graphics Control Panel to make the necessary adjustments.
Changing the Display Orientation on Windows Is Easy
Knowing how to change the display orientation on Windows can be helpful if you have a laptop with a rotatable screen or an external monitor that allows rotation.
Whether you choose to use a keyboard shortcut or the Windows Settings app, the process of rotating your screen is relatively easy so you can go back and forth quickly without having to keep digging into the Settings menu. Just remember that changing the display orientation also affects the cursor, so you’ll have to adjust your mouse movement accordingly.
Here, we share three methods for changing the display orientation on your Windows computer.
Also read:
- [New] 2024 Approved The Best GIF Maker Applications for Creative Freedom
- 2024 Approved Exploring the Capabilities of Toolwiz – A Comprehensive Mobile Review
- 2024 Approved Unleashing the Potential of YouTube Live In-Depth Insights Into WireCast Streaming
- Comprehensive Review: Navigating Through Google Voice Features
- Customize Windows: Using Spotlight Pictures for Dynamic Backdrops
- Effortless Blending of WIN Product Key & MICROSOFT ACCOUNT
- Essential Tips for Installing Kali Linux on PC
- Explore the Extent: Using GPT-My Bots for Game Strategy and Imagery
- Guide to Overcoming Frozen State of Essential WSReset
- Official HP Deskjet 2700 All-in-One Printer Drivers: Updated Guide [Free]
- Proposing Top Changes for the Taskbar in Next-Gen Windows 11 UX
- Techniques to Bypass Difficulty in Installing Version 22H2 of Win11 Updater
- The Comprehensive Breakdown of Huion's Luxurious Kamvas GT- 191 Masterpiece Pen Display
- The Insider’s Guide to Winstall and Application Groups in Windows 11
- Unveiling Window's Top Security Programs for Privacy (150 Chars)
- Updated Maximize Your Online Presence 10 Best Free Video Hosting Sites for 2024
- Why Hold Off on New Games: A Look at Four Persuasive Arguments for a Gaming Break This Year
- Windows 11 DXGI Correction for Removed Devices
- Windows 11 Login Woes: A Comprehensive Solution
- Title: Rotate Window Viewing Angle Windows-Style
- Author: David
- Created at : 2025-01-16 21:27:54
- Updated at : 2025-01-18 18:00:18
- Link: https://win11.techidaily.com/rotate-window-viewing-angle-windows-style/
- License: This work is licensed under CC BY-NC-SA 4.0.