
Reviving Systems: A Detailed Look at 13 Recovery Steps

Reviving Systems: A Detailed Look at 13 Recovery Steps
System Restore is one of the most useful Windows features, as it allows you to revert your computer to an earlier state, in case something goes wrong. This can be a lifesaver as long as it works.
There’s a chance you will figure out that System Restore stopped working only when you need it, which can add an extra layer of frustration to your existing issues. Many different factors can affect its performance, but these pointers should help you get to the root of the problem.
Disclaimer: This post includes affiliate links
If you click on a link and make a purchase, I may receive a commission at no extra cost to you.
1. Create a System Restore Point Manually
Your first port of call during System Restore irregularities should be to manually create a System Restore point. While this is unlikely to solve the problem outright, you may well be presented with an error message that makes it easier to diagnose what’s wrong.
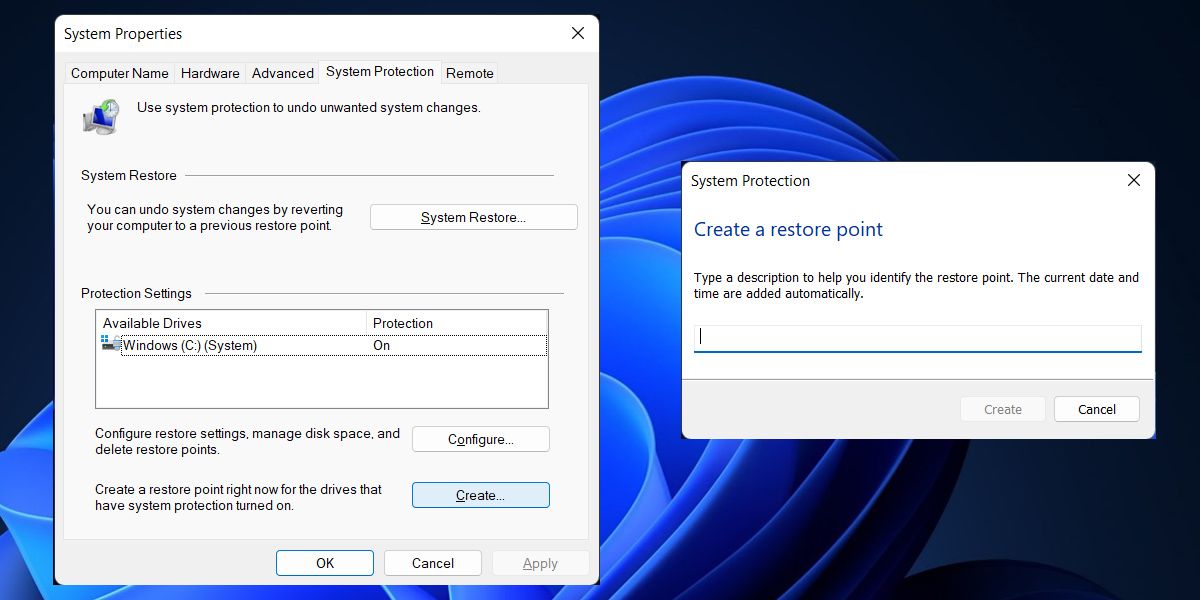
To get started, type Restore Point into your search bar and click on the result titled Create a restore point. Click the button labelled Create and choose a name, then wait for the process to complete and see if an error message pops up.
2. Check System Restore is Active on All Volumes
System Restore may simply not be activated on your computer. This is particularly relevant if you’re using more than one drive, or have recently swapped your system storage from one volume to another, as drives can have their protection turned on and off individually.
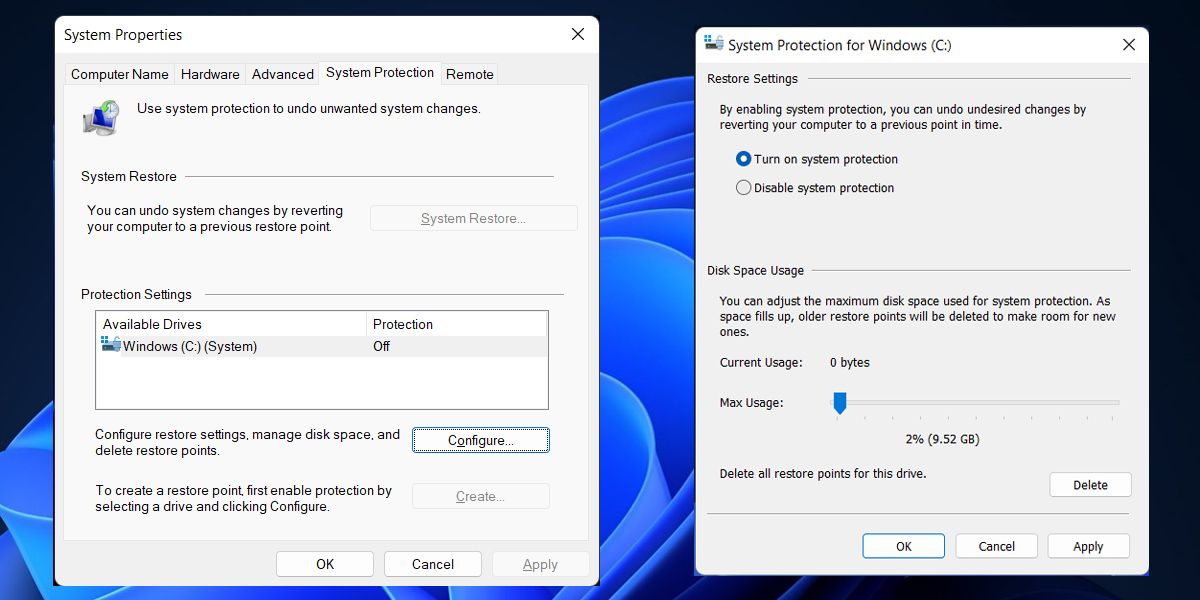
Type Restore Point into the search bar and click on Create a Restore Point. You’ll see the Available Drives listed under the Protection Settings subheading, alongside a column telling you whether or not they’re protected.
To change this setting, click on the desired drive to highlight it and then click on Configure. A radio toggle will allow you to turn System Restore protection on or off.
As with almost any other technical issue, turning System Restore off and on again is well worth a try.
3. Disable Antivirus Software
Using a reliable piece of antivirus software is a great way to keep your system protected against malware and other undesirable installs, but sometimes this kind of utility can cause problems for other tasks.
If you’re facing difficulties with System Restore, briefly disable your antivirus software early on during your troubleshooting — it may well fix things.
4. Check Your Disk Space Allocation
Your Restore Points will fail if there isn’t enough space allocated for their storage. To see how much space you have assigned to this task, enter Restore Point into the search bar and open the entry titled Create a restore point.
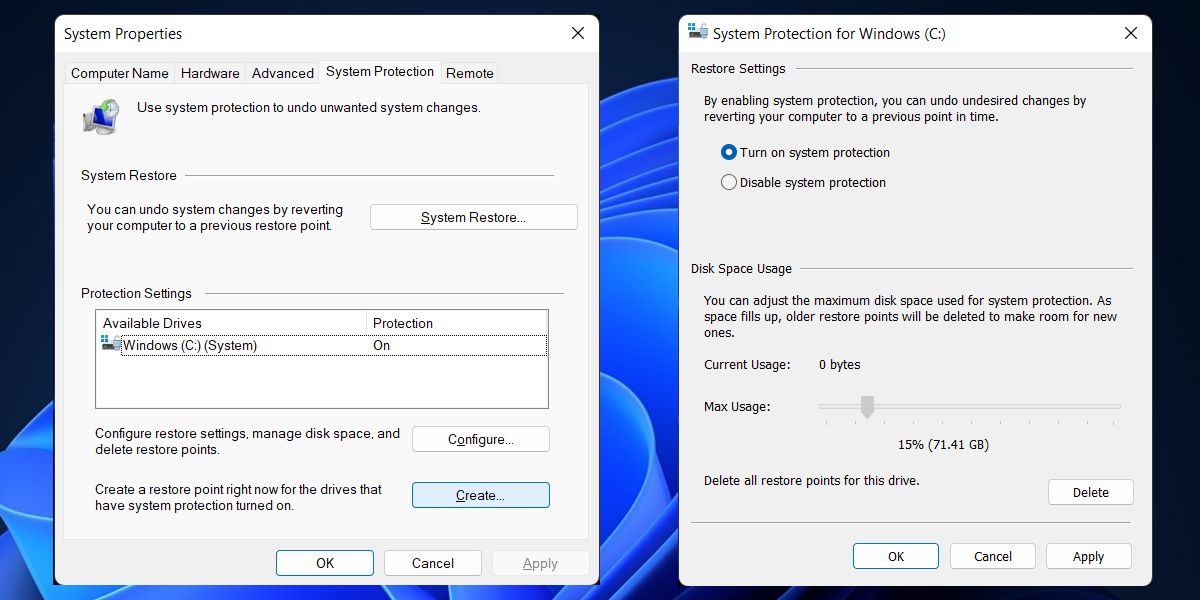
Click the Configure button and you’ll be able to tweak your Disk Space Usage. Try using the slider to increase your allocated space, then create a new Restore Point to see whether it has had the desired effect.
5. Manually Delete Restore Points
As we’ve mentioned, System Restore will fail to create a new restore point if there’s no available storage space on your computer. However, you can manually delete older restore points that you no longer need to free up some space for System Restore to work.
6. Confirm Essential Services are Running
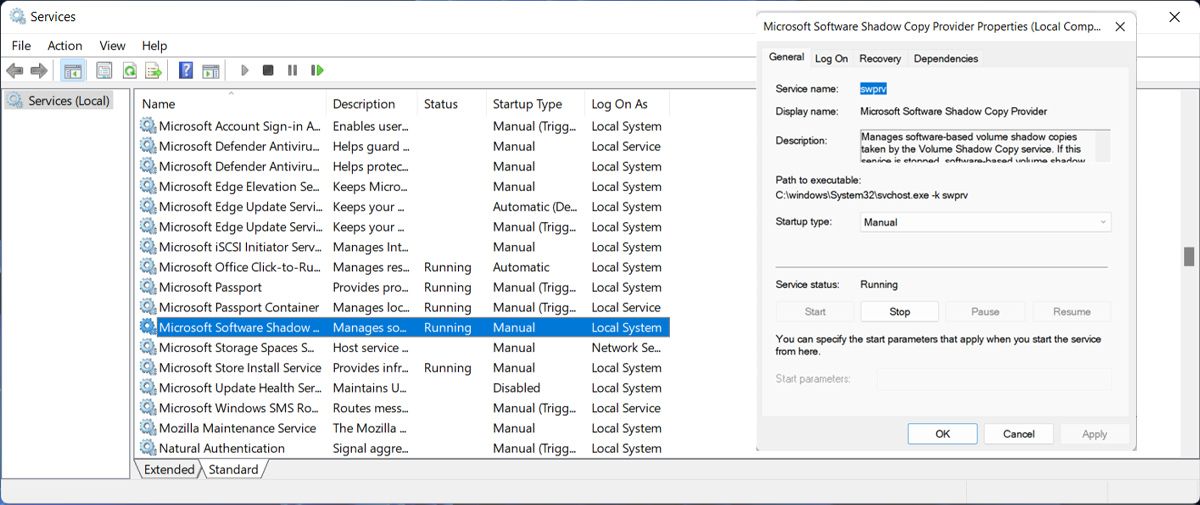
System Restore relies on a few different services to do its job; without them, it can’t function. Fortunately, it’s very easy to check whether or not they are active by typing Services into the search bar and opening the app.
You’ll be presented with a long list of all the services that are loaded onto your computer, but you’re just looking for three:
- Microsoft Software Shadow Copy Provider Service
- Task Scheduler
- Volume Shadow Copy
Make sure the Name column is sorted alphabetically, then skim through the list to find these three services. You need to confirm that all of them are Running and are set to Automatic in the Startup Type column.
7. Run Check Disk via Command Prompt
Check Disk is a system tool built into Windows that can verify the integrity of a file system, and fix logical errors. To access the utility, in the Start menu search bar, search for command prompt and select Run as administrator.
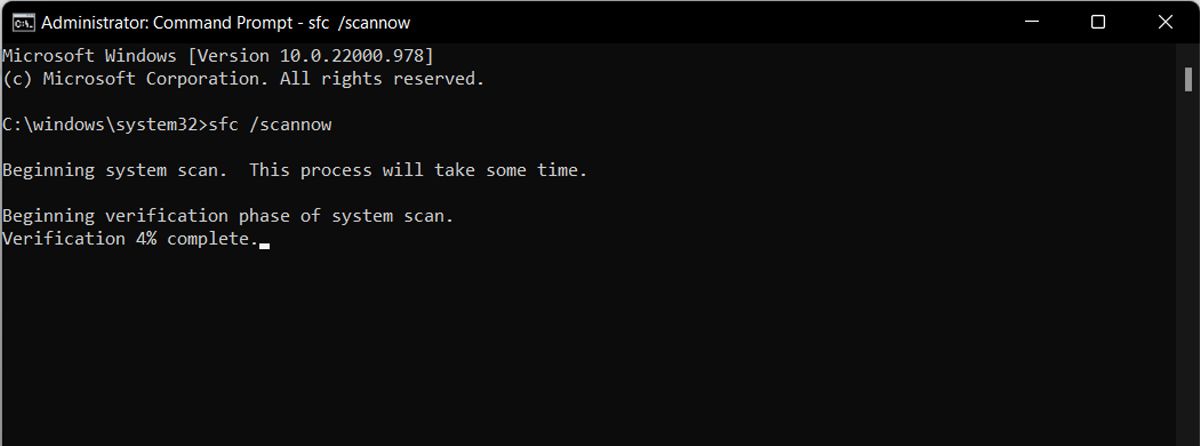
To run Check Disk, input the following command:
chkdsk /f /r
You might also want to try the similar System File Checker tool with this command:
sfc /scannow
8. Boot Into Safe Mode
Problems affecting System Restore can often be traced back to services and drivers from a source other than Microsoft. Safe Mode strips your computer’s abilities back to the bare essentials, meaning that those processes won’t interfere with your procedure.
You’ll still have to find the culprit if you want to fix the issue permanently, but dropping into Safe Mode can be a useful stopgap if you’re in a bind.
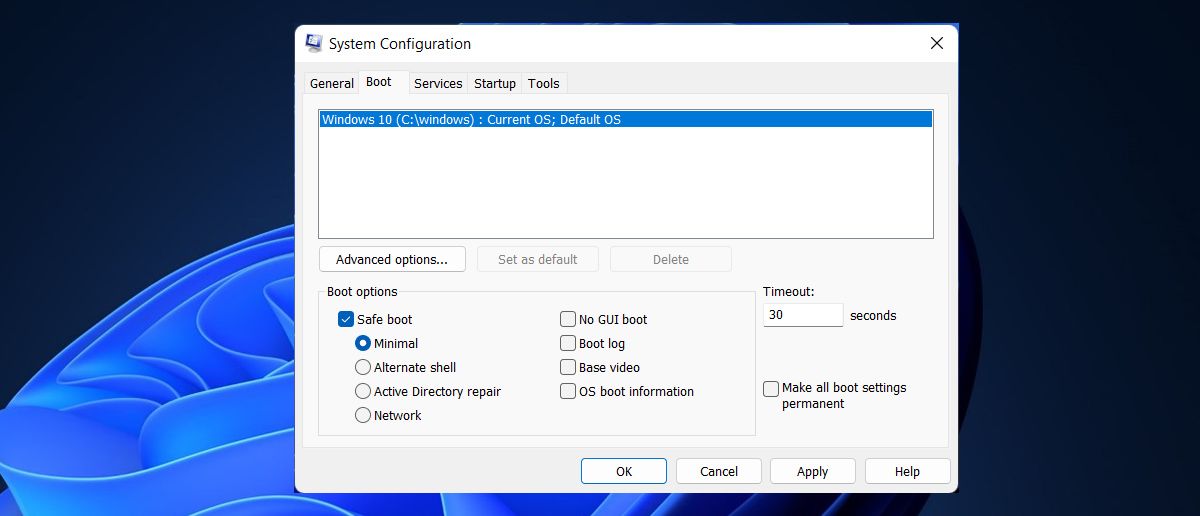
To boot into Safe Mode, type msconfig into the search bar and open System Configuration. Head to the Boot tab and tick the checkbox marked Safe boot, with the radio toggle set to Minimal. Then try running System Restore from Safe Mode.
If this didn’t work for you, there are other methods to boot your computer into Safe Mode .
9. Try Selective Startup
Selective Startup is a similar tool to Safe Mode, in that it reduces the amount of processes running on your computer to make it easier to diagnose problems. Type System Configuration into the search box and open the top result to get started.
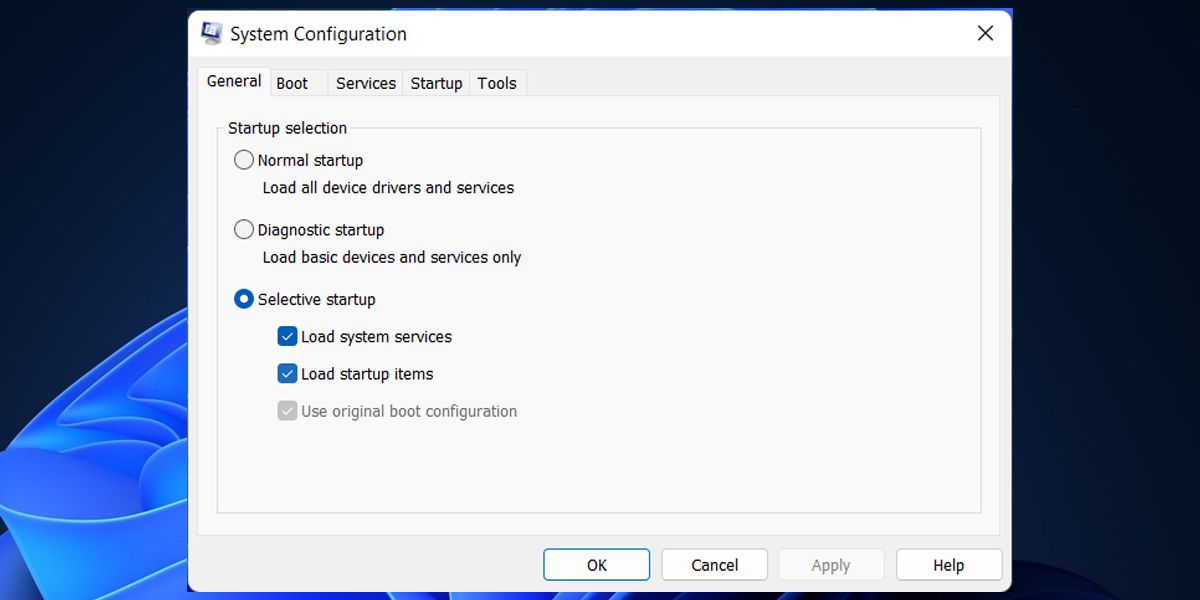
You can check and uncheck the Load system services and Load startup items boxes to customize how your computer behaves at startup. For more information on using Selective Startup to troubleshoot, refer to Microsoft’s guide to the process.
10. Consult the Event Viewer
You might be able to find some clues about errors pertaining to System Restore processes by delving into the Event Viewer. Search for the utility and open it up to get started — you’ll need to expand the Windows Logs folder, then click on Applications.
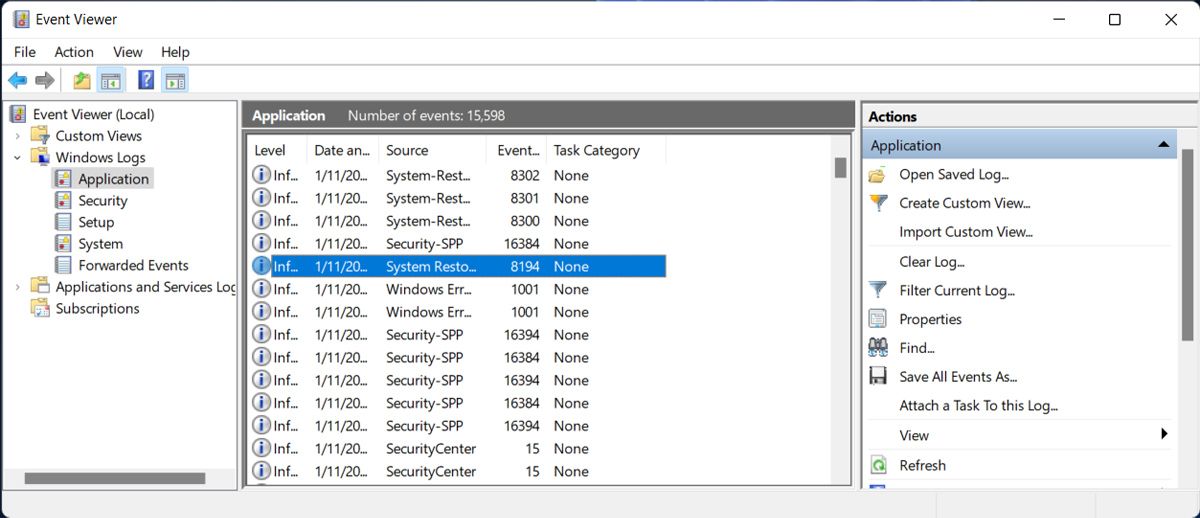
Scroll through the results to find anything with Error in the Level column. Click on an individual event to display its description, and see if that offers up any reason that it might be connected to System Restore. You can do a Google search for any related errors that you find to see what the best course of action is.
11. Check Your Timing
As simple as it might sound, your System Restore strife might be caused by something as straightforward as your computer being asleep when it’s scheduled to create a new image. Your PC won’t be able to wake itself up to do the job, unless you have a handy tool called Restore Point Creator .
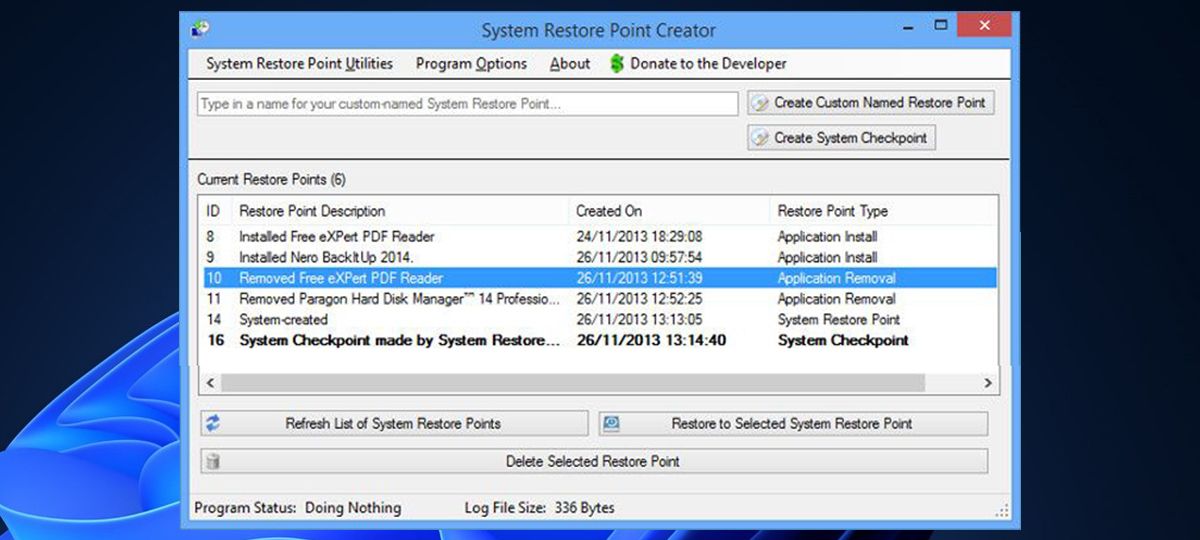
Among a host of other advantages, Restore Point Creator offers users the opportunity to schedule the task for the future, and instruct their system to wake up at that specified time. This option is available by navigating to System Restore Point Utilities > Schedule creation of System Restore Points and then checking the box labelled Wake computer if the system is sleeping.
One point to remember is that Restore Point Creator uses Task Scheduler to implement this feature. As such, you’ll have to check that your computer is compatible with the tool.
12. Employ a Third-Party Alternative
If you really can’t fix System Restore, you could always try a different solution. This won’t help anyone in the midst of a crisis right now, but for those readers that are just setting up their defenses, a backup plan could pay dividends down the line.
You might also check out these rescue and restore disks for your Windows System Restore .
13. Factory Reset Your Computer
If none of the above solutions fixed System Restore, and you’re stuck with a system full of bugs and glitches, you should factory reset your computer. This is a bold move, as it will return your PC to the state it was when you bought it.
Before doing so, make sure to back up any personal data you might need, so long as you’re able to.
Fixing Windows System Restore
There are plenty of reasons why System Restore might stop working, so it might be challenging to pin down the exact cause. However, with a bit of patience, the above tips will help you fix the issue so you can load a restore point any time you need it.
If you want to create restore points faster, you can add the option to the Windows context menu.
Also read:
- [New] 2024 Approved Enhancing Video Calls Incorporating Snap Camera on Teams
- [New] Cropped Frames in Media Pro What's the Cause?
- [New] Elevate Your Instagram Presence with These 9 Game-Changing Tips for 2024
- [Updated] Elevate Your Content Game with These 5 Proven YouTube Marketing Hacks
- Efficiently Maximize Disk Capacity in Windows Systems
- How to Open and Read Comics in Windows 11
- In 2024, 5 Quick Methods to Bypass HTC U23 FRP
- In 2024, How to Change Location On Facebook Dating for your ZTE Nubia Flip 5G | Dr.fone
- Mastering Lock Screen Settings How to Enable and Disable on Samsung Galaxy M34 5G
- Mastering Process Control on Windows 10/8
- Navigating Through Roblox Error 262 Resolution
- Patched Past: Microsoft's Cutoff of Windows 7 and 8.1 Security Updates
- Taming Ntoskrnl.exe CPU Usage Overload
- The Legislative Approach to AI Management: Key Tactics Used By Governments
- Troubleshoot iPhone 13 Glitches with These 6 Easy Fixes
- Title: Reviving Systems: A Detailed Look at 13 Recovery Steps
- Author: David
- Created at : 2024-12-02 23:28:54
- Updated at : 2024-12-07 04:55:26
- Link: https://win11.techidaily.com/reviving-systems-a-detailed-look-at-13-recovery-steps/
- License: This work is licensed under CC BY-NC-SA 4.0.