
Restoring Functioning Automated Rules in Microsoft Outlook
Restoring Functioning Automated Rules in Microsoft Outlook
By setting up Outlook rules, you can configure the app to handle your inbox efficiently. This allows you to save time and automate actions that would otherwise require manual effort. But what if these Outlook rules stop working on your Windows computer?
To help out, we have compiled a list of useful solutions that should get Outlook rules to work again.
1. Make Sure Outlook Rules Are Enabled
To start, you need to ensure that you haven’t inadvertently disabled any Outlook rules. To do so, use these steps:
- Open the Outlook app and click the File menu in the top left corner.
- In the Info tab, click the Manage Rules & Alerts button.
- Under the Email Rules tab, make sure the boxes next to your rules are checked.


2. Rename Outlook Rules
Using lengthy names for your Outlook rules can cause them to become larger in size, leading to unexpected issues with their functionality. To address this, try assigning shorter names to your Outlook rules and see if that gets things moving again.
To rename Outlook rules, use these steps:
- In the Outlook app, click the File menu in the top left corner.
- In the Info tab, click the Manage Rules & Alerts button.
- Under the Email Rules tab, select the rule you want to rename.
- Click Change Rule and select Rename Rule.
- Type in a shorter name for the rule and hit OK.
- Click Apply to save the changes.
PaperScan Professional: PaperScan Scanner Software is a powerful TWAIN & WIA scanning application centered on one idea: making document acquisition an unparalleled easy task for anyone.

 PaperScan Professional: PaperScan Scanner Software is a powerful TWAIN & WIA scanning application centered on one idea: making document acquisition an unparalleled easy task for anyone.
3. Delete Unwanted Outlook Rules
Apart from renaming rules, you can also consider deleting rules that you no longer need to prevent conflicts or unexpected behavior. Here’s how.
- In the Outlook app, navigate to File > Info > Manage Rules & Alerts.
- Hold down the Ctrl key and select the rules you no longer need.
- Click the Delete option at the top.
- Select Yes when prompted.

4. Reset the Outlook SRS File
Microsoft Outlook stores essential account configuration in an SRS (Send and Receive Settings) file on your PC. If this file somehow becomes corrupted, Outlook rules won’t work. To fix this, you can force Outlook to recreate the SRS file by renaming the old file. Here’s how.
- Press Win + R to open the Run dialog box.
- Type %appdata%\Microsoft\Outlook in the Open field and press Enter.
- In the File Explorer window that opens, locate and select Outlook.srs file.
- Press F2 on your keyboard and rename the file to Outlook.srs.old.

Restart Outlook after completing the above steps and check if your rules work as expected.
5. Disable the Stop Processing More Rules Option
By adjusting the settings in the Outlook app, you can instruct it to halt the processing of additional rules once a specific rule has run. However, this can lead to Outlook ignoring all subsequent rules, giving a false impression that your rules are not functioning correctly. To avoid this, you need to disable the “stop processing more rules” option by following the steps below.
- In Outlook, head over to File > Info > Manage Rules & Alerts.
- Select your rule from the list.
- Click the Change Rule option and select Edit Rule Settings from the list.
VSDC Pro Video Editor is a light professional non-linear video editing suite for creating a movie of any complexity. It supports the most popular video/audio formats and codecs, including 4K, HD and GoPro videos. Preconfigured profiles make the creation of videos for various multimedia and mobile devices absolutely hassle-free.


Key features:
• Import from any devices and cams, including GoPro and drones. All formats supported. Сurrently the only free video editor that allows users to export in a new H265/HEVC codec, something essential for those working with 4K and HD.
• Everything for hassle-free basic editing: cut, crop and merge files, add titles and favorite music
• Visual effects, advanced color correction and trendy Instagram-like filters
• All multimedia processing done from one app: video editing capabilities reinforced by a video converter, a screen capture, a video capture, a disc burner and a YouTube uploader
• Non-linear editing: edit several files with simultaneously
• Easy export to social networks: special profiles for YouTube, Facebook, Vimeo, Twitter and Instagram
• High quality export – no conversion quality loss, double export speed even of HD files due to hardware acceleration
• Stabilization tool will turn shaky or jittery footage into a more stable video automatically.
• Essential toolset for professional video editing: blending modes, Mask tool, advanced multiple-color Chroma Key
- Clear the stop processing more rules checkbox.
- Click Finish and then Apply.
6. Configure Outlook Rules to Run on All Devices
Another reason why your Outlook rules may not work is if you have configured them to run on a specific device only. Here’s how you can change that.
- In Outlook, head over to File > Info > Manage Rules & Alerts.
- Double-click the problematic rule.
- Under Select conditions, uncheck the on this computer only box.
- Hit Finish followed by Apply.
With Screensaver Wonder you can easily make a screensaver from your own pictures and video files. Create screensavers for your own computer or create standalone, self-installing screensavers for easy sharing with your friends. Together with its sister product Screensaver Factory, Screensaver Wonder is one of the most popular screensaver software products in the world, helping thousands of users decorate their computer screens quickly and easily.

 With Screensaver Wonder you can easily make a screensaver from your own pictures and video files. Create screensavers for your own computer or create standalone, self-installing screensavers for easy sharing with your friends. Together with its sister product Screensaver Factory, Screensaver Wonder is one of the most popular screensaver software products in the world, helping thousands of users decorate their computer screens quickly and easily.
7. Activate Cached Exchange Mode
When you enable the Cached Exchange Mode, Outlook retains a copy of your mailbox within the Outlook data file. This can help the app implement your rules without any issues.
To enable Cached Exchange Mode in Outlook:
- Open Outlook and click the File menu.
- In the Info tab, click Account Settings, and select Account Settings.
- Under the Email tab, select your account and click Change.
- Click More Settings and select Advanced.
- Tick the Use Cached Exchange Mode checkbox.
- Hit Apply followed by OK.
 CollageIt Pro
8. Run the Outlook Inbox Repair Tool
When you use Microsoft Outlook on your Windows PC, it generates OST and PST files to store your account data locally. If these data files become inaccessible for some reason, your Outlook rules may stop working. Fortunately, Outlook includes an inbox repair tool that can help you repair Outlook data files with ease . Here’s how to run it.
- Right-click the Outlook shortcut and select Properties.
- Under the Shortcut tab, click the Open File Location button.
- Double-click on SCANPST.EXE to run it.
- In the Microsoft Outlook Inbox Repair Tool window, click the Browse button and then navigate to the following directory:
C:\Users\*username*\AppData\Local\Microsoft\Outlook
Make sure you replace *username* in the above path with your own username. - Select the profile you want to repair and then click Start.
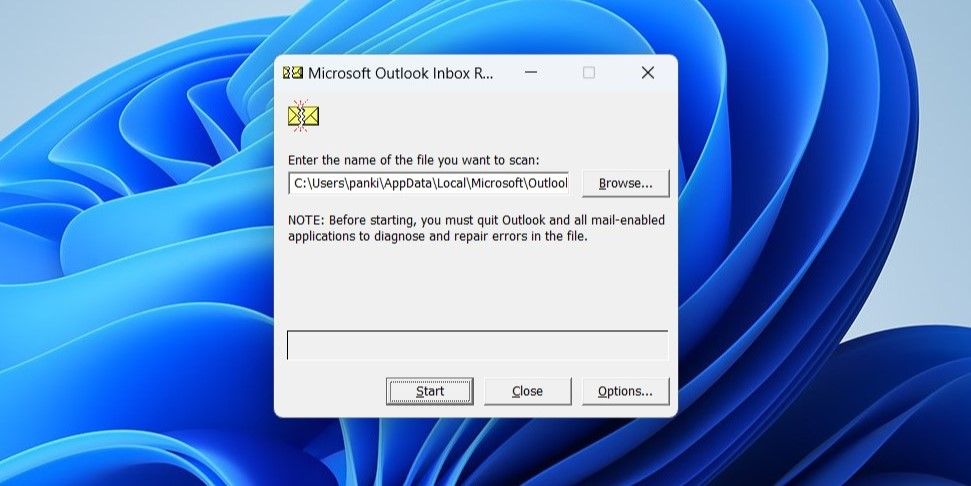
Restart Outlook after this and check if the issue is still there.
9. Update the Outlook App
Using an outdated version of Outlook can also lead to such issues. If you have disabled automatic updates for Office apps , use these steps to update the Outlook app.
- Open Outlook and select the File menu in the top-left corner.
- Choose the Office Account tab from the left column.
- Click Update Options > Update Now.
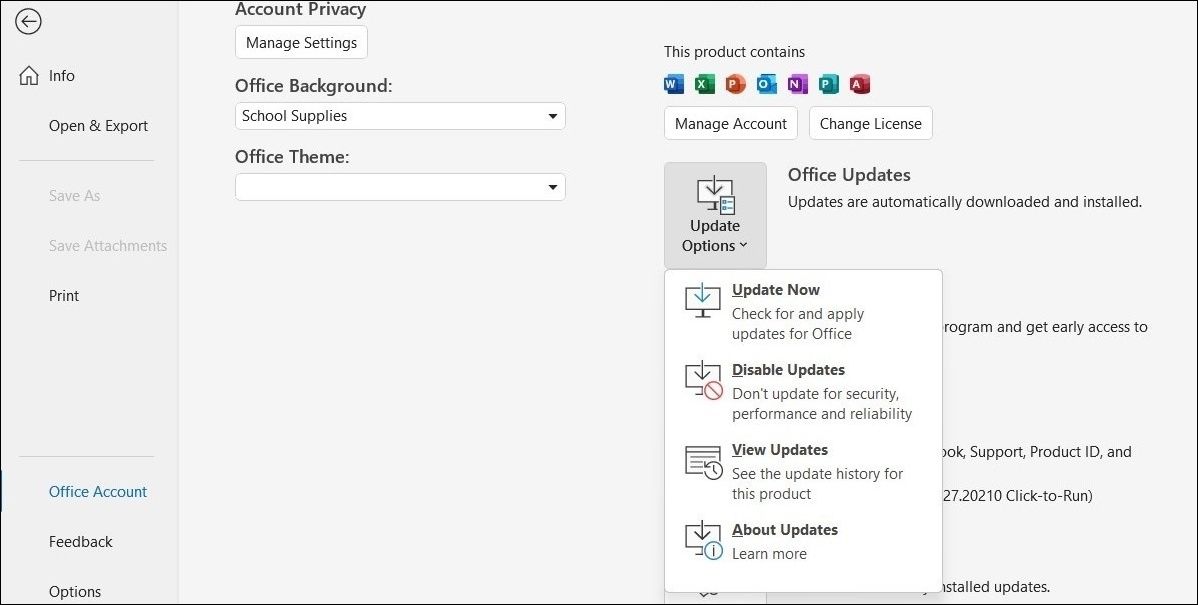
Wait for Microsoft Office to check for new updates and install them. Following that, Outlook rules should start working.

10. Reset All the Rules
Lastly, if none of the above tips help, you can consider deleting all the Outlook rules and then setting them up again. Doing so will help fix any issues caused by improper configuration or corrupt data.
To delete all the Outlook rules at once, open the Run dialog box . Type Outlook.exe /cleanrules in the text box and press Enter.

Once Outlook deletes all the rules, head to Manage Rules & Alerts and set them up again.
Manage Your Emails Efficiently With Outlook Rules
Without Outlook rules, organizing your inbox can be quite challenging, especially if you receive a lot of emails throughout the day. Hopefully, one or more of the above tips have proven useful, and Outlook rules are now working as before.
To help out, we have compiled a list of useful solutions that should get Outlook rules to work again.
- Title: Restoring Functioning Automated Rules in Microsoft Outlook
- Author: David
- Created at : 2024-08-15 23:43:09
- Updated at : 2024-08-16 23:43:09
- Link: https://win11.techidaily.com/restoring-functioning-automated-rules-in-microsoft-outlook/
- License: This work is licensed under CC BY-NC-SA 4.0.