Restoring Disconnected Network in Windows OS

Restoring Disconnected Network in Windows OS
Isn’t it frustrating when you’re trying to share files on a local network or update your software to the latest version, but you can’t?
One of the main reasons behind such issues is the “network resource unavailable” error. This means that the resource (file) you’re trying to access is no longer available for various reasons. Don’t worry, as you are not alone in facing this problem.
We’ll look closer at the possible solutions to overcome the network resource unavailable error on Windows.
Disclaimer: This post includes affiliate links
If you click on a link and make a purchase, I may receive a commission at no extra cost to you.
Why Does the Network Resource Unavailable Error Occur?
As highlighted above, this error mainly occurs when the resource is unavailable in the backend. It may be because the file or folder you are trying to access has been deleted from the server (network).
Below are some other common causes behind the network resource unavailable error:
- Unstable or disconnected network connection: If your internet connection is unstable or disconnected, Windows will have difficulty downloading the files correctly.
- Firewall and antivirus restrictions: Your firewall or antivirus software may sometimes block access to certain network resources. They may be blocking it because of false virus detection.
- Software glitches: While it’s rare, it may be the case that the software you are trying to update has some internal issues or bugs causing the error.
These are just a few possible causes of the resource unavailability error. Now, move on to the below methods for the recommended fixes. Please follow each step in a serial order to avoid any trouble.
1. Check Your Network Connection
Whenever you face a network-related error, the first step should be to check your internet connection . It ensures that your Wi-Fi or Ethernet is not the primary root cause of the error.
Here’s a tip: If you use a wireless connection, try the age-old trick of turning it off and on again. If that fails to work, try resetting your router or modem. Also, ensure your Wi-Fi or Ethernet cable is connected correctly.
But what if your other devices also face the same issue? In such a situation, it’s probably a network-wide problem. So, reaching out to your internet service provider (ISP) for help would be wise.
2. Temporarily Disable Your Firewall and Antivirus
If you can’t access a network resource, disable your firewall as well as your antivirus software to see if that fixes the issue.
Follow our guide on how to disable the Windows Firewall for the necessary steps. If disabling the firewall resolves the error, whitelist the resource source first and then re-enable the firewall.
If you use a third-party antivirus software, disable it through its settings or dashboard. Remember that turning off your antivirus software can expose your computer to security risks. So, re-enable the antivirus protection after you access the resource.
3. Enable Network Discovery on Your Computer
Network discovery is a Windows setting that follows its name. It makes your computer visible on a network or a local home server. When by chance, the network discovery is disabled from settings, you can neither find other devices nor transfer anything on a network.
In this case, enabling network discovery on your computer is worth the try to access the resource. But how to do it?
Follow these steps to enable network discovery from Windows Settings:
- Press Win + I to open the Windows Settings app.
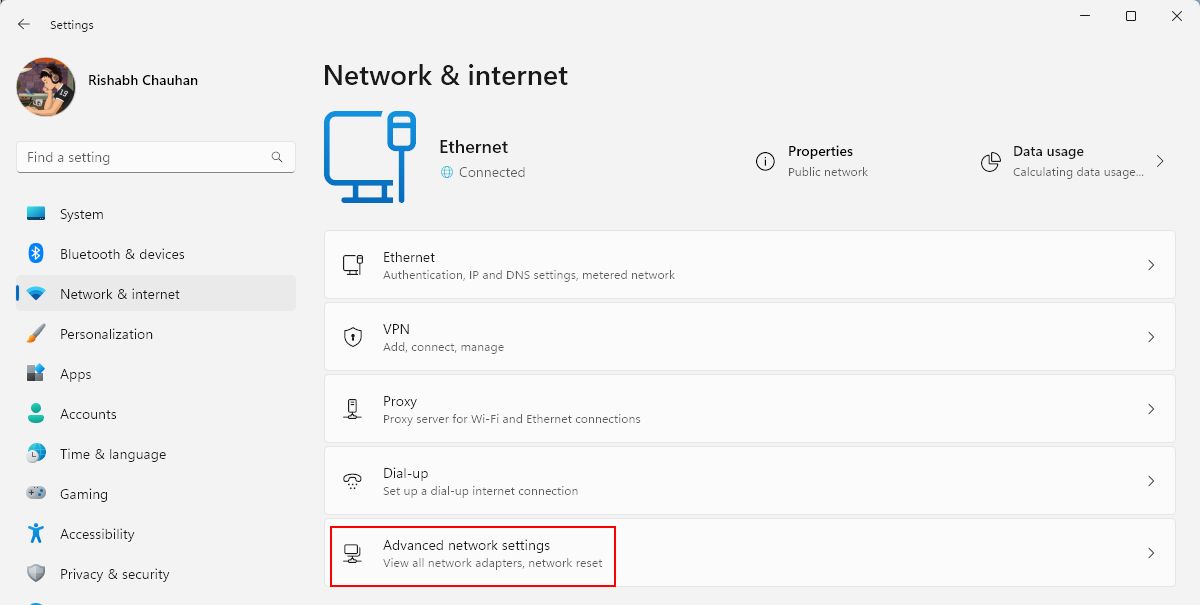
- Navigate to Network & internet from the left-hand sidebar.
- Then go to Advanced network settings > Advanced sharing settings to access all the network sharing options.

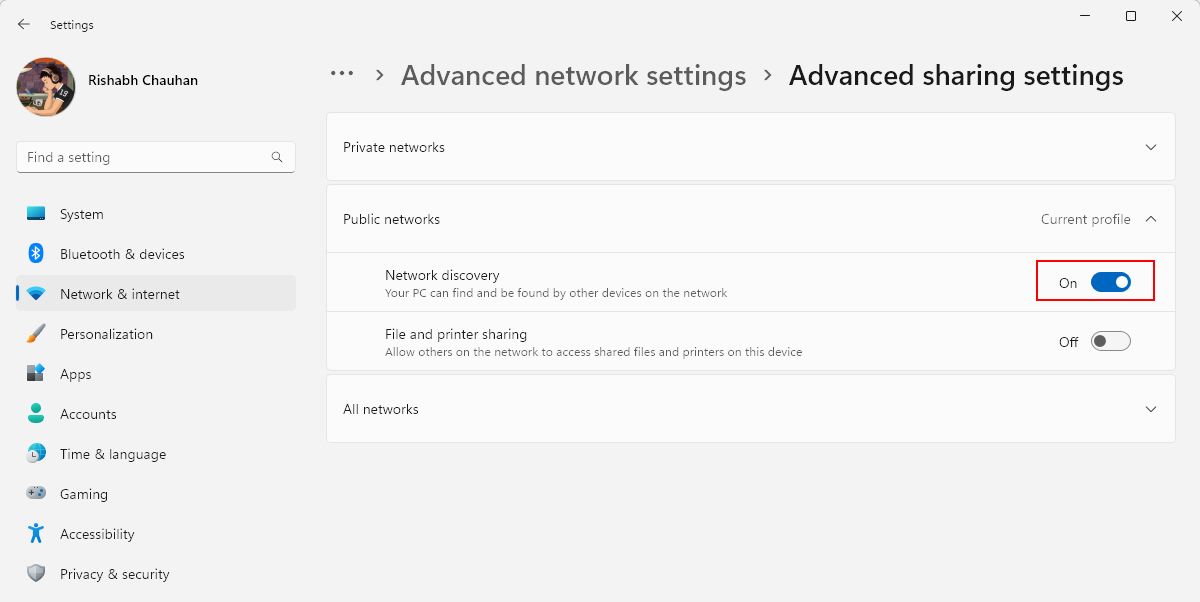
- Now, expand your current network profile. Network profile means whether you’re on a Private network or on a Public one. If you’re confused, just click on the Current profile text.
- Click the toggle next to Network discovery to enable it. The text with the toggle should change to On.

4. Clear the DNS Cache on Windows
Clearing the DNS cache removes any outdated or corrupted resource information stored on your computer. This forces your computer to re-establish a new connection and re-fetch the resource without issues.
Follow these simple steps to clear your computer’s DNS cache:
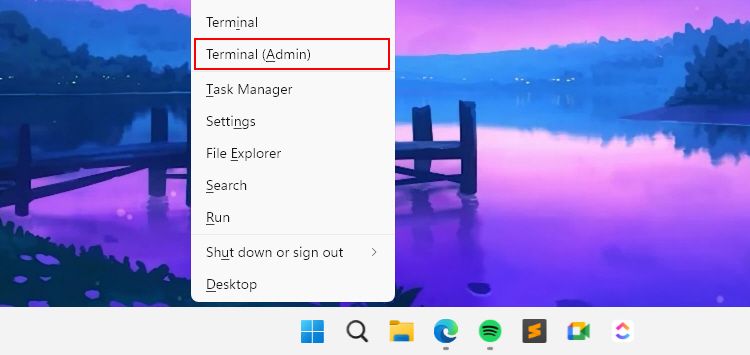
- Open the Windows Power menu by pressing Win + X.
- Choose Terminal (Admin) from the list. If there’s no such option, select Command Prompt (Admin).

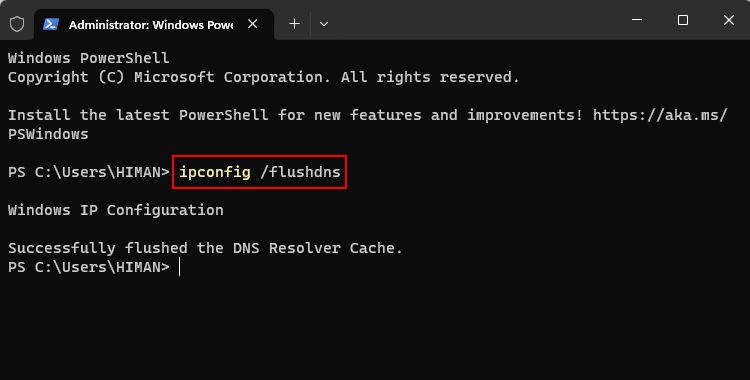
- Type the DNS flush command: ipconfig /flushdns and press Enter. This will execute the command and clear the DNS resolver cache.

- Now you can retry sharing files on the network.
In cases where the problem is due to your network misconfiguration, clearing the DNS cache may not always work. So, move on to the next step to reset the network configuration to default.
5. Reset the TCP/IP Settings
You don’t need to get confused by the term “TCP/IP.” To make it easier, TCP/IP means a network protocol that helps you download or upload files online. So now you can understand what will happen if the TCP/IP settings get messed up.
There are two ways to fix it: restarting the TCP/IP NetBIOS Helper service and using the Command Prompt. We’ll explain both ways one by one.
First, start by resetting the TCP/IP settings in a few steps:
- Begin by pressing Win + Q to bring up Windows search.
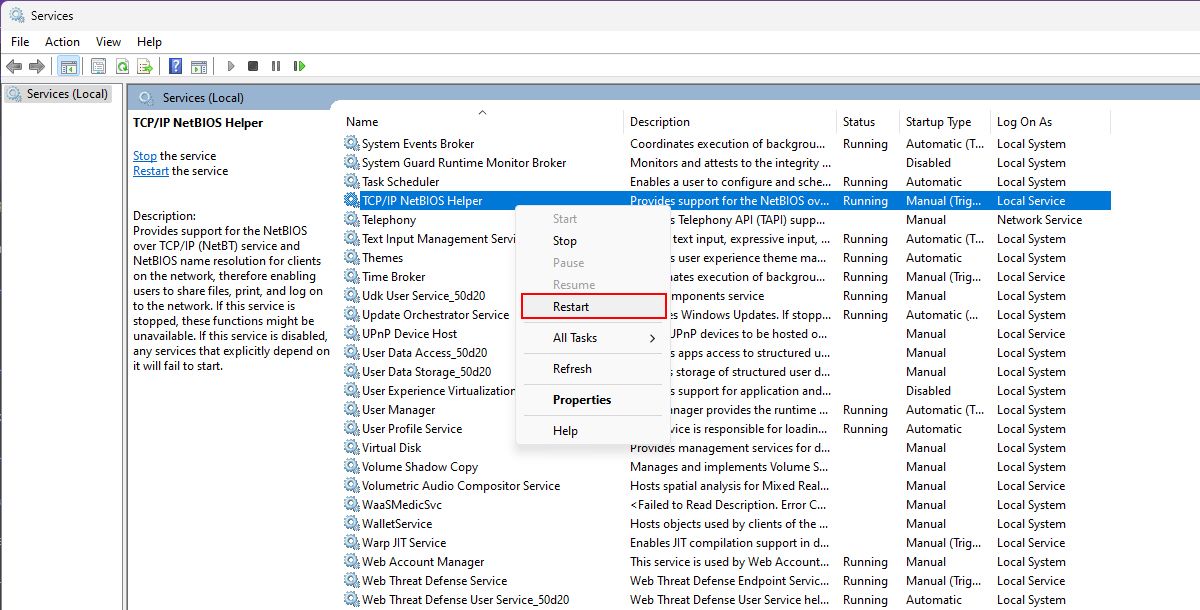
- Type Services and hit Enter to launch the Windows Services app, where you can manage all the services.
- Locate the TCP/IP NetBIOS Helper service by scrolling down. Use the right-click button and select the Restart option.

- Wait for a while till Windows force restarts the service. Once done, disconnect and then reconnect your internet.
That’s not it! You need to follow some more steps to address this issue.
To start, open Command Prompt as an administrator and type netsh int ip reset. Press the Enter key and restart your computer now.
After a restart, the changes should take effect, and you may no longer face the network resource unavailable error.
6. Clear Outdated ARP Cache
Before moving on to the steps, you must know what the ARP cache is. Simply put, the Address Resolution Protocol (ARP) cache saves a unique identification ID of all the devices within your network. This helps your computer communicate with other devices efficiently.
But here’s the kicker: as good as it may sound, an outdated or incorrect ID in the ARP cache can lead to a network resource unavailability problem. So clearing the ARP cache flushes such wrong or corrupted IDs.
Remember that clearing the ARP cache can momentarily disrupt ongoing network connections. So we recommend you save your work before proceeding.
To fix this problem, follow the below-given steps to clear the outdated ARP cache:
- Press the Win + Q keys simultaneously to open the Windows search menu.
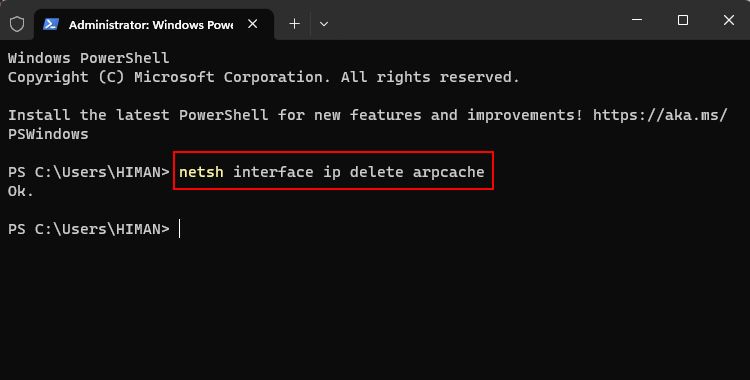
- Type Command Prompt and select Run as administrator from the right-hand sidebar.
- To remove all the outdated ARP cache entries, type in netsh interface ip delete arpcache and press Enter.

After completing the steps, your computer will no longer store outdated ARP cache entries.
No More Network Resource Unavailability on Windows
By now, you should have a better understanding of the network resource unavailable error and how to fix it.
In addition to the methods we’ve listed above, we recommend not to follow “internet speed up” tweaks without knowledge. Such tweaks affect necessary network settings and can cause trouble if done incorrectly.
One of the main reasons behind such issues is the “network resource unavailable” error. This means that the resource (file) you’re trying to access is no longer available for various reasons. Don’t worry, as you are not alone in facing this problem.
We’ll look closer at the possible solutions to overcome the network resource unavailable error on Windows.
Also read:
- [Updated] GoPro Deep Dive Side-by-Side Specification Comparison
- [Updated] Irreversible Termination of YouTube’s Brevity Mode for 2024
- 2024 Approved ScreenCentral Exclusive Global Views with Homeside Links
- A User-Friendly Guide: Overcoming The 'OpenGL32.dll Not Found' Challenge
- Guidelines for Clear Auditory Feedback During PowerPoint Recordings
- How to Fix a Remote Desktop Black Screen on Windows
- In 2024, How to Check Distance and Radius on Google Maps For your Oppo Reno 11 Pro 5G | Dr.fone
- Latest Epson WF 2540 Printer Driver for Multiple Windows OS - Download Now!
- MultiCam: Top-Tier Live Streaming App & Online Camera Simulation
- Overcoming Windows' Access Control Faults
- Steps to Restore Accidentally Erased INX Documents
- Unlock the Best Places to Explore Vector Artwork at No Cost
- Windows Onboard for Your PlayStation 2020 (Steam Deck)
- Title: Restoring Disconnected Network in Windows OS
- Author: David
- Created at : 2024-10-14 10:21:06
- Updated at : 2024-10-21 04:19:14
- Link: https://win11.techidaily.com/restoring-disconnected-network-in-windows-os/
- License: This work is licensed under CC BY-NC-SA 4.0.
