
Resolving Windows Remote Display Issue: Darkened Screen
Resolving Windows Remote Display Issue: Darkened Screen
Imagine you’re all set with your computer and going to connect to a remote desktop. But, instead of the desktop interface, you meet with a black screen.
A black screen on a remote desktop may appear due to many factors. For example, incorrect remote desktop settings, outdated graphics drivers, and compatibility issues.
If you’re dealing with this, we’ve explained how to fix the remote black desktop screen issue on Windows below.
1. Change the Screen Resolution Settings
When using Remote Desktop Connection on Windows, it’s important to check whether you’ve set the screen resolution settings properly. Improper settings may lead to a black screen or pixel blurriness, which can make your remote work challenging.
To avoid this, we recommend using the Remote Desktop Connection (RDC) utility on your Windows system.
Here’s how you can adjust the screen resolution settings of the remote desktop session using RDC:
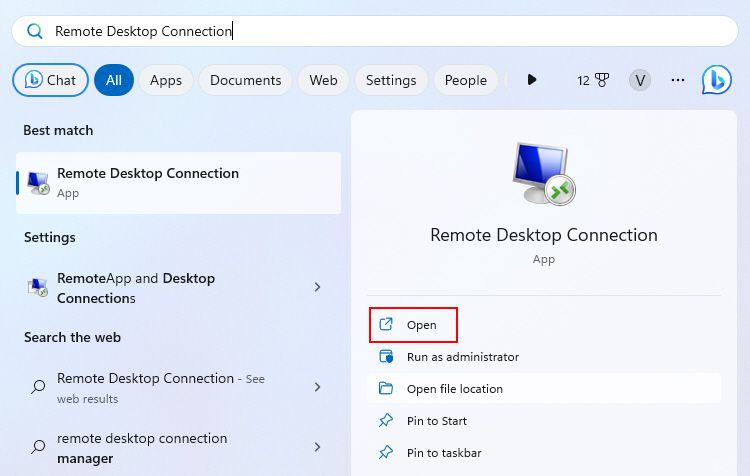
- PressWin + Q orWin + S to open the Windows search bar.
- EnterRemote Desktop Connection in the search bar, and choose the most suitable result.

- Click theShow Options toggle and go to theDisplay tab.
- Adjust the slider under theDisplay configuration to match the exact resolution of the remote computer’s display. For example, if the display resolution of your desktop is 1920 x 1080, you should match that in the settings.
- Enter the required details and clickConnect to launch the remote session.
Hopefully, this should fix the black screen on your remote desktop display.
While setting the screen resolution is important, you can’t ignore the other display settings. Move to the below steps to learn more about tweaking the display settings.
2. Adjust the Remote Desktop Display Settings
Adjusting your remote desktop display settings can easily help you fix the black screen issue.
Follow the below-given steps to adjust your remote desktop display settings:
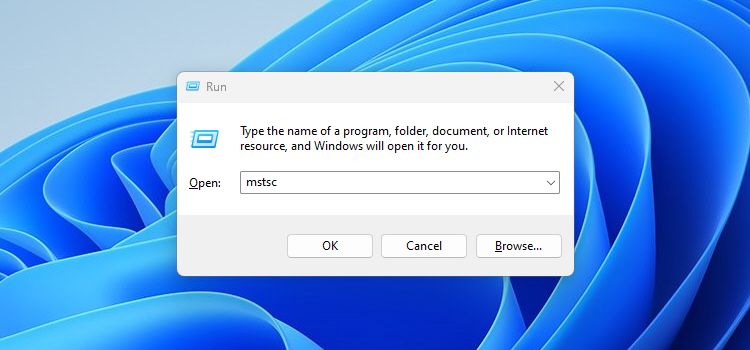
- PressWin + R to open the Windows Run dialog.
- Typemstsc in the search box and press theenter key.
WonderFox DVD Ripper Pro
- Click theShow Options button in the bottom-left corner and head towards theDisplay tab.
- UnderColors , selectHigh Color (16 bit) from the dropdown. Note that a higher number means better display quality. But, a lower number can help you out in the case of a black screen.
 WonderFox DVD Ripper Pro
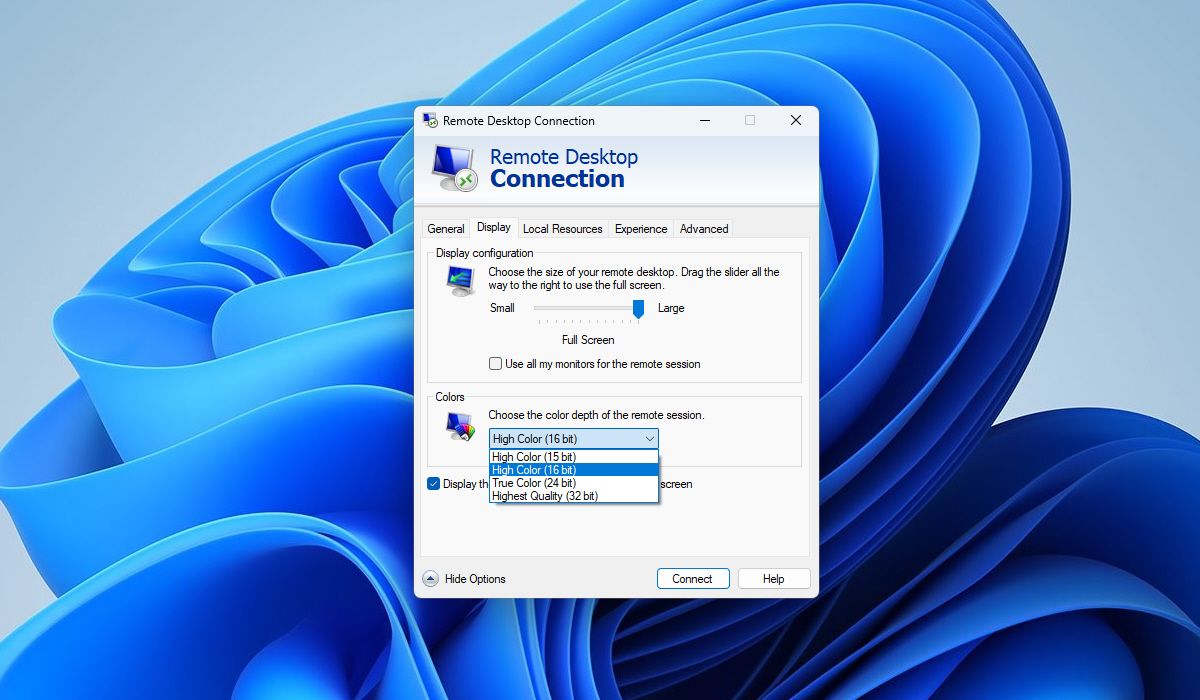
Check for the error now by connecting to your remote desktop. If it is not working, you can try changing the color depth toHighest Quality (32 bit) .
Note that black screen issues can have various causes, and the solution may not always be adjusting the display settings. If your issue is still unresolved, proceed to the advanced troubleshooting steps given below.
3. Update Your Computer’s Graphics Driver
Another way of fixing the black screen is by updating the GPU driver. An outdated GPU driver leads to many problems, including the issue of a completely black screen.
If you’re not a geek, we’ve covered a guide on updating your GPU driver on Windows for help.
Before moving forward, make sure you create a restore point on your desktop. It’ll give you a safer side if your system gets corrupt or the GPU drivers behave weirdly after updating.
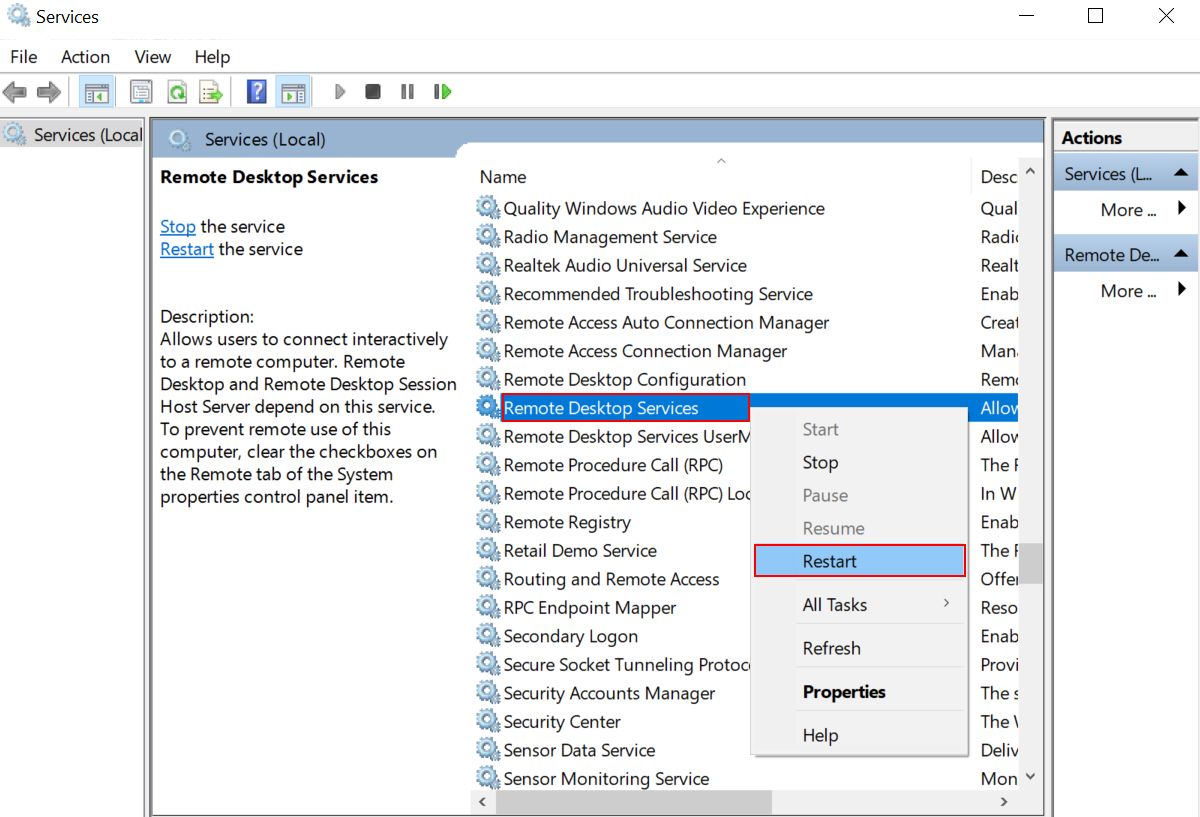
4. Restart the Remote Desktop Service
Are you still struggling to fix the black screen? If so, then you can try restarting the remote desktop service. This service controls and helps run the remote desktop sessions on your computer. Here’s how you can restart the remote desktop service on Windows:
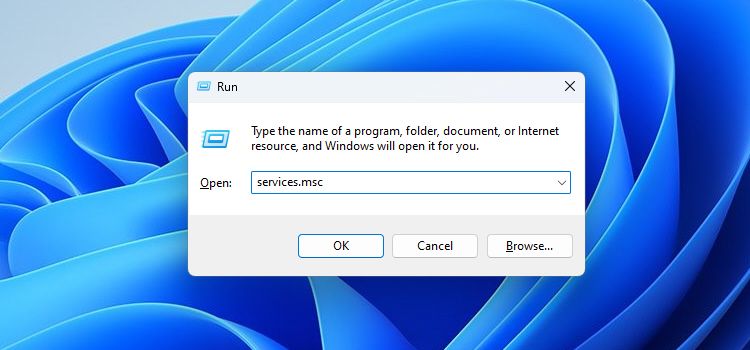
- PressWin + R and typeservices.msc in the Run dialogue box.
- Scroll down until you findRemote Desktop Services in the list of services.
- Right-click onRemote Desktop Services and select theRestart option.
- You can now restart your computer to ensure the changes are correctly applied.
5. Disable Bitmap Caching
Bitmap caching is a feature in Remote Desktop Connection that caches the bitmap images (locally) to improve performance. Simply put, it saves every small image rendered on your remote computer in the memory. As RDC uses the image data from memory, this saves time and resources significantly.
However, this feature can sometimes do more harm than good. Instead of boosting the performance while using a remote desktop, it may make the display appear black.
Here are the steps to take if you wish to turn off bitmap caching on your system:
- First, launch RDC on your computer. Then, click theShow Options button to access advanced settings.
- You’ve to now disable thePersistent bitmap caching option. Note that on older versions of Windows, this option might appear as justBitmap caching .
- Once you disable it, clickConnect to start interacting with your remote desktop.
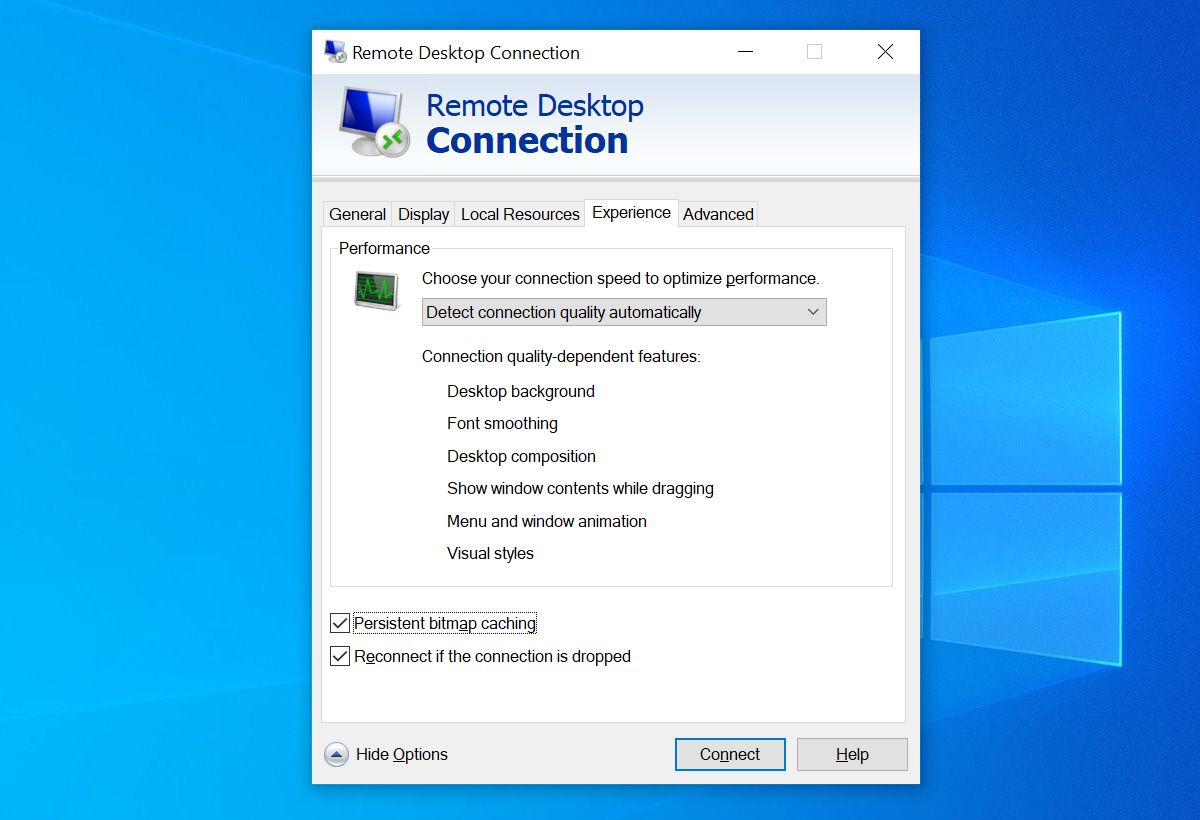

Note that once you disable it, the images will not be stored (or cached) locally. It means you may experience slightly slower performance while interacting with the desktop.

6. Enable WDDM Graphics Display Driver
The WDDM (Windows Display Driver Model) is a special type of display driver. It helps your graphics card work more efficiently, improving your computing experience.
While Windows runs smoothly using the default graphics card driver, WDDM provides additional support to it. If it is turned off for remote desktop connections for some reason, you might get random RDC crashes or a black screen. So, it goes without saying that you must enable WDDM on your desktop immediately.
Follow the below steps to enable WDDM for remote desktop connections:
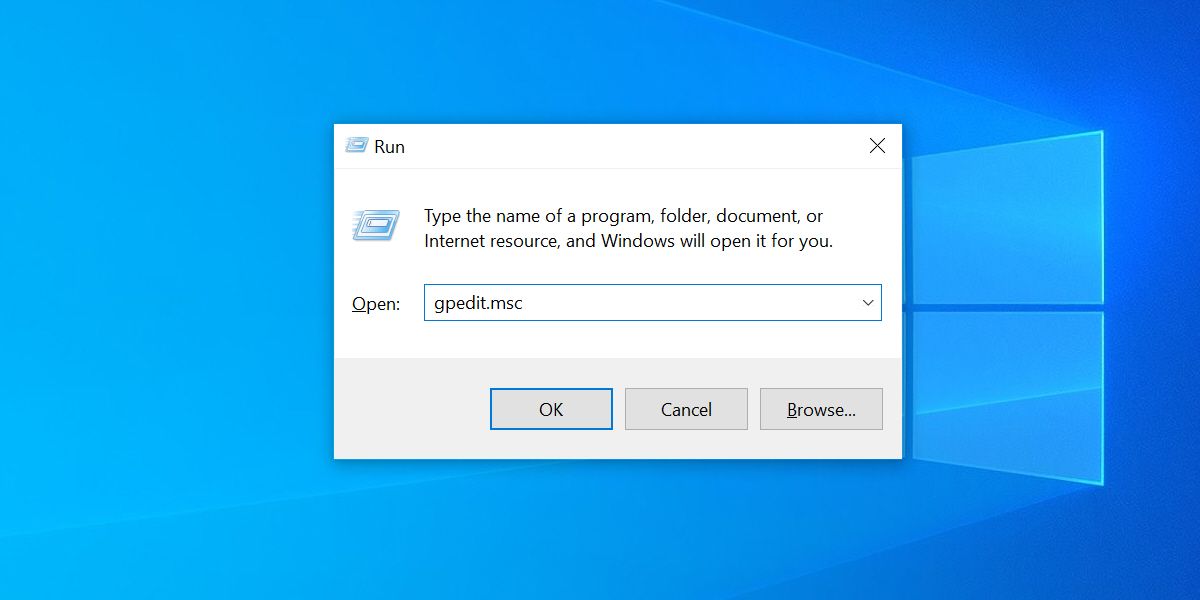
The following policy setting is only available on computers running Windows Pro and Enterprise editions. If you’re not using that, here’s a trick to access Group Policy Editor on Windows Home .
- PressWin + R , and typegpedit.msc in the Run dialog box. This will open theGroup Policy Editor on Windows.
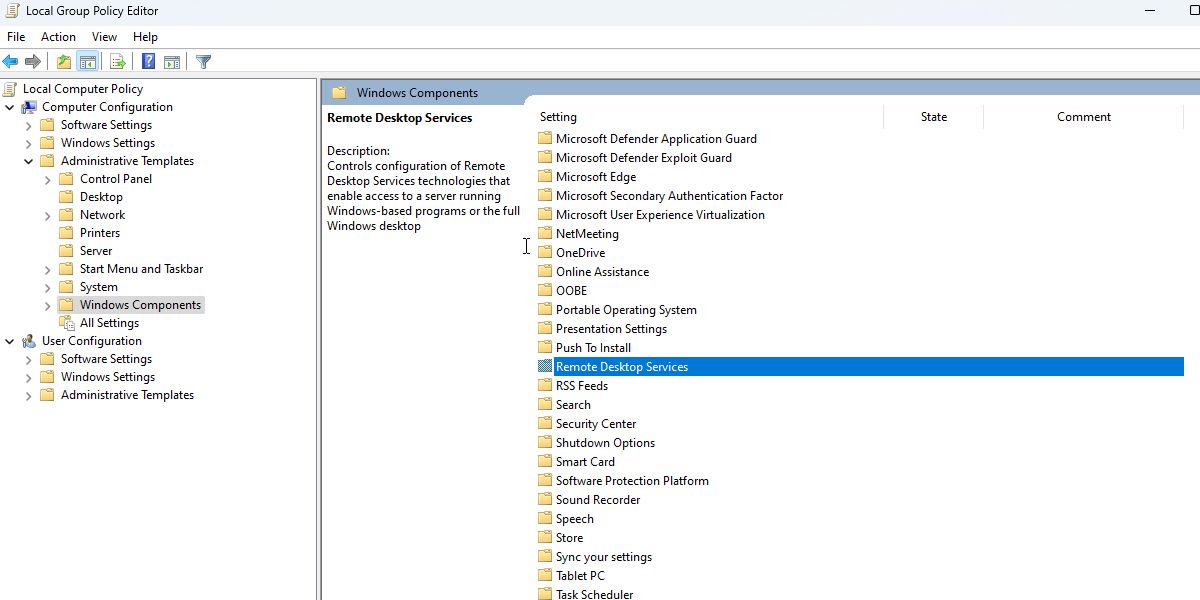
- Within theLocal Group Policy Editor window, head over toComputer Configuration . Next, move on toAdministrative Templates > Windows Components .
- Double-click onRemote Desktop Services and then go to Remote Desktop Session Host > Remote Session Environment .
Greeting Card Builder
- Double-click the Use WDDM graphics display driver for Remote Desktop Connections option.
- Select or check theEnabled option to enable this policy.
- Click theApply button, and after that, selectOK .
 Greeting Card Builder
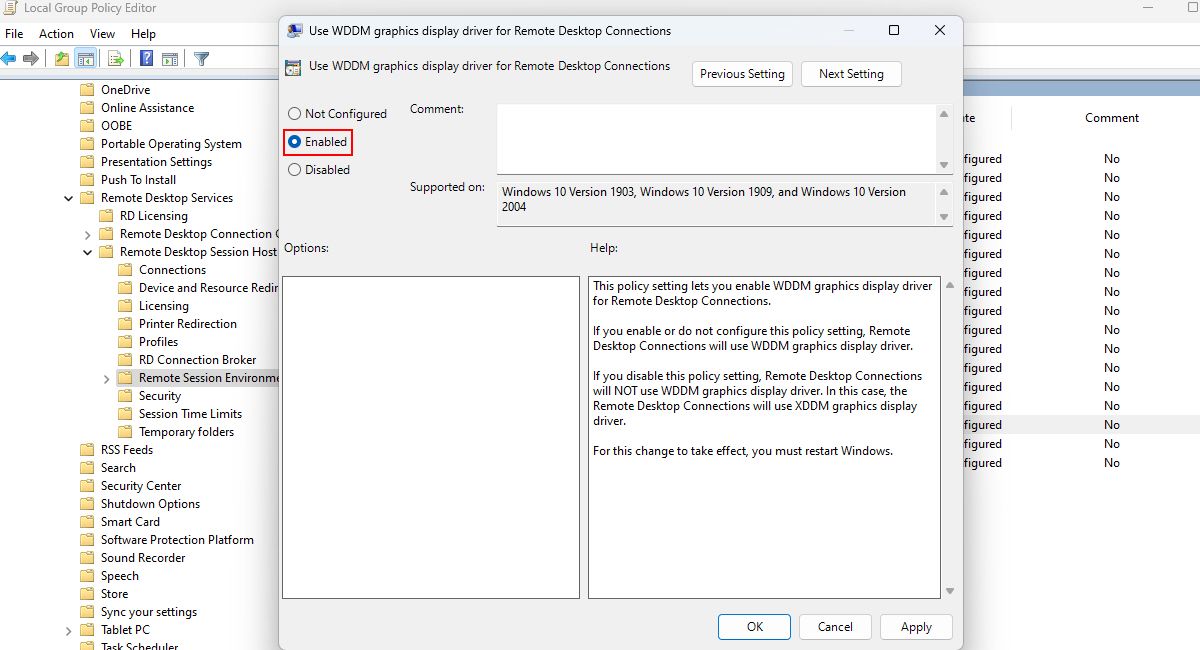
This will force Remote Desktop Connection to utilize WDDM for all the RDC sessions.
7. Adjust the Remote Desktop Performance Settings
Adjusting the performance settings may significantly affect the speed and quality of your remote desktop connection. This is why we recommend keeping a note of the default settings for safety’s sake.
While the default RDC performance settings are optimized for your PC, there’s nothing wrong with experimenting with them. By adjusting them, you can enhance your experience, depending on the network conditions and system resources.
Below are the steps to adjust your remote desktop performance settings:
- Open Remote Desktop Connection using any of the above-given ways.
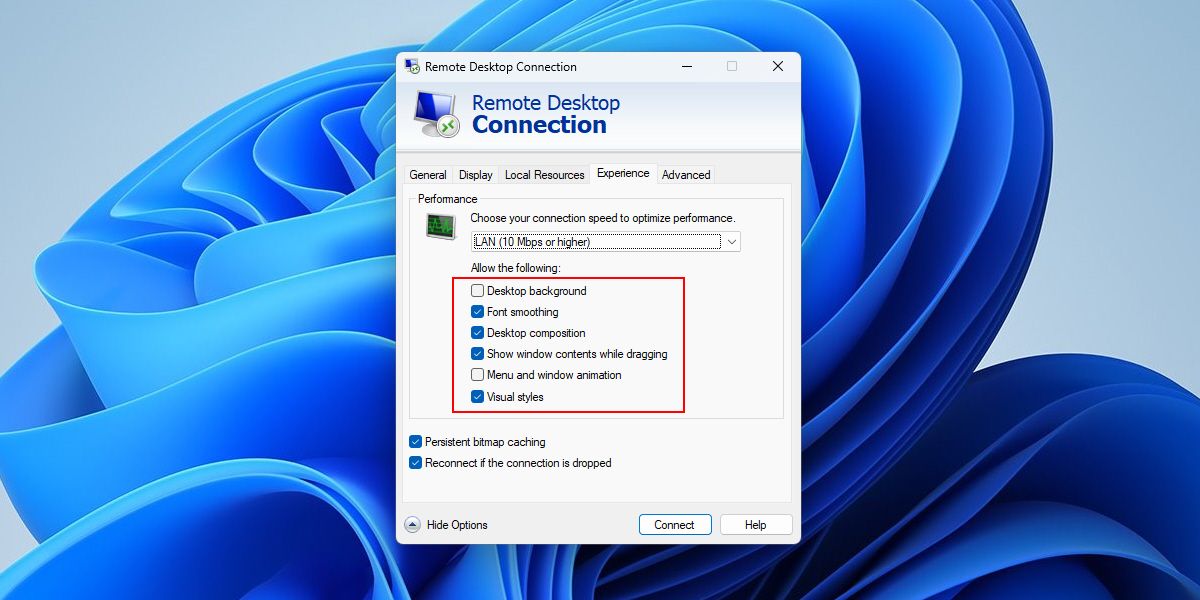
- Click on theShow Options toggle and navigate to theExperience tab.
- UnderPerformance , choose the connection speed that best suits your PC. For example, selectLAN (10 Mbps or higher) if you’re using high-speed internet. If you’re unsure about your network’s speed, selectDetect connection quality automatically from the dropdown.
- Uncheck all the options you don’t want to use or that are not important for you. For instance, you may not get any benefit from selectingDesktop background andMenu and window animation . Similarly, by unchecking such options, you can improve the performance of your remote desktop significantly.
Any DRM Removal for Win:Remove DRM from Adobe, Kindle, Sony eReader, Kobo, etc, read your ebooks anywhere.
- ClickHide Options and enter the remote computer’s name and username. You’re now ready to connect to your remote computer.
 Any DRM Removal for Win:Remove DRM from Adobe, Kindle, Sony eReader, Kobo, etc, read your ebooks anywhere.
Overall, the above settings may vary depending on your needs and computer specifications. So, we recommend that you test each setting to see which one works best for you.
Get Your Remote Desktop Back in Action
The remote desktop black screen issue is a frustrating one. Fortunately, there are several ways available to help you fix the black screen issue.
Make sure you try every troubleshooting step in order until the black screen issue with your remote desktop is resolved. It may take a little trial and error, but once you find the optimal configuration, the black screen will not reappear on your remote desktop.
- Title: Resolving Windows Remote Display Issue: Darkened Screen
- Author: David
- Created at : 2024-08-16 00:21:27
- Updated at : 2024-08-17 00:21:27
- Link: https://win11.techidaily.com/resolving-windows-remote-display-issue-darkened-screen/
- License: This work is licensed under CC BY-NC-SA 4.0.