
Resolving .NET Core Runtime Error on Windows: A Guide

Resolving .NET Core Runtime Error on Windows: A Guide
It’s quite irritating when you come across the “To run this application, you must install .NET Core” error.
Wondering why you’re seeing this error message? In most cases, this issue occurs when the required version of .NET Core is missing or isn’t installed properly. In this article, we’ll show you how to tackle this issue once and for all.
But before we dive into the solutions, let’s take you through how .NET Core works.
Disclaimer: This post includes affiliate links
If you click on a link and make a purchase, I may receive a commission at no extra cost to you.
What Is .NET Core, and How Does It Work?

.NET Core is an open-source, cross-platform framework developed by Microsoft. Unlike the traditional .NET Framework (which is Windows-specific), it’s designed to build and run apps on various platforms, including Windows, macOS, and Linux.
.NET Core provides a runtime environment and a set of libraries that allow developers to create high-performance, scalable, and modern apps. You can develop .NET Core apps using popular programming languages such as C#, VB.NET, and F#.
The core components of .NET Core include the Common Language Runtime (CLR), the Base Class Library (BCL), and the Core Library.
The CLR is responsible for executing the code and managing memory. Meanwhile, the BCL provides a comprehensive set of classes and APIs for common programming tasks. On the other hand, the Core Library consists of additional APIs specific to .NET Core.
So, what exactly does the “To run this application, you must install .NET Core” error mean?
This simply indicates that the app you’re trying to run requires the .NET Core runtime to be installed on your device. But if .NET Core is already installed, then the issue likely stems from other system-related problems.
Now, it’s time to check out the solutions to the “To run this application, you must install .NET Core” error.
1. Enable the .NET Framework Feature
You probably noticed that the error message suggests you should install .NET Core to resolve the issue. But before we get to that, let’s explore a simpler solution—enabling the .NET Framework Feature.
You should try this first, because if the .NET Framework feature is already installed but disabled, there’s no need to re-install it again. So, let’s check out how you can enable the .NET Framework feature:
- Press Win + R to open the Run command dialog box.
- Type Control Panel and press Enter.
- Click the View by drop-down menu and select Small icons.
- Select Programs and Features from the menu items.
- Click the Turn Windows features on or off option on the left part of the window.
- Check the .NET Framework boxes.
- Expand the .NET Framework options and check all the boxes within them.
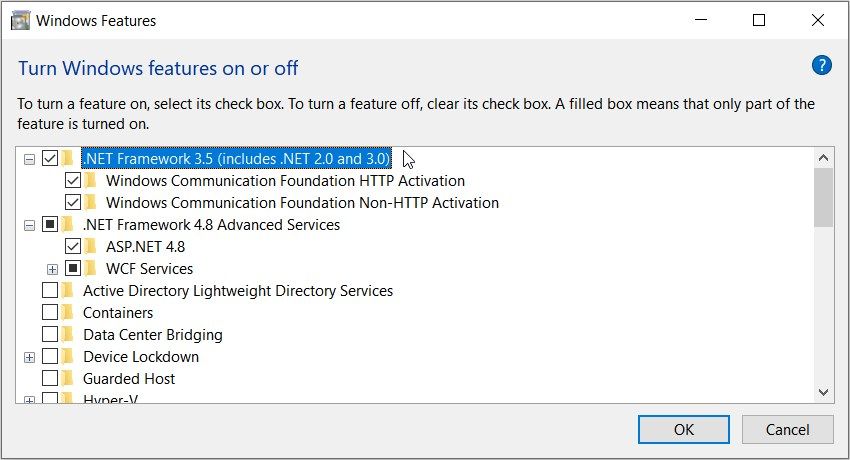
Click OK to save these changes, and then restart your computer.
2. Install the Required Version of .NET Core
Running into the same issue even though you’ve enabled the “.NET Framework” feature? If so, then that’s a sign that you need to install .NET Core.
Let’s take you through the installation process:
- Find the specific version of .NET Core that’s needed to run the affected app. For example, check the app’s documentation, system requirements, or error message for information about the required .NET Core version.
- Go to the .NET Core Installation page and download the right .NET Core installer.
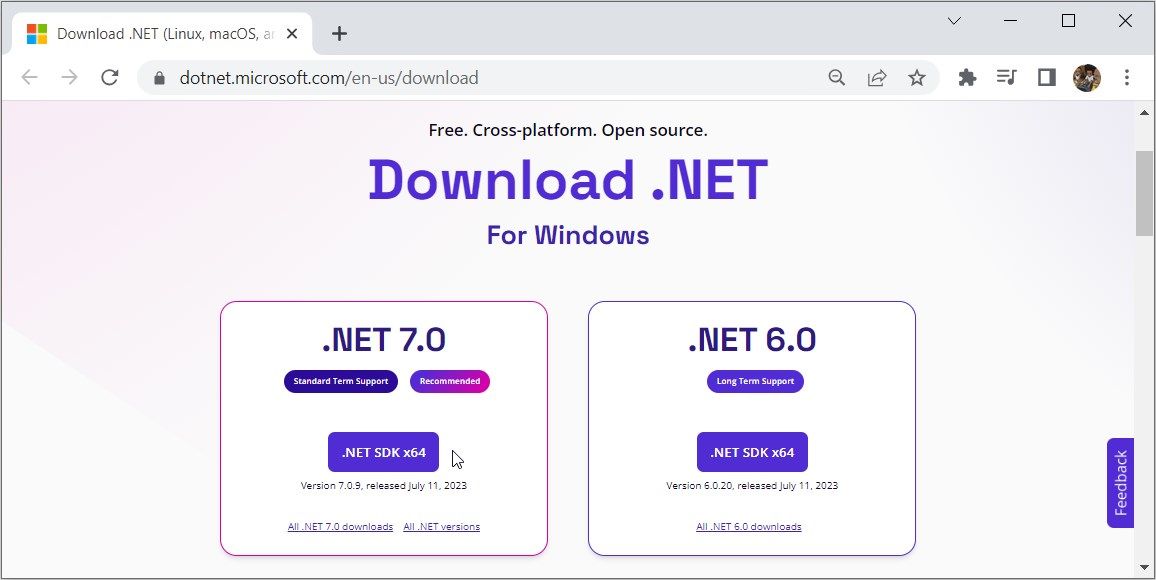
From there, run the .NET Core installer executable (EXE) file and then follow the on-screen instructions.
3. Repair the .NET Core Feature
Sometimes, all you need to do is repair .NET Core to tackle the issue at hand. This can help fix any corrupted or missing files and resolve configuration issues.
So, here are the steps for repairing .NET Core on your device:
- Type Control Panel in the Start menu search bar and select the Best match result.
- Click the View by drop-down menu and select Small icons.
- Select Programs and Features from the menu items.
- Right-click on the Microsoft .NET Core Runtime (or Microsoft .NET Core) and select Repair or Change.
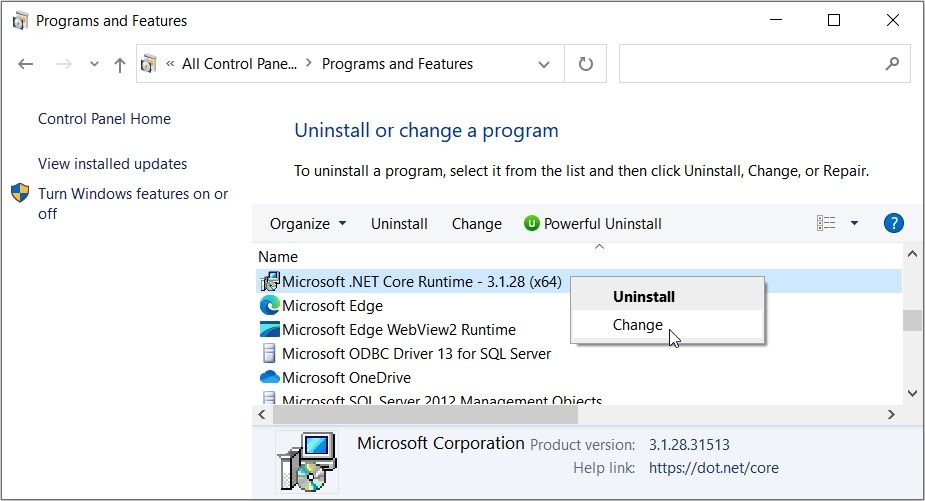
From there, follow the on-screen instructions to complete the repair process. This should fix any issues with the existing .NET Core installation.
4. Check the .NET Core Path Using the “Environment Variables” Feature
Environment variables are named values that store data used by the operating system and other programs. For instance, the WINDIR environment variable contains the location of the Windows installation directory.
You can check and fix the path to the .NET Core installation folder using environment variables. This will ensure that the system can locate the necessary .NET Core components when running apps.
Let’s take you through the process:
- Press Win + E to open File Explorer. Alternatively, check out the different ways to open File Explorer .
- Right-click on This PC option on the left and select Properties.
- Scroll down to the Related settings section and then click the Advanced system settings option.
- Click the Environment Variables button.
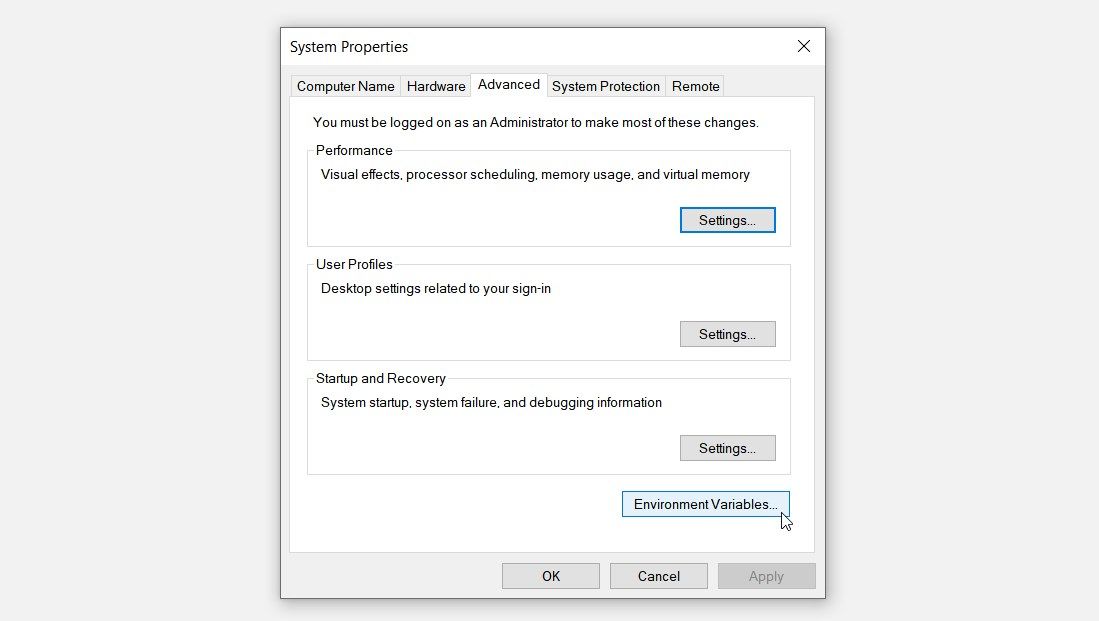
Navigate to the System variables section and then follow these steps:
- Select the Path variable.
- Click the Edit button.
- Check if the path to the “.NET Core installation” folder is present. It should typically be something like “C:\Program Files\dotnet.”
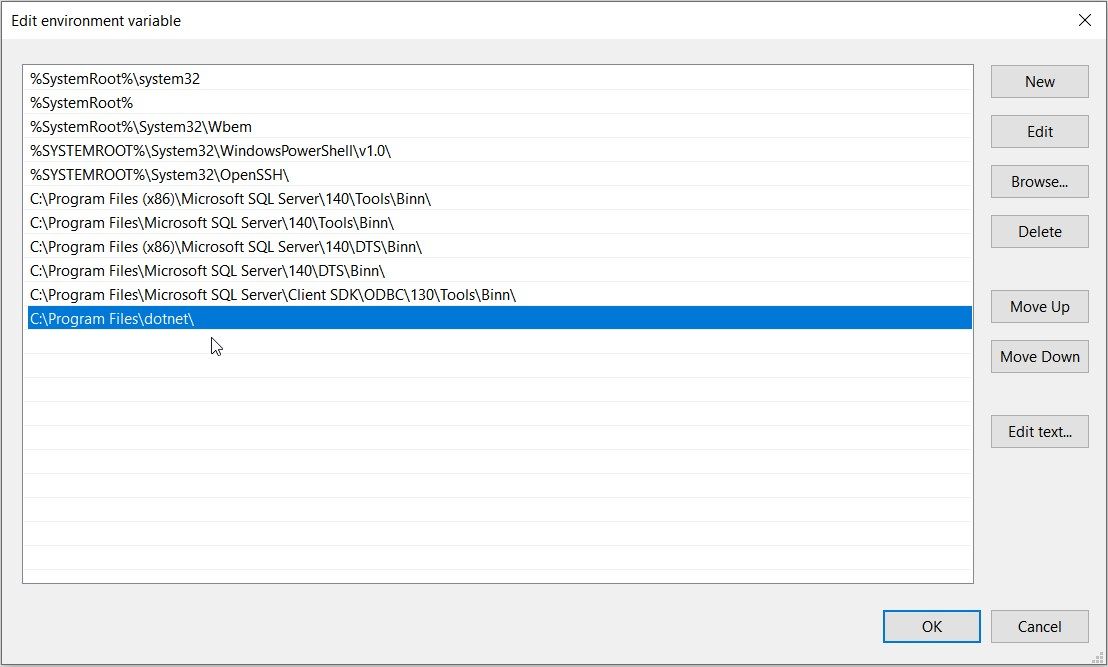
If the path is already present, then the “.NET Core” error likely stems from other system issues. In this case, you’d need to check out the other solutions in this article.
If the .NET Core path is missing or incorrect, then follow these steps to resolve the error:
- Click the New button in the top-right corner.
- Type C:\Program Files\dotnet in the box.
- Press OK and then close the Environment Variables window. Finally, restart your device to save these changes.
5. Ensure the App Is Compatible With Your Device

Sometimes, you might be running an app that’s incompatible with your device. In this case, that particular app will likely pop up strange error messages.
So, an easy way out is to check the app’s compatibility. Here are tips on how you can do that:
- Verify Supported Platforms: Confirm that the app is compatible with your Windows version. Some apps may have specific compatibility restrictions or require certain updates to function properly. If needed, update your Windows device to address compatibility issues with .NET Core and other components.
- Review App Requirements: Check the documentation or system requirements provided by the app developer. For instance, look for any specific mentions of .NET Core versions or dependencies required to run the app. From there, ensure that your system meets those requirements.
- Contact the App Developer or Customer Support: If you’re unable to find clear information about the app’s compatibility with your device, reach out to the app developer or support team. They can provide guidance and troubleshooting steps that can help you resolve the “.NET Core installation” error.
6. Perform a Clean Boot or Reset Your PC

As a last resort, try resolving the issue by performing a clean boot or resetting your PC.
Performing a clean boot involves starting your computer with a minimal set of startup programs and services. It disables unnecessary background processes and can eliminate any potential conflicts that could be causing the error.
Meanwhile, resetting your PC essentially restores it to its original factory settings—removing any installed apps and user data. This can be a more drastic solution, but it can effectively address the issue at hand and other system issues. But before you proceed, make sure that you back up your PC.
Run Your Favorite Apps Without Restrictions on Windows
It’s really annoying when you see error messages while trying to run your apps. Fortunately, you can tackle the “To run this application, you must install .NET Core” error using the tips we’ve covered.
But before we dive into the solutions, let’s take you through how .NET Core works.
Also read:
- [New] Enhancing Follows Into Genuine Subscriptions
- [New] In 2024, Optimize, Customize & Enhance with These Win11 Tips
- [Updated] Top-Ranked Gaming Monitors for PS5 & Xbox X
- Correcting Vanished Files Problem on Windows 11
- Decoding the Battle Between Neo QLED and OLED Displays: Key Insights
- New Exclusive Listing of the Top 11 Cost-Free Speech Adjustment Software for iOS & Android Users for 2024
- Overcoming Outlook's Unpreviewable Files Issue on Windows
- Quick Fixes for App Not Verified Error on Windows PC
- Removing False Device Errors: Tips and Tricks, WIndows
- Solution Steps for 'Application.exe Has Stopped Working' Issue on Your Computer
- Title: Resolving .NET Core Runtime Error on Windows: A Guide
- Author: David
- Created at : 2024-10-21 21:07:18
- Updated at : 2024-10-27 05:44:07
- Link: https://win11.techidaily.com/resolving-net-core-runtime-error-on-windows-a-guide/
- License: This work is licensed under CC BY-NC-SA 4.0.