Refresh Virtual Memory on New Windows 11

Refresh Virtual Memory on New Windows 11
Are you having trouble with virtual memory on Windows 11? Resetting virtual memory on Windows can improve system performance or free up extra hard drive space. So, we’ll show you exactly how to reset the virtual memory on your Windows 11 computer.
What Is Virtual Memory and How Does It Work?
Virtual memory, also known as a paging file, is a technology used in computers to allow programs to use more memory than what’s physically available on it. When you run out of RAM, your operating system relies on virtual memory to continue running programs.
The computer creates a special file called a page or swap file on the hard drive. It stores some data temporarily removed from RAM and written to the hard drive. This way, the computer can access more memory than what’s installed.
Although virtual memory allows programs to operate smoothly, it can also hurt overall performance. For example, if your computer runs out of RAM, it will use more of the hard drive to store data. This also significantly slows overall performance as HDDs and SSDs are much slower than RAM.
Let’s now see how to reset Virtual Memory on Windows.
1. Use the System Properties window
If you want to reset virtual memory settings on your Windows device, you can use the System Properties window. To do this, press Win + R on your keyboard to open the Run dialog box .
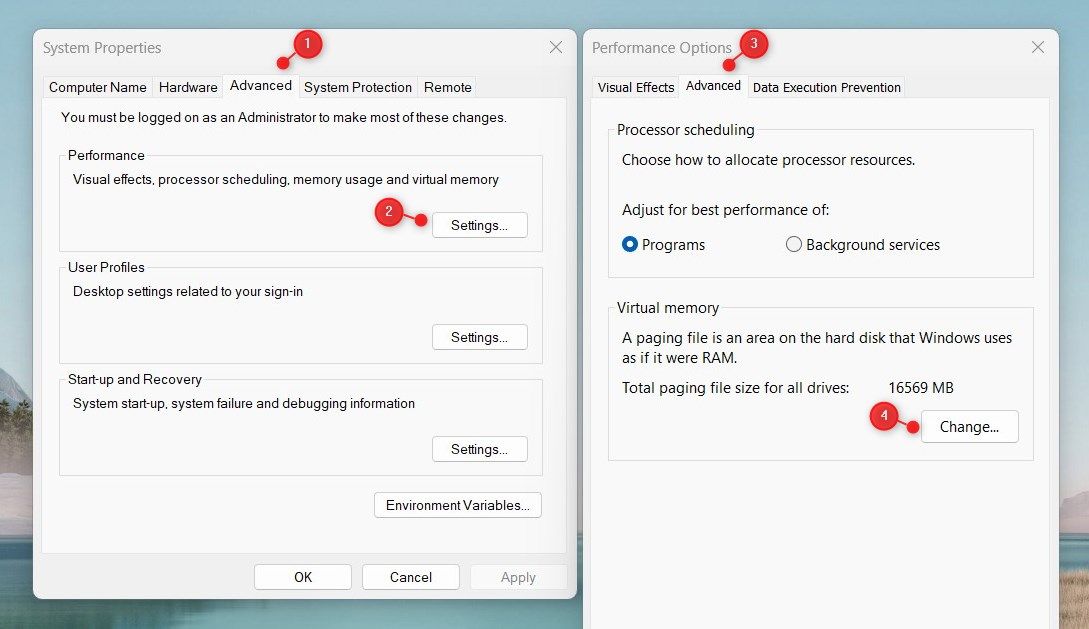
In the text box, type sysdm.cpl, and hit Enter. A system properties window will open up. Then, go to the Advanced tab and click the Settings button in the Performance section.

This will open up the Performance Options window, where you can manage virtual memory settings. For this, switch to the Advanced tab and click on Change in the Virtual Memory section.

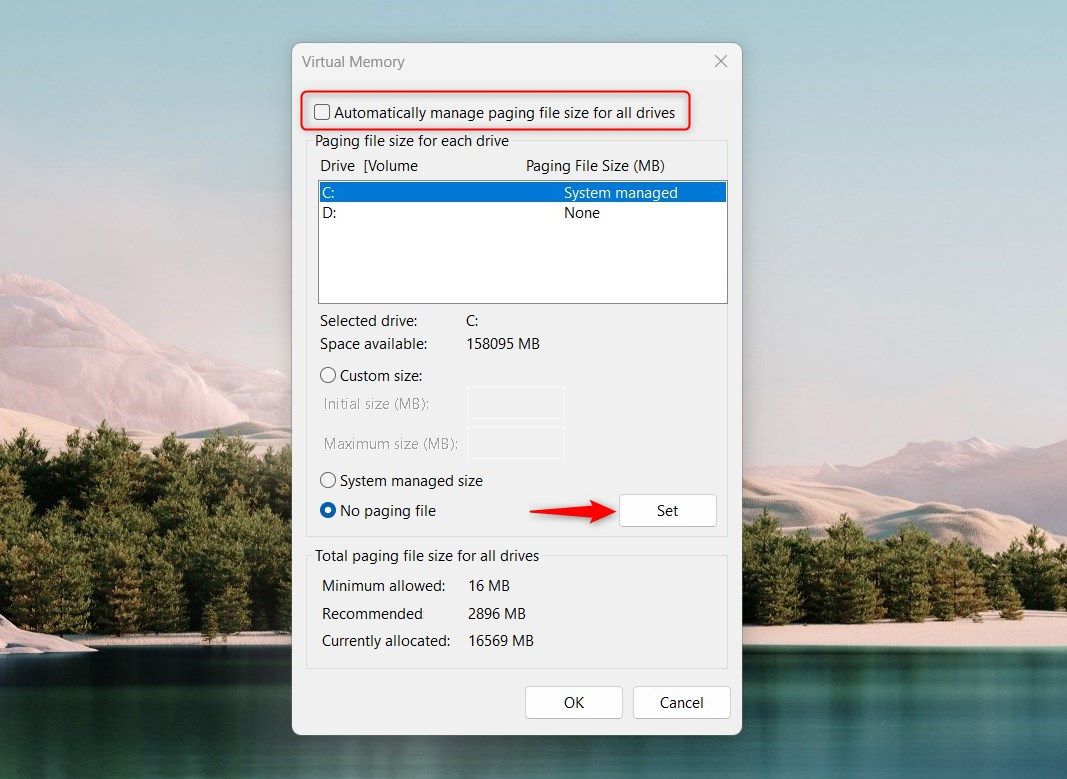
On the next screen, uncheck the Automatically manage paging file size for all drives checkbox and select the drive you want to configure virtual memory. Normally, this will be the drive on which Windows is installed.
Set the custom size for virtual memory. Then, check the No paging file radio button and click Set. If you see a warning message, click Yes to confirm.
After following the above steps, click OK to save your changes. Now close the System Properties and Settings windows and restart your computer. The new virtual memory settings should now be in effect.
2. Use Group Policy Editor
You can also use the Local Group Policy Editor to reset virtual memory settings on your Windows device. But remember that this method is only available on Pro and Enterprise editions.
If you’re using a Home edition, you should first enable the Local Group Policy Editor in Windows Home .
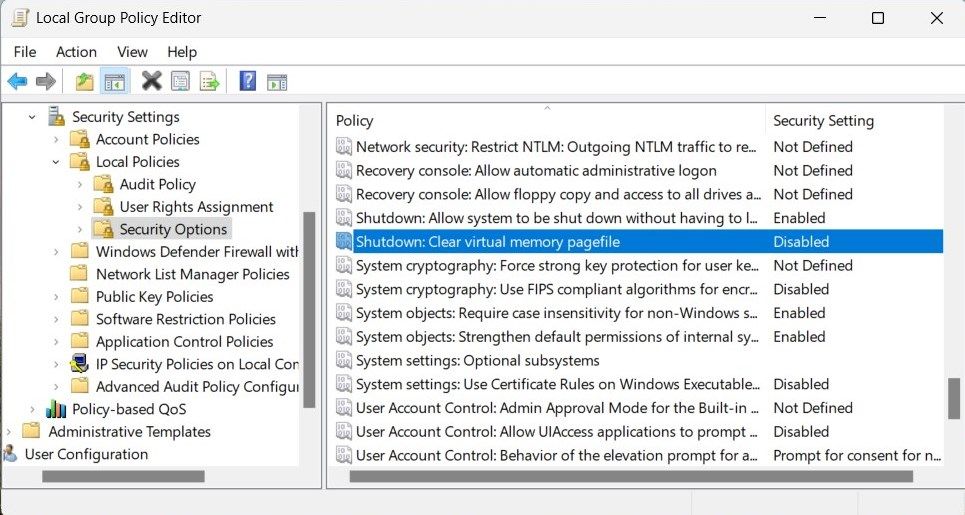
To get started, open the Run dialog box and type gpedit.msc into the text box. Then click OK or press Enter to open the Local Group Policy Editor window.

Then navigate to the following location:
Local Computer Policy > Computer Configuration > Windows Settings > Security Settings > Local Policies > Security Option
Scroll down and double-click Shutdown: Clear virtual memory pagefile policy. In the Properties window, select Enabled and then click Apply. Next, click OK to save it.
3. Use Registry Editor
If you don’t have access to the Local Group Policy Editor, you can also use the Registry Editor to reset virtual memory settings on Windows. Before proceeding, you should create a backup of the registry in case something gets wrong.

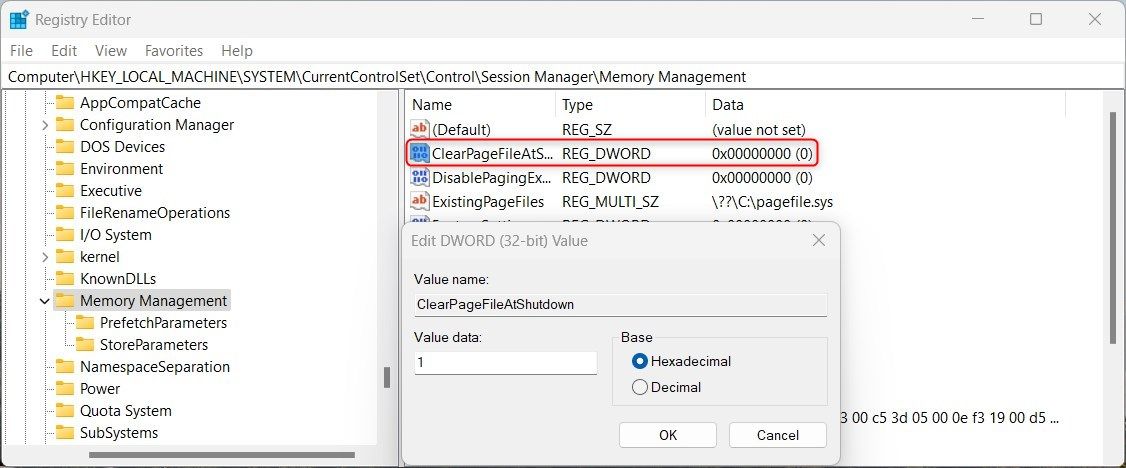
To get started, search for Registry Editor in the Start menu and click on it. Once you open the Registry Editor, navigate to the following path:
HKEY_LOCAL_MACHINE\SYSTEM\CurrentControlSet\Control\Session Manager\Memory Management
Next, double-click on the ClearPageFileAtShutdown key and set its value to 1. Click on the OK button to save your changes.
Reset Virtual Memory To Get Better Performance
Resetting virtual memory settings improves Windows computer performance. This guide introduces three methods to learn how to reset virtual memory on Windows. Give it a try and see which methods work best for you. If you face any issues while doing this, you can always use system restore to revert to the previous settings.
Also read:
- [New] 2024 Approved Detailed Methods for Seamless WireCast Livestreams on YouTube
- [Updated] Premier Edits The Ultimate Filmmaker's Guide
- 2024 Approved Unleashing Creativity Advanced OBS Techniques Explained
- DVDコピー自由化アプリ: 2024新鋭版全面紹介!
- Enhancements in Apple AI Technology Set to Elevate Siri by 2025 - Insights
- MP4への一括変換:多数MOVファイル対応マニュアル
- The Essential Checklist for Using Zoom on Your Windows PC for 2024
- Top 10 No-Cost DVD Duplication Programs: How to Copy Your DVD Without Paying a Dime
- VTS形式のデータを効率的に変換: VTS変換ソフトウェア使用ガイド
- WMVファイルの効率的なコンパクト化方法
- Title: Refresh Virtual Memory on New Windows 11
- Author: David
- Created at : 2025-01-02 18:23:17
- Updated at : 2025-01-06 18:54:43
- Link: https://win11.techidaily.com/refresh-virtual-memory-on-new-windows-11/
- License: This work is licensed under CC BY-NC-SA 4.0.