
Reclaim Original Look for Discoloured Extend Volume
Reclaim Original Look for Discoloured Extend Volume
The “extend volume” option in the Disk Management tool enables you to increase the size of a volume or partition. However, there may be a situation where the extend volume option may be grayed out, preventing you from increasing the volume.
If this is happening to you, try the below solutions for a grayed-out “extend volume” option on Windows
Why Is the Extend Volume Option Grayed Out on Windows?
If you see the extend volume option is grayed out in the Disk Management tool, there are a few possible reasons:
- The unallocated space is not located directly next to the partition you want to extend.
- The partition’s file system is not supported on Windows.
- The extend volume option will be grayed out if your drive has no unallocated space.
Now that you know all the possible culprits behind the issue, let’s check out all the solutions that can help fix it.
1. Convert the Partition to an NTFS File System
Windows only supports certain file systems for partitions. If the partition you want to extend is formatted in a file system incompatible with Windows, you will not be able to extend it.
To extend the partition, you must format the partition and convert it into an NTFS file system. However, formatting the partition will delete all the data, so make sure to back up the data on the partition first.
To convert the partition to an NTFS file system, follow these steps:
- Right-click on the partition and select Format.
- Choose NTFS from the File system drop-down menu. Then, click OK.

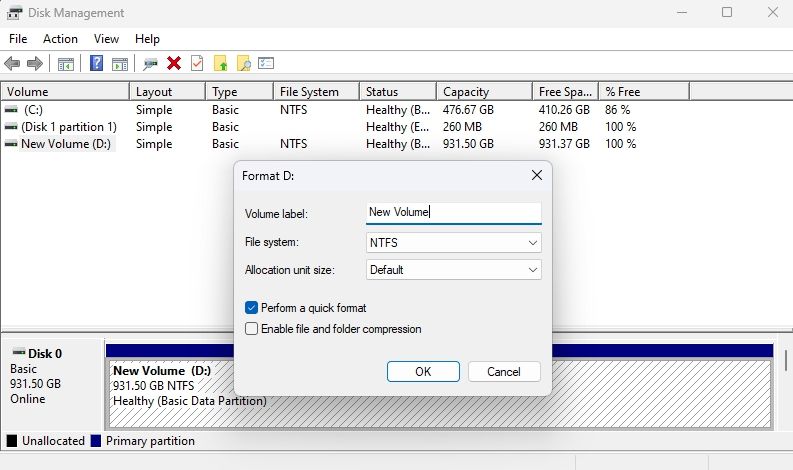
The formatting process may take some time, depending on the amount of data on the partition. Once done, restart your computer and check if the issue is resolved.
2. Delete a Partition and Create Unallocated Space
The “extend volume” option will gray out if there is no unallocated space next to the partition you want to extend. To create unallocated space, you will have to delete a partition that is next to the partition you want to extend.
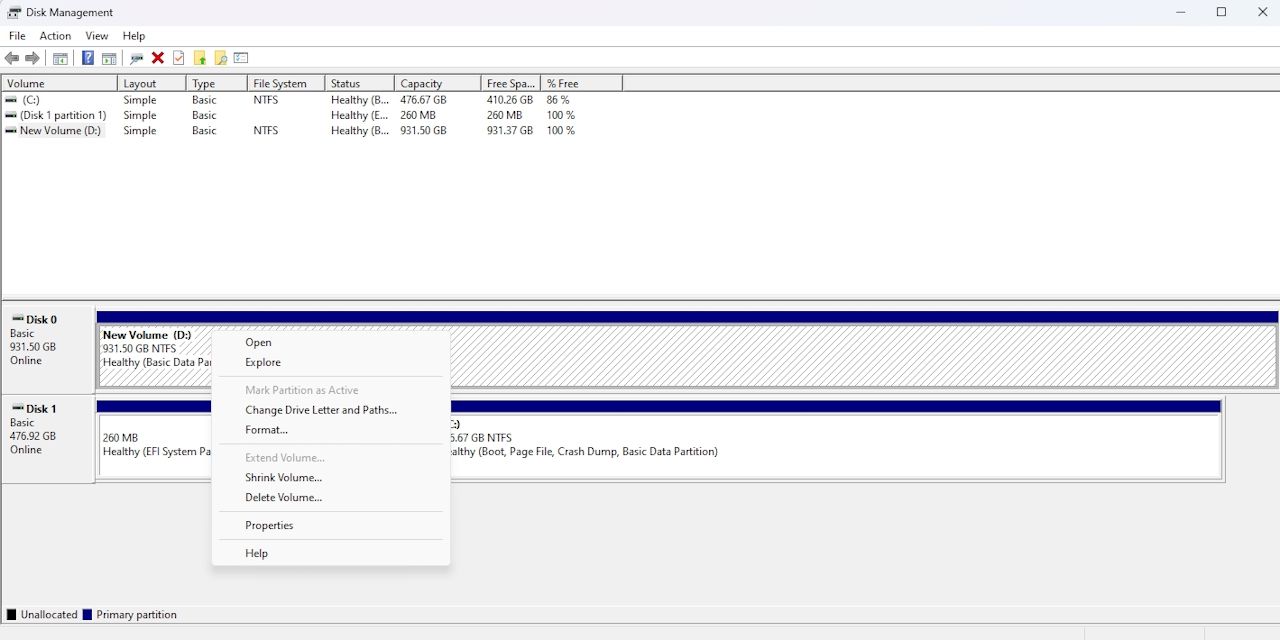
If the partition is a normal volume, you can simply right-click on it and select Delete Volume. However, if the partition contains data, make sure to back it up before deleting it.
If the partition is a recovery partition, you cannot delete it using Disk Management. You’ll have to delete it using the Command Prompt. Here are the steps to do it:
- Press the Win key to open the Start Menu, type Command Prompt, and choose Run as administrator from the right pane. If this method doesn’t work, check out other ways to launch Command Prompt as an administrator .
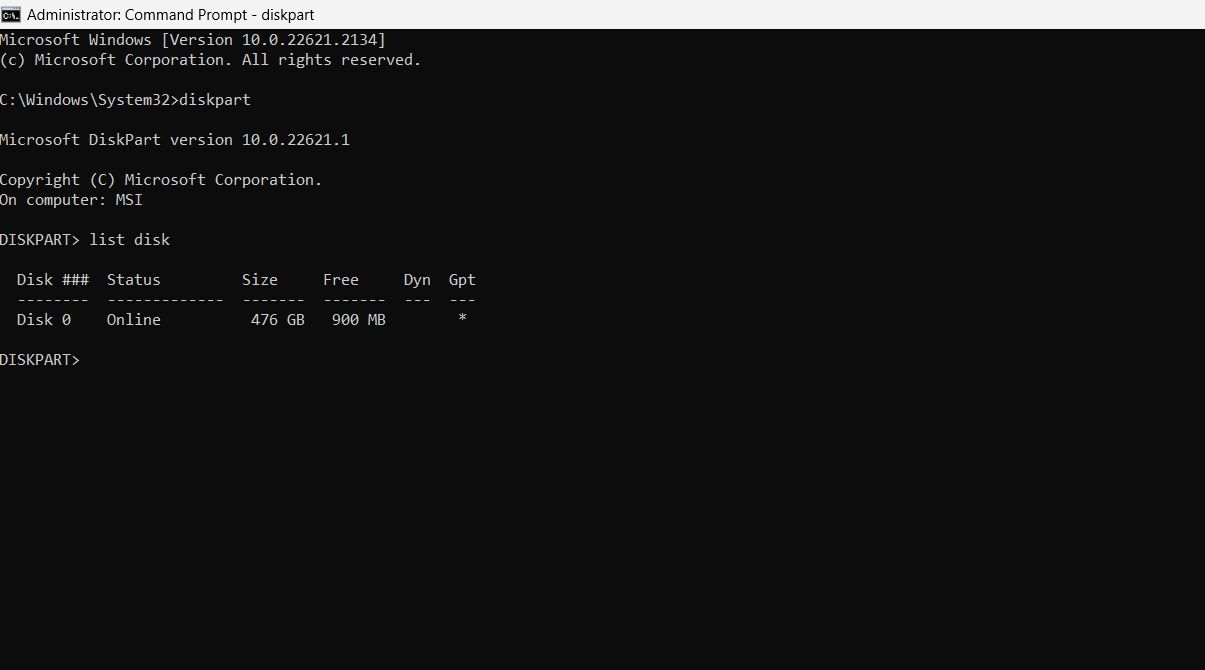
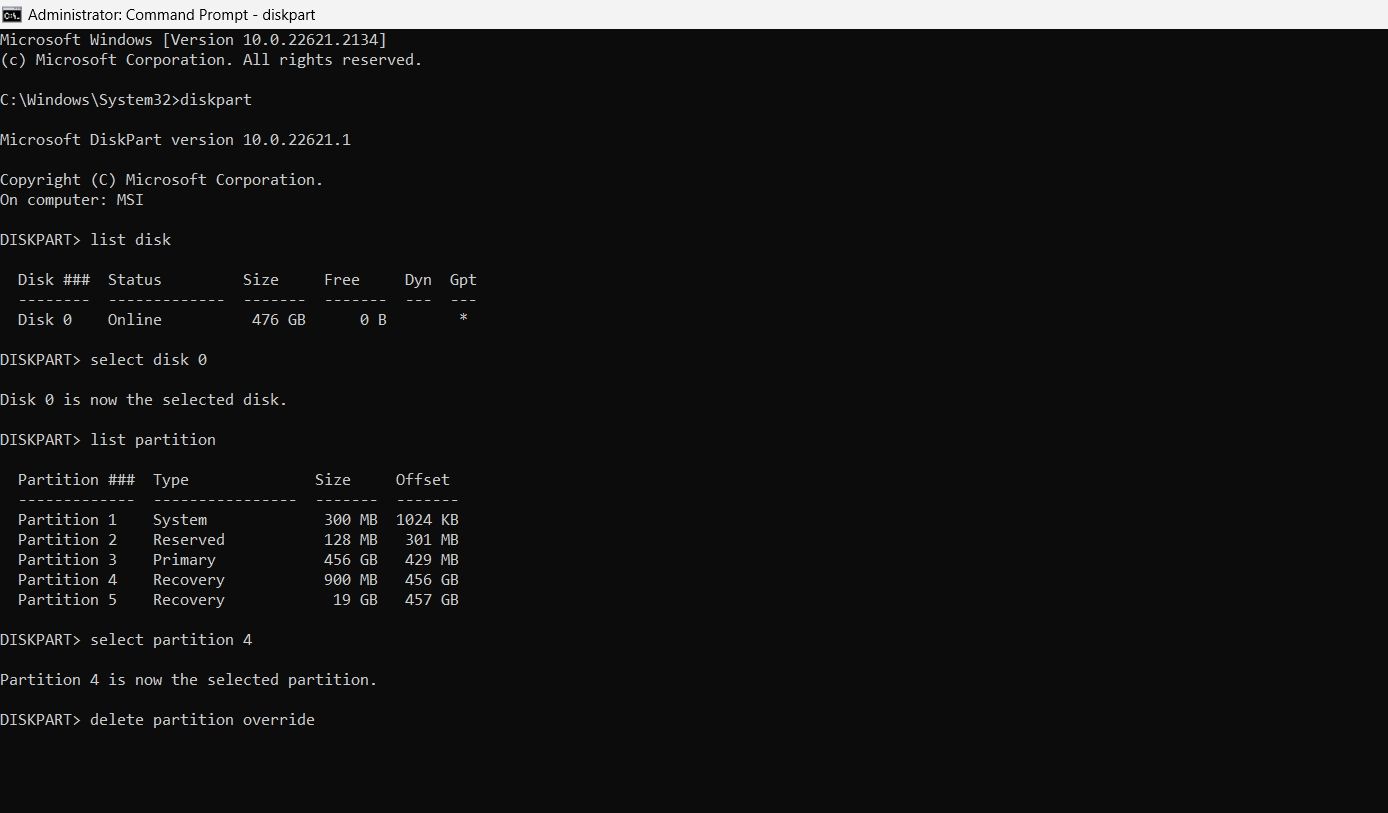
- Type DiskPart and press Enter.
- Type list disk and press Enter. This command will display all the available disks.
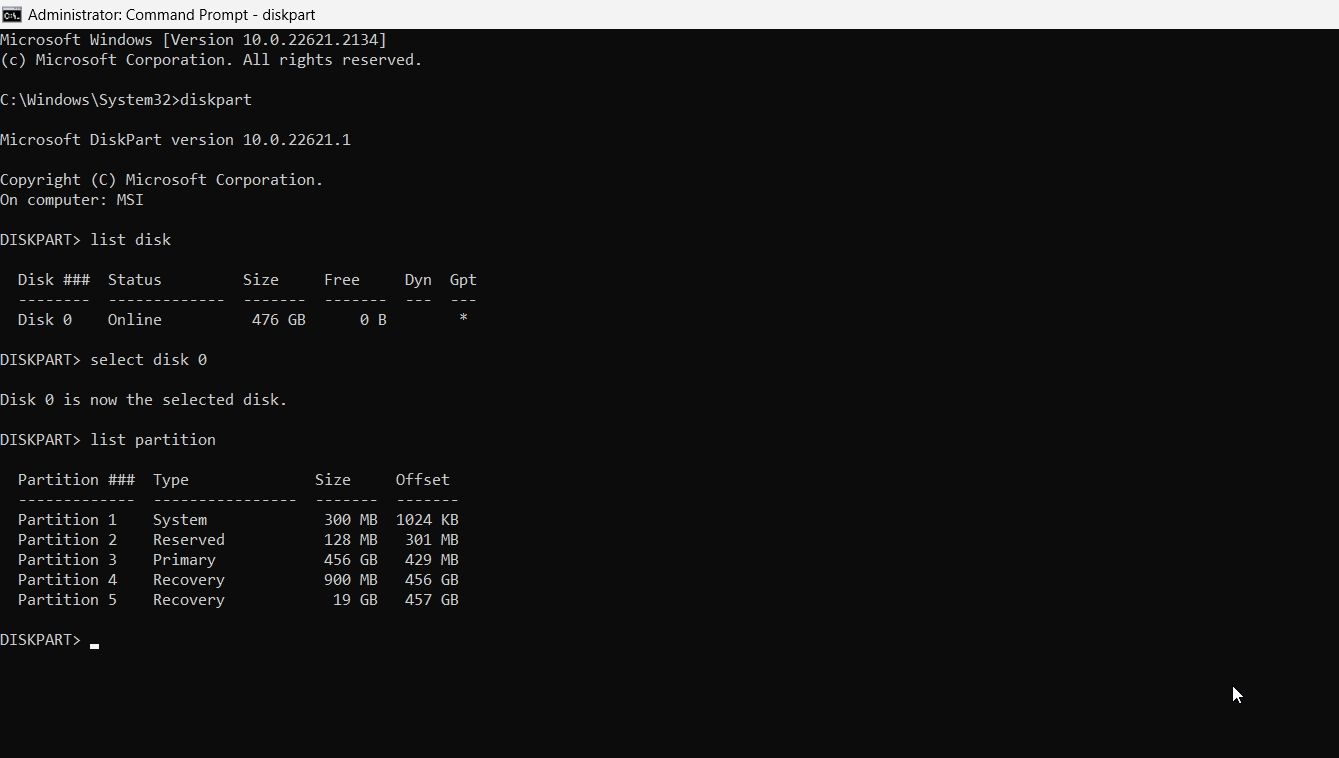
- Select the disk that you want to extend. For example, if you want to extend disk 0, type select disk 0 and press Enter.
- Type list partition and press Enter. This will list all the partitions on the disk.
- In the Type column, look for the partition that says Recovery. Note the partition number. For example, if the partition number is 4, type select partition 4 and press Enter. This will select the recovery partition.
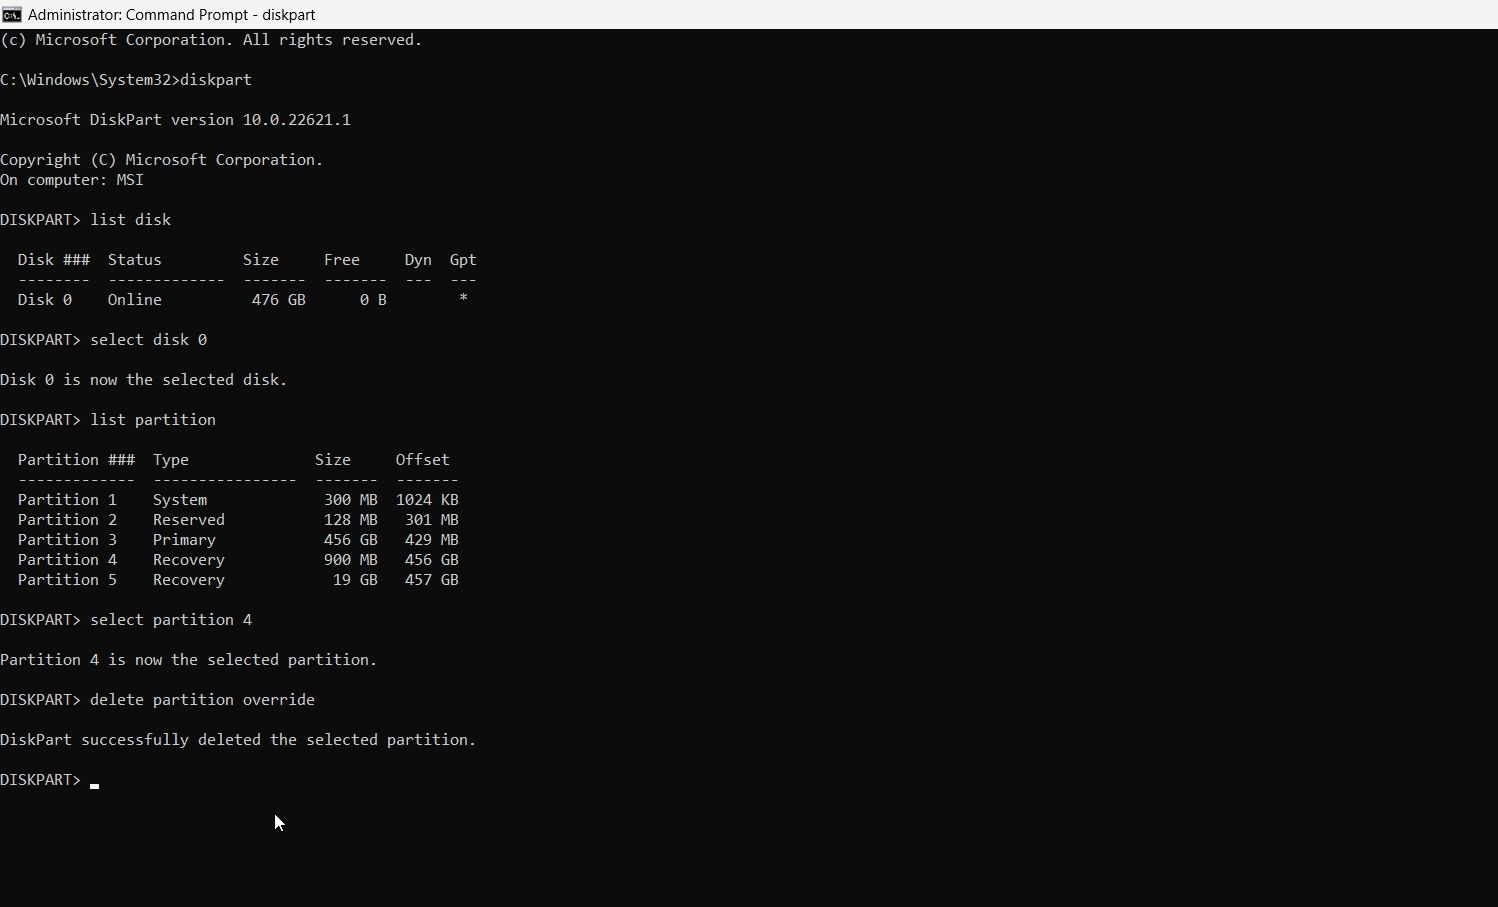
- To delete the recovery partition, type delete partition override and press Enter.
You will see the message DiskPart successfully deleted the selected partition. This indicates that the recovery partition has been deleted.
Next, open the Disk Management tool, and you will see an unallocated space next to the partition you want to extend. Right-click on the partition, choose Extend Volume, and then click Next.
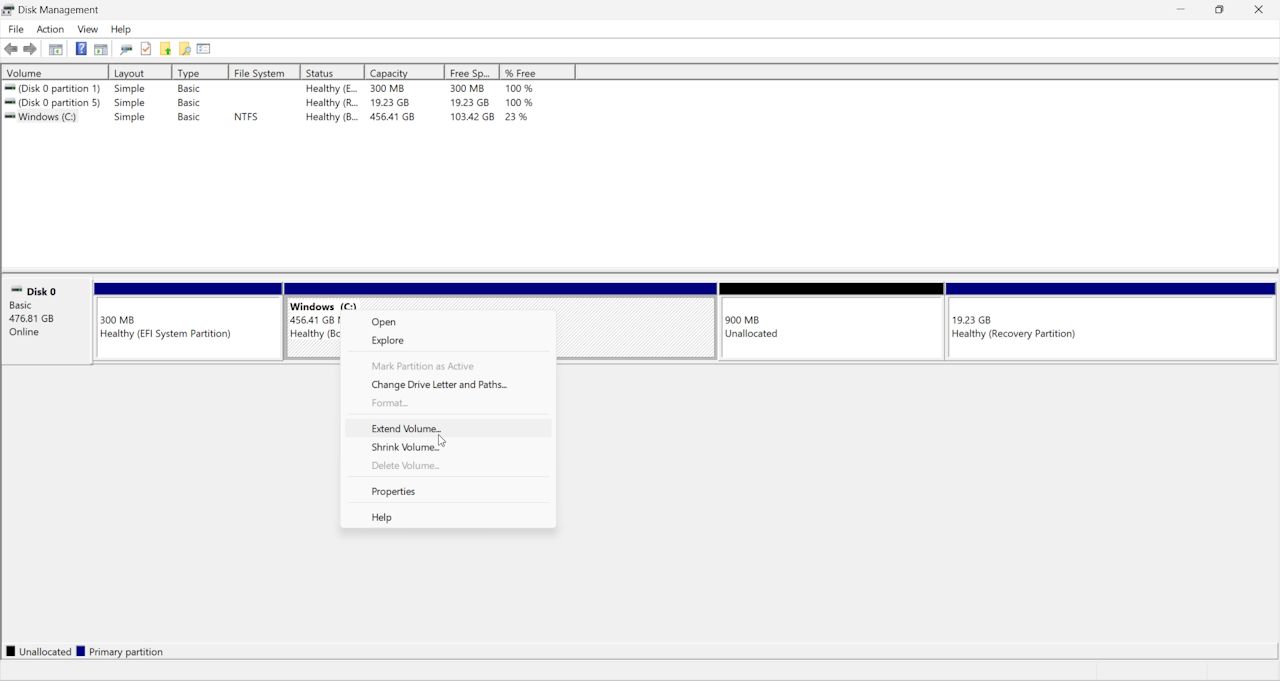
Once the wizard completes, you will see the partition size has been increased.
Extend Your Windows Partitions Without Any Further Issues
If you run out of space on a drive, you can use the unallocated space to increase storage. However, you will not be able to do so if the extend volume option is grayed out in the Disk Management tool. Fortunately, you can quickly troubleshoot this issue using the solutions above.
If this is happening to you, try the below solutions for a grayed-out “extend volume” option on Windows
Also read:
- [Updated] In 2024, Superior SD Card Compatible with A7S II
- 2024 Approved Maximize Gameplay Efficiency With Top Monitor Extensions
- Accelerate Finding Documents with Windows 11 Taskbar Search Feature
- Access GPOs Securely: A Guide to Win11's Tools
- Accessing Microsoft Paint in Windows 11
- Achieve Full Control with Admin CMD Role
- Addressing Profile Not Valid Issue for Users in Windows
- Border Techniques for Enhanced Instagram Pictures for 2024
- Bypass Incompatibility Woes in Windows XP, 7 & 8 Easily.
- Elite Camera Tech Review for 2024
- In 2024, Delete Gmail Account With/Without Password On Infinix Note 30 VIP Racing Edition
- Step-by-Step Guide: Linking Your PS4 Gaming Controller with Ease
- The Art of Creating Smooth Audio Cuts
- What is Fake GPS Location Pro and Is It Good On Samsung Galaxy M14 4G? | Dr.fone
- Title: Reclaim Original Look for Discoloured Extend Volume
- Author: David
- Created at : 2025-01-20 20:52:44
- Updated at : 2025-01-25 01:05:44
- Link: https://win11.techidaily.com/reclaim-original-look-for-discoloured-extend-volume/
- License: This work is licensed under CC BY-NC-SA 4.0.