Re-Engaging Lost LAN Discovery on Windows

Re-Engaging Lost LAN Discovery on Windows
Disclaimer: This post includes affiliate links
If you click on a link and make a purchase, I may receive a commission at no extra cost to you.
Quick Links
- What Causes the “Network discovery is turned off” Error on Windows?
- Run the Network and Internet Troubleshooter
- Enable the Network Discovery Feature
- Enable the Services Network Discovery Depends On
- Whitelist Network Discovery From Windows Defender
- Reset the Windows Defender Firewall Settings
- Update the Network Adapter Drivers
Key Takeaways
- Ensure Network Discovery is enabled in the Settings app.
- Check that the essential services required for Network Discovery to work are turned on.
- Whitelist Network Discovery in Windows Defender Firewall.
When you encounter the “Network discovery is turned off” error while searching for other devices on a network, networked computers and devices will not be visible to your Windows PC. This guide explains the solutions you can apply to fix it.
While we use Windows 11 here, these fixes apply to Windows 10 as well.
What Causes the “Network discovery is turned off” Error on Windows?
This error typically occurs when the Windows Network Discovery feature is disabled. You may have disabled this feature accidentally or reset the network settings that disabled it. Other possible causes include:
- Services required for Network Discovery to work are turned off.
- Network adapter drivers are outdated.
- Network Discovery isn’t whitelisted in Windows Defender—so the firewall turned it off.
Now, let’s explore some solutions to resolve this issue.
1. Run the Network and Internet Troubleshooter
Windows includes a handy Network and Internet troubleshooter to help identify and fix network issues. You should begin the troubleshooting process by running this tool to see if it resolves the problem.
To run the troubleshooter, right-click the Start button and go to Settings. Navigate to System > Troubleshoot > Other troubleshooters.
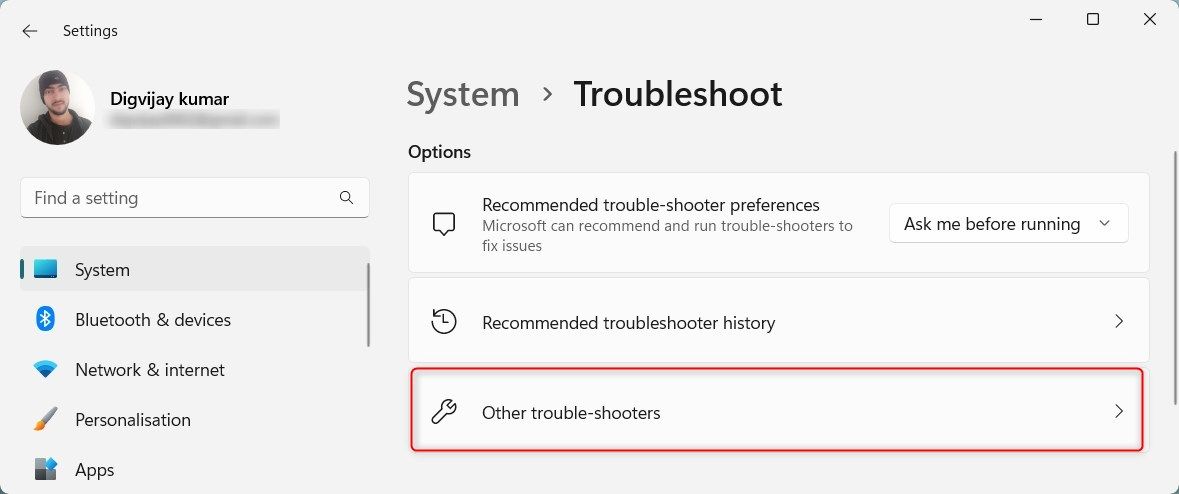
Click on the Run button next to Network and Internet.

Windows will launch the Get Help app. Follow the on-screen instructions to assist Windows in pinpointing the main issue with your network. Then it’ll guide you through the steps to resolve it.
2. Enable the Network Discovery Feature
To make sure Network Discovery isn’t disabled, follow the steps below:
Right-click on the Start button and open Settings.
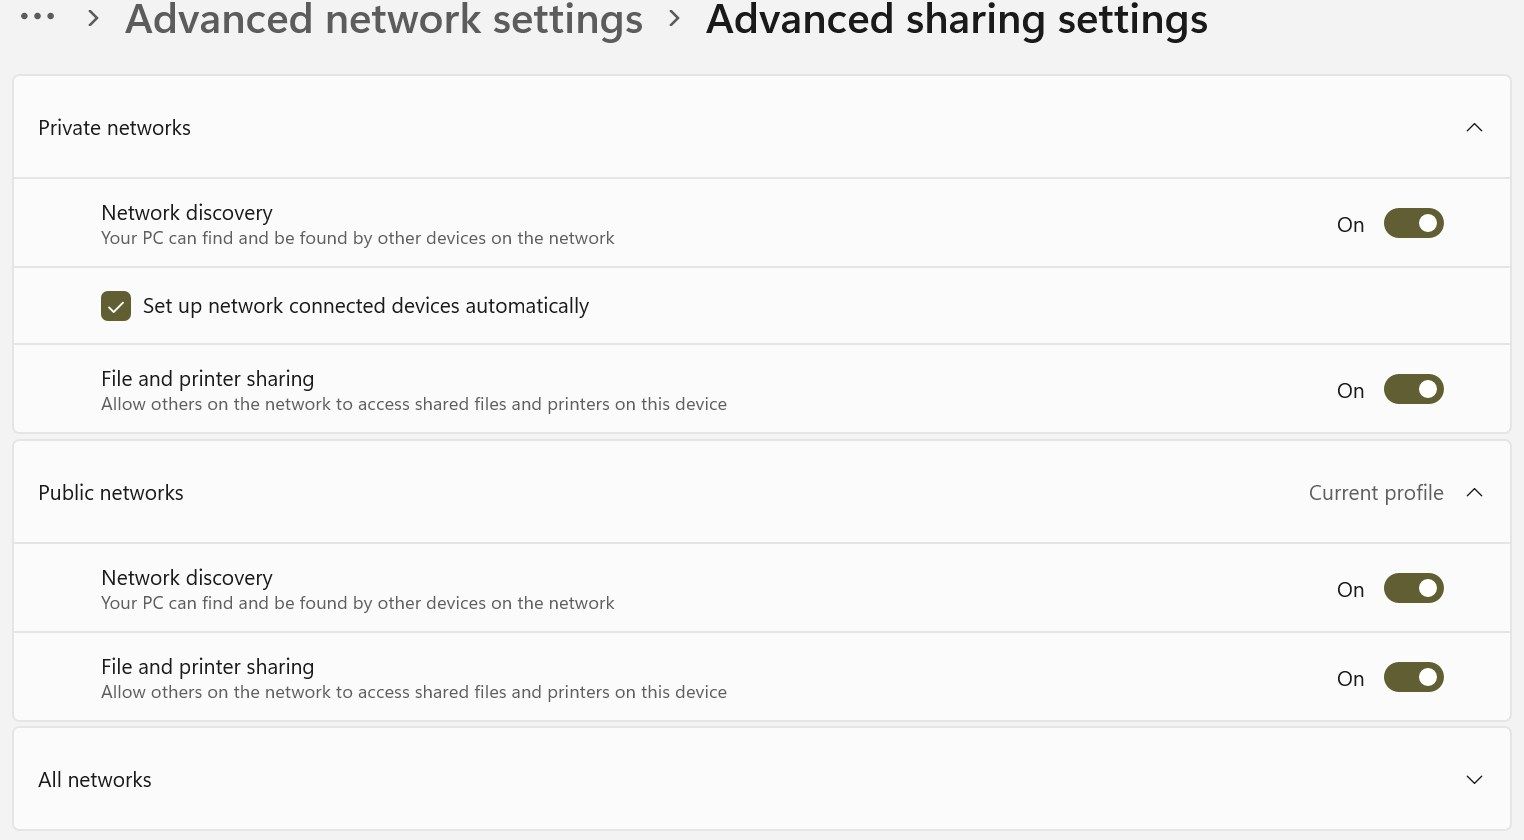
Go to the Network and internet tab on the left and open Advanced network settings on the right.

Choose Advanced sharing settings under More settings.
Expand the menus for Private and Public networks.
If the toggle next to Network discovery is turned off, the feature is disabled. To activate it, toggle the switch on and check the box for Set up network connected devices automatically.
Also, turn on the toggle next to File and printer sharing.

Once you have activated the feature, try using network sharing again. If you see the error again, apply the remaining fixes.
3. Enable the Services Network Discovery Depends On
Five essential services must be enabled for Network Discovery to operate correctly:
- Function Discovery Provider Host
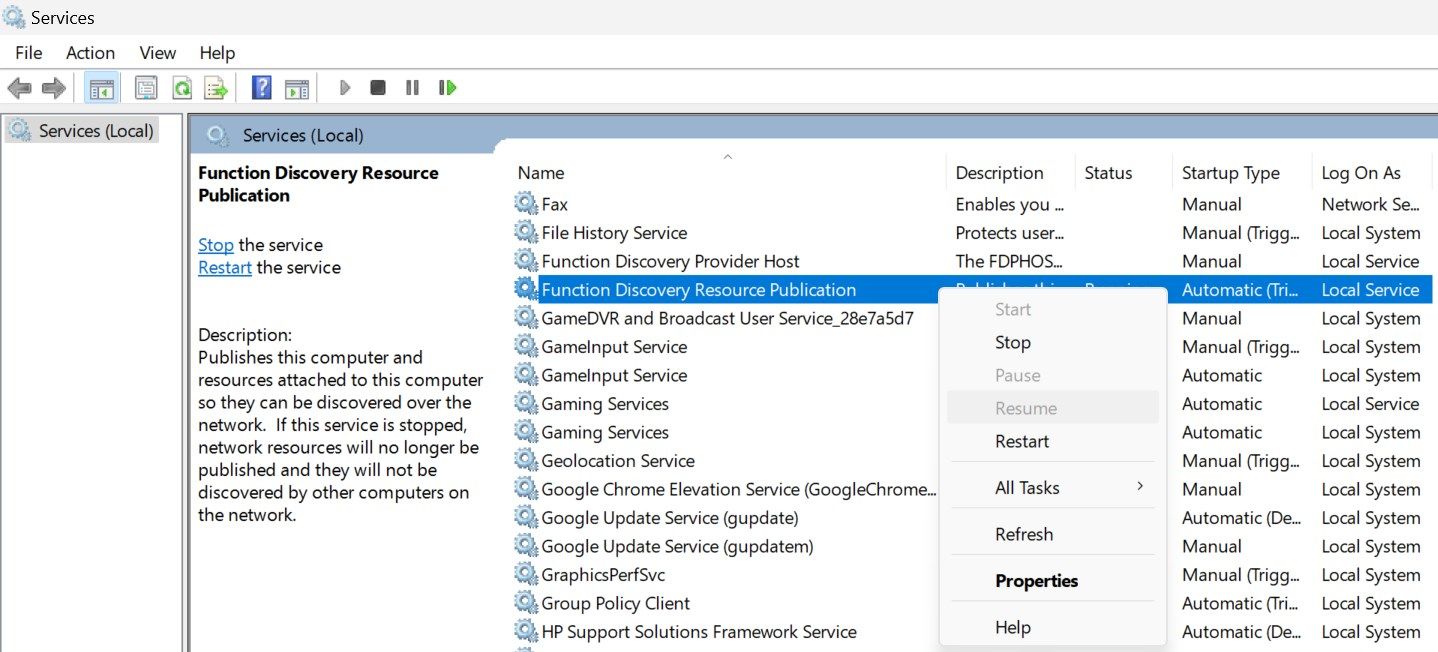
- Function Discovery Resource Publication
- SSDP Discovery
- UPnP Device Host
- DNS Client
You should ensure these services are active and set to start automatically with these steps:
Open the Services app by typing”services” in Windows Search.
Locate the specific service (as mentioned above) you want to check and enable.
Right-click on the service and select Properties.

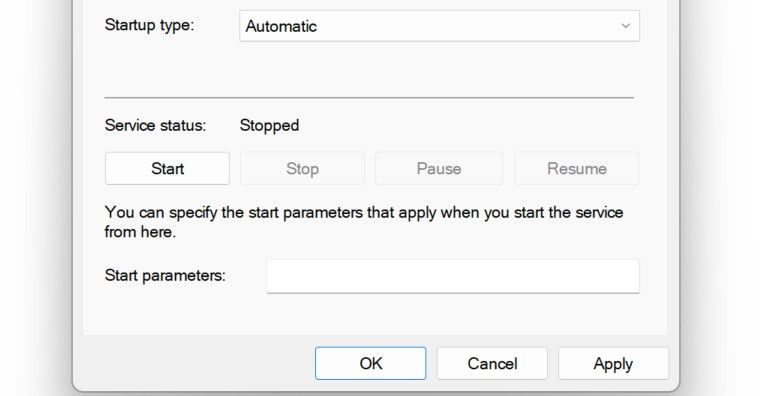
Select Automatic from the Startup type dropdown menu.
Click the Start button to activate the service.

Repeat this process for each of the other four services. Afterward, run the same process that triggered the error earlier. If the error persists, apply the next fix.
4. Whitelist Network Discovery From Windows Defender
You may experience the “Network discovery is turned off**”** error if the Windows Defender Firewall blocks your connection to the network. To remove this, whitelist the feature in Windows Defender:
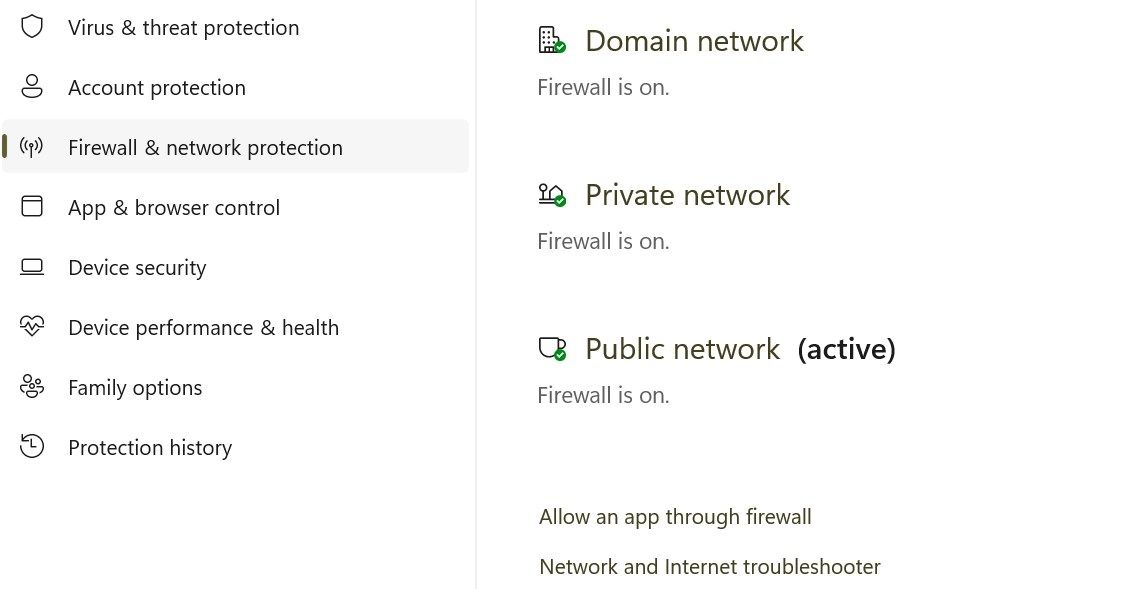
Type “Windows Security”in Windows Search and open the Windows Security app.
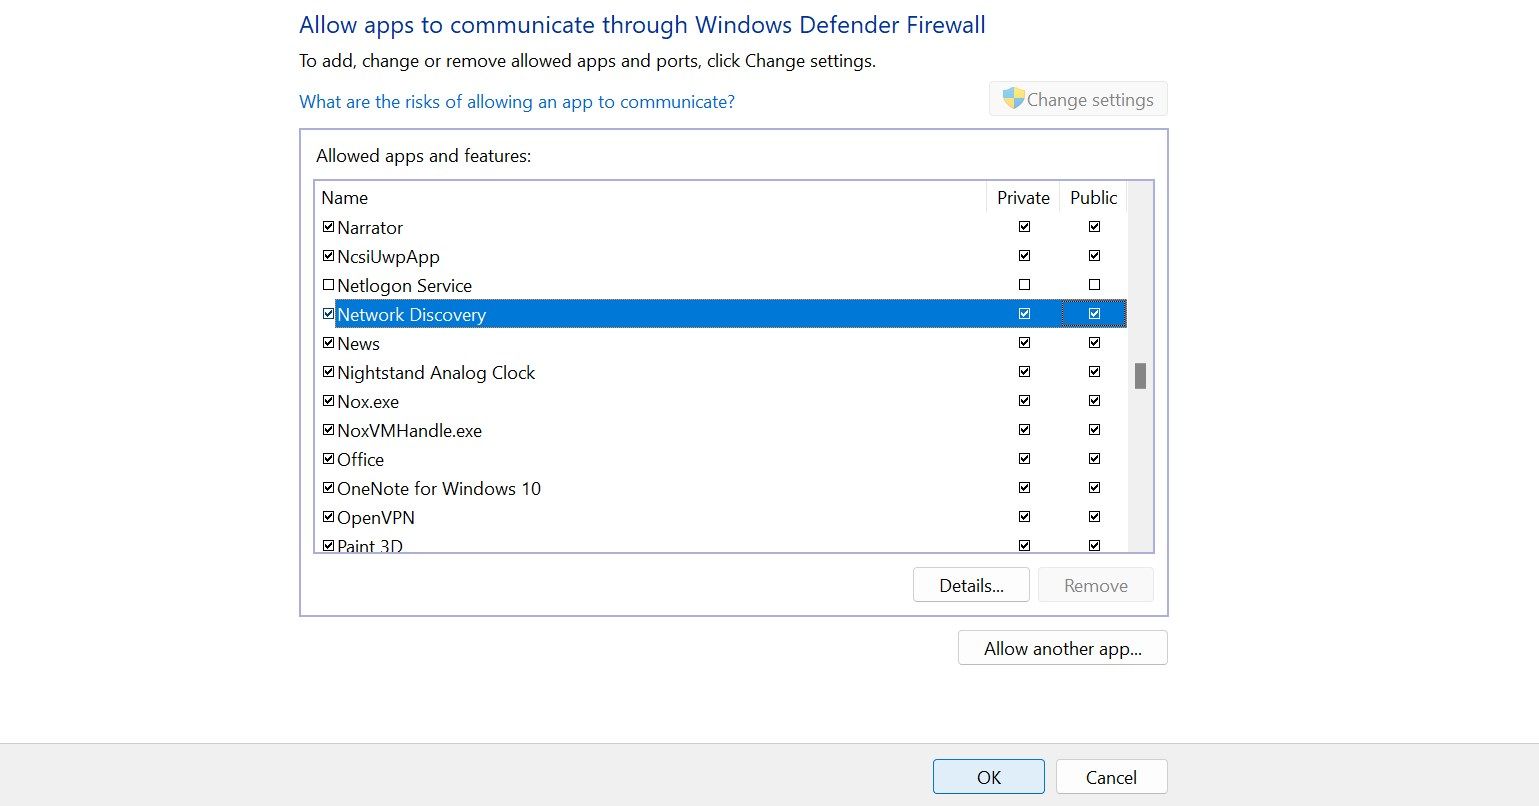
Navigate to the Firewall and network protection tab on the left and click Allow an app through firewall on the right.

Press the N key a few times to find Network Discovery.
If the Public and Private boxes are checked next to Network Discovery, the feature is already whitelisted through the firewall.
If none of these boxes are checked, click on Change settings, check the boxes, and click OK.

5. Reset the Windows Defender Firewall Settings
If whitelisting the feature doesn’t fix the problem, reset Windows Defender Firewall’s settings . This will revert the firewall to its default configuration, removing any custom rules or settings you may have configured.
If you use any third-party antivirus software as your primary security suite and it’s currently active, temporarily disable it.
Resetting Windows Firewall is a more drastic action that can affect other network functions. Always proceed cautiously, as this could impact other applications and network settings. Be sure to note any custom settings or rules before the reset so you can recreate them afterward.
6. Update the Network Adapter Drivers
Outdated network adapter drivers could be a potential cause of this error. To rule out this possibility, update those drivers to the latest version available. There are different ways to install network adapter drivers on your Windows PC . The most reliable approach is downloading them from the manufacturer’s website and manually installing them using Device Manager.
The above solutions will allow your Windows computer to discover other networked devices. Note that if you’re on a domain network, group policies can override local settings, and you may be unable to change Network Discovery settings without administrative permissions.
Key Takeaways
- Ensure Network Discovery is enabled in the Settings app.
- Check that the essential services required for Network Discovery to work are turned on.
- Whitelist Network Discovery in Windows Defender Firewall.
When you encounter the “Network discovery is turned off” error while searching for other devices on a network, networked computers and devices will not be visible to your Windows PC. This guide explains the solutions you can apply to fix it.
While we use Windows 11 here, these fixes apply to Windows 10 as well.
What Causes the “Network discovery is turned off” Error on Windows?
This error typically occurs when the Windows Network Discovery feature is disabled. You may have disabled this feature accidentally or reset the network settings that disabled it. Other possible causes include:
- Services required for Network Discovery to work are turned off.
- Network adapter drivers are outdated.
- Network Discovery isn’t whitelisted in Windows Defender—so the firewall turned it off.
Now, let’s explore some solutions to resolve this issue.
1. Run the Network and Internet Troubleshooter
Windows includes a handy Network and Internet troubleshooter to help identify and fix network issues. You should begin the troubleshooting process by running this tool to see if it resolves the problem.
To run the troubleshooter, right-click the Start button and go to Settings. Navigate to System > Troubleshoot > Other troubleshooters.

Click on the Run button next to Network and Internet.

Windows will launch the Get Help app. Follow the on-screen instructions to assist Windows in pinpointing the main issue with your network. Then it’ll guide you through the steps to resolve it.
2. Enable the Network Discovery Feature
To make sure Network Discovery isn’t disabled, follow the steps below:
Right-click on the Start button and open Settings.
Go to the Network and internet tab on the left and open Advanced network settings on the right.

Choose Advanced sharing settings under More settings.
Expand the menus for Private and Public networks.
If the toggle next to Network discovery is turned off, the feature is disabled. To activate it, toggle the switch on and check the box for Set up network connected devices automatically.
Also, turn on the toggle next to File and printer sharing.

Once you have activated the feature, try using network sharing again. If you see the error again, apply the remaining fixes.
3. Enable the Services Network Discovery Depends On
Five essential services must be enabled for Network Discovery to operate correctly:
- Function Discovery Provider Host
- Function Discovery Resource Publication
- SSDP Discovery
- UPnP Device Host
- DNS Client
You should ensure these services are active and set to start automatically with these steps:
Open the Services app by typing”services” in Windows Search.
Locate the specific service (as mentioned above) you want to check and enable.
Right-click on the service and select Properties.

Select Automatic from the Startup type dropdown menu.
Click the Start button to activate the service.

Repeat this process for each of the other four services. Afterward, run the same process that triggered the error earlier. If the error persists, apply the next fix.
4. Whitelist Network Discovery From Windows Defender
You may experience the “Network discovery is turned off**”** error if the Windows Defender Firewall blocks your connection to the network. To remove this, whitelist the feature in Windows Defender:
- Type “Windows Security”in Windows Search and open the Windows Security app.
- Navigate to the Firewall and network protection tab on the left and click Allow an app through firewall on the right.

- Press the N key a few times to find Network Discovery.
- If the Public and Private boxes are checked next to Network Discovery, the feature is already whitelisted through the firewall.
- If none of these boxes are checked, click on Change settings, check the boxes, and click OK.

5. Reset the Windows Defender Firewall Settings
If whitelisting the feature doesn’t fix the problem, reset Windows Defender Firewall’s settings . This will revert the firewall to its default configuration, removing any custom rules or settings you may have configured.
If you use any third-party antivirus software as your primary security suite and it’s currently active, temporarily disable it.
Resetting Windows Firewall is a more drastic action that can affect other network functions. Always proceed cautiously, as this could impact other applications and network settings. Be sure to note any custom settings or rules before the reset so you can recreate them afterward.
6. Update the Network Adapter Drivers
Outdated network adapter drivers could be a potential cause of this error. To rule out this possibility, update those drivers to the latest version available. There are different ways to install network adapter drivers on your Windows PC . The most reliable approach is downloading them from the manufacturer’s website and manually installing them using Device Manager.
The above solutions will allow your Windows computer to discover other networked devices. Note that if you’re on a domain network, group policies can override local settings, and you may be unable to change Network Discovery settings without administrative permissions.
Key Takeaways
- Ensure Network Discovery is enabled in the Settings app.
- Check that the essential services required for Network Discovery to work are turned on.
- Whitelist Network Discovery in Windows Defender Firewall.
When you encounter the “Network discovery is turned off” error while searching for other devices on a network, networked computers and devices will not be visible to your Windows PC. This guide explains the solutions you can apply to fix it.
While we use Windows 11 here, these fixes apply to Windows 10 as well.
What Causes the “Network discovery is turned off” Error on Windows?
This error typically occurs when the Windows Network Discovery feature is disabled. You may have disabled this feature accidentally or reset the network settings that disabled it. Other possible causes include:
- Services required for Network Discovery to work are turned off.
- Network adapter drivers are outdated.
- Network Discovery isn’t whitelisted in Windows Defender—so the firewall turned it off.
Now, let’s explore some solutions to resolve this issue.
1. Run the Network and Internet Troubleshooter
Windows includes a handy Network and Internet troubleshooter to help identify and fix network issues. You should begin the troubleshooting process by running this tool to see if it resolves the problem.
To run the troubleshooter, right-click the Start button and go to Settings. Navigate to System > Troubleshoot > Other troubleshooters.

Click on the Run button next to Network and Internet.

Windows will launch the Get Help app. Follow the on-screen instructions to assist Windows in pinpointing the main issue with your network. Then it’ll guide you through the steps to resolve it.
2. Enable the Network Discovery Feature
To make sure Network Discovery isn’t disabled, follow the steps below:
- Right-click on the Start button and open Settings.
- Go to the Network and internet tab on the left and open Advanced network settings on the right.

- Choose Advanced sharing settings under More settings.
- Expand the menus for Private and Public networks.
- If the toggle next to Network discovery is turned off, the feature is disabled. To activate it, toggle the switch on and check the box for Set up network connected devices automatically.
- Also, turn on the toggle next to File and printer sharing.

Once you have activated the feature, try using network sharing again. If you see the error again, apply the remaining fixes.
3. Enable the Services Network Discovery Depends On
Five essential services must be enabled for Network Discovery to operate correctly:
- Function Discovery Provider Host
- Function Discovery Resource Publication
- SSDP Discovery
- UPnP Device Host
- DNS Client
You should ensure these services are active and set to start automatically with these steps:
Open the Services app by typing”services” in Windows Search.
Locate the specific service (as mentioned above) you want to check and enable.
Right-click on the service and select Properties.

Select Automatic from the Startup type dropdown menu.
Click the Start button to activate the service.

Repeat this process for each of the other four services. Afterward, run the same process that triggered the error earlier. If the error persists, apply the next fix.
4. Whitelist Network Discovery From Windows Defender
You may experience the “Network discovery is turned off**”** error if the Windows Defender Firewall blocks your connection to the network. To remove this, whitelist the feature in Windows Defender:
Type “Windows Security”in Windows Search and open the Windows Security app.
Navigate to the Firewall and network protection tab on the left and click Allow an app through firewall on the right.

Press the N key a few times to find Network Discovery.
If the Public and Private boxes are checked next to Network Discovery, the feature is already whitelisted through the firewall.
If none of these boxes are checked, click on Change settings, check the boxes, and click OK.

5. Reset the Windows Defender Firewall Settings
If whitelisting the feature doesn’t fix the problem, reset Windows Defender Firewall’s settings . This will revert the firewall to its default configuration, removing any custom rules or settings you may have configured.
If you use any third-party antivirus software as your primary security suite and it’s currently active, temporarily disable it.
Resetting Windows Firewall is a more drastic action that can affect other network functions. Always proceed cautiously, as this could impact other applications and network settings. Be sure to note any custom settings or rules before the reset so you can recreate them afterward.
6. Update the Network Adapter Drivers
Outdated network adapter drivers could be a potential cause of this error. To rule out this possibility, update those drivers to the latest version available. There are different ways to install network adapter drivers on your Windows PC . The most reliable approach is downloading them from the manufacturer’s website and manually installing them using Device Manager.
The above solutions will allow your Windows computer to discover other networked devices. Note that if you’re on a domain network, group policies can override local settings, and you may be unable to change Network Discovery settings without administrative permissions.
Key Takeaways
- Ensure Network Discovery is enabled in the Settings app.
- Check that the essential services required for Network Discovery to work are turned on.
- Whitelist Network Discovery in Windows Defender Firewall.
When you encounter the “Network discovery is turned off” error while searching for other devices on a network, networked computers and devices will not be visible to your Windows PC. This guide explains the solutions you can apply to fix it.
While we use Windows 11 here, these fixes apply to Windows 10 as well.
What Causes the “Network discovery is turned off” Error on Windows?
This error typically occurs when the Windows Network Discovery feature is disabled. You may have disabled this feature accidentally or reset the network settings that disabled it. Other possible causes include:
- Services required for Network Discovery to work are turned off.
- Network adapter drivers are outdated.
- Network Discovery isn’t whitelisted in Windows Defender—so the firewall turned it off.
Now, let’s explore some solutions to resolve this issue.
1. Run the Network and Internet Troubleshooter
Windows includes a handy Network and Internet troubleshooter to help identify and fix network issues. You should begin the troubleshooting process by running this tool to see if it resolves the problem.
To run the troubleshooter, right-click the Start button and go to Settings. Navigate to System > Troubleshoot > Other troubleshooters.

Click on the Run button next to Network and Internet.

Windows will launch the Get Help app. Follow the on-screen instructions to assist Windows in pinpointing the main issue with your network. Then it’ll guide you through the steps to resolve it.
2. Enable the Network Discovery Feature
To make sure Network Discovery isn’t disabled, follow the steps below:
- Right-click on the Start button and open Settings.
- Go to the Network and internet tab on the left and open Advanced network settings on the right.

- Choose Advanced sharing settings under More settings.
- Expand the menus for Private and Public networks.
- If the toggle next to Network discovery is turned off, the feature is disabled. To activate it, toggle the switch on and check the box for Set up network connected devices automatically.
- Also, turn on the toggle next to File and printer sharing.

Once you have activated the feature, try using network sharing again. If you see the error again, apply the remaining fixes.
3. Enable the Services Network Discovery Depends On
Five essential services must be enabled for Network Discovery to operate correctly:
- Function Discovery Provider Host
- Function Discovery Resource Publication
- SSDP Discovery
- UPnP Device Host
- DNS Client
You should ensure these services are active and set to start automatically with these steps:
- Open the Services app by typing”services” in Windows Search.
- Locate the specific service (as mentioned above) you want to check and enable.
- Right-click on the service and select Properties.

- Select Automatic from the Startup type dropdown menu.
- Click the Start button to activate the service.

Repeat this process for each of the other four services. Afterward, run the same process that triggered the error earlier. If the error persists, apply the next fix.
4. Whitelist Network Discovery From Windows Defender
You may experience the “Network discovery is turned off**”** error if the Windows Defender Firewall blocks your connection to the network. To remove this, whitelist the feature in Windows Defender:
Type “Windows Security”in Windows Search and open the Windows Security app.
Navigate to the Firewall and network protection tab on the left and click Allow an app through firewall on the right.

Press the N key a few times to find Network Discovery.
If the Public and Private boxes are checked next to Network Discovery, the feature is already whitelisted through the firewall.
If none of these boxes are checked, click on Change settings, check the boxes, and click OK.

5. Reset the Windows Defender Firewall Settings
If whitelisting the feature doesn’t fix the problem, reset Windows Defender Firewall’s settings . This will revert the firewall to its default configuration, removing any custom rules or settings you may have configured.
If you use any third-party antivirus software as your primary security suite and it’s currently active, temporarily disable it.
Resetting Windows Firewall is a more drastic action that can affect other network functions. Always proceed cautiously, as this could impact other applications and network settings. Be sure to note any custom settings or rules before the reset so you can recreate them afterward.
6. Update the Network Adapter Drivers
Outdated network adapter drivers could be a potential cause of this error. To rule out this possibility, update those drivers to the latest version available. There are different ways to install network adapter drivers on your Windows PC . The most reliable approach is downloading them from the manufacturer’s website and manually installing them using Device Manager.
The above solutions will allow your Windows computer to discover other networked devices. Note that if you’re on a domain network, group policies can override local settings, and you may be unable to change Network Discovery settings without administrative permissions.
Also read:
- [Updated] Explore Top-Rated Image Transition Tools
- Apple iPhone X Asking for Passcode after iOS 17/14 Update, What to Do? | Dr.fone
- Disabling Windows Update Interruptions
- Feel Windows Power with Curated App Selection
- How Can I Restore or Reboot My Graphics Card to Resolve Common Problems? - Tech Solutions by YL
- Instant PC Assembly with Corsair's Game-Changing One-Turn Fan Screw Design - Save Precious Seconds
- Revamped Interview Inquiries to Spark Podcast Fans' Curiosity
- Simplify Your Windows with 5 Mac-Inspired Ideas
- Stopping Unsolicited Search Window Opens in Windows 11
- Title: Re-Engaging Lost LAN Discovery on Windows
- Author: David
- Created at : 2025-02-27 22:32:15
- Updated at : 2025-03-04 16:15:31
- Link: https://win11.techidaily.com/re-engaging-lost-lan-discovery-on-windows/
- License: This work is licensed under CC BY-NC-SA 4.0.

