Quiet Windows 11: Ceasing Background Tasks

Quiet Windows 11: Ceasing Background Tasks
Background apps in Windows continue to perform actions such as updates and fetch up-to-date data even when you are not using them. While Windows can intelligently manage and power-optimize background apps, it can still drain your battery and increase data usage.
Fortunately, Windows lets you change the background permission for individual Microsoft Store apps. Here we show you how to disable individual or all background apps in Windows 11.
1. How to Disable Background Apps via the Settings App
If you want to disable individual Microsoft Store apps from running in the background, you can disable it from the Settings page. Follow the below steps to disable background apps from Settings.
- Press Win + I to open the Settings app.
- Open the Apps tab in the left pane.
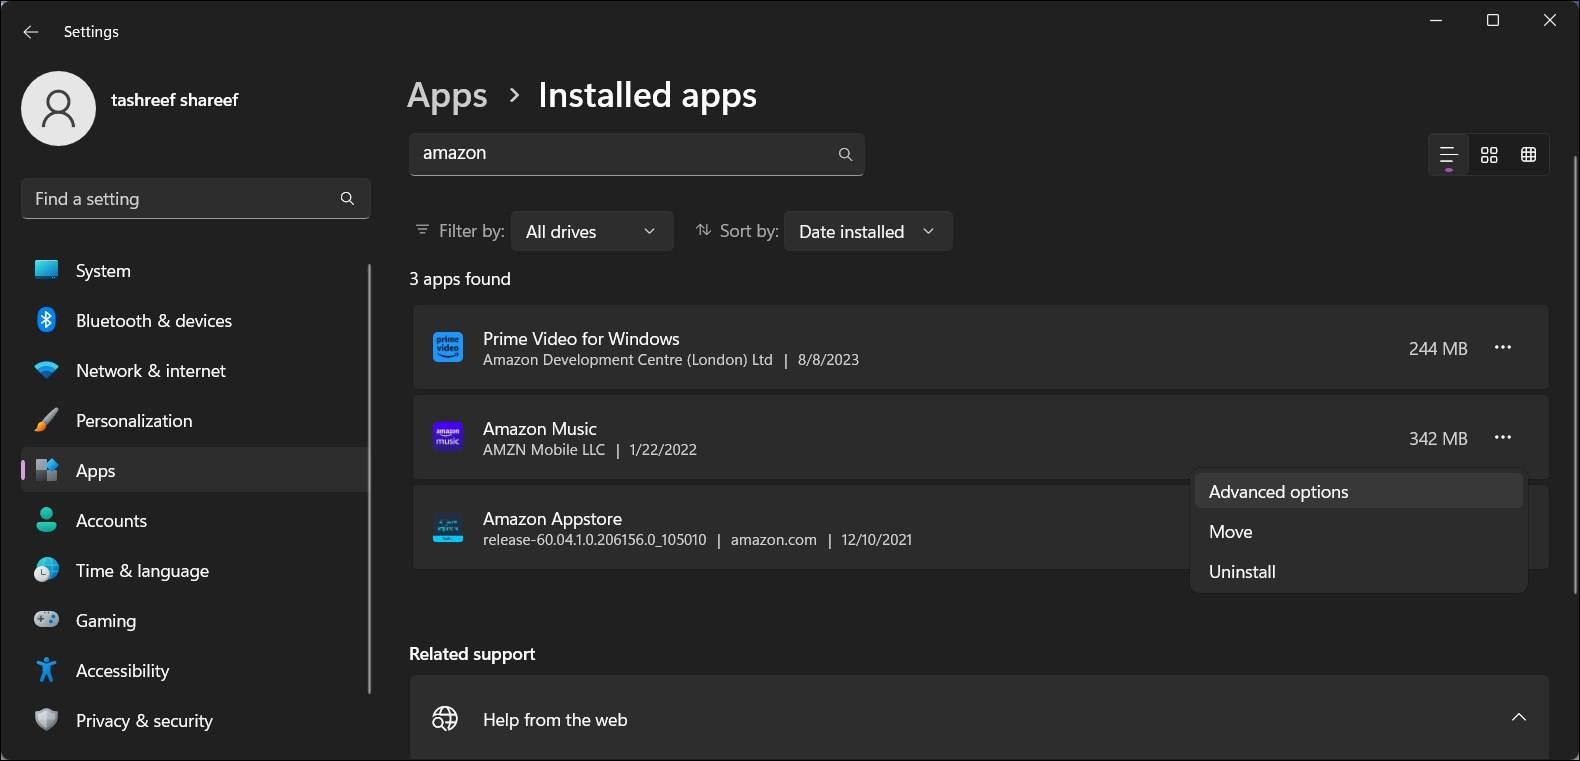
- Click on Installed apps in the right pane and search to locate the app for which you want to change the background permission.
- Click the three-dots menu icon next to the app name and select Advanced options. If the option is not available, then the app does not support the background app permission management feature.

- Scroll down to the Background apps permissions section.
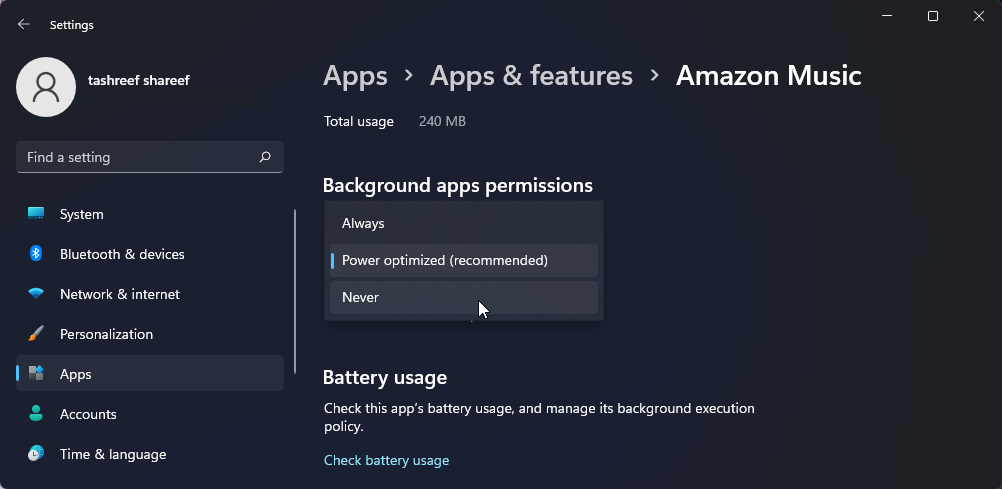
6. Click the drop-down for Let this app run in background and select Never. This should disable the app from running in the background.
By default, the background permission for the app is set to Power optimized(recommended). This means Windows will decide when the app can run in the background to save more power. If you set it to Always, the app will continuously run in the background irrespective of your power status.
2. How to Disable Background Apps via Power & Battery Settings
The Power & battery page in Windows 11 Settings provides data on the battery usage of installed apps. This is really useful If you want to disable background apps based on battery usage to save some juice.
Here’s how to do it.
- Press Win + X to open the WinX men and select Settings.
- In the System tab, scroll down and click on Power & battery.
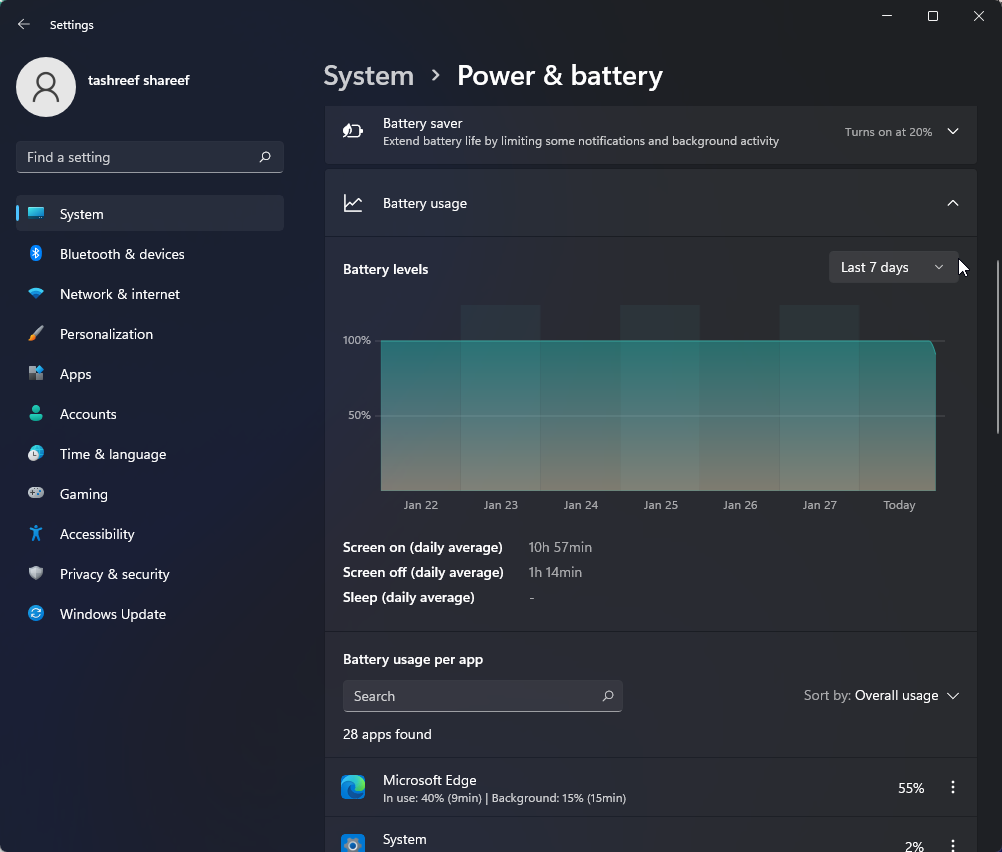
- Scroll down to the Battery section and click on Battery usage.

- Click the drop-down for Battery levels and select Last 7 days. Windows will load all the apps using the battery power in the last seven days.

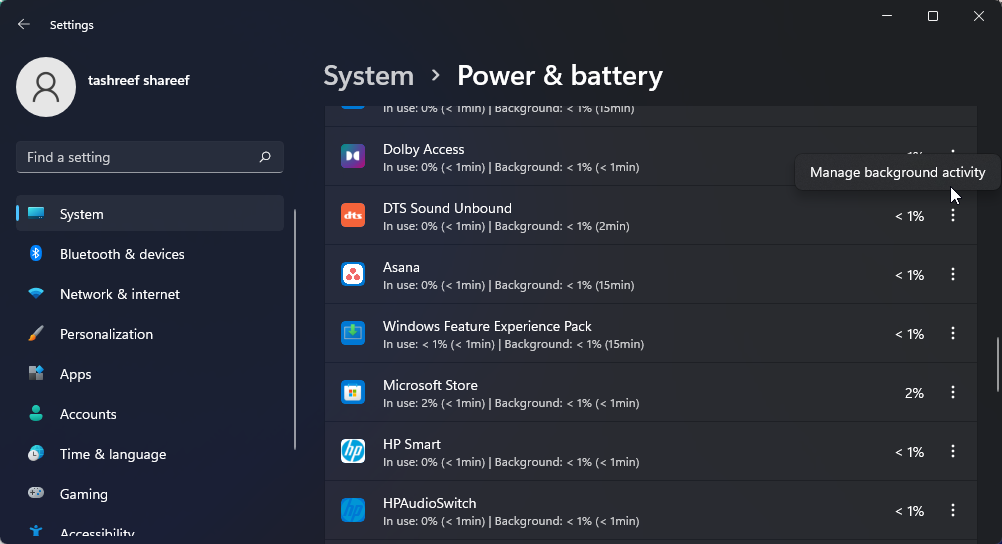
- To change the background app permission, click the three-dots menu beside the app name, and click on Manage background productivity. This option is only available for Microsoft Store apps.
- Click the drop-down (Power optimized) under the Background apps permissions section and select Never. This will disable the app from running in the background.
- Repeat the steps for all the apps that can drain your battery or affect system performance.
In addition to disabling background apps, try to create and use custom Windows power plans to extend your laptop battery life . With custom power plans, you can tweak your processor and other components to configure low-power modes to achieve an improved battery life.
3. How to Disable Background Apps for the Current User
If you want, you can disable background apps for the individual user. Useful if you share your PC with multiple users at work or home. Also useful if you need to disable a non-Microsoft third-party app from running in the background.
For this, you will need to create a registry file and run it with administrative privilege. Before you proceed, create a restore point . You can use the restore point to revert your PC to its previous state if something goes wrong when editing the registry entries.
To disable background apps for the current user:
- Press Win + R to open the Run dialog.
- Type notepad and click OK to open the text editor app.

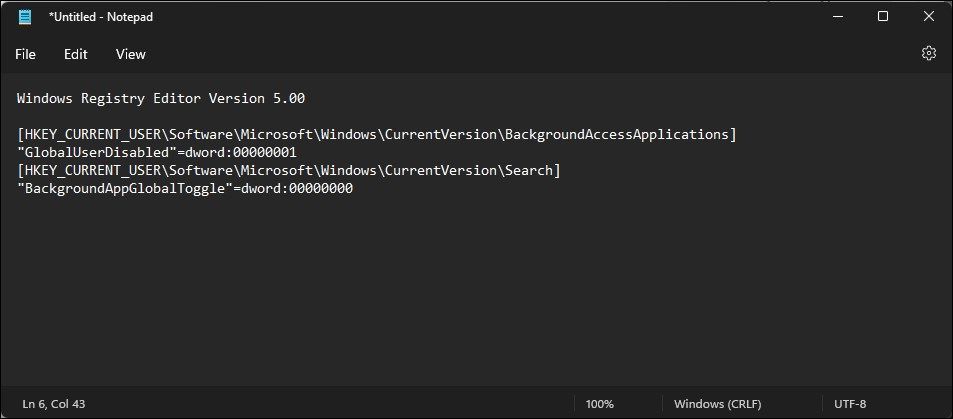
- In the Notepad file, copy and paste the following content:
`Windows Registry Editor Version 5.00
[HKEY_CURRENT_USER\Software\Microsoft\Windows\CurrentVersion\BackgroundAccessApplications]
“GlobalUserDisabled”=dword:00000001
[HKEY_CURRENT_USER\Software\Microsoft\Windows\CurrentVersion\Search]
“BackgroundAppGlobalToggle”=dword:00000000`
4. Next, press Win + S to open the Save dialog.
5. Here, name the file as Disable_Background_Apps_for_current_user.reg. Then, click the Save as type drop-down and select All Files.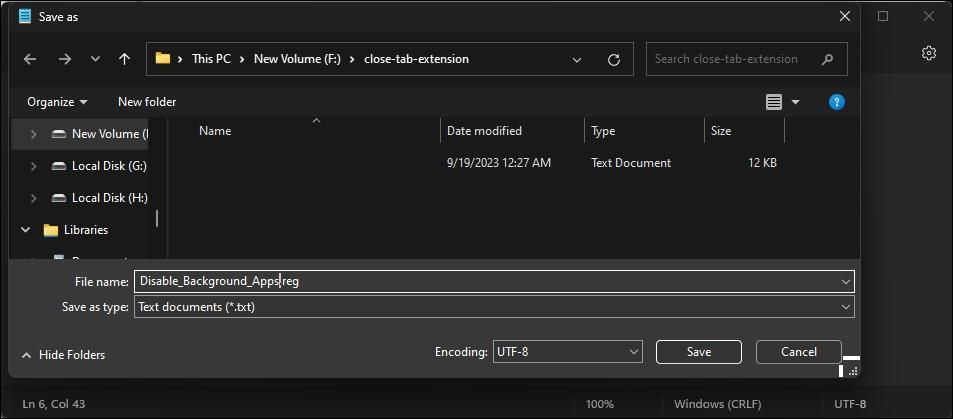
6. Click the Save button to save the file.
7. Right-click on the newly created reg file and select Open. Click Yes to confirm and modify the registry entries to disable background apps.
8. If the script runs without error, restart your PC to apply the changes.
The above script modifies the two DWORD values, GlobalUserDisabled and BackgroundAppGlobalToggle, setting them to 1 and 0, respectively. Modifying the GlobalUserDisabled value prevents background access to applications.
Similarly, changes to the BackgroundAppGlobalToggle turn off the toggle for background apps in Windows search, thus limiting its background access.
If you need to turn on background apps for the current user, then save the following script as enable_background_apps.reg and run it as administrator.

Windows Registry Editor Version 5.00 [HKEY_CURRENT_USER\Software\Microsoft\Windows\CurrentVersion\BackgroundAccessApplications] "GlobalUserDisabled"=- [HKEY_CURRENT_USER\Software\Microsoft\Windows\CurrentVersion\Search] "BackgroundAppGlobalToggle"=-
4. How to Disable Background Apps for All Users Using Registry Editor
If you want to disable background apps for all the user accounts, you can manually create and modify the registry values in the Registry Editor.
To disable background apps for all the user accounts:
- Press Win + R to open Run.
- Type regedit, and click OK. Click Yes to grant administrative access.
- In the Registry Editor, navigate to the following location:
HKEY_LOCAL_MACHINE\SOFTWARE\Policies\Microsoft\Windows - Under the Windows key, locate the AppPrivacy key**.** If not available, you will need to create a new key.

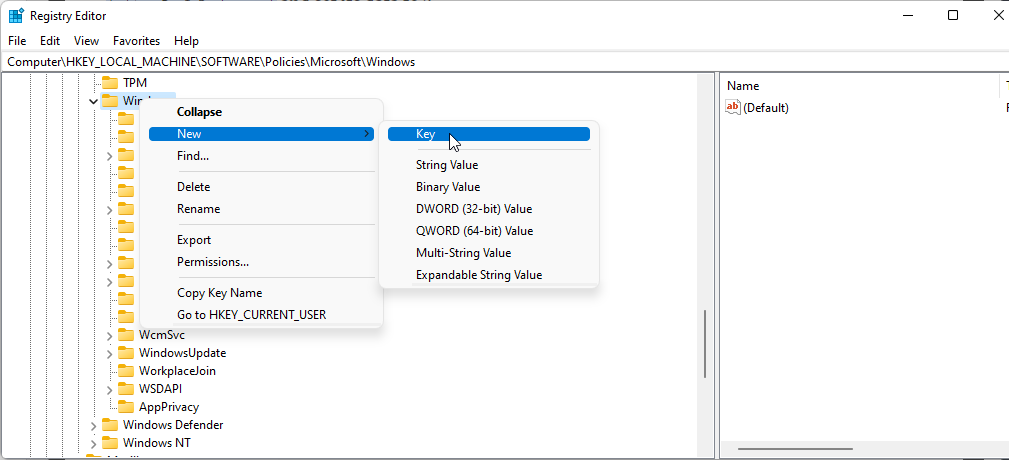
- Right-click on the Windows key and select New > Key. Rename the key as AppPrivacy.
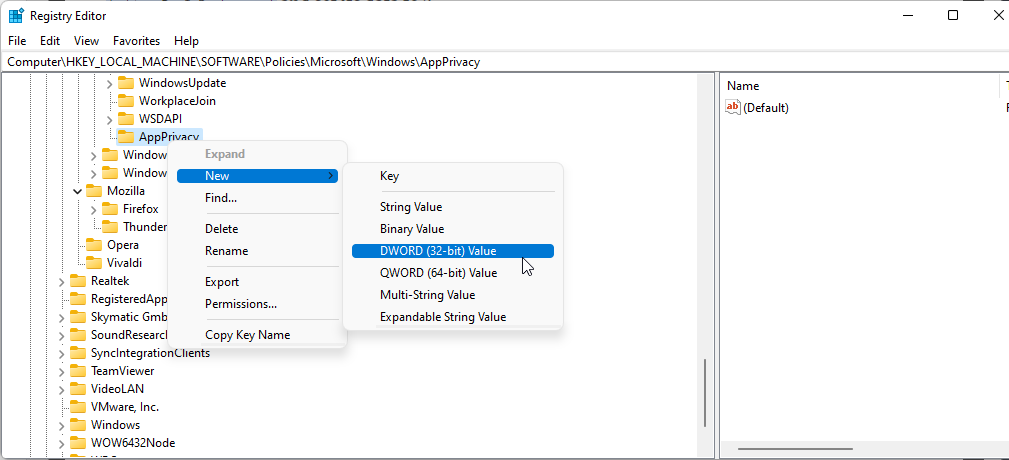
- Right-click on the AppPrivacy key and select New > DWORD (32-bit) Value. Rename the value as LetAppsRunInBackground.

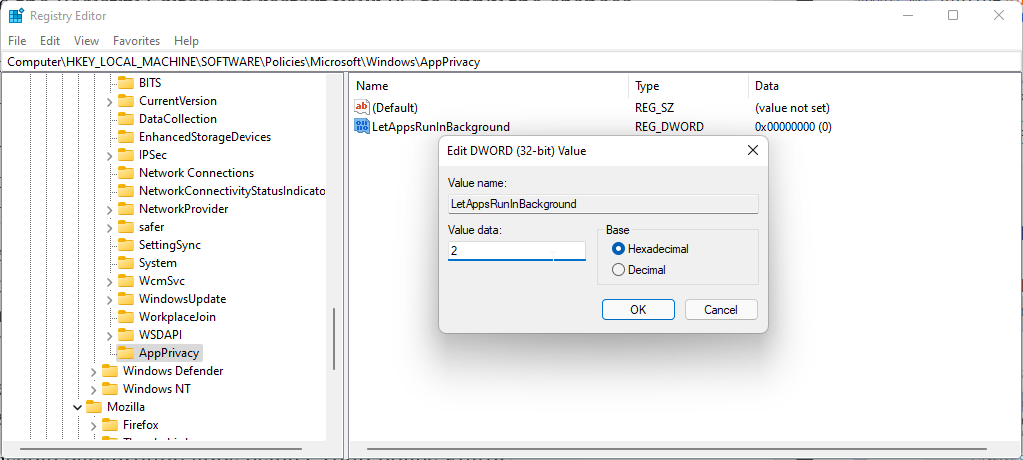
- Right-click on the LetAppsRunInBackground value and select Modify.

- Type 2 in the Value data field and click OK to save the changes.
- Close the Registry Editor and restart your PC to apply the changes.
This should disable Microsoft Store apps from running in the background. To enable the background apps, modify the LetAppsRunInBackground value and set it to 0.
5. How to Disable Background Apps Using the Group Policy Editor
Alternatively, you can also use the Group Policy Editor to configure background apps settings on your computer network. This is useful for system administrators having to configure multiple systems.
Note that Group Policy Editor is officially only available in the Pro, Education, and Enterprise editions of the Windows OS. If you are on Home, read our guide on how to enable Group Policy Editor in Windows Home . This involves a registry hack to enable the missing functionality in the Home edition of the OS.
Once you have the policy editor up and running, continue with the steps below. To disable background apps using Group Policy Editor:
- Press the Win key, type group policy, and click on Edit group policy from the search results.
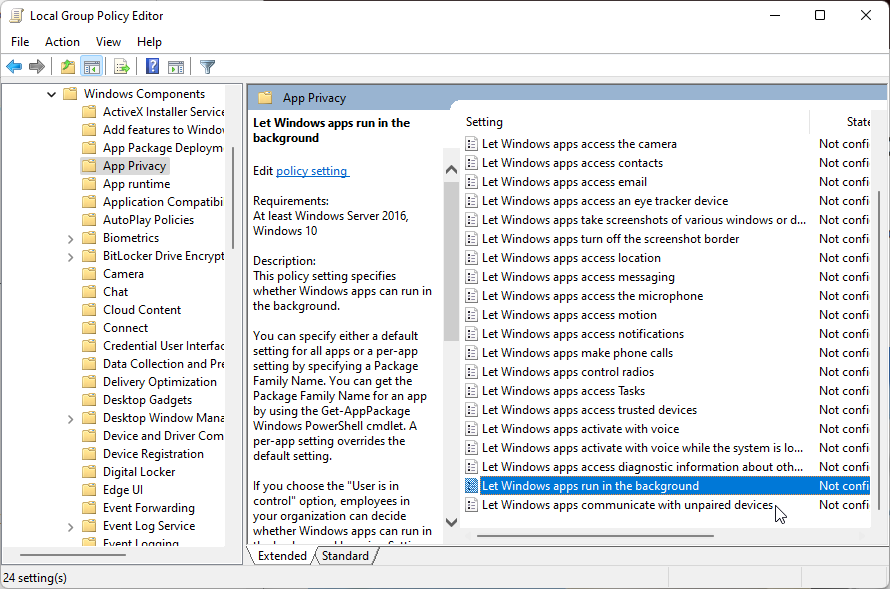
- In the Group Policy Editor, navigate to the following location:
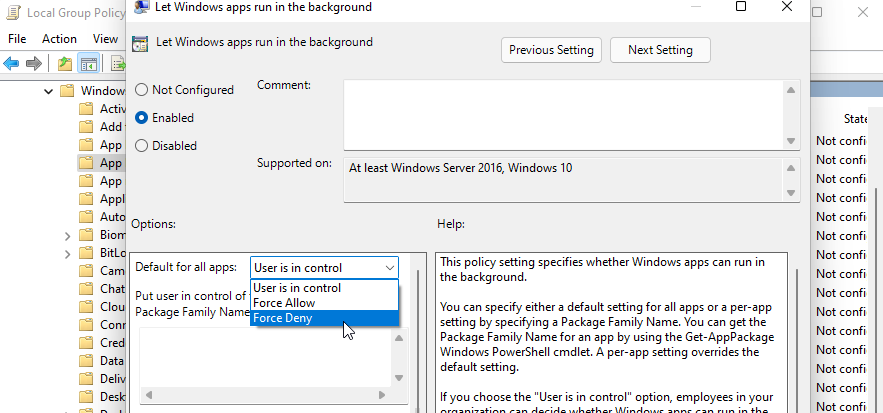
Computer Configuration\Administrative Templates\Windows Components\App Privacy - In the right pane, locate and double-click on Let Windows apps run in the background policy.

- In the new window that appears, select Enabled.
- Next, under the Options section, click the drop-down for Default for all apps and select Force Deny.

- Click OK and Apply to save the changes.
Alternatively, you can set the Let Windows apps run in the background policy to Disabled and apply the changes. However, when set to Disabled or Not Configured, individual employees in your organization can configure the apps to run in the background.
On the contrary, setting this policy to Force Deny will prevent the app from running in the background, with no option for the employees to change the policy.
Disabling Background Apps in Windows 11
Windows allows you to configure background app permission for the Microsoft Store apps. You can disable these apps to conserve battery and avoid unnecessary data usage on a metered connection.
That said, if you are struggling with slow system performance issues, disabling background apps may not be the solution. What you can do instead is reconfigure your OS, analyze your storage devices and look for hardware upgrades to boost system performance.
Fortunately, Windows lets you change the background permission for individual Microsoft Store apps. Here we show you how to disable individual or all background apps in Windows 11.
Also read:
- [New] From Long-Winded to Concise The Art of YouTube Trimming
- [New] Innovators Uniting Video, Sound & Imagery for 2024
- [Updated] Chart-Topping Photos Origins Explored
- [Updated] The Financial Frontier Acquiring High-Value Youtubes
- Exploring the Benefits of DXVK on Your Windows PC
- Fix a Non-Installable Windows Store App
- How To Change Your SIM PIN Code on Your Honor 100 Phone
- In 2024, Unlock Apple ID without Phone Number From Apple iPhone XS Max
- Navigating the New Wave with Copilot Key for Windows 11 Enthusiasts
- Quick Fix Guide: Resolve Error Code 0X800f0831 Using Windows Updates
- Remedy Windows Taskbar Thumbnail Failures
- Title: Quiet Windows 11: Ceasing Background Tasks
- Author: David
- Created at : 2025-01-04 18:50:58
- Updated at : 2025-01-06 17:18:21
- Link: https://win11.techidaily.com/quiet-windows-11-ceasing-background-tasks/
- License: This work is licensed under CC BY-NC-SA 4.0.
