
Quelling the 0X800736CC Dilemran in Windows Update
Quelling the 0X800736CC Dilemran in Windows Update
Windows Update keeps your computer safe and secure with the latest security patches. However, you might encounter errors while installing these updates, like 0x800736cc. This error code stops you from deploying critical security updates, leaving your computer vulnerable. In this guide, we’ll show you some troubleshooting steps to fix this error.
1. Restart Your PC
The first thing you need to do is restart your computer . Although it may seem too simplistic, you’d be surprised how often this resolves various issues. When your computer reboots, it clears temporary files and processes that could cause problems. This includes incomplete Windows updates that failed to install or encountered installation errors.
A quick reboot can bypass the error and complete the update, so it should be your primary course of action before delving into more intricate troubleshooting methods.

2. Run the Windows Update Troubleshooter
If restarting the PC doesn’t work, you can use the Windows Update Troubleshooter. This built-in utility solves minor problems that prevent Windows from updating correctly.
To run the Windows Update Troubleshooter, follow these steps:
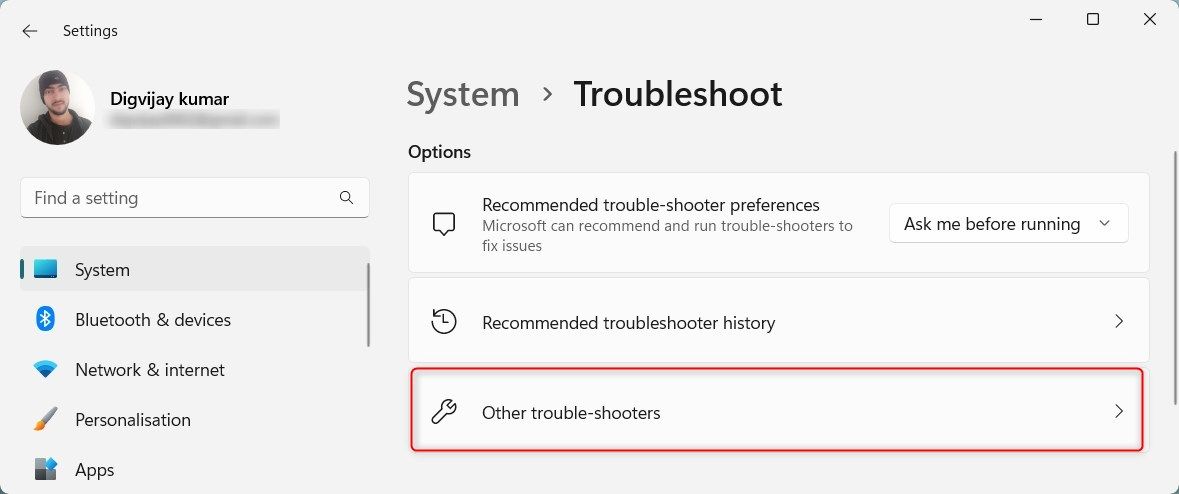
- Press Win + S to open the Windows Search bar.
- Type in Troubleshoot and select Troubleshoot Settings from the results list.
- On the right sidebar, click Other troubleshooters.
- Under Most frequent, locate Windows Update and click Run.
CalendarBudget - Monthly subscription membership to CalendarBudget via web browser or mobile app. Support included.

 CalendarBudget - Monthly subscription membership to CalendarBudget via web browser or mobile app. Support included.
 Follow the on-screen instructions to complete the troubleshooting process. It may take a few minutes for the tool to finish its job.
3. Clear the Windows Update Cache
Windows Update Cache stores temporary files and processes related to updates. If these files become corrupted, they can interfere with the update process and cause errors like 0x800736cc. In this case, clearing the cache can fix the problem.
To clear the Windows Update Cache, do the following:
- Open the Start menu.
- Type services.msc in the search box and hit Enter. The Services window will open.
- Scroll down and locate the Windows Update service. Then, right-click on it and select Stop. Doing so temporarily stops Windows Update.
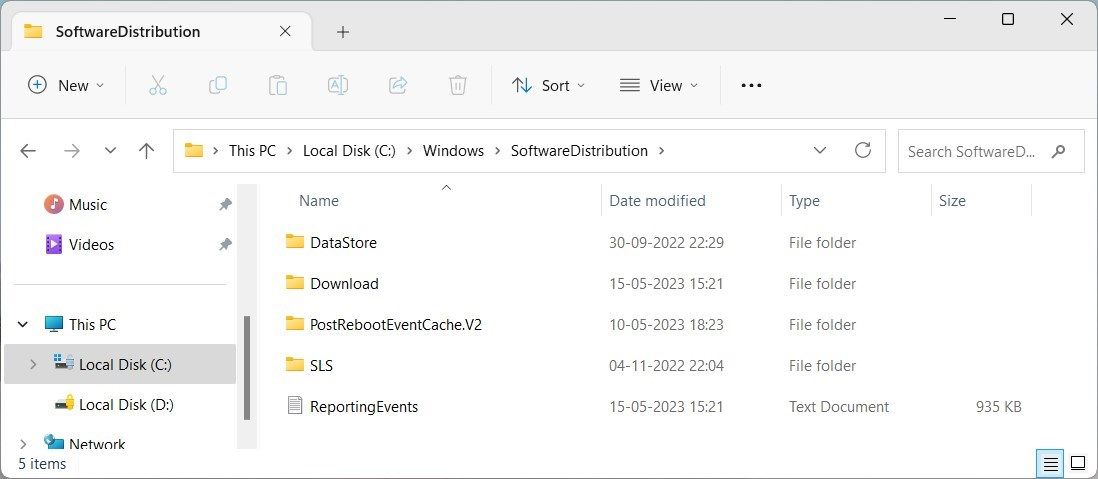
- Now, open File Explorer and navigate to this location:
C:\Windows\SoftwareDistribution - In the SoftwareDistribution folder, delete all files and folders. This is just temporary data, so removing it won’t affect your computer.
- After deleting the files, head back to the Services window, right-click on the Windows Update service, and select Start. This step restarts the Windows Update service.
Now restart your computer. It will allow Windows Update to recreate cache files from scratch.
 DLNow Video Downloader
4. Disable your Antivirus Temporarily
Security software interferes with Windows Update and causes errors. To avoid this issue, temporarily disable your security program before running updates. Once you have disabled it, restart the computer and install the update again. If it works, it was your security software that caused the issue.
Remember that disabling security software leaves your computer vulnerable to malware attacks, so enable it immediately.
5. Reset Windows Update Components
Windows Update components include files and processes crucial to the update process. If these components become corrupted or damaged, Windows Update cannot run correctly. In this case, you must reset the components to their original state.
Fortunately, there’s an easy way to do this. Microsoft provides a batch script called Reset Windows Update Tool that resets various Windows Update components with just a few clicks.
To reset Windows Update components, follow these steps:
- Click on Start and type Notepad in the search bar.
- Right-click on Notepad and select Run as administrator.
- If the User Account Control window pops up, click Yes to continue.
- In the Notepad window, copy and paste the following code:
<code>net stop bits net stop wuauserv net stop appidsvc net stop cryptsvc Del "%ALLUSERSPROFILE%\Application Data\Microsoft\Network\Downloader\*.*" rmdir %systemroot%\SoftwareDistribution /S /Q rmdir %systemroot% system32\catroot2 /S /Q sc.exe sdset bits D:(A;;CCLCSWRPWPDTLOCRRC;;;SY)(A;;CCDCLCSWRPWPDTLOCRSDRCWDWO;;;BA)(A;;CCLCSWLOCRRC;;;AU)(A;;CCLCSWRPWPDTLOCRRC;;;PU) sc.exe sdset wuauserv D:(A;;CCLCSWRPWPDTLOCRRC;;;SY)(A;;CCDCLCSWRPWPDTLOCRSDRCWDWO;;;BA)(A;;CCLCSWLOCRRC;;;AU)(A;;CCLCSWRPWPDTLOCRRC;;;PU) cd /d %windir% system32 regsvr32.exe /s atl.dll regsvr32.exe /s urlmon.dll regsvr32.exe /s mshtml.dll regsvr32.exe /s shdocvw.dll regsvr32.exe /s browseui.dll regsvr32.exe /s jscript.dll regsvr32.exe /s vbscript.dll regsvr32.exe /s scrrun.dll regsvr32.exe /s msxml.dll regsvr32.exe /s msxml3.dll regsvr32.exe /s msxml6.dll regsvr32.exe /s actxprxy.dll regsvr32.exe /s softpub.dll regsvr32.exe /s wintrust.dll regsvr32.exe /s dssenh.dll regsvr32.exe /s rsaenh.dll regsvr32.exe /s gpkcsp.dll regsvr32.exe /s sccbase.dll regsvr32.exe /s slbcsp.dll regsvr32.exe /s cryptdlg.dll regsvr32.exe /s oleaut32.dll regsvr32.exe /s ole32.dll regsvr32.exe /s shell32.dll regsvr32.exe /s initpki.dll regsvr32.exe /s wuapi.dll regsvr32.exe /s wuaueng.dll regsvr32.exe /s wuaueng1.dll regsvr32.exe /s wucltui.dll regsvr32.exe /s wups.dll regsvr32.exe /s wups2.dll regsvr32.exe /s wuweb.dll regsvr32.exe /s qmgr.dll regsvr32.exe /s qmgrprxy.dll regsvr32.exe /s wucltux.dll regsvr32.exe /s muweb.dll regsvr32.exe /s wuwebv.dll netsh winsock reset netsh winsock reset proxy net start bits net start wuauserv net start appidsvc net start cryptsvc - The above commands form part of a script to reset Windows Update components. After you paste the code into Notepad, click File and select Save as.
- In the Save As window, select All files from the drop-down menu.
- Type ResetWindowsUpdate.bat as the file name and save it to your desktop.
- Now, you have the batch script on your desktop. Right-click on it and select Run as administrator.
- When the UAC pops up, click Yes to grant elevated privileges.


The script will take a few minutes to run. When it’s finished, close the Command Prompt window and restart your computer. Once your computer restarts, check if the 0x800736cc error is resolved.
 SwifDoo PDF 2-Year Plan
6. Try Generic Windows Update Fixes
Besides the methods listed above, you can also try some generic Windows Update fixes. These methods usually work if a temporary issue or corrupted system files cause the error.
Here are some generic Windows Update fixes you can try:
- Repair Corrupted System Files - Run the System File Checker tool to scan and repair corrupted system files. If you need help with this, you can find detailed instructions in our SFC guide . You can also use the Deployment Image Service and Management (DISM) tool to replace broken files with healthy ones.
- Perform a Clean Boot - Clean Boot can identify software conflicts causing the error. It disables all non-essential services and programs from running in the background. That way, you can isolate the problematic process and resolve the issue.
- Manually Install the Update - If Windows Update fails to install or is stuck, you can download and install it manually
Fixing Windows Update Error 0x800736cc
As you can see, multiple ways exist to fix the Windows Update error. We hope one of these methods has solved your problem, and you can now successfully install Windows Update. If nothing else works, you can restore your computer to a previous state or reinstall Windows.
- Title: Quelling the 0X800736CC Dilemran in Windows Update
- Author: David
- Created at : 2024-08-16 00:36:37
- Updated at : 2024-08-17 00:36:37
- Link: https://win11.techidaily.com/quelling-the-0x800736cc-dilemran-in-windows-update/
- License: This work is licensed under CC BY-NC-SA 4.0.