Protect Excel Worksheets From Changes - Master the Art of Cell Lockdown Techniques

Protect Excel Worksheets From Changes - Master the Art of Cell Lockdown Techniques
Quick Links
If you want to restrict editing in a Microsoft Excel worksheet to certain areas, you can lock cells to do so. You can block edits to individual cells, larger cell ranges, or entire worksheets, depending on your requirements. Here’s how.
Enabling or Disabling Cell Lock Protection in Excel
There are two stages to preventing changes to cells in an Excel worksheet.
First, you’ll need to choose the cells that you want to allow edits to and disable the “Locked” setting. You’ll then need to enable worksheet protection in Excel to block changes to any other cells.
Related: How to Protect Workbooks, Worksheets, and Cells From Editing in Microsoft Excel
By default, Excel will assume that, when you “protect” a worksheet from editing, you want to prevent any changes to all of its cells. If this is the case, you can skip to the next section.
How to Disable Cell Lock Protection in Excel
To allow or block changes to cells in Excel, open your Excel workbook to the sheet you’re looking to edit.
Once you’ve selected the worksheet, you’ll need to identify the cells you want to allow users to modify once your worksheet is locked down.
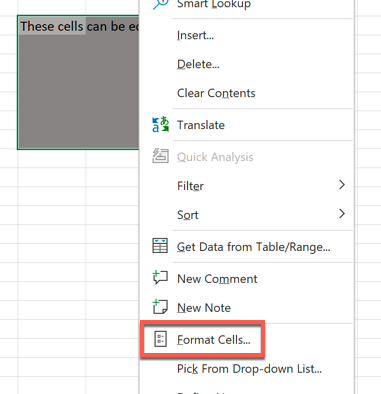
You can select individual cells or select a larger range of cells. Right-click the selected cells and select “Format Cells” from the pop-up menu to proceed.

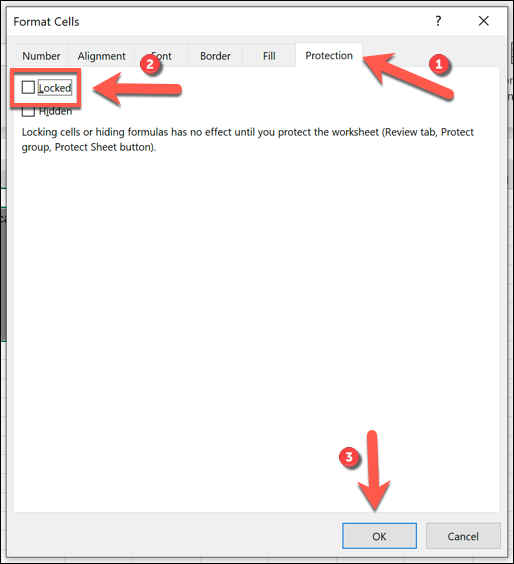
In the “Format Cells” menu, select the “Protection” tab. Uncheck the “Locked” checkbox to allow changes to those cells once you’ve protected your worksheet, then press “OK” to save your choice.

With the “Locked” setting removed, the cells you’ve selected will accept changes when you’ve locked your worksheet. Any other cells will, by default, block any changes once worksheet protection is activated.
Enabling Worksheet Protection in Excel
Only cells with the “Locked” setting removed will accept changes once worksheet protection is activated. Excel will block any attempt to make changes to other cells in your worksheet with this protection enabled, which you can activate by following the steps below.
How to Enable Worksheet Protection in Excel
To enable worksheet protection, open your Excel workbook and select the worksheet you want to restrict. From the ribbon bar, select Review > Protect Sheet.

In the pop-up menu, you can provide a password to restrict changes to the sheet you’re locking, although this is optional. Type a password into the text boxes provided if you want to do this.
By default, Excel will allow users to select locked cells, but no other changes to the cells (including formatting changes) are permitted. If you want to change this, select one of the checkboxes in the section below. For example, if you want to allow a user to delete a row containing locked cells, enable the “Delete Rows” checkbox.
When you’re ready, make sure that the “Protect Worksheet and Contents of Locked Cells” checkbox is enabled, then press “OK” to save your changes and lock the worksheet.

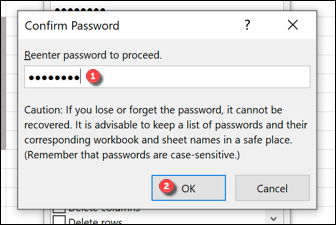
If you decided to use a password to protect your sheet, you’ll need to confirm your changes using it. Type the password you provided into the “Confirm Password” box and press “OK” to confirm.

Once you’ve locked your worksheet, any attempts to make changes to locked cells will result in an error message.

You’ll need to remove the worksheet protection if you wish to make any changes to locked cells afterwards.
How to Remove Worksheet Protection in Excel
Once you’ve saved your changes, only the cells you’ve unlocked (if you’ve unlocked any) will allow changes. If you want to unlock other cells, you’ll need to select Review > Unprotect Sheet from the ribbon bar and provide the password (if used) to remove worksheet protection.

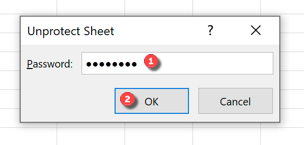
If your worksheet is protected with a password, confirm the password by typing it into the “Unprotect Sheet” text box, then press “OK” to confirm.

This will remove any restrictions to your worksheet, allowing you to make changes to previously locked cells. If you’re a Google Docs user, you can protect Google Sheets cells from edits in a similar way.
Related: How to Protect Cells From Editing in Google Sheets
Also read:
- 2024 Approved The Essential Distinctions Between Metaverse and Multimeva
- All Must-Knows to Use Fake GPS GO Location Spoofer On Itel P55 5G | Dr.fone
- How to Completely Refresh Your PC: A Comprehensive Guide to Resetting Windows 10
- In 2024, Best Free Photo Enhancer Online and App for Mobile Phone
- Overcoming DLL Absence in Windows 11
- Preserving Your Digital Post-Its in Windows
- Solutions to Correct Err 87 Library Misloading Issue
- Troubleshooting: Fixing Issues with Your Outdated USB Composite Device
- Win 10 & 11'S Hidden Gems: Restoring Off-Screen Windows with These 6 Methods
- Title: Protect Excel Worksheets From Changes - Master the Art of Cell Lockdown Techniques
- Author: David
- Created at : 2025-01-02 16:38:22
- Updated at : 2025-01-06 17:32:38
- Link: https://win11.techidaily.com/protect-excel-worksheets-from-changes-master-the-art-of-cell-lockdown-techniques/
- License: This work is licensed under CC BY-NC-SA 4.0.