
Preempting Vagrant Start Issues for VMs on Win11OS
Preempting Vagrant Start Issues for VMs on Win11OS
Virtual machines enable you to try out multiple operating systems without removing your main operating system. VMware is one such popular third-party hypervisor that supports multiple operating systems. However, some users face the ‘Failed to start the virtual machine’ error when they power on any virtual machine in VMware.
As a result, they are unable to launch any virtual machine in VMware and are stuck at the error screen. We will discuss multiple methods to resolve this issue and help you successfully launch the virtual machine. Let’s begin.
1. Close and Restart the VMWare Virtual Machine
VMware can face a glitch and can face issues while launching the virtual machines. So, you must completely close the app and run it with administrator rights. Here’s how:
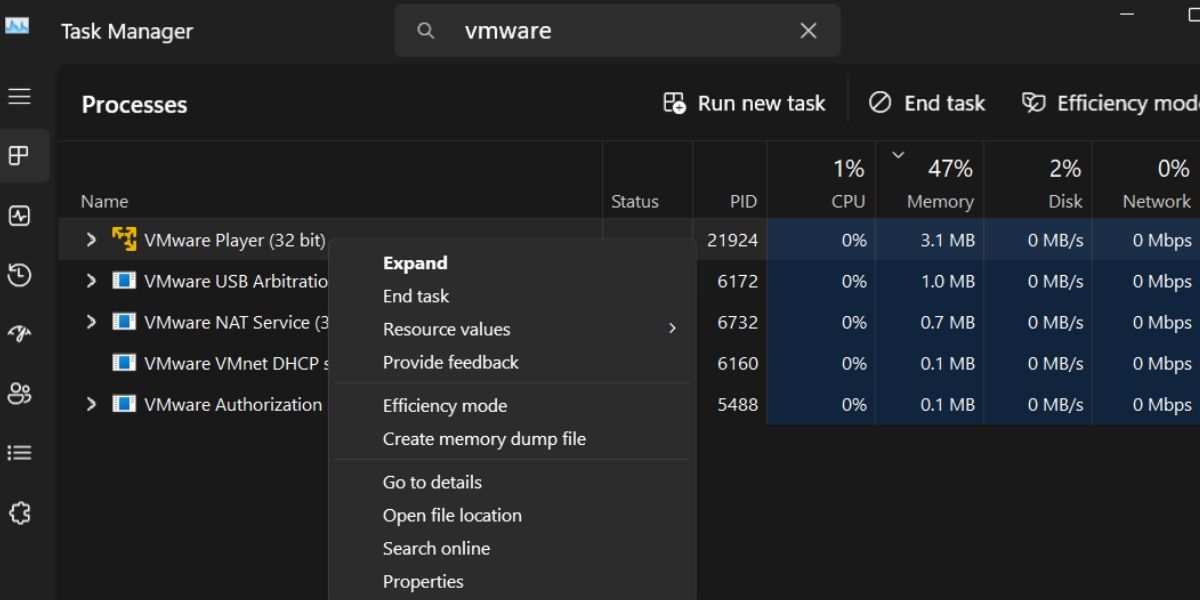
- Right-click on the Start button to launch the Power User menu. Click on the Task Manager option.
- Click on the search bar and type vmware. Press the Enter key to search for all the related processes.
- Right-click on the process and select the End Task option.

- Similarly, close all the related processes and then close the Task Manager window.
- Press the Win key, type vmware, and click on the Run as administrator option.
- The User Account Control window will open. Click on the Yes button.
- Try to launch a virtual machine and check if you face the error again.
 The BootIt Collection covers multi-booting, partitioning, and disk imaging on traditional PC’s using the standard BIOS and newer PC’s using UEFI. The collection includes BootIt Bare Metal (BIBM) for standard BIOS systems and BootIt UEFI (BIU) for UEFI system.
2. Check If Virtualization is Active
Every virtualization program including VMware needs hardware virtualization to work on a Windows PC. So, if you have turned off virtualization from BIOS, you must re-enable it. Repeat the following steps:
- Restart your Windows PC.
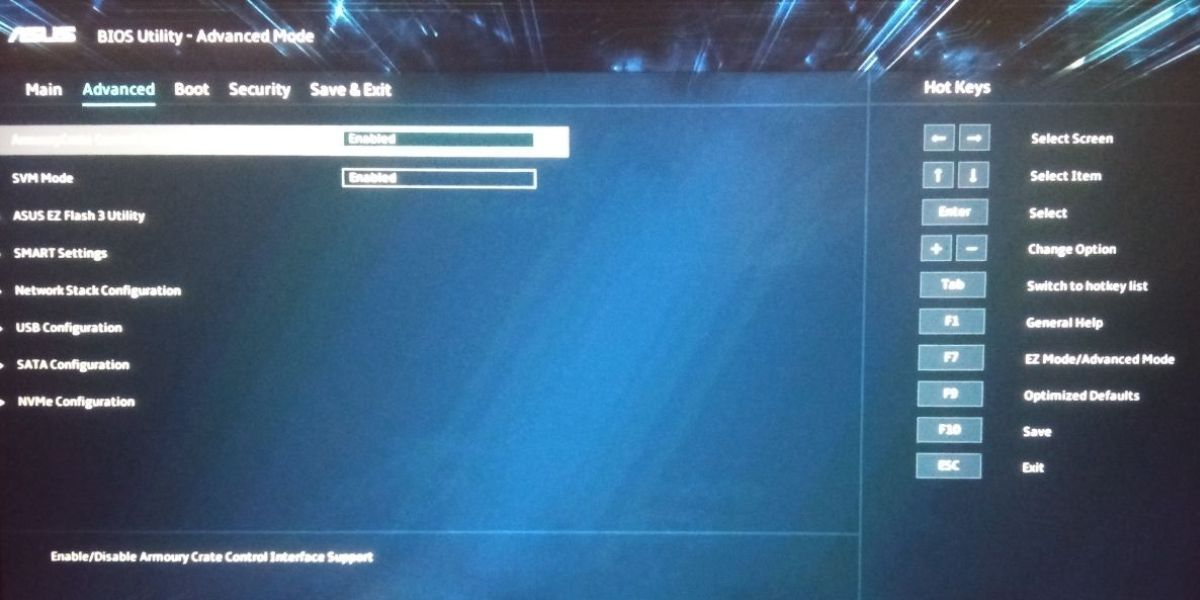
- Repeatedly mash the designated F-key (or even Esc key in some cases) to enter the BIOS. You can find out the designated F-key for your PC by searching its model name.
- Switch to the Advanced Settings page.
- Locate the Hardware Virtualization settings. In our Asus PC, it shows up as “SVM” mode, but you may see other names like VT-x, AMD-V, or Vanderpool. Use the arrow key to highlight and press the Enter key to enable the feature.
- Press the F10 key to save the changes and exit the BIOS.
- Boot to the desktop and launch VMware. Check if you can launch a virtual machine without any error.
 Any DRM Removal for Mac: Remove DRM from Adobe, Kindle, Sony eReader, Kobo, etc, read your ebooks anywhere.
3. Update VMware App
An outdated and buggy build of VMware can cause issues with certain features. So, you must update the app to install the latest build and fix issues with new Windows updates. Here’s how to do it:
- Press the Win key and type vmware. Then press the Enter key to open the app.
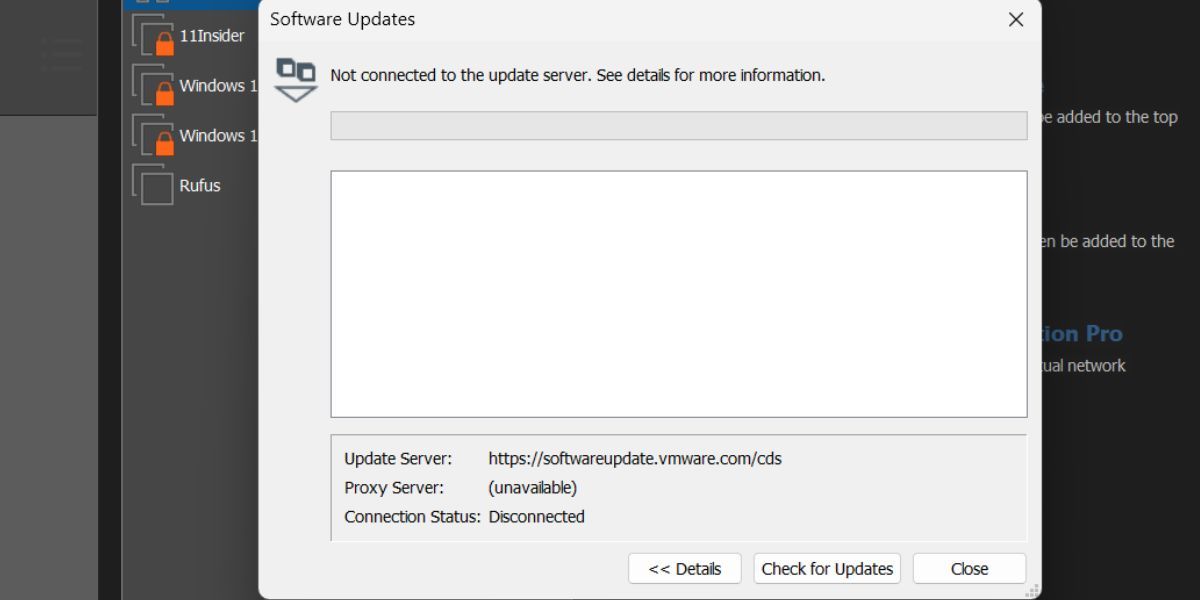
- Go to the top menu and click on the Player button.
- Navigate to the Help > Software updates option.
- Click on the Check for updates button.
- Wait for the utility to search the servers for new updates if any. Download and install the updates on your PC.
- Restart your PC and launch VMware. Power on a virtual machine and check if the error pops up or not.
 Project Manager - Asset Browser for 3Ds Max
4. Disable Memory Integrity in Windows Security
Memory Integrity is a feature listed under the Core Isolation setting in the Windows Security app. It protects high-security processes from malware and requires hardware virtualization. Since hardware virtualization can only be used by one program at a time, VMware can encounter errors when you power on a virtual machine.
So, you must disable memory integrity on your PC. Here’s how to do it:
- Press the Win key, type Windows Security, and press the Enter key.
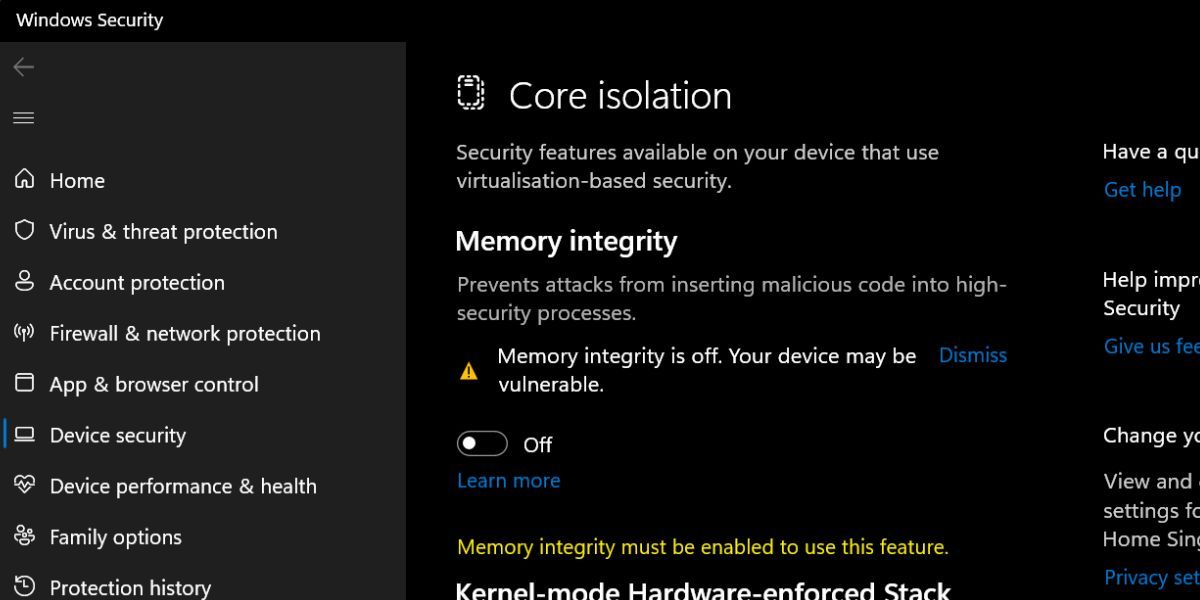
- Click on the Device Security option.
- Locate the Core Isolation section and click on the Core Isolation details option.
- Now, click on the toggle below Memory Integrity to disable the feature.
- Close the Windows Security app.
5. Remove Other Windows Virtualization Features
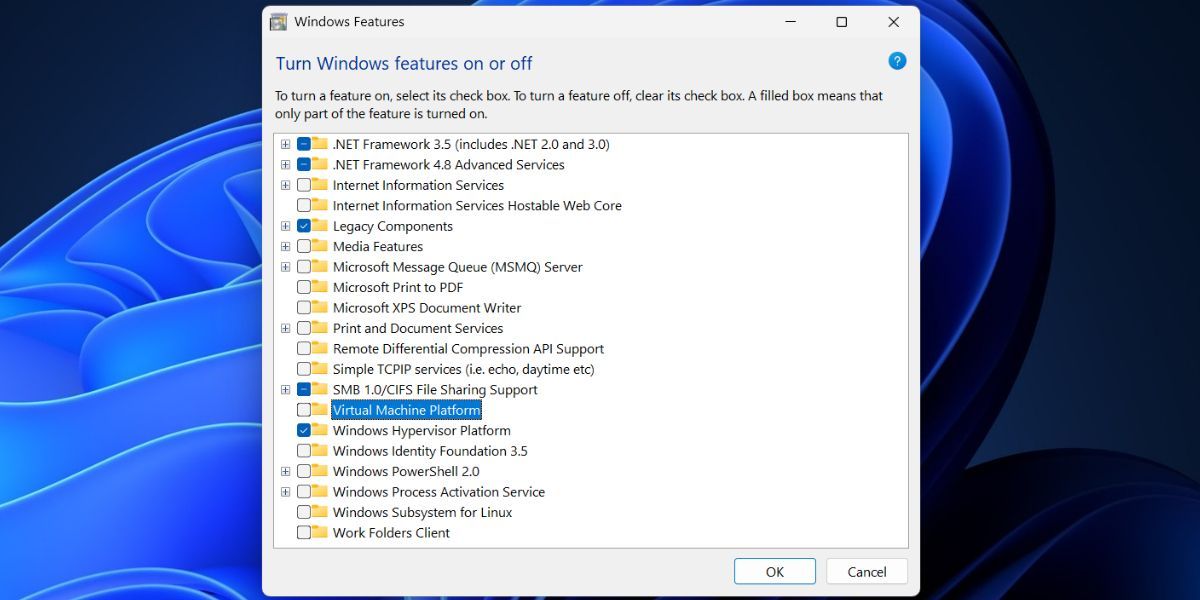
VMware relies on the Windows Hypervisor Platform feature which offers support for third-party hypervisors. But if you have other Windows virtualization features also installed on your PC, it can conflict with VMware’s virtual machine. So, you must remove these features. Repeat the following steps:
- Press Win + R to launch the Run command box . Type appwiz.cpl and press the Enter key.
- The Programs and Features window will open. Click on the Turn Windows features on or off option.
- Scroll down and uncheck Hyper-V, Virtual Machine Platform, and Windows Subsystem for Linux features in the list.
- Click on the OK button.
- Now, click on the Restart now button to apply the changes and remove all these features from your PC.
 Easy and Safe Partition Software & Hard Disk Manager
6. Disable VBS
Virtualization-based security can interfere with third-party hypervisors, so you must disable it. Check out how to disable VBS to increase performance in Windows 11 for more information. After disabling VBS, launch VMware and run a virtual machine to check if the ‘Failed to Start the Virtual Machine’ error persists.
7. Remove Any Other Virtualization-Based Program
If you use other third-party hypervisors like VirtualBox on your PC, you must uninstall them for some time and then run VMware. You won’t lose any virtual machines because you are only removing the hypervisor program. The virtual machine files will remain intact.
Repeat the following steps to remove other hypervisors:
- Press Win + R to open the Run dialog box. Type appwiz.cpl in the text box and press the Enter key.
- The Programs and Features window will launch. Scroll down and locate the other third-party hypervisors in the list.
- Right-click on the program and click on the Uninstall option.
- Follow the on-screen instructions to remove the program from your computer.
8. Reinstall the VMware App
If the existing installation of VMware is corrupt or crucial files are missing from the installation folder, you must reinstall the app. It will remove all the installation files and install a new copy of the app on your PC.
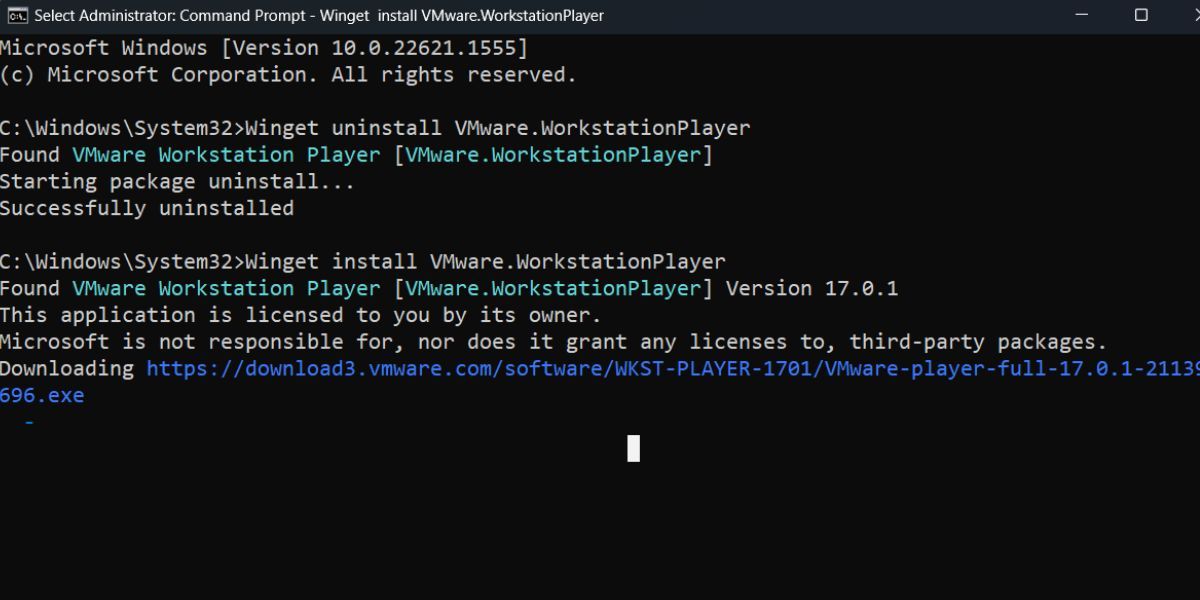
Repeat the following steps to install VMware using Winget:
- Right-click on the Start button to open the Power User menu. Click on the Terminal (Admin) option.
- The User Account Control window will pop up. Click on the Yes button.
- Type the following command and press the Enter key to uninstall VMware:
Winget uninstall VMware.WorkstationPlayer - Wait for Winget to remove the app package from your PC.
- Now, execute the following command to install VMware from the Winget repository:
Winget install VMware.WorkstationPlayer - It will take a while to download and install the app on your PC.
- Close the Terminal app window.
- Launch VMware and power on a virtual machine to check if it runs without any issues now.

9. Use System Restore
If VMware was running fine on your PC before installing a new update or making changes to your PC, you can use System Restore to revert to an earlier state. All your personal files will stay unaffected, and you won’t have to reset your PC for an app.
Get VMware Working Again
These were the nine methods to fix VMware’s ‘Failed to Start the Virtual Machine’ error on Windows 11. Check virtualization settings in BIOS, update the app, and disable memory integrity. After that, disable VBS, uninstall optional virtualization features, and reinstall the app to fix the issue.
As a result, they are unable to launch any virtual machine in VMware and are stuck at the error screen. We will discuss multiple methods to resolve this issue and help you successfully launch the virtual machine. Let’s begin.
- Title: Preempting Vagrant Start Issues for VMs on Win11OS
- Author: David
- Created at : 2024-08-16 00:05:12
- Updated at : 2024-08-17 00:05:12
- Link: https://win11.techidaily.com/preempting-vagrant-start-issues-for-vms-on-win11os/
- License: This work is licensed under CC BY-NC-SA 4.0.