Overcoming Difficulties with Windows 11 Default App Configurations

Overcoming Difficulties with Windows 11 Default App Configurations
If you are not satisfied with any of the default apps assigned by Windows, you can change them to your preferred options. This process was quite simple in Windows 10, but Microsoft has made it a bit complicated for Windows 11 users.
In this guide, we will discuss the method of changing the default apps in Windows 11 in detail. We have also discussed several troubleshooting methods later in this guide that you can try if the default apps fail to change.
Disclaimer: This post includes affiliate links
If you click on a link and make a purchase, I may receive a commission at no extra cost to you.
How to Change the Default Apps in Windows 11
Changing the default apps in Windows 10 is quite simple. You can access theDefault Apps section of the Settings app and replace the current default app with your preferred option.
In Windows 11, this method is slightly different. You must set a program default for all the registered file types and links relevant to it since there isn’t aSet default for all option available.
Below, we have listed different ways of changing the default apps in Windows 11:
1. Choose the Open With Option
The easiest method of changing the default apps option is by using the Open with option in the context menu for files.
Here is how you can do that:
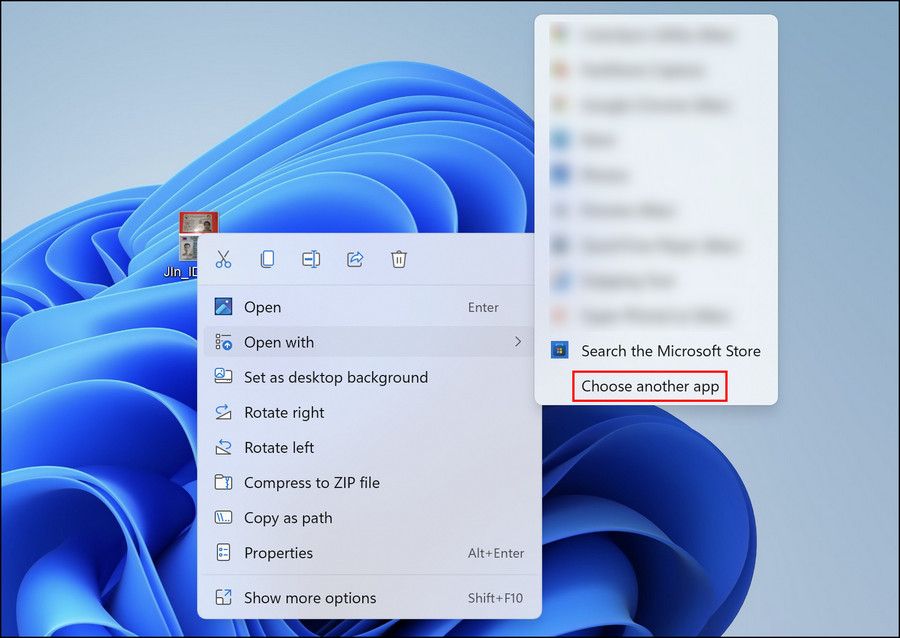
Right-click on the targeted file. For instance, an image file that you want to open with an app other than the default Photos app.
ChooseOpen with >Choose another app from the context menu.

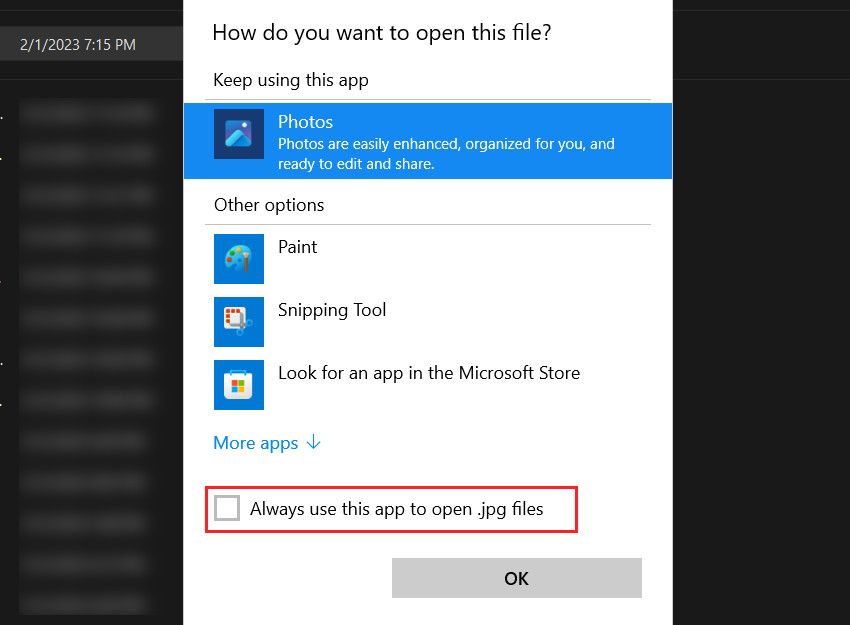
Now, in the following dialog, choose the app you want to set as the default option. If you cannot find the targeted app in the list, chooseLook for another app on this PC and then select the app.
Click onAlways use this app to open files and clickOK . This should set the selected app as the default preference.

2. Use the Settings App
The next thing that you can do is access the Default Apps option and choose the preferred app from there.
Follow these steps to proceed:
Press the Win + I keys together to open the Windows Settings.
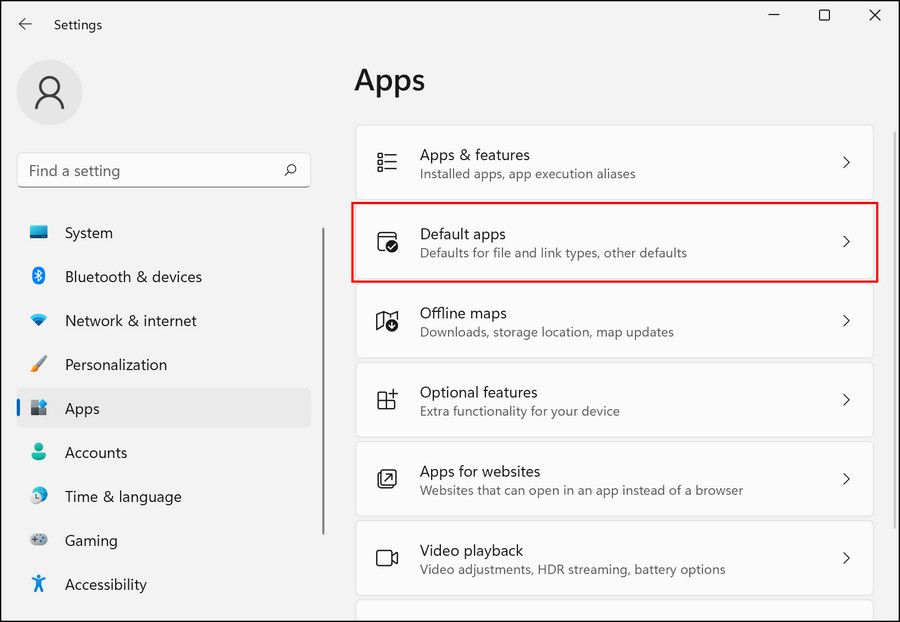
ChooseApps from the left pane.
Click onDefault apps .

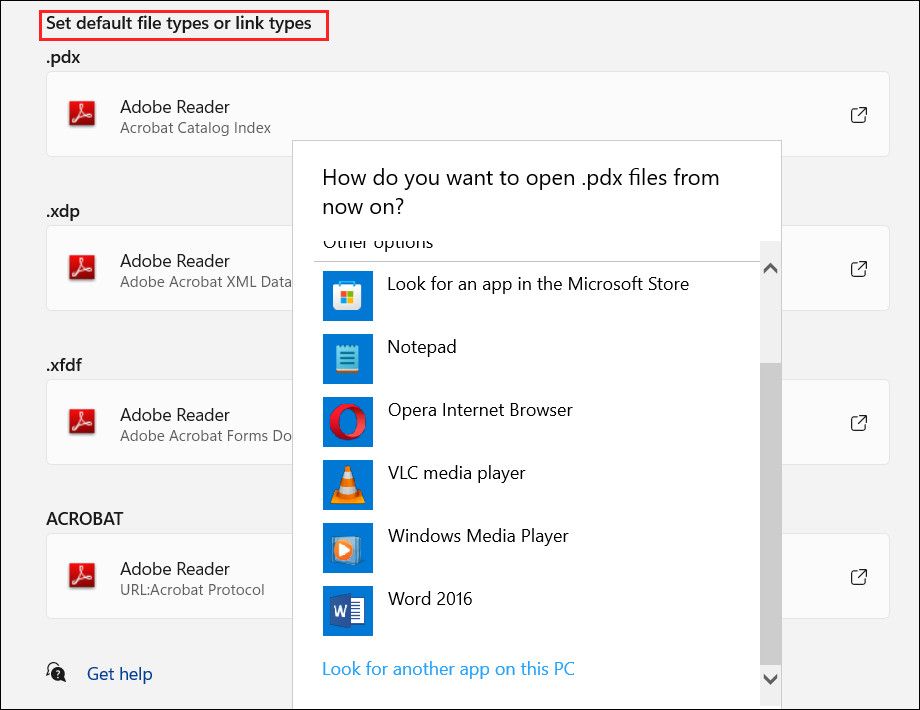
Next, choose the app that you want to set as default. You should now see all the file types and link types the app is registered with.
If you want to choose a program as the default for all its registered file types and links, you’d need to click each type and choose the desired application in the following dialog.

This should set the app as the default option for the selected file and link types. However, if youreset Windows 11 to its default state ever, you will lose all these settings.
3. Use File Properties
You can also change the file properties of the targeted file to open it with a new default app.
To proceed, follow these steps:
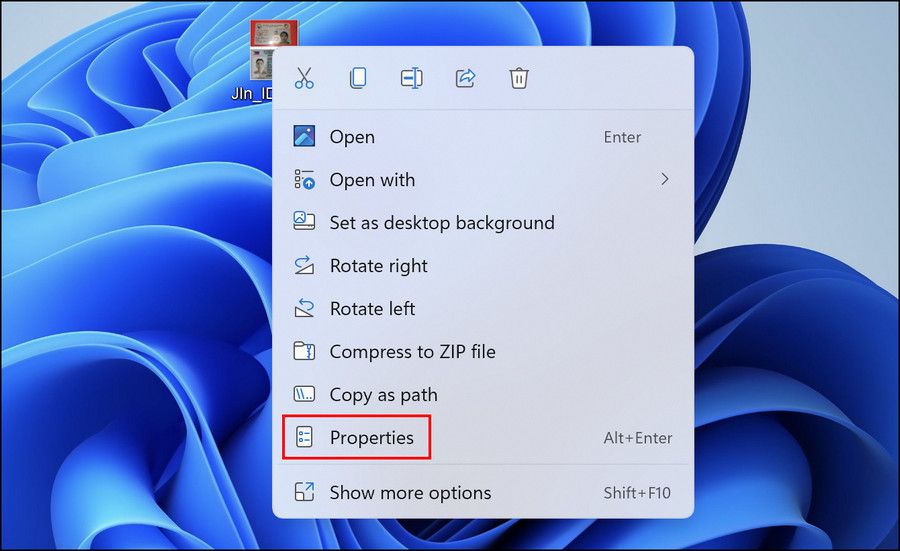
- Right-click on the targeted file and chooseProperties from the context menu.

- Head over to the General tab and click on theChange button associated withOpens with .
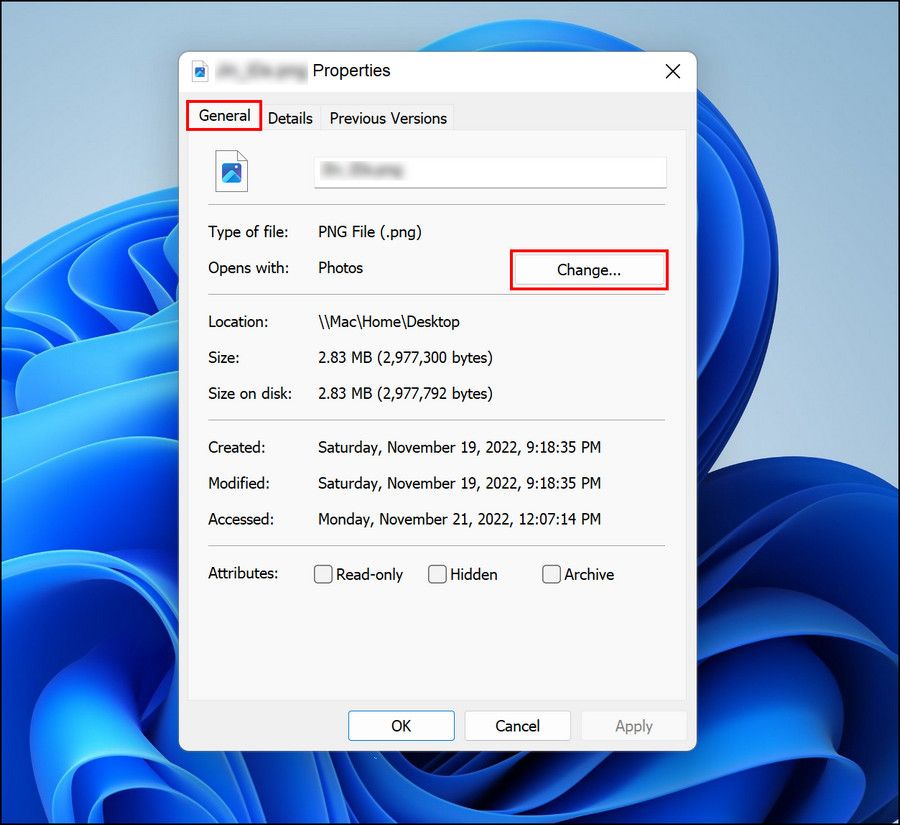
3. Now, choose the desired app and clickOK .
What to Do If You Cannot Change the Default Apps in Windows 11?
If you are unable to change the default apps in Windows 11 despite trying the different methods mentioned above, it could be due to the following reasons:
- The app that you are trying to set as the default option is dealing with a corruption error or is not installed correctly.
- A group policy setting in the system is preventing you from changing these configurations.
- You do not have sufficient permissions to make changes of this level in the system.
- The app is not compatible with your system.
In this case,ensure that your user account has administrative rights and that the app you are trying to set as default is compatible with the system. Here are some more steps you can follow to resolve the problem.
1. Update Windows 11
If you’re running an outdated version of Windows, you may be experiencing problems due to incompatibility issues. Windows 11 needs to be updated to the latest version in this case.
Here is how you can do that:
- Press the Win + I keys together to open Windows Settings.
- ChooseWindows Update from the left pane.
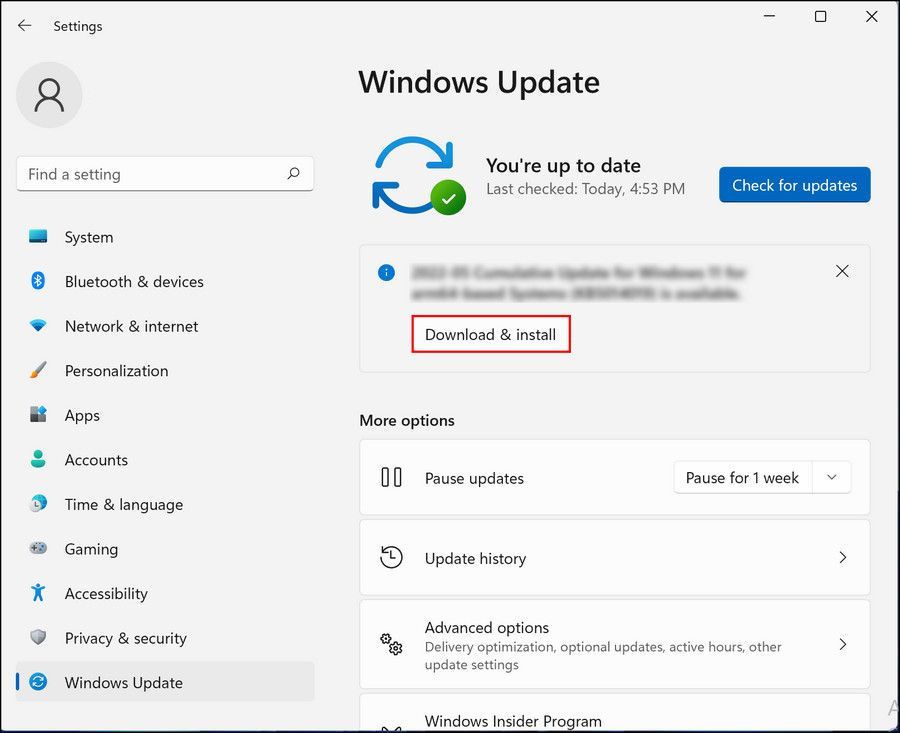
- Now, click on theCheck for updates button on the right side.
- Install all the pending updates one by one by clicking on theDownload & install button and then restart your PC.

Once this is done, follow one of the steps above to change the default app.
2. Reset the Targeted App
If the problem is within the app that you are trying to change, you can reset the program to solve the problem.
Follow these steps to proceed:
- Press Win + S keys together to open Windows Search.
- Type Powershell and chooseRun as administrator .
- ClickYes in the User Account Control prompt.
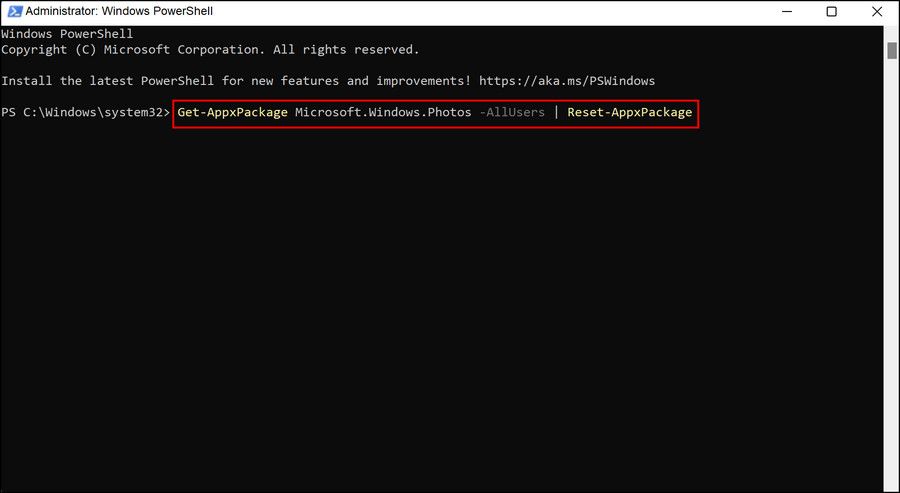
- In the Powershell window, type the command mentioned below and click Enter. Replace packagename with the name package name of the app that you want to set as default.
Get-AppxPackage packagename -AllUsers | Reset-AppxPackage - For instance, if you want to change the Photos app, execute the following command:
Get-AppxPackage Microsoft.Windows.Photos -AllUsers | Reset-AppxPackage
- Once the command is executed, check if you can change the default app.
3. Reinstall the App
Lastly, you can try reinstalling the app that you want to set as default. This will eliminate any corruption errors are bugs within the app that are preventing you from setting it as the default option.
Here is how you can proceed:
- Press the Win + R keys together to open a Run dialog.
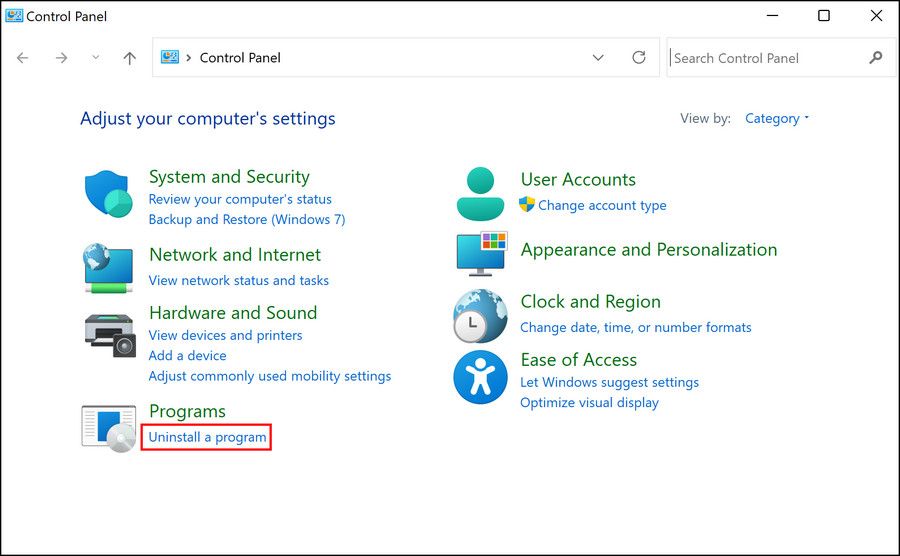
- Type control in Run and click Enter.
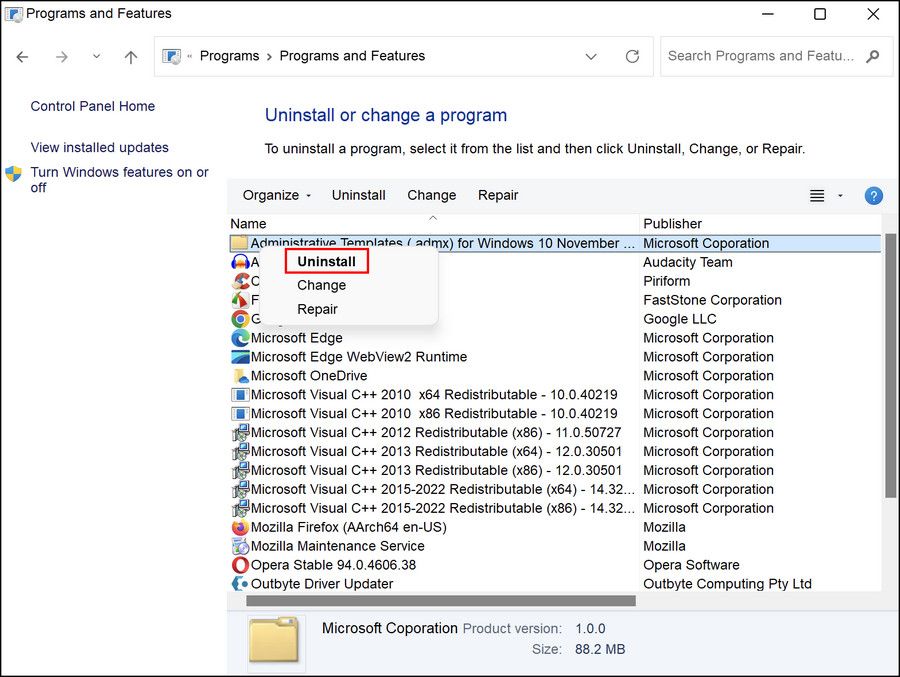
- In the following window, navigate toUninstall a program .

- Locate the targeted app and right-click on it.
- ChooseUninstall and follow the on-screen instructions to proceed.

Once the uninstallation is completed, restart the computer and reinstall the app. Hopefully, this time, you will be able to set it as the default option without any problems.
Make Your Preferred Apps Default
The apps set as the default options on Windows are quite user-friendly and efficient. It is possible, however, to change the default preference to a better option if you have found one that suits your system better.
With the methods listed above, you should be able to change the default apps on your Windows 11 system in no time. Nevertheless, keep in mind that in the event that Windows is reinstalled or reset, these options will return to the default configuration.
Also read:
- [New] Laugh Tracks for iPhone Devices
- [Updated] In 2024, Expert Tips for Efficient Screenshotting with ZD Software's Advanced Features
- Chatbot Battle Royale: Determining the Leader in Generative AI Between ChatGPT and Bing Chat
- From Disappearing Acts to Full Display: Revive Off-Screen Apps with These Quick Fixes (6 Essentials)
- How to Repair Your HyperX Cloud Stinger's Malfunctioning Microphone for Perfect Audio
- In 2024, How Can We Unlock Our Motorola Razr 40 Phone Screen?
- Introducing GPT-4 by OpenAI – An Advanced Breakthrough in Artificial Intelligence
- Key Hardware Diagnostic Tools
- Mastering the Art of Resetting Windows PINs
- Navigating Through Email App Chaos: Solving the Mystery of Zero X Eight Oh Three One F
- Quick Fixes: Engaging Windows' Repair Feature
- Quotes That Will Inspire and Encourage You In Your Journey | Free Book
- Reviving Soundscape: A Step-by-Step Guide for Windows Media Player Issues
- Troubleshooting 'Access Denied' On Windows Devices
- Windows 11 File Expertise: Tab Management Made Simple
- Title: Overcoming Difficulties with Windows 11 Default App Configurations
- Author: David
- Created at : 2024-12-10 18:37:15
- Updated at : 2024-12-12 20:00:30
- Link: https://win11.techidaily.com/overcoming-difficulties-with-windows-11-default-app-configurations/
- License: This work is licensed under CC BY-NC-SA 4.0.
