Optimize Full-Screen Display: Defeating Windows Overscan
Optimize Full-Screen Display: Defeating Windows Overscan
Is the display on your Windows computer getting cut off or extending beyond the visible screen area? This can make it difficult to read content near the edges or click on buttons and options.
Fortunately, it’s possible to fix the overscanning or overscaling issues in Windows so that all the content is visible. This guide will walk you through the process.
1. Disconnect and Reconnect the Display
Overscanning problems on Windows can arise from a poorly connected HDMI or DisplayPort cable. This can cause the screen image to appear stretched or cut off. Hence, the first thing you should do is disconnect and reconnect the display.
Turn off your monitor or TV and unplug the HDMI or DisplayPort cable. Wait a few seconds, and then plug the cable back in. While you’re at it, ensure that both the cable’s connector and the port are clean and free from any visible dust to ensure a secure connection.
2. Change the Display Resolution
Although Windows can automatically detect and adjust the resolution of a connected display, it may encounter difficulties at times. This can lead to overscanning or other display-related problems. In such cases, you can attempt to fix the issue by manually adjusting the display resolution.
Follow these steps to continue:
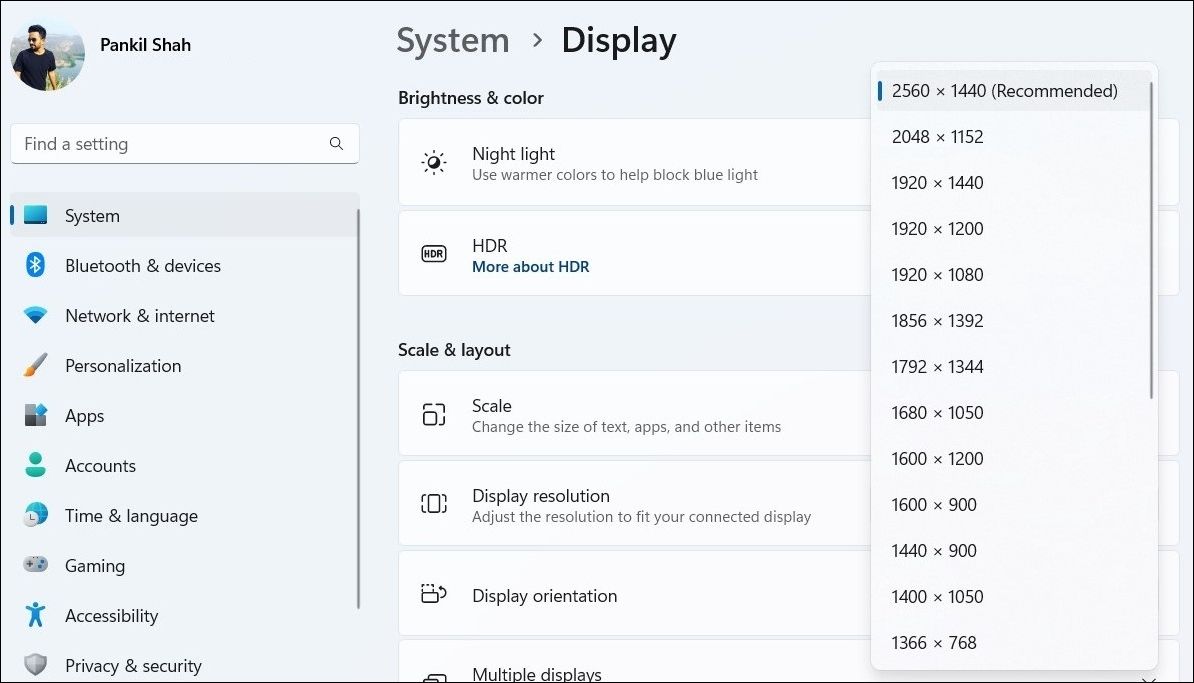
- Open the Start menu and click the gear-shaped icon to launch the Settings app.
- Select the System tab and click on Display.
- Click the drop-down menu next to Display resolution to select the correct resolution from the list. If you don’t know the appropriate display resolution for your display, refer to the product manual or experiment with different options.

When attempting this fix, some users report having their screen resolution settings appear grayed out. If such is the case for you too, check our guide on fixing inaccessible screen resolution settings on Windows .
3. Change the Display Scale
Opting for an incorrect display scale may result in certain desktop elements being cropped or extending beyond the visible screen area, leading to an overscaled display. To fix this, you need to adjust the display scale on Windows using the steps below:
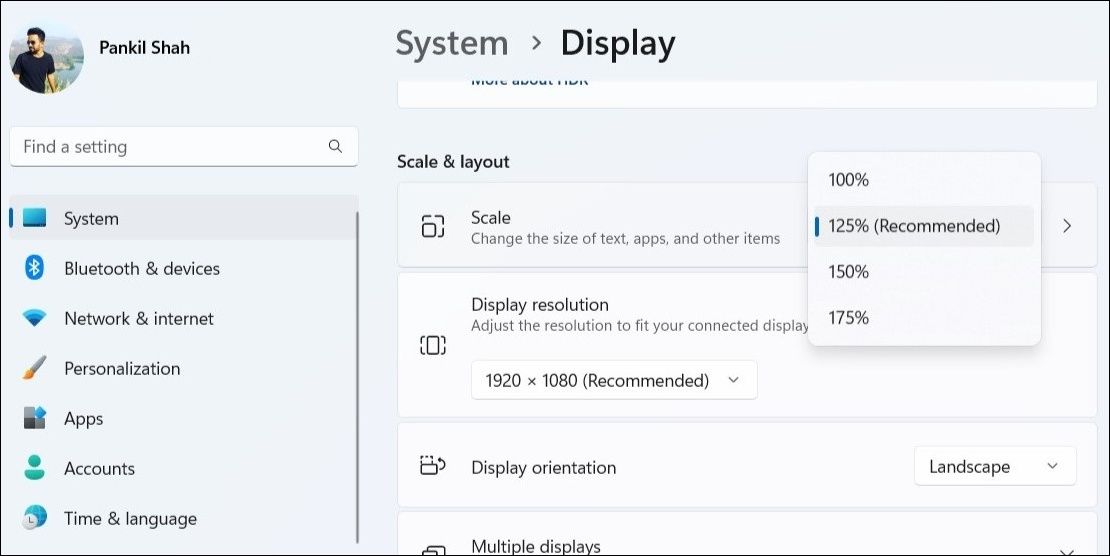
- Press Win + I to open the Windows Settings app .
- Head to System > Display.
- Click the drop-down menu next to Scale to select the Recommended value.
After changing the display scale, disconnect and reconnect the display and check if the issue is resolved.
4. Use the Graphics Control Panel
If adjusting the display resolution and scale via the Windows Settings app proves ineffective, you can try using the built-in graphics control panel to apply the changes. The exact steps will vary depending on whether your PC is equipped with Intel, NVIDIA, or AMD graphics.
Here’s how you can use the graphics control panels for each type:
Fix Overscanning Using the Intel Graphics Command Center
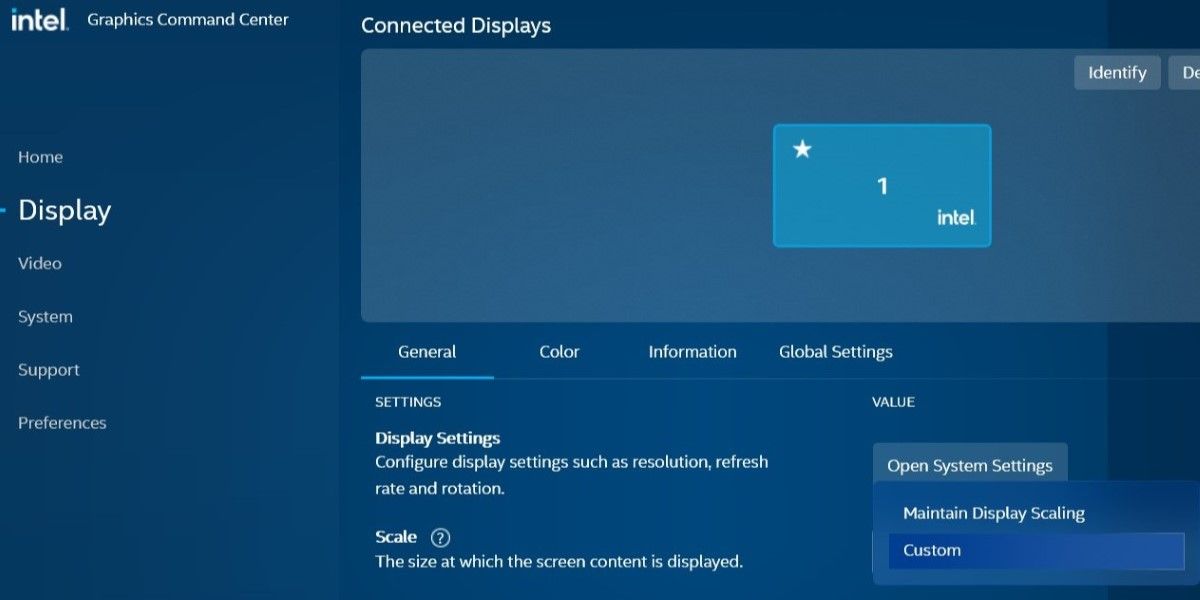
- Press Win + S to open the search menu.
- Type Intel Graphics Command Center in the box and press Enter.
- Select Display from the left pane.
- Select the monitor that is showing the overscan issue.
- Under the General tab, click the drop-down menu next to Scale and select Custom.
- Use the two sliders that appear on your left to adjust the display so that the screen fits.
- Click X to close the window.
Power Tools add-on for Google Sheets, 12-month subscription
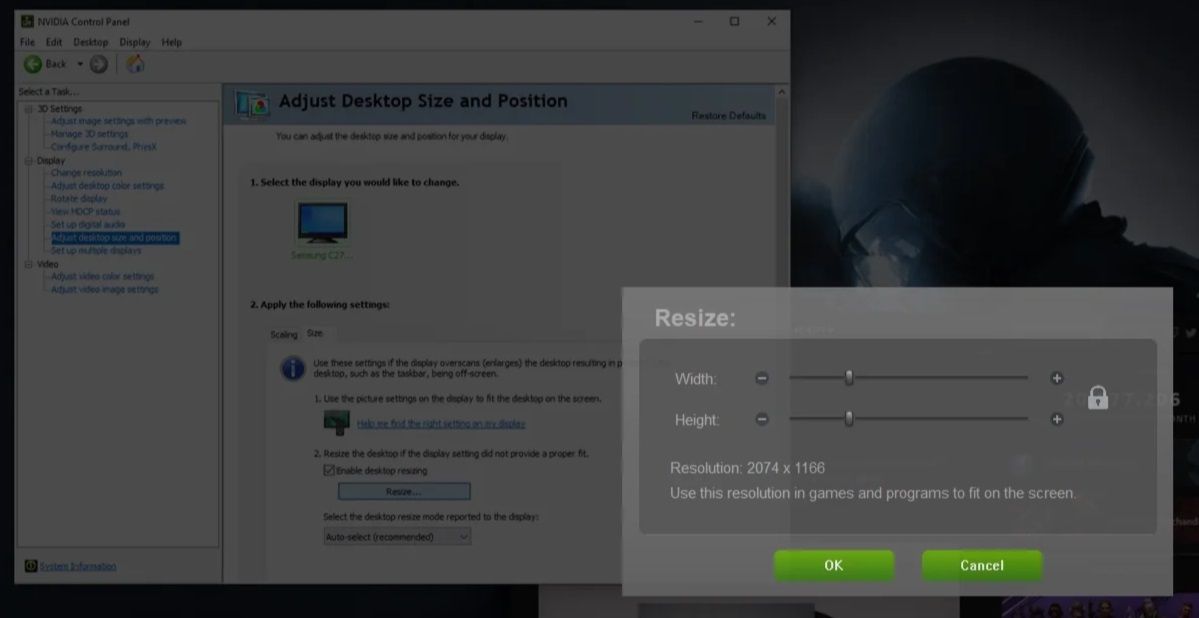
Fix Overscanning Using the NVIDIA Control Panel
- Open the NVIDIA Control Panel using the search menu.
- Double-click the Display menu in the left pane to expand it.
- Select Adjust display size and position from the Display section.
- In the right pane, switch to the Size tab and tick the Enable desktop resizing checkbox.
- Click the Resize button.
- Adjust the Width and Height sliders so that the display fits the screen.
- Click OK and then Apply.
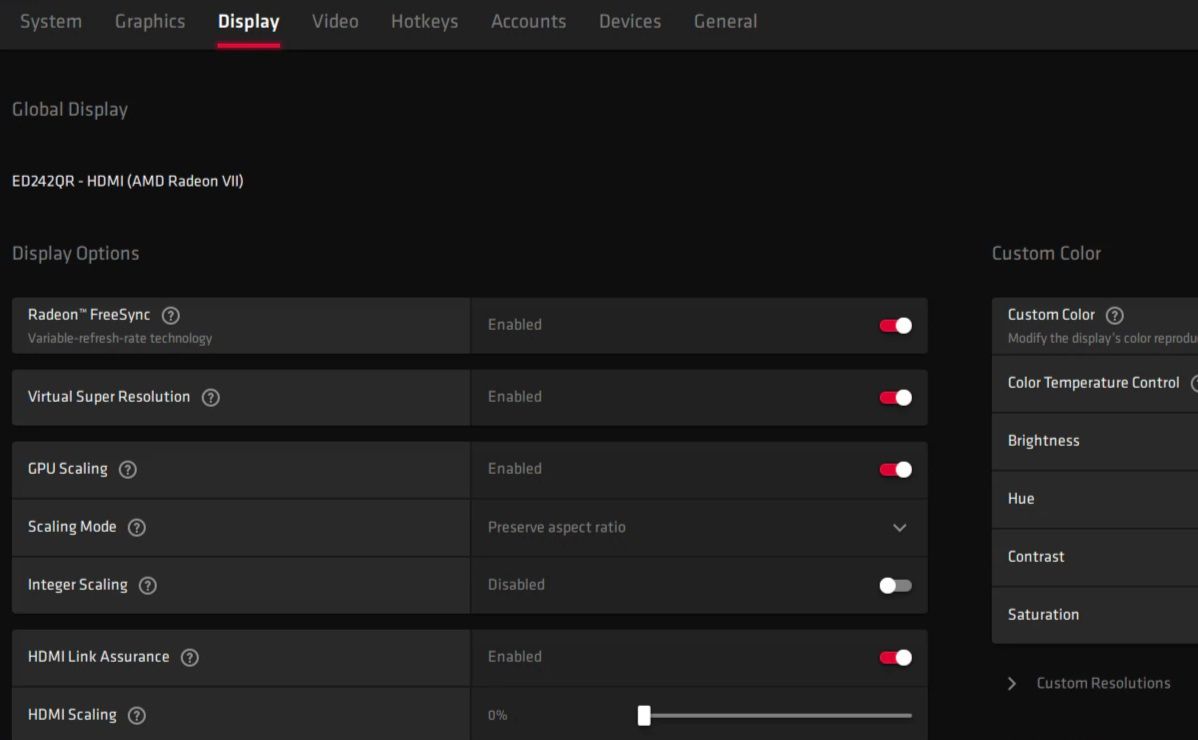
Fix Overscanning via AMD Radeon Settings
- Right-click on an empty spot on your desktop and select AMD Radeon Settings from the context menu.
- Select the Display tab at the top.
- Move the slider next to HDMI Scaling to make the display fit the screen.
Advanced Find and Replace for Google Sheets, Lifetime subscription
Once you make the necessary adjustments using the above steps, the issue should not occur again.
5. Adjust Your Monitor’s Display Settings
Most modern monitors include settings that let you customize display parameters like resolution, aspect ratio, scaling, and more. You can access the On-Screen Display (OSD) menu using the physical buttons or a remote.
Look for settings such as “Auto Adjust,” “Screen Fit,” “1:1,” or “Scaling” on the menu. Experiment with different options and see if they help resolve overscanning or overscaling issues on your Windows PC.
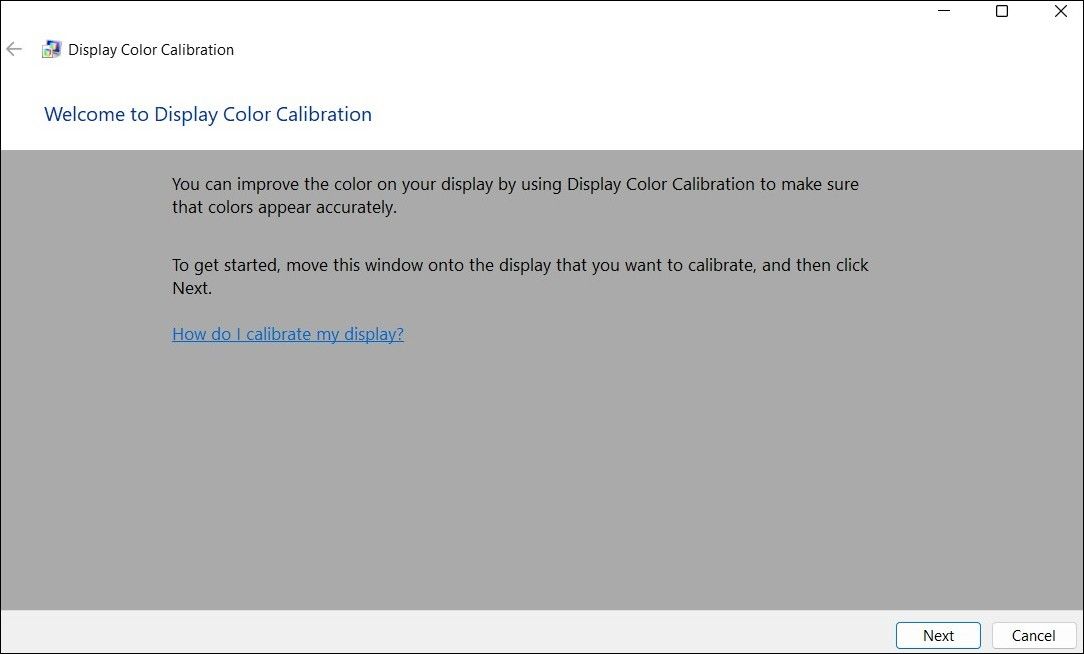
6. Run the Display Calibration Tool
Both Windows 10 and 11 offer a display calibration tool that can help you fix various display-related issues, including this one. Here’s how you can run it.
- Press Win + S to open the search menu.
- Type Calibrate Display Color in the search box and select the first result that appears.
- In the Display Color Calibration window, follow the on-screen prompts.
Any DRM Removal for Win:Remove DRM from Adobe, Kindle, Sony eReader, Kobo, etc, read your ebooks anywhere.
 Any DRM Removal for Win:Remove DRM from Adobe, Kindle, Sony eReader, Kobo, etc, read your ebooks anywhere.
Complete the calibration process and see if the overscanning issue still occurs on Windows.
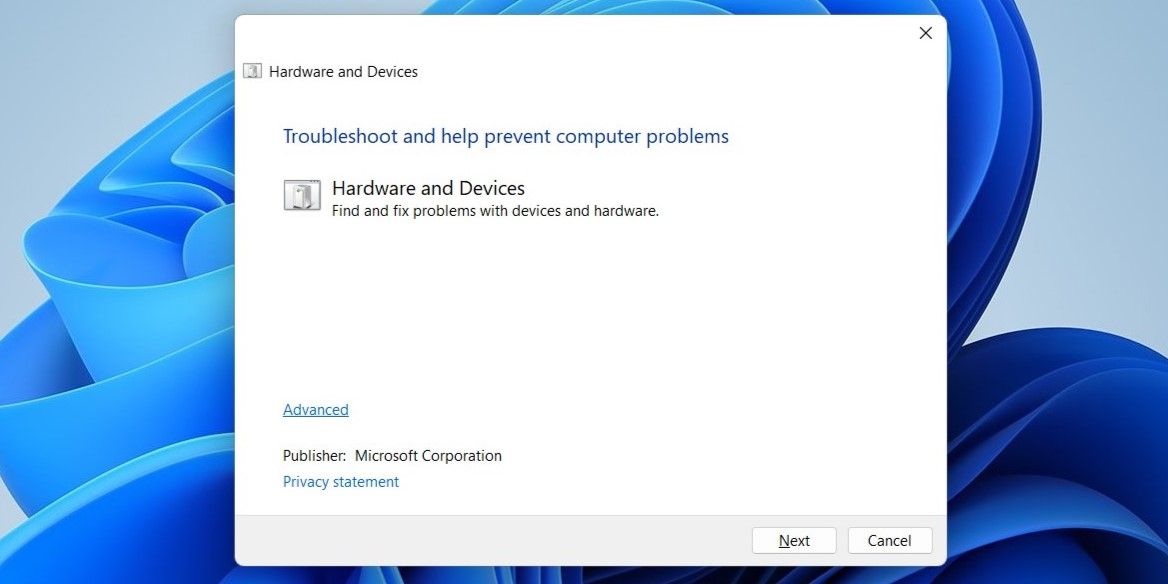
7. Run the Hardware and Devices Troubleshooter
Another thing you can do to fix the overscaling issue on Windows is to run the built-in Hardware and Devices troubleshooter. Follow these steps to continue with this solution:
- Right-click on the Start icon or use the Win + X keyboard shortcut to access the Power User menu.
- Select Terminal (Admin) from the list.
- Click Yes in the User Account Control prompt.
- In the console, paste the following command and hit Enter.
msdt.exe -id DeviceDiagnostic - Click the Advanced option and tick the checkbox that reads Apply repairs automatically.
- Click Next to run the troubleshooter.

Wait for the troubleshooter to find and fix any issues, and see if the issue persists.
8. Try Some Generic Fixes
If you are still struggling with the overscanning issue, you can try your luck with a couple of generic Windows fixes to see if they resolve the problem.
- Update Display Drivers: Faulty or outdated display drivers on your PC can cause such anomalies. You can try updating the display drivers on your Windows computer to see if that helps.
- Install Windows Updates: It is possible that the overscanning issue is caused by a buggy Windows build. In such cases, installing pending Windows updates should help resolve the problem.

Overcome Overscanning on Windows
Overscanning issues on Windows can make it difficult to use your computer, as they can cause menus, options, and other elements to be cut off.
We hope that one or more of the tips provided above has helped you resolve the problem, and now your computer display fits the screen correctly.
Fortunately, it’s possible to fix the overscanning or overscaling issues in Windows so that all the content is visible. This guide will walk you through the process.
- Title: Optimize Full-Screen Display: Defeating Windows Overscan
- Author: David
- Created at : 2024-08-15 23:32:21
- Updated at : 2024-08-16 23:32:21
- Link: https://win11.techidaily.com/optimize-full-screen-display-defeating-windows-overscan/
- License: This work is licensed under CC BY-NC-SA 4.0.