Navigating Windows 11 with Microsoft's PowerToys

Navigating Windows 11 with Microsoft’s PowerToys
Microsoft PowerToys is a collection of productivity tools that enhance your Windows experience to the next level. This software package offers awesome features like FancyZones for custom window layouts, PowerRename for bulk file renaming, and the Shortcut Guide for easy access to Windows key shortcuts.
To access these features, you need Microsoft PowerToys installed on your PC. Let’s look at the different ways you can install it on your Windows computer and walk through the installation process for each.
Disclaimer: This post includes affiliate links
If you click on a link and make a purchase, I may receive a commission at no extra cost to you.
1. Install Microsoft PowerToys From the Microsoft Store
Microsoft Store is an online marketplace pre-installed on Windows. It offers a diverse array of free and paid apps, games, and even device updates, all in one place. This gives Windows users access to everything they need under one roof.
To install Microsoft PowerToys from the Microsoft Store, follow these steps:
- Press Win + Q and type Microsoft Store in the search bar.
- Click on the Microsoft Store icon in the search results.
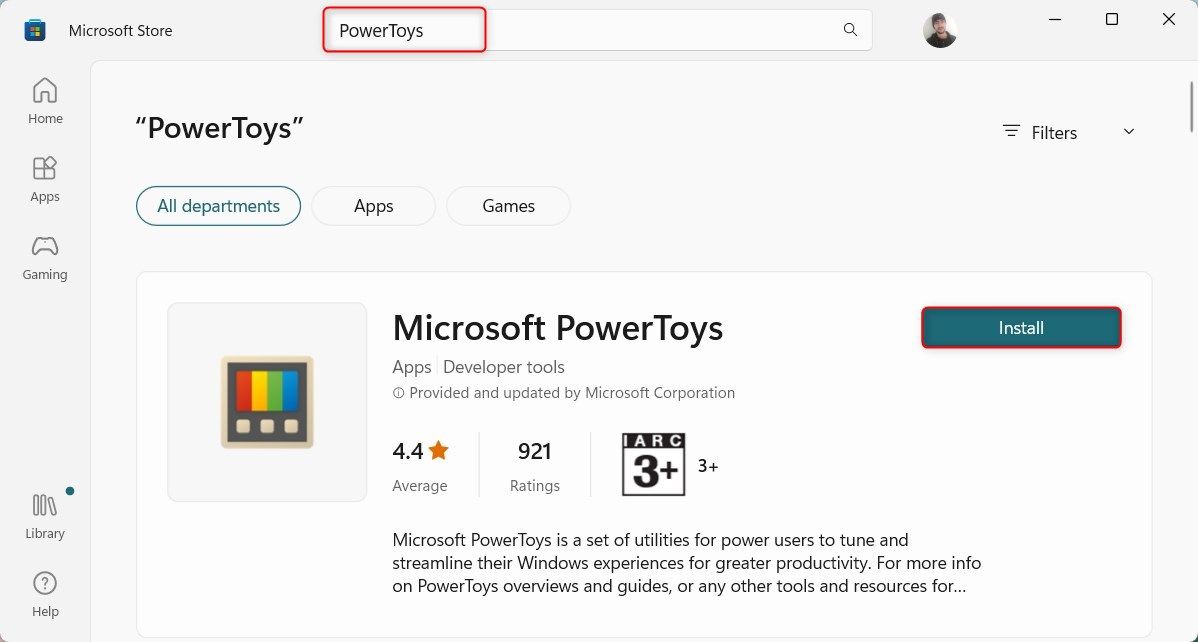
- On the Microsoft Store page, search for PowerToys. The next page will provide a detailed overview of the software package. Please read it carefully before continuing.
- If you feel satisfied, click Install to begin the downloading & installation process. The process might take a few minutes.

Once installation is complete, open the Microsoft PowerToys app from the Start menu. All features are ready to use.
2. Install Microsoft PowerToys From the GitHub Page
If you don’t have access to the Microsoft Store, you can also download and install Microsoft PowerToys from the GitHub page.
To install Microsoft PowerToys from GitHub, do the following:
Visit the official Microsoft PowerToys GitHub page and navigate to the Releases section. It’s usually on the right side of the page.
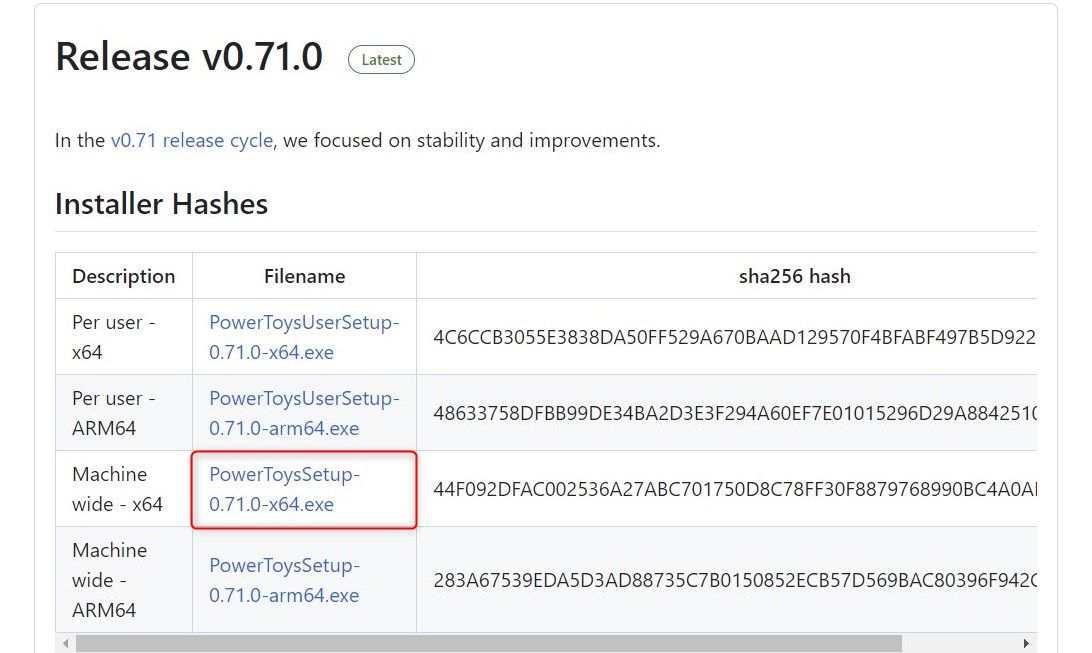
In the Releases section, click on the most recent stable version. It should be at the top and have the word Latest beside it.

Now look for a file that is named something like PowerToysSetup-0.##.#-x64.exe. Here, the # represents the version number. Click on this file to start the download. After that, navigate to your downloads folder and double-click on it. This will start the installation process.
A window might pop up asking for permission to change your device. Click Yes to continue. The setup wizard will then open. Here, follow the installation prompts. Typically, you just need to click Next a few times and then Install.
Once the installation process is completed, you’ll be prompted to finish and exit the setup. Click Finish. You might be asked to agree to terms and conditions, choose an installation location, and decide whether you want a shortcut created.
After performing the above procedure, you can access Microsoft PowerToys from the Start menu or the shortcut if you created one.
3. Install Microsoft PowerToys Through the Command Prompt
If you’re comfortable using the command prompt, this might be the quickest and most efficient way to install Microsoft PowerToys.
To install Microsoft PowerToys through the Command Prompt, follow these steps:
- Open the Run dialog box .
- Type cmd in the text field and press Ctrl + Shift + Enter to open the Command Prompt with administrative privileges .
- If the User Account Control prompt pops up, click Yes to confirm the action.
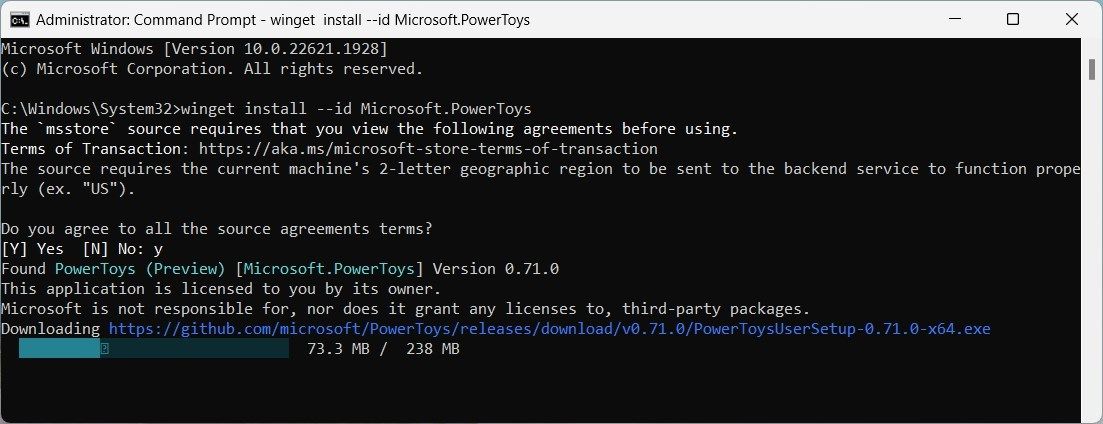
- In the Command Prompt window, type the following command:
winget install –id Microsoft.PowerToys
- Now hit Enter to execute the command. This will download and install Microsoft PowerToys.
The process might take a few minutes, so be patient. Once it’s finished, you’ll find Microsoft PowerToys in your Start Menu.
Download Microsoft PowerToys Easily on Windows
If you’ve made it this far, you now know how to install Microsoft PowerToys on Windows. Try out the Microsoft Store version first, as it’s the most user-friendly and least complicated.
Whichever method you choose, we hope you find this guide helpful. Enjoy customizing your Windows experience with Microsoft PowerToys.
To access these features, you need Microsoft PowerToys installed on your PC. Let’s look at the different ways you can install it on your Windows computer and walk through the installation process for each.
Also read:
- 2024 Approved Entertaining Entrances Tales That Resonate
- 2024 Approved Top Picks for the Best Android Image Correction Tools (5 Choices)
- 2024 Approved Total Circles Capture Systems
- Explore the Ultimate List of Free YouTube Channel Starters
- Immediate Remediation for a Frozen Epic Games Launcher
- Precise Clipping Pains? Solutions for Immediate Relief
- Tips to Resolve Error: Unable to Locate Windows Lsass
- Verbale Reue Im Deutschen Praktizieren
- Win10/W11: Avoiding the “Soon to Expire License” Warnings
- Windows 11-Problembehebung Erleichtern: Sorgenumgründe Aufklären Und Lösungsmöglichkeiten Präsentieren
- Windows Fingerprint Scanners Hacked – Security Advisory Needed
- Title: Navigating Windows 11 with Microsoft's PowerToys
- Author: David
- Created at : 2025-02-27 00:52:01
- Updated at : 2025-03-05 03:18:27
- Link: https://win11.techidaily.com/navigating-windows-11-with-microsofts-powertoys/
- License: This work is licensed under CC BY-NC-SA 4.0.


