Navigating Error E:8024002E in Windows Updates

Navigating Error E:8024002E in Windows Updates
Windows Update is generally reliable, but it can sometimes surprise you with the error 0x8024002e. This unfortunate glitch could leave your device’s operating system open to potential security threats and stop it from downloading further updates.
Fortunately, we’ve identified the steps needed to quickly resolve this issue - so be sure to take action now for smooth sailing with Windows Updates in the future.
Disclaimer: This post includes affiliate links
If you click on a link and make a purchase, I may receive a commission at no extra cost to you.
What Causes Windows Update Error 0x8024002e?
If you’re dealing with Windows Update error 0x8024002e, there are a variety of potential causes, ranging from corrupted files and incompatible hardware settings to incorrect network configurations. Other possible culprits include outdated drivers and limited storage space.
It usually includes an error message that states, “There were some problems installing updates, but we’ll try again later. If you keep seeing this and want to search the web or contact support for information, this may help: (0x8024002e).”
Let’s now see how to fix this error code on Windows:
1. Restart Your Computer
Restarting your computer is an easy way to resolve many Windows Update errors. By restarting, you’re resetting the memory of your device and clearing out any pesky bugs that may be causing trouble with error 0x8024002e. Give it a try - after rebooting, check if the issue has been resolved.
2. Restart the Windows Update Services
If you’re still facing Windows Update errors such as error 0x8024002e, then it may be a result of one or more defective services or processes. You can try restarting the Windows Update service to ensure that all your essential services are operating properly and without issue.
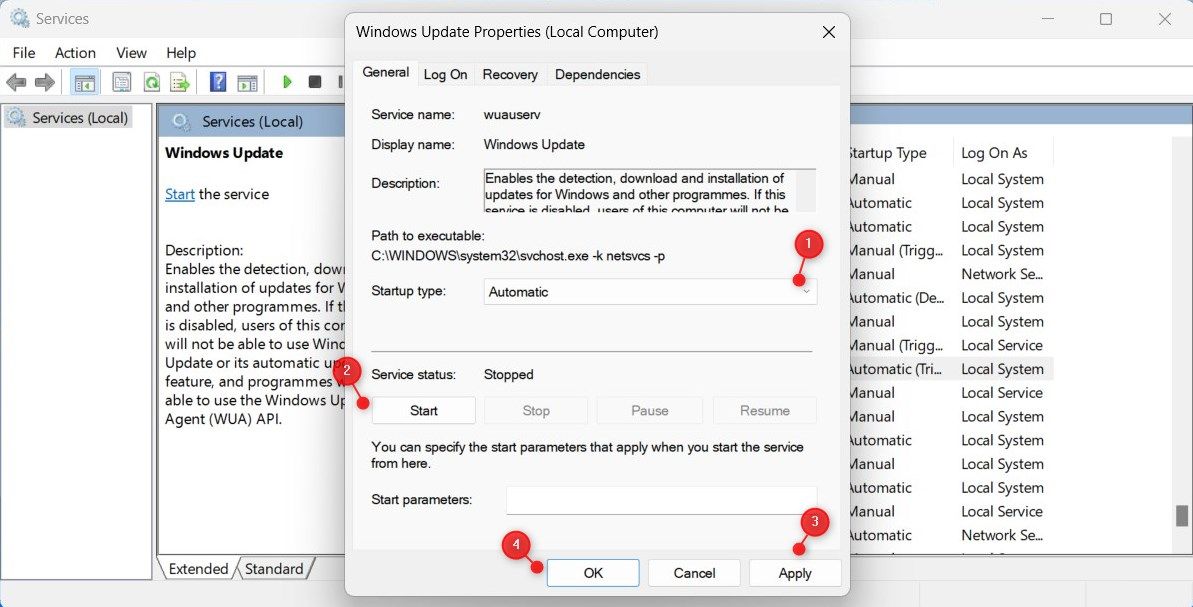
To restart the Windows Update service, follow these steps:
- PressWin + R on your keyboard to open the Run dialog.
- Typeservices.msc into the text box and clickOK .
- Next, scroll down toWindows Update and double-click on it.
- In the Properties window, set the Startup type toAutomatic .
- Then go to Service status and clickStart .

- Now clickApply > OK to save the changes.
After you have started the Windows Update service, repeat this same process with several other services provided below:
- Background Intelligent Transfer Service.
- Cryptographic Service.
- Windows Update Medic Service.
- DCOM Server Process Launcher
- Windows Installer.
Once you’ve completed the process, check Windows Update again to see if the error is still occurring.
3. Tweak the Registry Editor
This solution might work if you’re dealing with a corrupt or missing Windows Update setting in your registry. Be very cautious when accessing and modifying your registry, as you could be exposed to a range of unwanted issues if done incorrectly.
Alwaysback up the registry files before making any changes, just in case something goes wrong so that it can easily and quickly be restored.
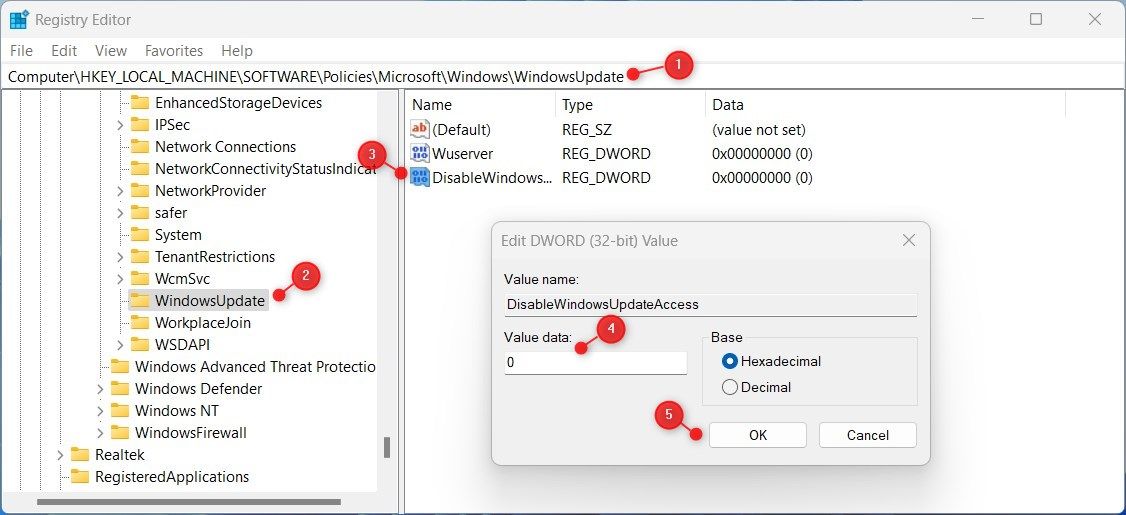
To adjust the Windows Update setting in your registry, follow these steps:
- Open the Run dialog box .
- Typeregedit in the Open field and clickOK .
- If UAC prompts appear on the screen, clickYes .
- Once you’re in the Registry Editor window, navigate to the following location:
HKEY_LOCAL_MACHINE\Software\Policies\Microsoft\Windows\WindowsUpdate - Double-clickDisableWindowsUpdateAccess in the right pane.
- If the Value data in the popup window is1 , change it to0 .
- ClickApply > OK to save the changes.

- Now close the Registry Editor window and restart your computer.
After you follow these steps, you should check to see if the 0x8024002e error has been resolved.
4. Reset All Relevant Windows Update Components
Sometimes, the components responsible for Windows Update may get corrupted. If this occurs, you can try resetting the components to resolve the issue.
Follow these steps to reset your Windows Update Components:
- First, open Notepad on your Windows computer. In case you need help, see our guide onhow to open Notepad on Windows .
- Copy and paste the following commands into the Notepad window:
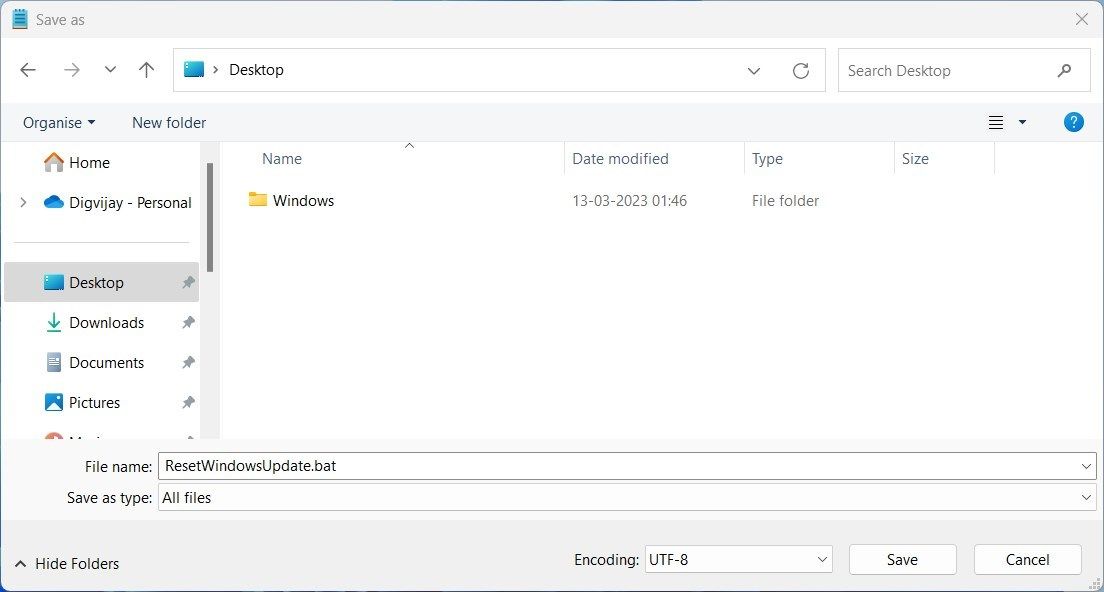
net stop bits net stop wuauserv net stop appidsvc net stop cryptsvc Del "%ALLUSERSPROFILE%\Application Data\Microsoft\Network\Downloader\*.*" rmdir %systemroot%\SoftwareDistribution /S /Q rmdir %systemroot% system32\catroot2 /S /Q sc.exe sdset bits D:(A;;CCLCSWRPWPDTLOCRRC;;;SY)(A;;CCDCLCSWRPWPDTLOCRSDRCWDWO;;;BA)(A;;CCLCSWLOCRRC;;;AU)(A;;CCLCSWRPWPDTLOCRRC;;;PU) sc.exe sdset wuauserv D:(A;;CCLCSWRPWPDTLOCRRC;;;SY)(A;;CCDCLCSWRPWPDTLOCRSDRCWDWO;;;BA)(A;;CCLCSWLOCRRC;;;AU)(A;;CCLCSWRPWPDTLOCRRC;;;PU) cd /d %windir% system32 regsvr32.exe /s atl.dll regsvr32.exe /s urlmon.dll regsvr32.exe /s mshtml.dll regsvr32.exe /s shdocvw.dll regsvr32.exe /s browseui.dll regsvr32.exe /s jscript.dll regsvr32.exe /s vbscript.dll regsvr32.exe /s scrrun.dll regsvr32.exe /s msxml.dll regsvr32.exe /s msxml3.dll regsvr32.exe /s msxml6.dll regsvr32.exe /s actxprxy.dll regsvr32.exe /s softpub.dll regsvr32.exe /s wintrust.dll regsvr32.exe /s dssenh.dll regsvr32.exe /s rsaenh.dll regsvr32.exe /s gpkcsp.dll regsvr32.exe /s sccbase.dll regsvr32.exe /s slbcsp.dll regsvr32.exe /s cryptdlg.dll regsvr32.exe /s oleaut32.dll regsvr32.exe /s ole32.dll regsvr32.exe /s shell32.dll regsvr32.exe /s initpki.dll regsvr32.exe /s wuapi.dll regsvr32.exe /s wuaueng.dll regsvr32.exe /s wuaueng1.dll regsvr32.exe /s wucltui.dll regsvr32.exe /s wups.dll regsvr32.exe /s wups2.dll regsvr32.exe /s wuweb.dll regsvr32.exe /s qmgr.dll regsvr32.exe /s qmgrprxy.dll regsvr32.exe /s wucltux.dll regsvr32.exe /s muweb.dll regsvr32.exe /s wuwebv.dll netsh winsock reset netsh winsock reset proxy net start bits net start wuauserv net start appidsvc net start cryptsvc - Now clickFile and selectSave as from the option list.
- In theSave as type field, chooseAll Files .

- Name the fileResetWindowsUpdate.bat and save it to your desktop.
- Now right-click on the batch file and selectRun as administrator from the context menu.
- If UAC window pops up on the screen, clickYes to continue.
Wait for the process to complete and then restart your computer. After you follow these steps, check to see if the 0x8024002e error is resolved.
5. Apply Generic Windows Update Fixes
If all else fails, it’s time to try some more general fixes. These have had good track records for fixing Windows Update errors, regardless of the error code it gives you.
Check outthe ways to fix Windows Update errors on Windows 11 for more. Most of them should also work on Windows 10 machines.
Resolving Windows Update Error 0x8024002e
It’s easy to solve Windows Update error 0x8024002e with the fixes mentioned above. Most of the time, this issue is related to corrupted or missing system files in your Windows Update service. In case you still experience problems afterward, then a system restore should do the trick.
Also read:
- [New] In 2024, A Compreenas Guide to Choosing Ideal Lenses for Filmmaking
- 2024 Approved Revolutionize Virtual Reality with Our Expertise
- Analyzing the Impact of Reduced Photo Jiggles in Adobe
- Elevating Historical DirectX Games Through DXVK Technology
- Embracing Game-Driven Efficiency with Windows OS
- Gain Control: Tackling Unbidden Window Movement
- Guide to Resolve Non-Responsive Microsoft Outlook Application
- In 2024, Comparative Analysis 64 vs 128GB Video Holding Power
- In 2024, How to Fake GPS on Android without Mock Location For your Lava Yuva 3 Pro | Dr.fone
- Optimizing Visual Quality Through Driver Restart on Win10/11
- Overcome Access Denial: Five Pivotal Strategies for Correcting Secure Keys in Windows
- Set Your Preferred Job Location on LinkedIn App of your Apple iPhone SE | Dr.fone
- Title: Navigating Error E:8024002E in Windows Updates
- Author: David
- Created at : 2024-10-25 23:18:50
- Updated at : 2024-10-26 22:13:59
- Link: https://win11.techidaily.com/navigating-error-e8024002e-in-windows-updates/
- License: This work is licensed under CC BY-NC-SA 4.0.


