
Navigate and Name Files Effortlessly With PowerToys

Navigate and Name Files Effortlessly With PowerToys
We’ve touched on PowerToys’ PowerRename before, but it’s worth going into more detail on how you can use it to batch-rename your files.
Let’s look at multiple scenarios for batch-renaming your files like a pro with PowerRename’s powerful options.
Disclaimer: This post includes affiliate links
If you click on a link and make a purchase, I may receive a commission at no extra cost to you.
What Is PowerToys PowerRename?
PowerRenamer is one of the “toys” in Microsoft’s PowerToys collection and works as an excellent replacement for most full-blown third-party batch-renaming tools.
With PowerRenamer, you can not only mass-rename files, but also “do it the smart way”. As we’ll see, PowerRenamer is much more powerful than Windows’ built-in rename function.
Instead of going through each file one by one, PowerRenamer allows you to batch-rename several files at once. With a single click, you can identify, change, or replace “patterns” of characters in filenames, or you can capitalize them correctly.
If this sounds interesting, it’s worth taking the time to learn more about PowerToys and what it can do. For instance,how to do more with Windows 10 and 11 using PowerToys works as a nice general overview of Microsoft’s extra tools collection.
You can alsofind any color anywhere on your screen with PowerToys Color Picker , orbring one of Windows 11’s best features to Windows 10 with PowerToys FancyZones , for better organizing multiple windows on your monitors.
How to Install PowerToys & Enable PowerRename
Despite having the official Microsoft seal, PowerToys is an open-source project to which anyone can contribute. This makes it one of the few instances where the same Microsoft software is available on both GitHub and the Microsoft Store. Or more accurately, “almost the same”.
Thanks to the very nature of software development, testing, and distribution, the official source for PowerToys is Github. That’s where you’ll find the newest version with the latest updates, since that’s where its developers collaborate and “push” their updates and patches.
For this article, though, we went with the Microsoft Store version. We’d like to believe this version is inherently more stable, having undergone more extensive testing before being distributed through Windows’ official digital software store.
If you go for the Github version, you’ll have to download it fromPowerToys official Github page . Then, run the downloaded executable to install the app.
To use the Microsoft Store version, visit Windows’ Start menu, search for theMicrosoft Store , and launch it. Then, look for “powertoys” using the window’s top search field.
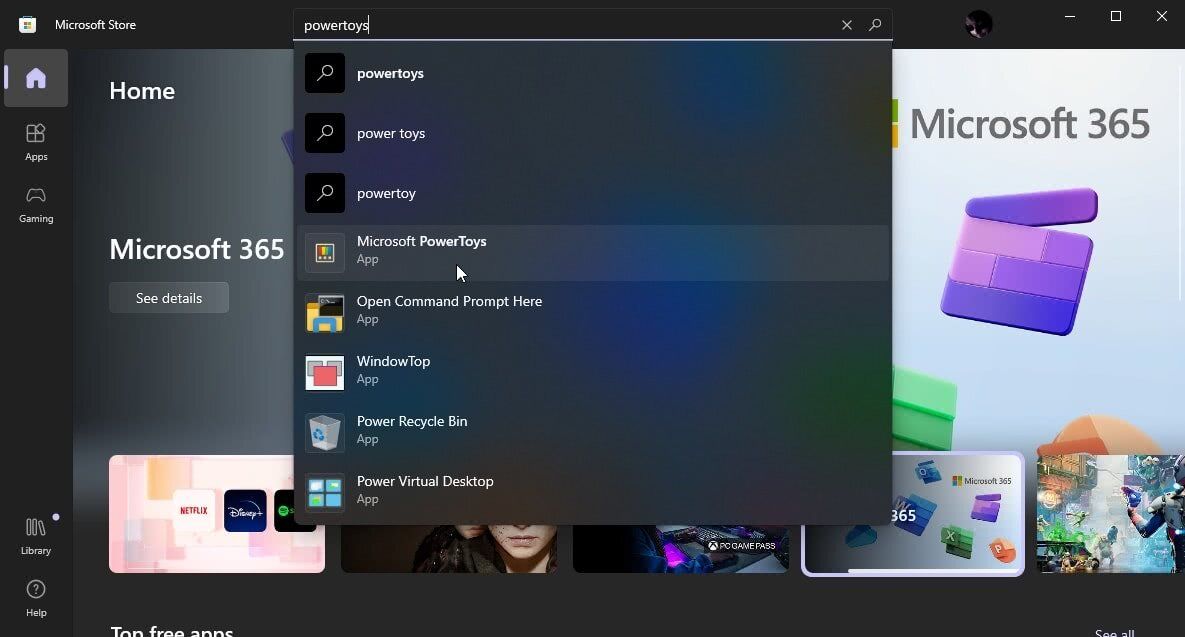
When you find theMicrosoft PowerToys entry, click on it to visit its page. There, click onInstall on the left to bring PowerToys onboard.
After installation, run PowerToys and notice its icon on the tray. Right-click on that and chooseSettings .
The PowerRename “toy” that we’ll use For this article might be disabled by default. To enable it, select the PowerRename page from the list on the left of the Settings window. Then, flick the switch on the right ofEnable PowerRename to the right.
How to Use the PowerRename PowerToy
Like most tools in PowerToys, PowerRename is accessible “outside” of the PowerToys’ own window.
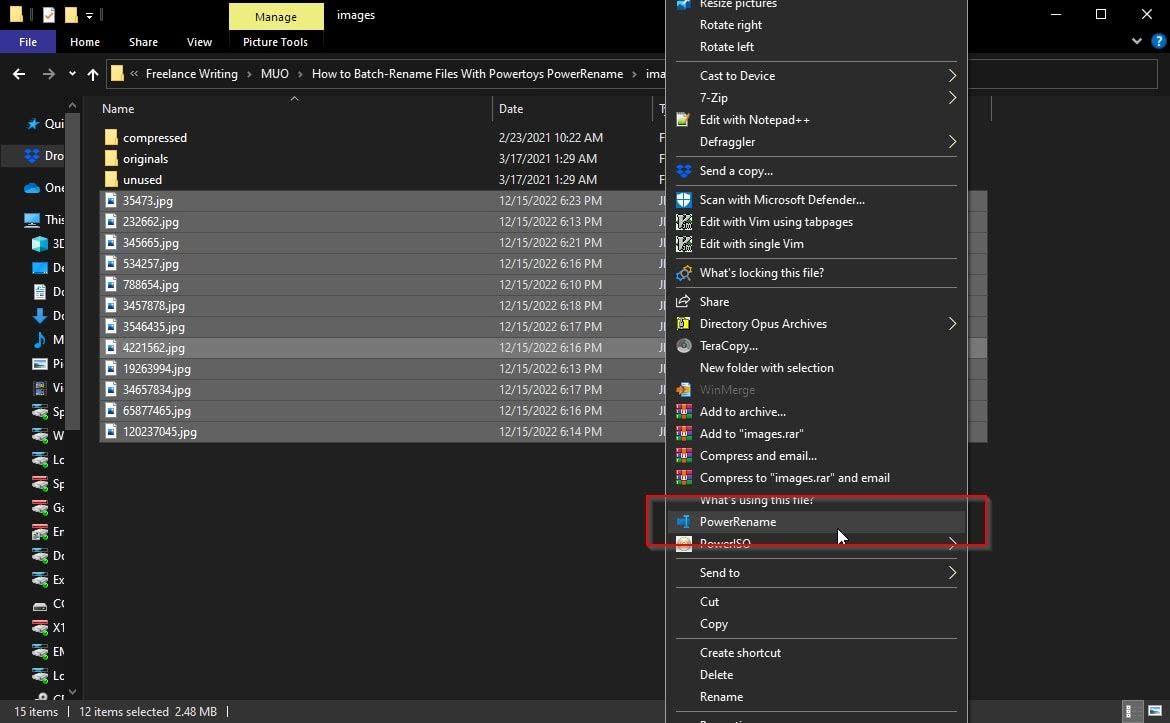
- To use PowerRename, fire up your favorite file manager. Windows File Explorer is fine if you aren’t using a third-party solution to juggle your files.
- Choose the files you wish to batch rename.
- Right-click on one of them and selectPowerRename from the context menu.
All the batch-renaming magic happens on the window you’ll see pop up on your screen.
1. Simple Find & Replace
The easiest operation you can carry out with PowerRename is a straightforward Find & Replace procedure.
Notice how there are two fields on the left of the app where you can type.
The top field with theSearch for string is your “source”, where you define a string of one or more characters in your selected files’ names that you want to replace with something else.
The bottom field, statingReplace with , is where you enter this “something else”.
So, to replace a particular string found in multiple filenames with a different one:
- Enter the string you want to replace in the field at the top left of PowerRename’s window while all files are selected on the right.
- Type in the field underneath with what you want to replace the above string.
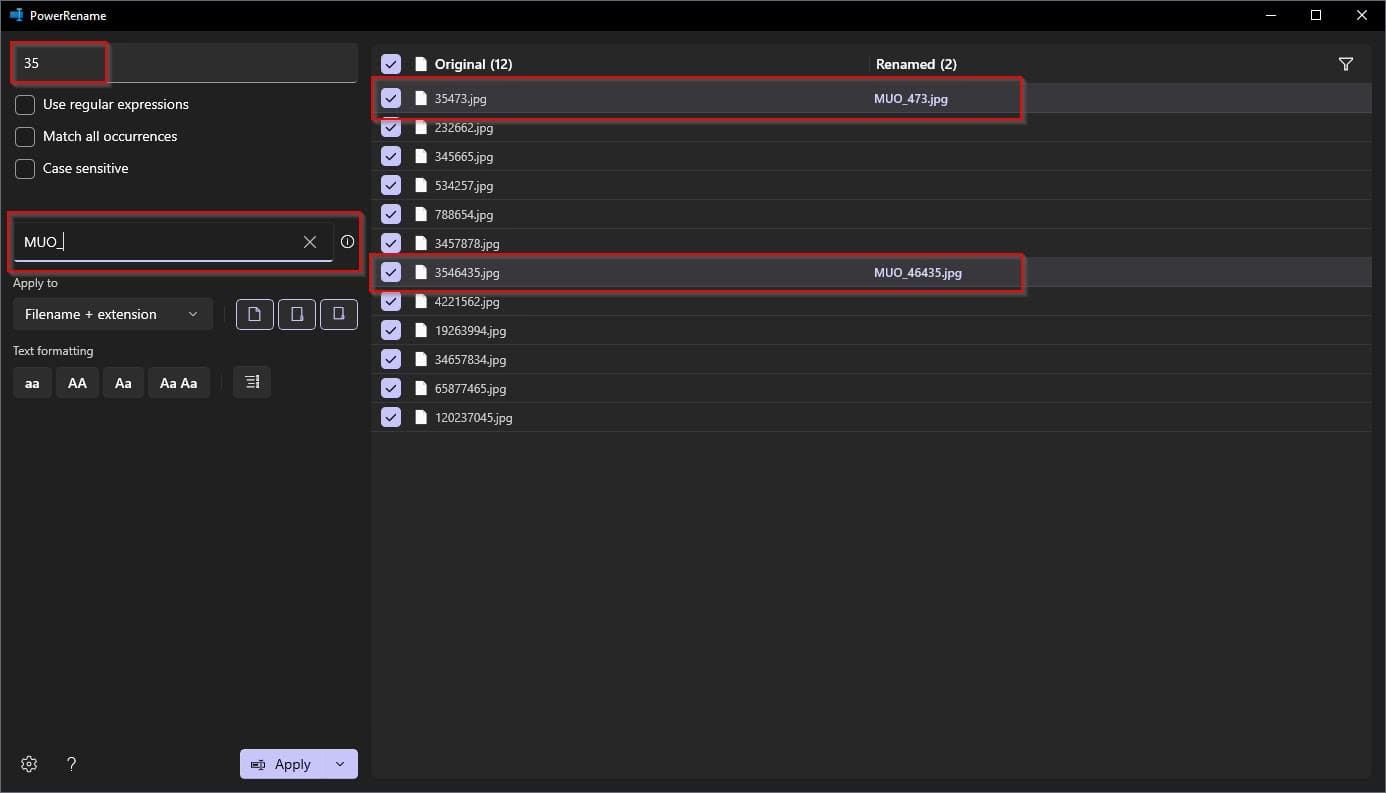
Note that this will try to match only the first instance of the “source” string in every filename. This scenario is practical when, for example, you want to add a prefix to the filenames.
If you want to match and replace every instance of the string instead, enable theMatch all occurrences option.
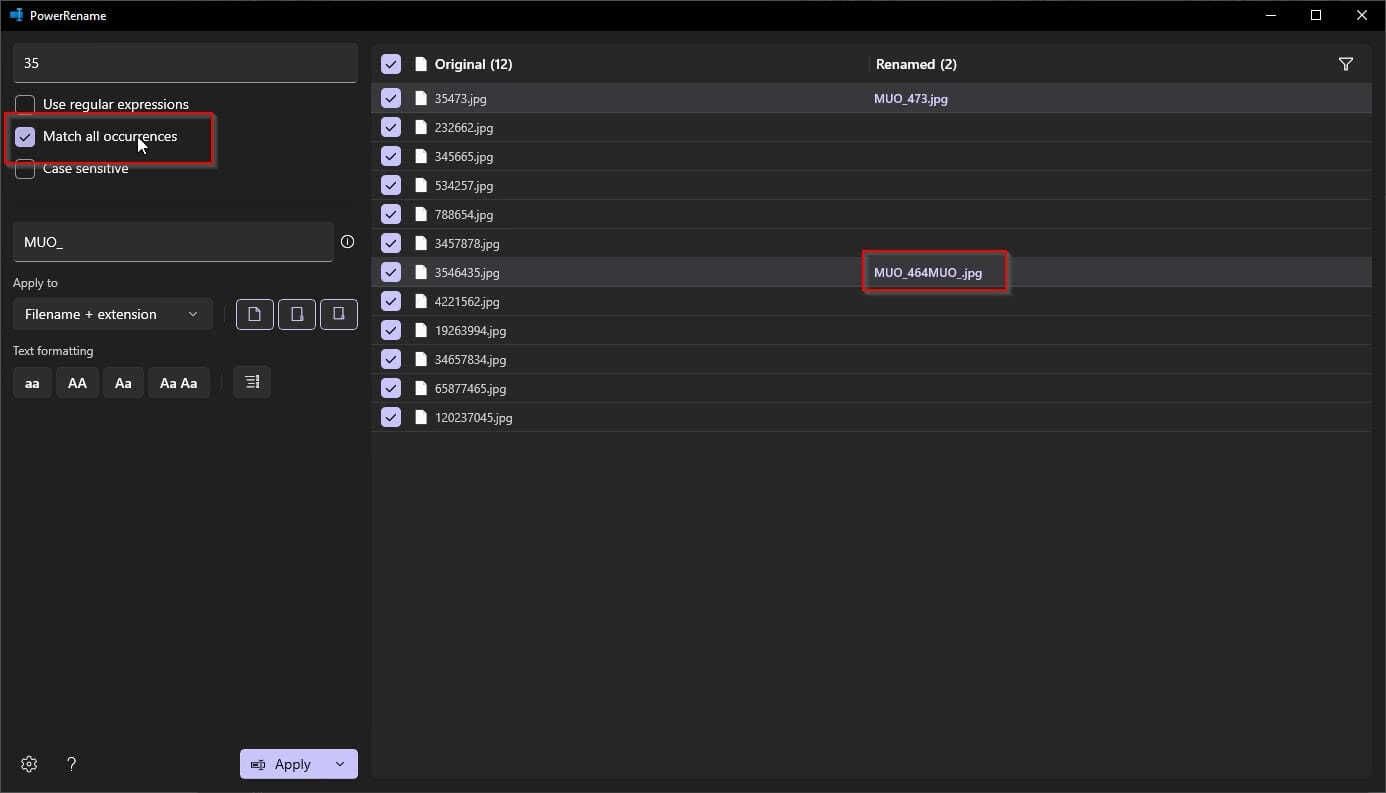
You’ll see a preview of the new filenames on the right of the affected files. If you’re happy with the results, click Apply to perform the actual rename process.
2. Filenames & Extensions
By default, PowerRename will act on the actual name of each file, skipping its extension. There are cases where you might want to batch-rename extensions instead.
For instance, you could rename some MarkDown files with an MD extension to the compatible and more easily manageable typical text file TXT extension.
Or, like in the following screenshot, you may want to replace the JPG extension of some image files with the acronym of your site just because you now can, all thanks to PowerToys.
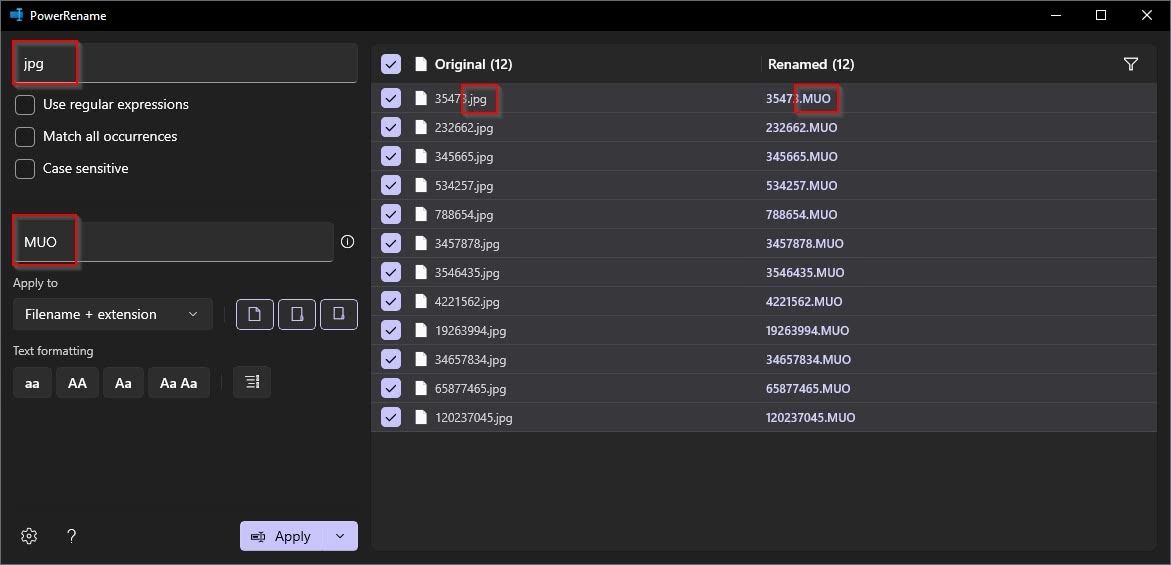
To do that, check the setting underApply to , right below the “target string” field.
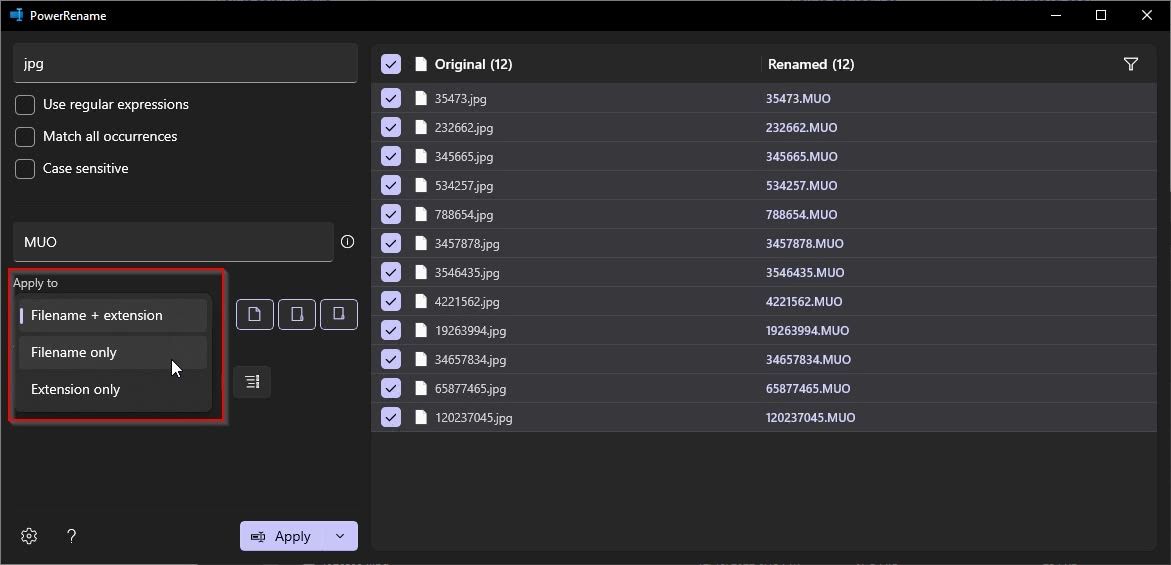
From there, you can choose if PowerRename will affect only the selected filesFilenames , theirExtensions , or bothFilenames + Extensions .
3. Text Formatting
Apart from renaming, PowerRename also offers some basic text formatting functionality. By using the buttons underText formatting , you can tweak the files’ filenames to make them lowercase, uppercase (“all caps”), capitalize their first letter, or capitalize the first letter of each word in them.
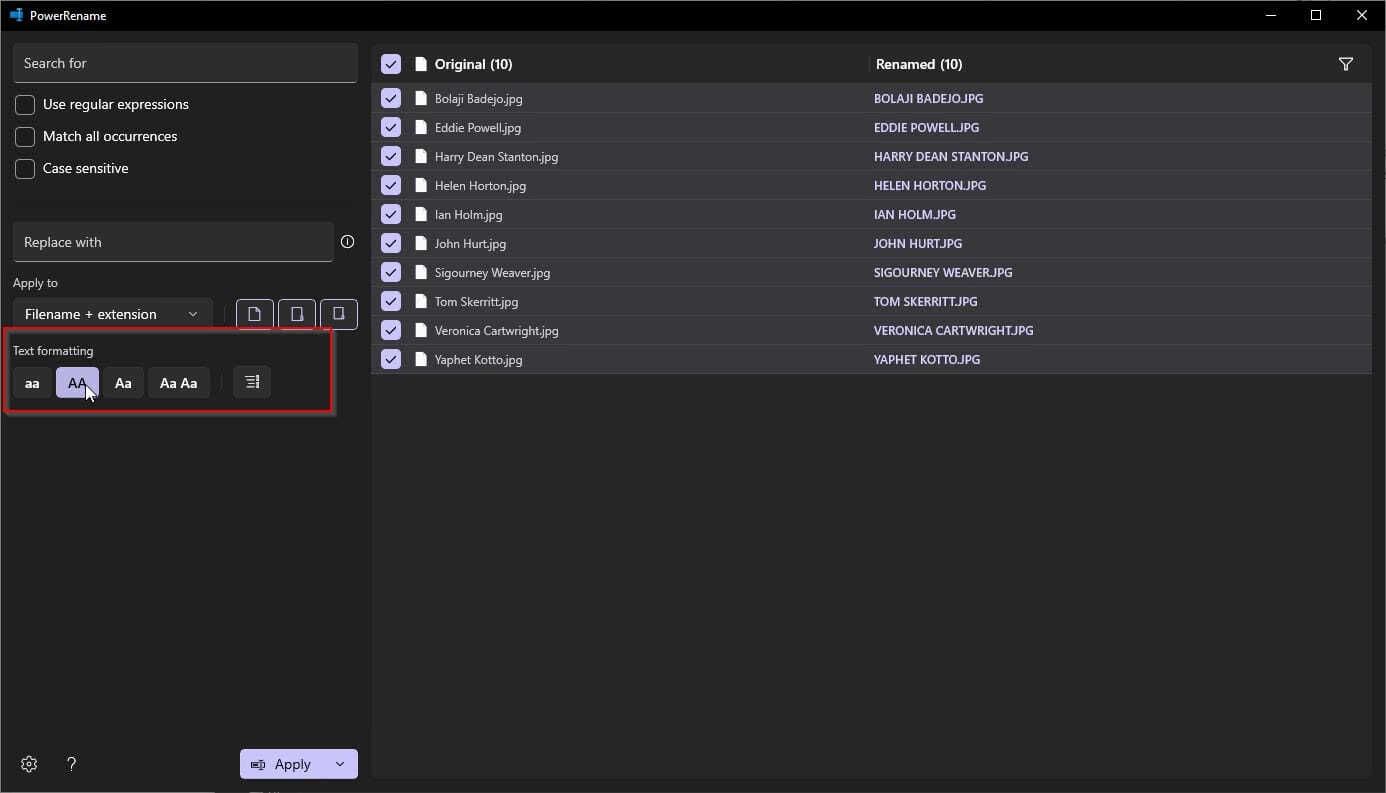
The final icon, separated from the others and on the right, is the numbering toggle. Click on it, and PowerRename will add numbers inside parentheses to the filenames so that “filename.jpg” may become “filename (1).jpg”.
Keep in mind that Numbering doesn’t work on its own, but only as an “enhancer” on top of another renaming process.
4. Regular Expressions
The most powerful way to rename files with PowerRenamer is by taking advantage of its support for Regular Expressions, better known as RegEx. However, it’s also harder to grasp and even more challenging to master.
RegEx is a way to define with absolute precision complex renaming scenarios syntactically.
For example, by typing three dots in the “source field”, you’re “telling” PowerRename to match the first three characters of any filename. Then, you can enter on the “target field” the string with which to replace them.
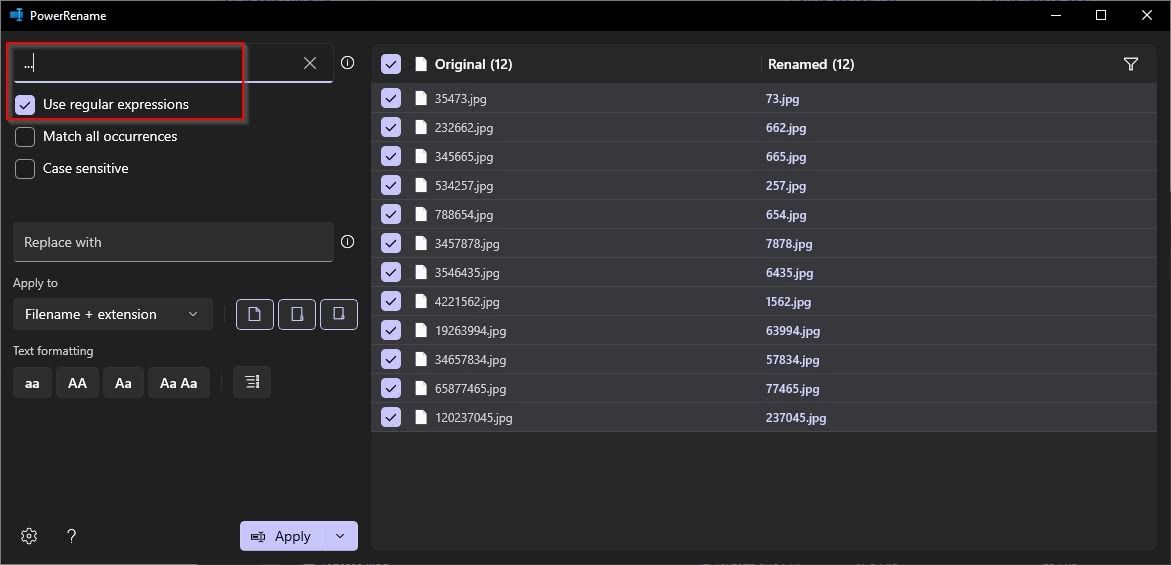
To use RegEx instead of “simple” string replacement, place a checkmark beforeUse regular expressions .
Quite helpfully, PowerRenamer offers a “cheat sheet” with a few standard RegEx syntax examples. You can find it by clicking on the littlecircular icon with the i (for “information”) inside, right next to the “source field”.
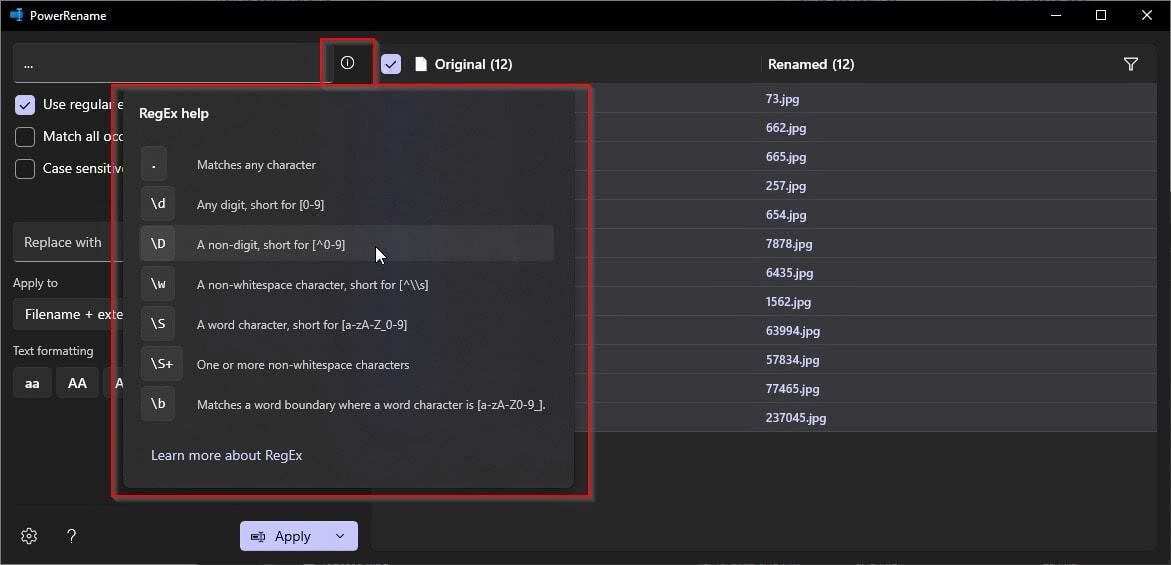
Still, that mini-guide is short, restricted, and only covers basic RegEx syntax. Find out more about RegEx inour beginner’s guide to Regular Expressions with Python . However, note that there might be variations in Python RegEx syntax compared to PowerRename’s implementation.
Quick, Effortless, and Powerful File Organization With PowerRename
PowerRename helps you quickly and easily rename multiple files at once using various criteria, like adding a prefix or suffix, replacing text, or changing the case.
Although you can immediately start using PowerRename to organize hundreds of files (and give them more sensible names), its true power will be unleashed once you get more familiar with it and start experimenting with its RegEx syntax.
After that point, the sky’s the limit, and you’ll be able to create various “renaming scenarios” that can help you eliminate the most tedious task of file management: renaming your files one by one.
Also read:
- 2024 Approved Immortalizing Moments Live Photo to Dynamic Video
- Declutter Windows 11: A Guide to Ditching Bloatware
- Easily Boot Into Linux with Windows Subsystem
- How to Fix a High CPU Usage When Gaming on Windows
- How to Revive Your Network Connection on Windows 11 Devices
- In 2024, Does Infinix Hot 40 Have Find My Friends? | Dr.fone
- In 2024, How Can We Bypass Realme V30 FRP?
- Keeping High Usage at Bay: Streamline Media on Windows 11
- Simple Solutions to Fix Android SystemUI Has Stopped Error For Xiaomi Redmi 13C | Dr.fone
- Tackle No Signage on Sims' TVs
- The Ultimate Resource Compendium for Optimizing On-Screen Captioning
- Top Tech Insights: Exploring the Exceptional Performance of Apple iPad Pro (11-Inch) - Market Leader Reviewed
- Unlocking Control Center with Easy Methods
- Title: Navigate and Name Files Effortlessly With PowerToys
- Author: David
- Created at : 2024-10-11 19:45:13
- Updated at : 2024-10-15 18:22:38
- Link: https://win11.techidaily.com/navigate-and-name-files-effortlessly-with-powertoys/
- License: This work is licensed under CC BY-NC-SA 4.0.