Modify Image Positioning on Windows PCs

Modify Image Positioning on Windows PCs
While the default landscape orientation on your Windows computer is suitable for most tasks, there can be times when you need to change it. Whether it’s for work, creative endeavors, or simply personal preference, rotating the display on your Windows computer is quick and easy.
Here, we share three methods for changing the display orientation on your Windows computer.
Disclaimer: This post includes affiliate links
If you click on a link and make a purchase, I may receive a commission at no extra cost to you.
1. Change Windows Display Orientation via the Settings App
The Display section in the Windows Settings app makes it easy for you to modify things like screen brightness , color, layout, scale, and more. Additionally, it also offers the option to change the display orientation on your Windows 10 or 11 computer.
Use the following steps:
- Press Win + I or use one of the many ways to open the Settings app .
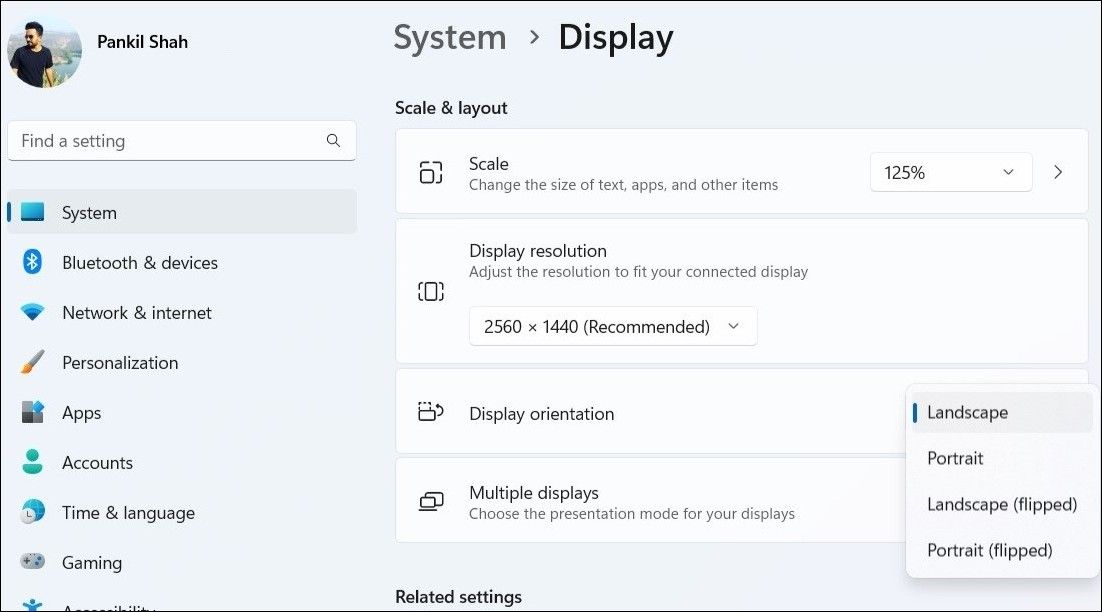
- Head over to System > Display.
- Click the drop-down menu next to Display orientation to select from the available options: Landscape, Portrait, Landscape (flipped), and Portrait (flipped).
- Click the Keep changes button to confirm.

Once you have completed the above steps, Windows will rotate your screen 90 degrees, 180 degrees, or 270 degrees, depending on the option you select.
2. Change Windows Display Orientation via the Graphics Control Panel
Apart from the system settings, you can also use the built-in graphics control panel to change the display orientation on Windows. However, the exact steps for doing so will depend on the type of graphics card installed on your PC .
Here’s how you can rotate your screen using the Intel Graphics Command Center and the NVIDIA Control Panel.
Change the Display Orientation Using the Intel Graphics Command Center
- Click the magnifying icon on the taskbar or use the Win + S keyboard shortcut to open the search menu.
- Type Intel Graphics Command Center in the box and press Enter.
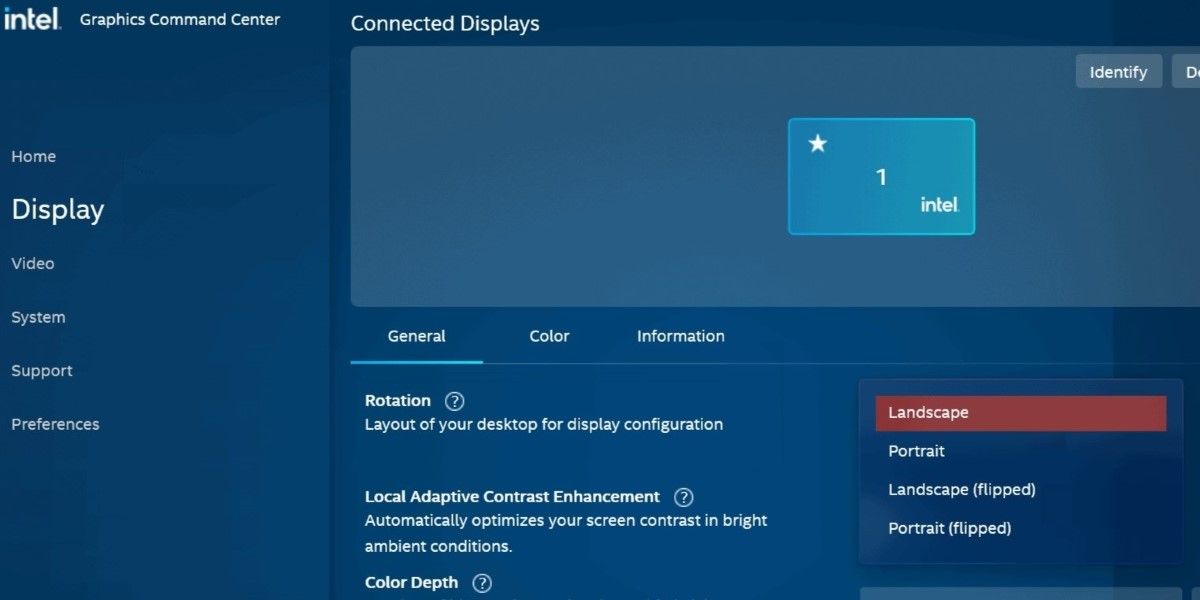
- Select the Display tab from the left pane.
- Under the General tab, click the drop-down menu next to Rotation to select your preferred display orientation.

Change the Display Orientation Using the NVIDIA Control Panel
- Open the NVIDIA Control Panel using the search menu.
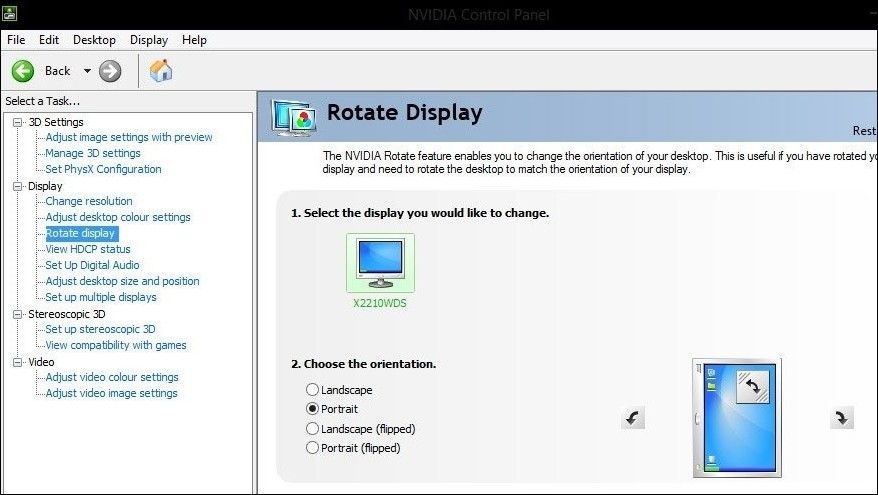
- Double-click the Display menu in the left pane to expand it.
- Click the Rotate display option.
- Select your preferred orientation in the right pane.
- Click the Apply button to save the changes.

3. Change Windows Display Orientation With Keyboard Shortcuts
Another quick way to rotate your Windows computer’s screen is to use keyboard shortcuts. This method can be especially useful if you frequently need to switch between different display orientations.
Here are the keyboard shortcuts you can use to rotate your computer screen.
- Ctrl + Alt + Right arrow: Rotates your screen clockwise by 90 degrees (portrait-flipped).
- Ctrl + Alt + Left arrow: Rotates your screen counterclockwise by 90 degrees (portrait).
- Ctrl + Alt + Down arrow: Rotates your screen 180 degrees (landscape-flipped).
- Ctrl + Alt + Up arrow: Resets your screen to its original orientation (landscape).
It’s important to note that the above keyboard shortcuts may not work on all Windows computers. If they do not work on your PC, you can use the Settings app or the built-in Graphics Control Panel to make the necessary adjustments.
Changing the Display Orientation on Windows Is Easy
Knowing how to change the display orientation on Windows can be helpful if you have a laptop with a rotatable screen or an external monitor that allows rotation.
Whether you choose to use a keyboard shortcut or the Windows Settings app, the process of rotating your screen is relatively easy so you can go back and forth quickly without having to keep digging into the Settings menu. Just remember that changing the display orientation also affects the cursor, so you’ll have to adjust your mouse movement accordingly.
Here, we share three methods for changing the display orientation on your Windows computer.
Also read:
- [New] How to Utilize Your AppleTV for a Smooth View of FB Videos Online
- 5 Ways to Reset Motorola Moto G 5G (2023) Without Volume Buttons | Dr.fone
- Avoid These 7 Pitfalls: Why Generative AI Might Not Suit Your Messaging Application
- Capturing Imagery with a Track Discover the Top 5 Photo Experts with Musical Accompaniment
- Comprehensible Guide to Fix Flickering Screens in Windows
- Elevate Your Security Game: Password in Files for Win OSes
- Essentials Unveiled: How This Lenovo Laptop's Key Traits Triumph for Professional Use
- Maximize Your Local Drive Space in Windows 11 Safely (No Data Loss, Max 156 Chars)
- Remedying Ignored Devices with the Help of Razer Synapse
- Revel in Microsoft's Exclusive Windows Suite
- Selecting Your Streaming Choice Podcast or Video Platform
- Supercharge Your Channels Mastering YouTube Traffic Boosts for 2024
- Tackling Windows Subsystem for Linux's Error Code: 4294967295
- The Smart Student's Pathway to Low-Cost Computing with Dell's Special Offers
- Title: Modify Image Positioning on Windows PCs
- Author: David
- Created at : 2024-12-11 21:18:25
- Updated at : 2024-12-12 22:02:55
- Link: https://win11.techidaily.com/modify-image-positioning-on-windows-pcs/
- License: This work is licensed under CC BY-NC-SA 4.0.


