Maximizing Efficiency: Navigating Windows Files without LS Command

Maximizing Efficiency: Navigating Windows Files without LS Command
Linux has a very powerful and valuable command-line terminal that is used and loved by its users. As such, if you have previously used Linux’s Command Line Interface (CLI) and have only recently started using the Windows Command Prompt, you’re bound to feel underwhelmed by the latter’s lack of features.
There are many commands that are supported on the Linux terminal that does not exist on Windows 10 and 11. Luckily the “ls” command in Windows is supported on the Command Prompt. Read on as we explore how to use the “ls” command in Windows 10 and 11.
Disclaimer: This post includes affiliate links
If you click on a link and make a purchase, I may receive a commission at no extra cost to you.
What Is the “ls” Command in Windows?
The “ls” command (that’s LS, not IS) is one of the first terminal commands that veterans teach Linux beginners . It allows users to list files and directories from the Command Line Interface. You can think of it as a File Explorer, but without the user-friendly icons and navigation buttons.
By using the “ls” command, users can list the contents of the current working directory, similarly, you can also switch directories using Command Prompt . On Windows, the usage of “ls” in Command Prompt is slightly different compared to Linux, but it can accomplish the same task.
How to Use the “ls” Command in Command Prompt on Windows 10 and 11
Windows is an entirely different ecosystem when compared to Linux. As a result, many Linux CLI commands are not supported by the Windows Command Prompt tool.
If you try using the “ls” command in Command Prompt, you will get the following error: “‘ls’ is not recognized as an internal or external command, operable program or batch file.”
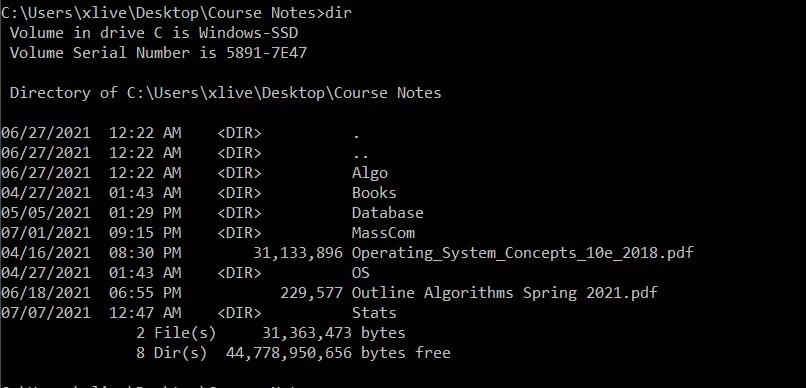
However, you can use the “ls” command in Windows using the equivalent dir command in Command Prompt.

To list files and directories using the equivalent of “ls” in Command Prompt on Windows 10 and 11:
- Click on the Start menu icon, search for Command Prompt, right-click the Best Match, and select Run as administrator.
- Once the Command Prompt window is open, navigate to the directory you want to view and type dir.
- Command Prompt will now list all of the files in the current working directory, along with their sizes and last modified date.
How to Use “ls” Command in Windows PowerShell
While the “ls” command does not work on the Windows Command Prompt, it does work within Windows PowerShell . Windows PowerShell is a very powerful utility, and even allows you to carry out complex file management tasks such as creating, removing, and copying files and folders straight through the terminal.
The Get-ChildItem cmdlet script of PowerShell allows users to easily list file directories using any of the aliases such as ls, dir, and even gci.

Follow these steps to view a file directory using the “ls“ command on Windows using Windows PowerShell:
- Launch Windows PowerShell using the Start menu and select the Best match.
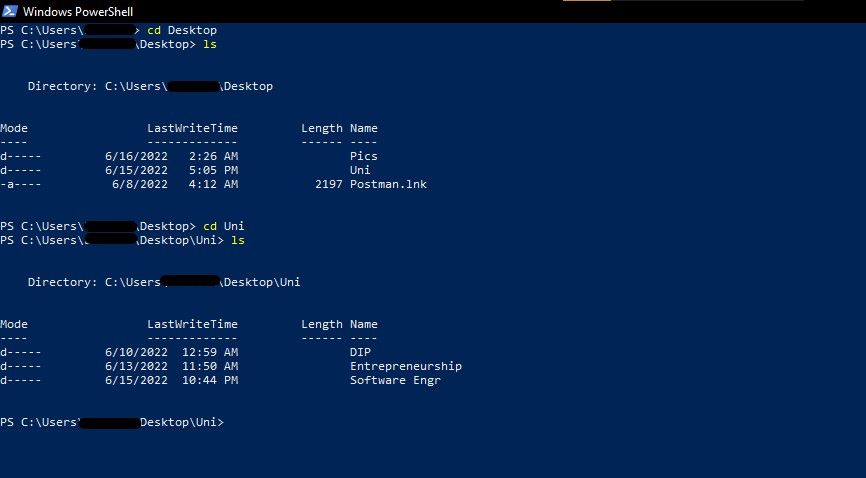
- Navigate to your target directory using the cd command.
- Type the ls command and press enter to view all of the listed files and folders within your target directory.
- Similarly, you can even use the dir or gci command to view the contents of a folder.
A Handy Tool for Both Linux and Windows Users
If you love using Linux, you’ll likely find that Microsoft’s own command prompt is a bit weaker in comparison. Fortunately, the “ls” command is also on Windows; it just uses a different name within Command Prompt. If you’re using PowerShell you can use any of the alias commands to get the required file directories.
If you haven’t explored them yet, the Windows Command Prompt and PowerShell utility are a handy gateway to using more advanced Windows tools. It is always a good idea to be familiar with Windows CMD commands so you can make full use of your copy of Windows.
There are many commands that are supported on the Linux terminal that does not exist on Windows 10 and 11. Luckily the “ls” command in Windows is supported on the Command Prompt. Read on as we explore how to use the “ls” command in Windows 10 and 11.
Also read:
- [New] 2024 Approved How to Watch Facebook Live on Roku?
- [Updated] 2024 Approved Engineering Temporal Anomalies on Camera Setups
- 2024 Approved Essential Techniques for Insta Photo Cover Highlights
- Conquering WoW Error #132 in Windows 11/11 Games
- Experience Next-Gen Gaming with Xbox One X - A Comprehensive Review for Console Enthusiasts
- Expert Advice: Eradicate Windows 10 BSOD Issues
- How to Make Thumbnails for YouTube With Mobile Phones
- Looking For A Location Changer On Samsung Galaxy M34? Look No Further | Dr.fone
- Optimizing Windows Metric Tracking Functionality
- Quick Tips: Adjust Font Styles on Android Device Using Pre-Installed Options & Third-Party Tools
- Solutions for Disabled Taskbar Icon Clicks
- Solving Quick-Fix Popcorn Time Loading Errors - Easy Repair Guide
- Transformer Des Fichiers Au Format MP3 Sans Frais Sur Movavi : Guérilla SEO Pour Les Amateurs De Musique
- Unlocking File Write Access Blockade in WINOS
- Win 11 Icon Troubleshooting and Restoration
- Title: Maximizing Efficiency: Navigating Windows Files without LS Command
- Author: David
- Created at : 2024-12-05 20:11:44
- Updated at : 2024-12-07 12:06:19
- Link: https://win11.techidaily.com/maximizing-efficiency-navigating-windows-files-without-ls-command/
- License: This work is licensed under CC BY-NC-SA 4.0.