
Maximize Virtual Box's Capabilities with v7.0 on Windows 11 Systems
Maximize Virtual Box’s Capabilities with v7.0 on Windows 11 Systems
Earlier, installing Windows 11 in VirtualBox was no easy feat. But with VirtualBox 7.0 you can install Windows 11 much faster without performing any registry hacks.
If you use VirtualBox 6.1 on your system, it is better to upgrade to the newest version. Unlike most apps that auto-update, VirtualBox needs manual efforts to update to the new version. We will elaborate on the methods to update to VirtualBox 7.0 on Windows 11 and install the necessary add-ons.
What’s New in VirtualBox 7.0?
VirtualBox comes with support for Secure Boot in UEFI mode. It can now emulate TPM chips which are a mandatory requirement for Windows 11. Along with that, there are some subtle but useful design changes that make it feel like a latest-gen app. Some menu options appear in new places, but it isn’t something to worry about. Plus, you can enjoy the dark mode on VirtualBox now and protect your eyes!

How to Upgrade to VirtualBox 7.0 on Windows 11
VirtualBox does remind you that an update is available. But unlike most apps, you need to visit the official site and download all the necessary components and the new installer file to upgrade VirtualBox. Then, you need to install the new version on your system which will replace all the files of the current build present on your system.
But that’s not all! If you connect USB devices to VirtualBox virtual machines, you will have to remove the old extension pack and install the latest one released for the new build. Lastly, you will have to install the new guest additions pack for VirtualBox 7.0. So, let’s begin.
1. Download the VirtualBox 7.0 Installer File and the Extension Pack
Repeat the following steps to download all the necessary files for VirtualBox 7.0.
- Launch the VirtualBox app on your system. Navigate toHelp > VirtualBox Web Site .
- The app will redirect you to the official VirtualBox website.
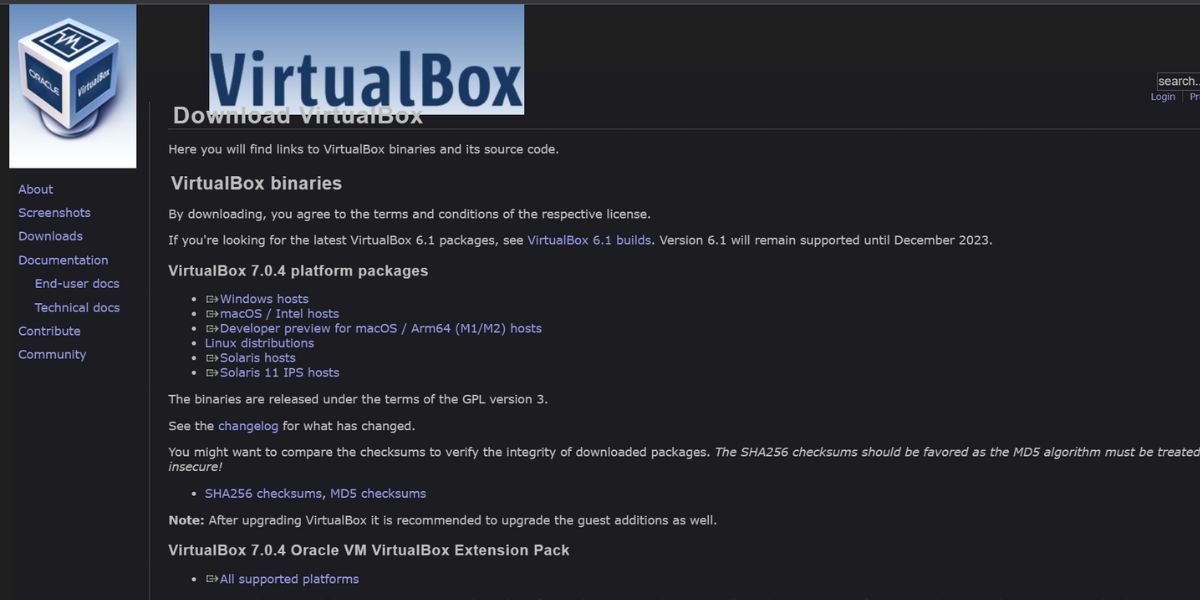
- Navigate to the left-hand side menu and click on theDownloads option.
Project Manager - Asset Browser for 3Ds Max
- Locate theVirtualBox 7.0.4 platform packages section. Click on theWindows Hosts option to download the installer file on your system.
- Scroll down and find theVirtualBox 7.0.4 Oracle VM VirtualBox Extension Pack section. Click on theAll supported platforms option to download the extension pack file for version 7.0.4.
- Wait for both downloads to finish and close the browser.
 Project Manager - Asset Browser for 3Ds Max
Now, you have all the necessary files to upgrade to VirtualBox 7.0.
2. Install VirtualBox 7.0
To install VirtualBox 7.0, repeat the following steps:
- Close the VirtualBox app if it is already running on your system. You can even restart your system for reducing issues while installing the latest version of VirtualBox.
- Press theWin + E key to launch the File Explorer app on your system (see how to launch File Explorer for more info). Click on theDownloads folder and locate the VirtualBox 7.0 installer file.
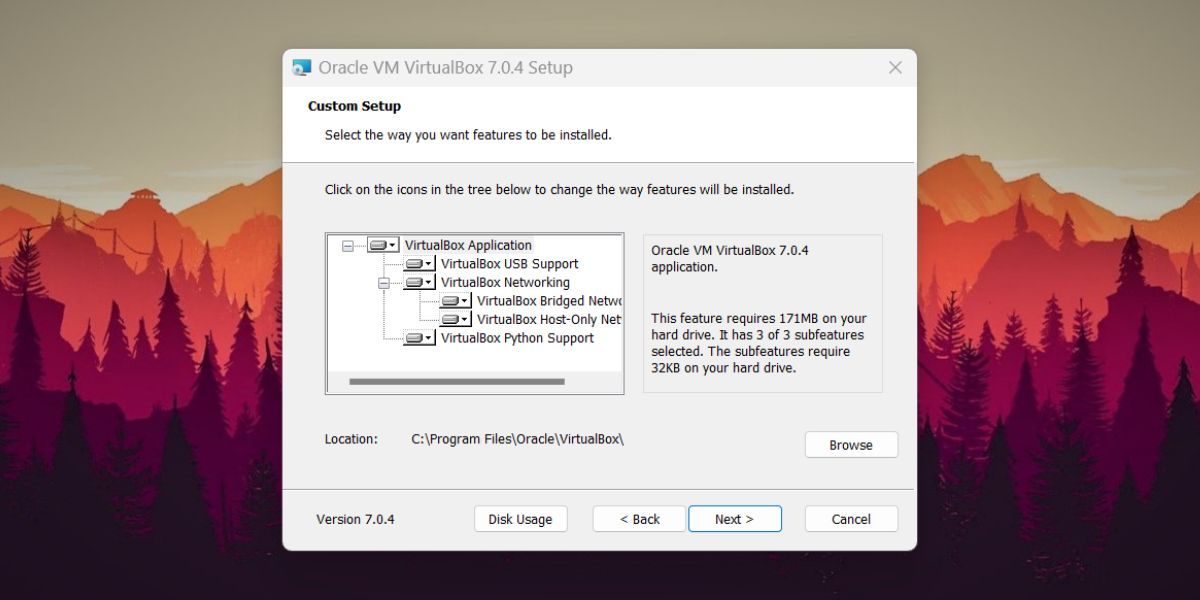
- Right-click on the installer file and select theRun as administrator option from the context menu.
- UAC will pop up. Click on theYes button to continue.
- VirtualBox 7.0 installer will launch. Pick the installation destination and click on theYes button.
- VirtualBox will warn you about temporarily shutting the network interfaces. It means you will lose internet connectivity for some time.
- Click on theYes button. The installer will notify you about the missing dependencies. Click on theYes button to install them as well.
- Wait for the installation to complete. Click on theFinish button to close the installer window.
VirtualBox 7.0 will launch on your system. But wait! Don’t close the app yet.
3. Install the New Extension Pack
Even after you upgrade the VirtualBox app to the newest version, the extension pack doesn’t upgrade along with it. So, it will have the older version of the extension pack which worked with the older VirtualBox version. You need to remove it and install the new extension pack that you download in the second method.
To install the VirtualBox 7.0 extension pack, do as follows:
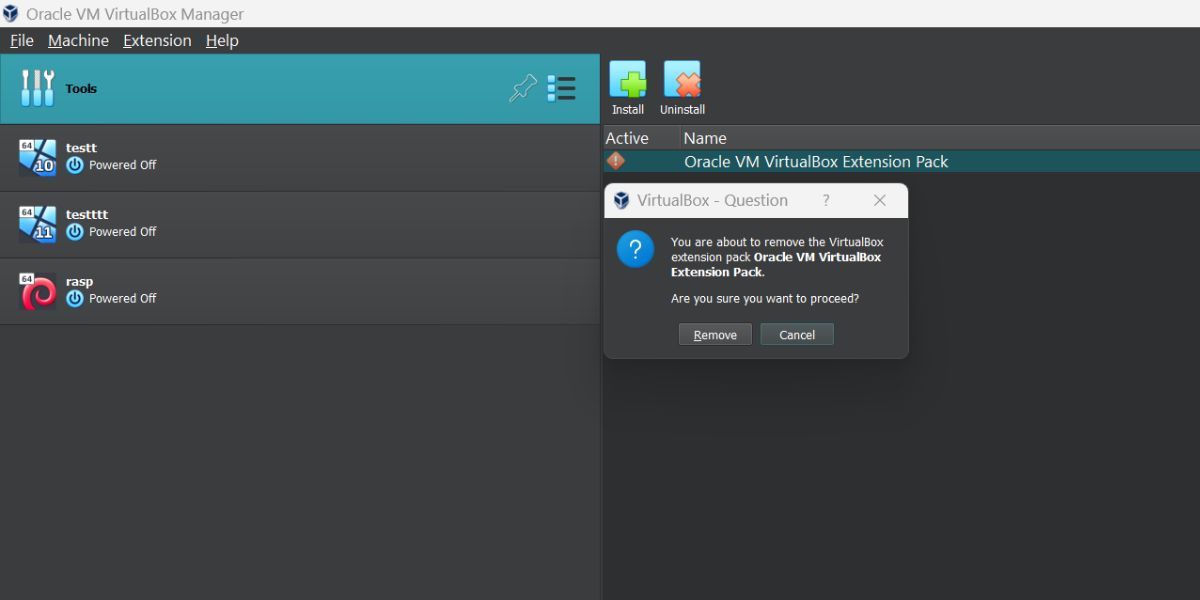
Open the VirtualBox app. Navigate toFile > Tools > Extension Pack Manager .
Under the list of active extension packs, you will see the older version with a red sign. It indicates that the extension pack is incompatible with VirtualBox 7.0.
Right-click on the old extension pack and select theUninstall option.
Click on theRemove button to begin the uninstallation.
UAC will pop up. Click on theYes button to begin the uninstallation.
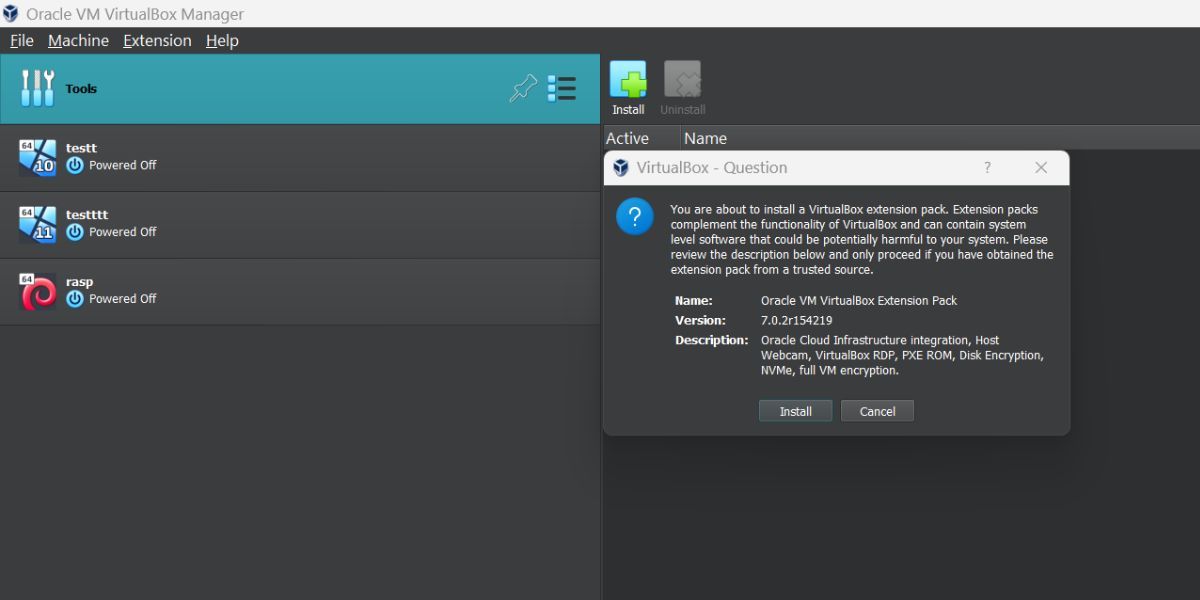
Now, click on theInstall Extension Pack button located at the top. Locate the extension pack file you downloaded previously and select it. Click on theOpen button.
VirtualBox extension pack installer will pop up. Click on theInstall button.
Accept theEULA by scrolling down. Click on theI Agree button.
UAC will pop up. Click on theYes button to begin the extension pack installation.
Once the extension pack installs, it will appear in the list of installed extension packs.

Now, you can easily connect the USB devices to one or many virtual machines that you created using VirtualBox. Check out our guide on how to add a USB device to VirtualBox on Windows for more information.
4. Install the Guest Additions
VirtualBox Guest Additions offers all the necessary drivers for a virtual machine. Since VirtualBox supports DirectX 11, it is advisable to install Guest Additions as it will offer drivers for all the components.
Here’s how to install the VirtualBox Guest Additions on a virtual machine:
- Open the VirtualBox app. Click on any Windows virtual machine and then select theStart option.
- Wait for the Windows virtual machine to boot up. After that, navigate to the top of the VirtualBox windows and click onDevices .
- Then, select theInsert Guest Additions CD Image option.
- Open theFile Explorer app on your Windows virtual machine. You will see the guest additions CD image mounted there.
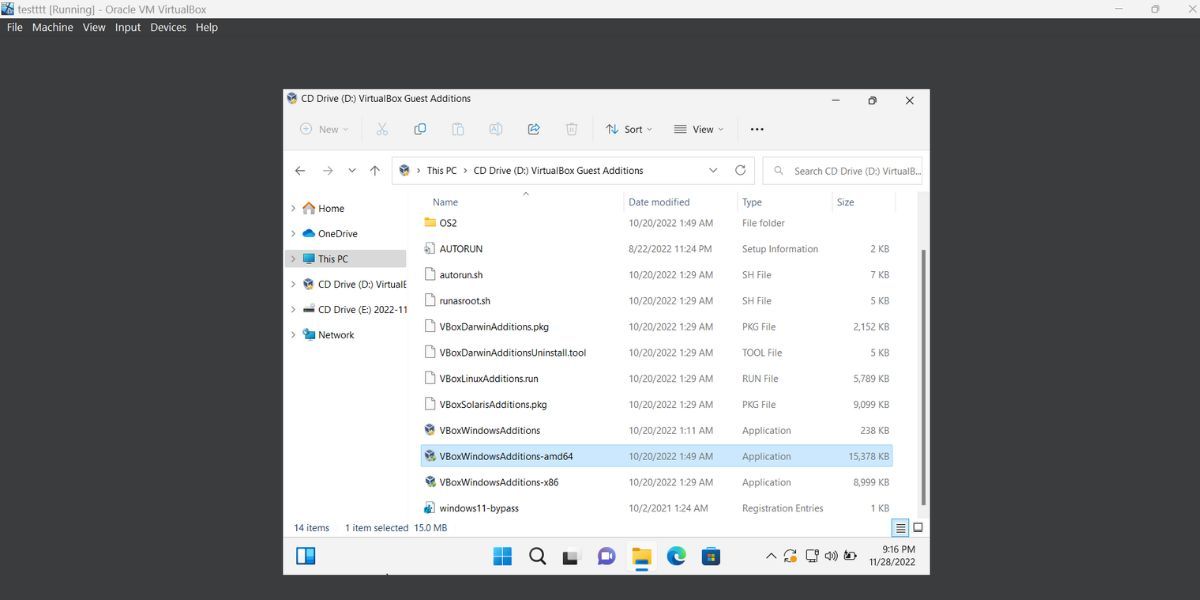
- Double-click to open the CD image directory. Scroll down and right-click on theVBoxWindowsAdditions–amd64.exe file. SelectRun as administrator from the context menu.
- UAC will pop up. Click onYes to continue.
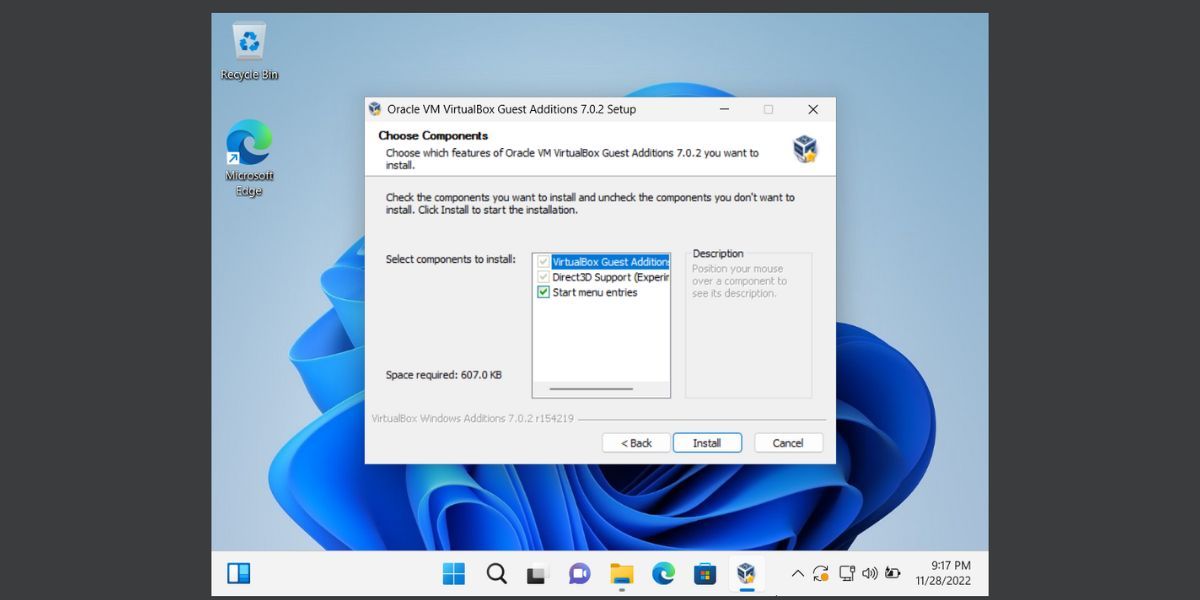
- Follows the on-screen prompts to install the Guest Additions on your system.
- Click on theReboot now option to apply changes to the Windows virtual machine.
It may take a while to install the guest additions. Once done, you can change the resolution of the virtual machine to match the display resolution.

Will the Old Virtual Machines Work With VirtualBox 7.0?
Yes. VirtualBox 7.0 will run the old virtual machines that you created without any issues. But you have to install the extension pack and the guest additions otherwise it could crash or not run at all. We tried running old Windows 10 and 11 virtual machines that we created in version 6.1.32, and they worked fine.
Upgrade to VirtualBox 7.0 With Ease
VirtualBox 7.0 is the first third-party hypervisor to introduce emulation of TPM 2.0 chips. Microsoft still impedes Windows 11 installation as a virtual machine if the hypervisor cannot emulate the chip. But VirtualBox 7.0 can now install Windows 11 after enabling the passthrough of the TPM 2.0 chip for a virtual machine.
- Title: Maximize Virtual Box's Capabilities with v7.0 on Windows 11 Systems
- Author: David
- Created at : 2024-08-16 00:15:13
- Updated at : 2024-08-17 00:15:13
- Link: https://win11.techidaily.com/maximize-virtual-boxs-capabilities-with-v70-on-windows-11-systems/
- License: This work is licensed under CC BY-NC-SA 4.0.