
Mastering Windows 11 Installation in VMWare 17 Player
Mastering Windows 11 Installation in VMWare 17 Player
Have you ever tried installing Windows 11 on VMware Workstation Player? It is not as easy as you expect from a Windows OS installation. Microsoft imposed the TPM requirement and secure boot for installing Windows 11. Fortunately, Oracle introduced TPM virtualization in October 2022 and VMware also caught up sometime later.
As such, you don’t have to rely on registry hacks to disable the TPM and secure boot requirements while installing Windows 11. This post will guide you to create a virtual machine and install Windows 11 on it.
The Prerequisites for Installing Windows 11 on VMware
Here’s what you will need to install Windows 11 with TPM support in VMware Workstation 17 Player:
- A Windows 11 ISO image file. Check our detailed guide on how to download the Windows 11 ISO file .
- A Windows 10 or above operating system with TPM 2.0 and virtualization support.
- The latest version of VMware Workstation 17 Player must be pre-installed on the host system.
- Adequate computing resources to run Windows 11 as a virtual machine. The list includes 64 GB disk space, 4 GB RAM, and a dual-core x64 processor.
Once you have the necessary ISO file and the latest copy of VMware on your system, you can proceed to the virtual machine creation and Windows 11 installation.
How to Install Windows 11 in VMware Workstation 17 Player
Firstly, we will create a virtual machine in VMware for Windows 11. Then, we will install Windows 11 on the virtual machine. Lastly, we will install VMware tools to finish setting up the virtual machine.
1. Create a Windows 11 Virtual Machine
Here’s how to create a virtual machine for Windows 11 in VMware:
- Launch VMware Player on your system. On the home page, click onCreate a new virtual machine option.
- Select theI will install the operating system later radio button and click on theNext button.

- Keep theGuest Operating System option asWindows and then click on the drop-down menu. Pick theWindows 11 x64 option and click on theNext button.
- Enter an appropriate name for the new Windows 11 virtual machine. Then, click on theBrowse button to pick a location on the disk drive for virtual disk creation. Click onNext .
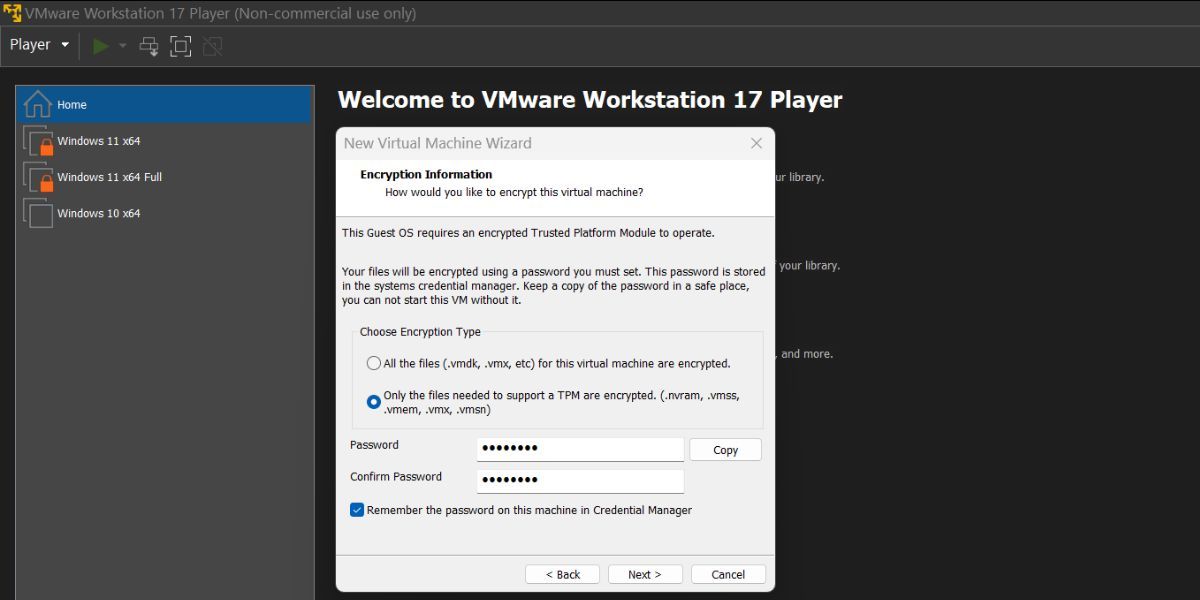
- On the Encryption information page, Choose the encryption type asOnly the files needed to support a TPM are encrypted .
- You need to create an 8-character password to encrypt the virtual machine. Keep the Remember the password on this machine in Credential Manager checkbox enabled. Click on theNext button to continue.
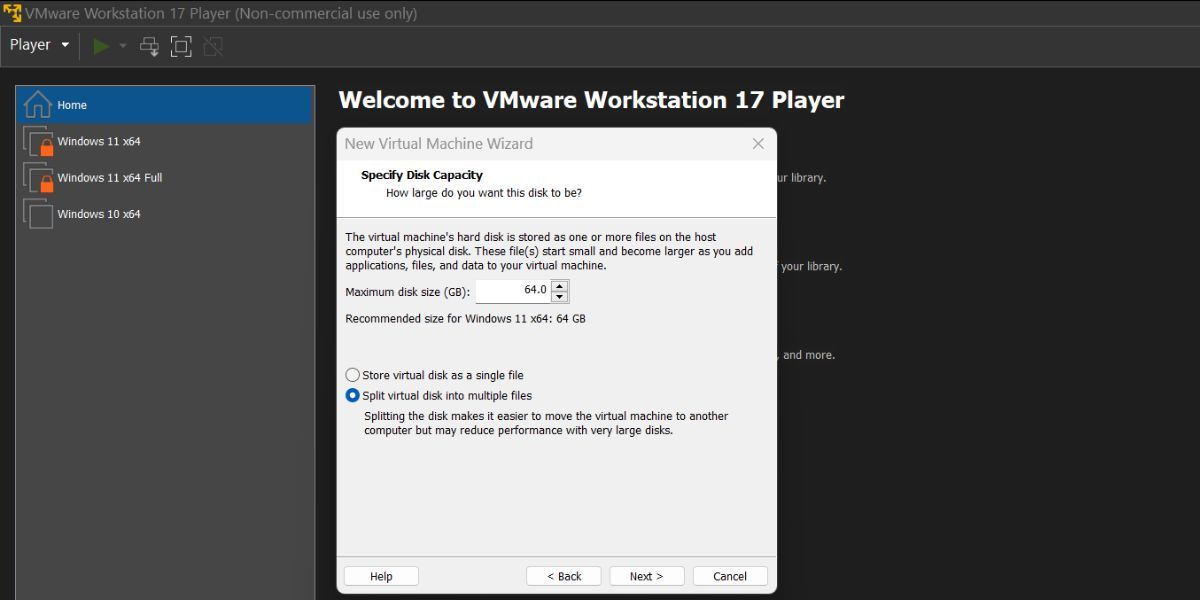
- Now, specify the disk capacity and set the maximum disk size to64 GB . Increase the space if you want to install multiple programs in the virtual machine.
- Select theSplit virtual disk into multiple files option and click onNext .
Kanto Player Professional


.png) Kanto Player Professional
Kanto Player ProfessionalVMware will display a summary of all the settings you picked for the Windows 11 virtual machine. But there’s one thing still missing: you haven’t customized the hardware preferences or added the Windows 11 ISO file to the virtual machine.
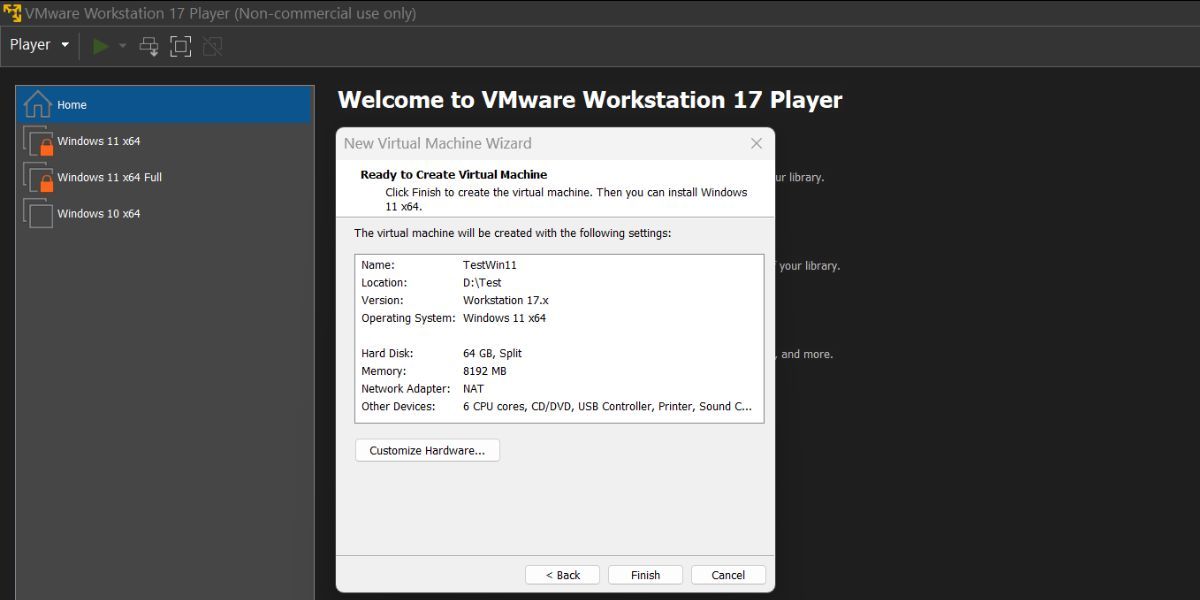

- Click on theCustomize Hardware button. Under the memory tab, increase theRAM allocation to6 GB or more to avoid a sluggish Windows 11 experience.
- Switch to theProcessors tab and allocate4 or more cores to the Windows virtual machine.
- Next, move to theNew CD/DVD (SATA) tab, and click on theUse ISO image file option located under theConnection section.
- Click on theBrowse button and select the Windows 11 ISO image file you previously downloaded. Click on theOpen button.
- Now, close the Hardware window and click on theFinish button to create the new virtual machine.
2. Install Windows 11 on the Virtual Machine
Repeat the following steps to install Windows 11 on the newly created virtual machine:
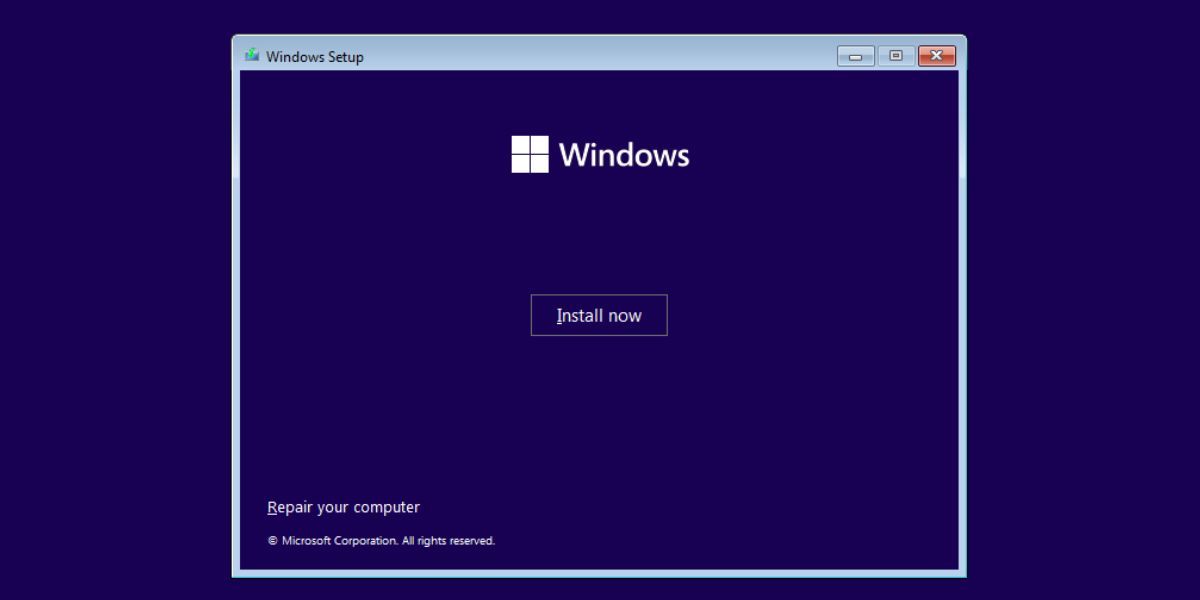
Navigate to the left-hand side menu and select the Windows 11 virtual machine. Click on thePlay virtual machine option.
Press any keyboard key to boot from the ISO file. Pick the appropriate language and region and click on theNext button. Then, click on theInstall now button.
In the Windows setup window, click on theI don’t have a product key option.
Pick the Windows 11 version (Home, Pro, or Education) and click on theNext button.
Accept theEnd User License Agreement and select theCustom installation option.
Click on theNext button. Setup will begin the Windows 11 installation. The virtual machine will restart a few times.
After the machine boots up, select the correct region and click on theYes button. Pick the appropriate keyboard layout.
Windows 11 will force you to add a Microsoft account. To avoid this, pressShift + F10 , type theoobe\bypassnro command, and press theEnter key.
The virtual machine will restart. Click on theI don’t have internet option.
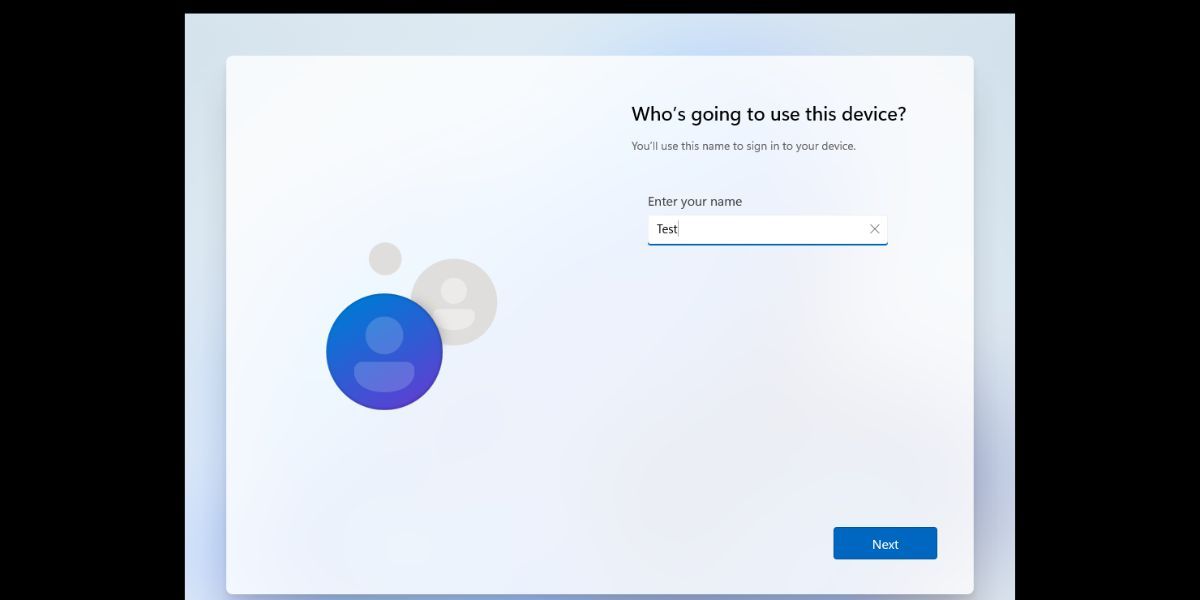
Enter aname for your Windows PC and assign apassword . Pickthree security questions and proceed.
Uncheck all the tracking options on the Privacy settings page and click on theAccept button.
Wait for the setup to finalize changes and boot to the desktop.
 Any DRM Removal for Win:Remove DRM from Adobe, Kindle, Sony eReader, Kobo, etc, read your ebooks anywhere.
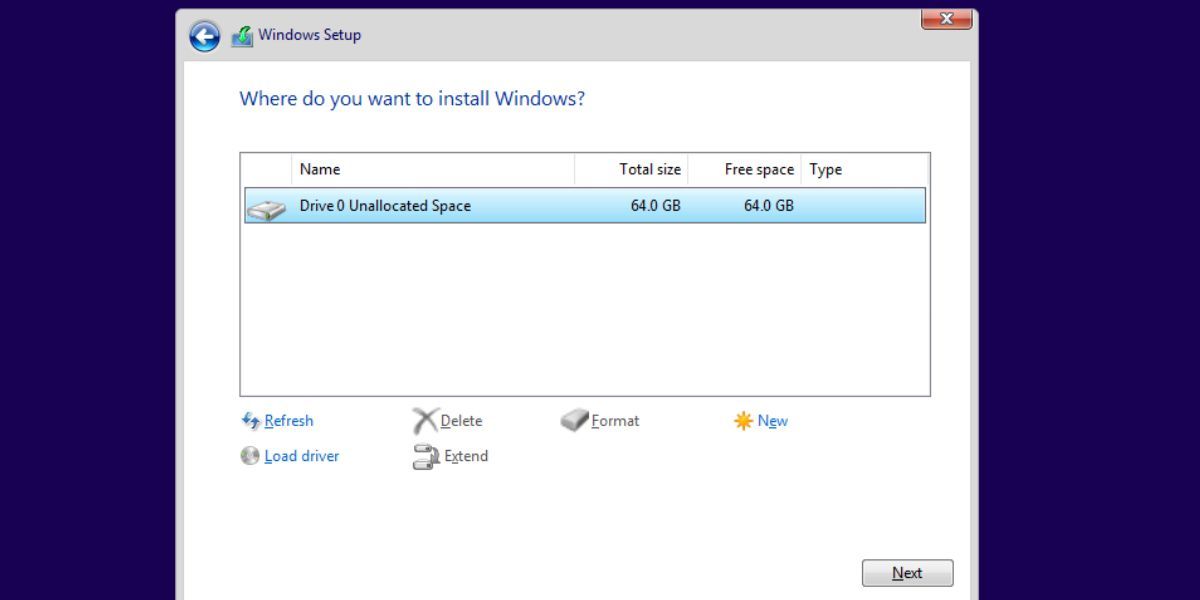


3. Install the VMware Tools
The Windows 11 virtual machine is up and running in VMware. But it appears cropped and very small. Many useful features won’t activate until you install VMware tools in the Windows 11 virtual machine. Repeat the following steps:
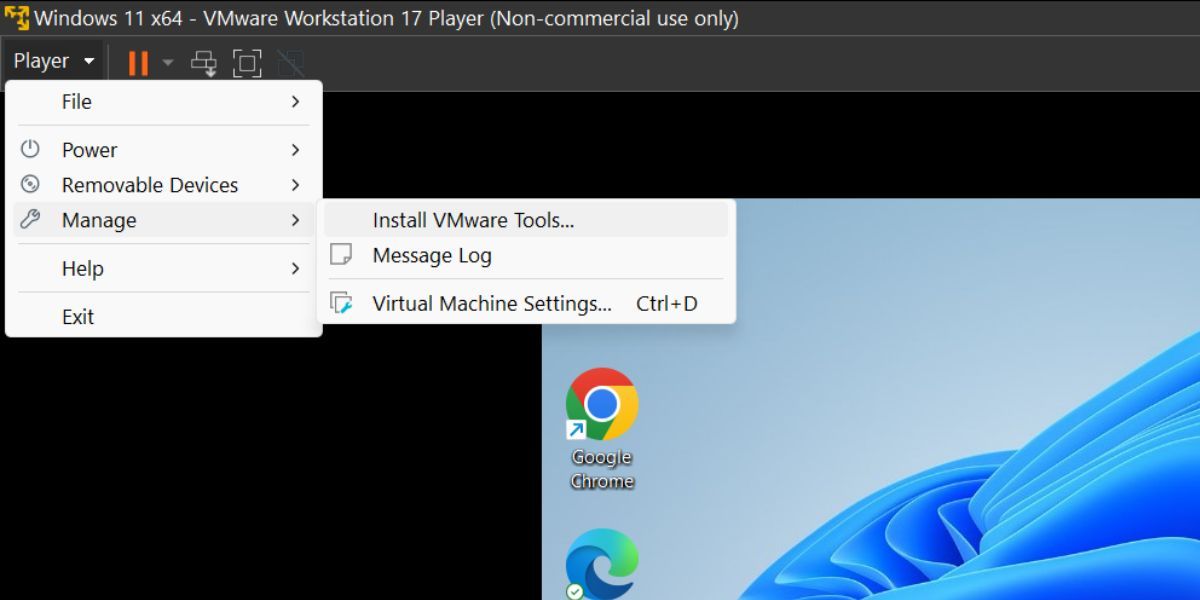
- Go to the top menu of VMware Player and click on thePlayer button.
- Select theManage option from the drop-down menu and click on theInstall VMware tools option. It will mount the VMware tools setup image file in Windows File Explorer.
- PressWin + E to launch the File Explorer and open the mounted ISO file drive.
- Locate and select thesetup64.exe file. PressCtrl + Shift + Enter to launch the setup with admin privileges.
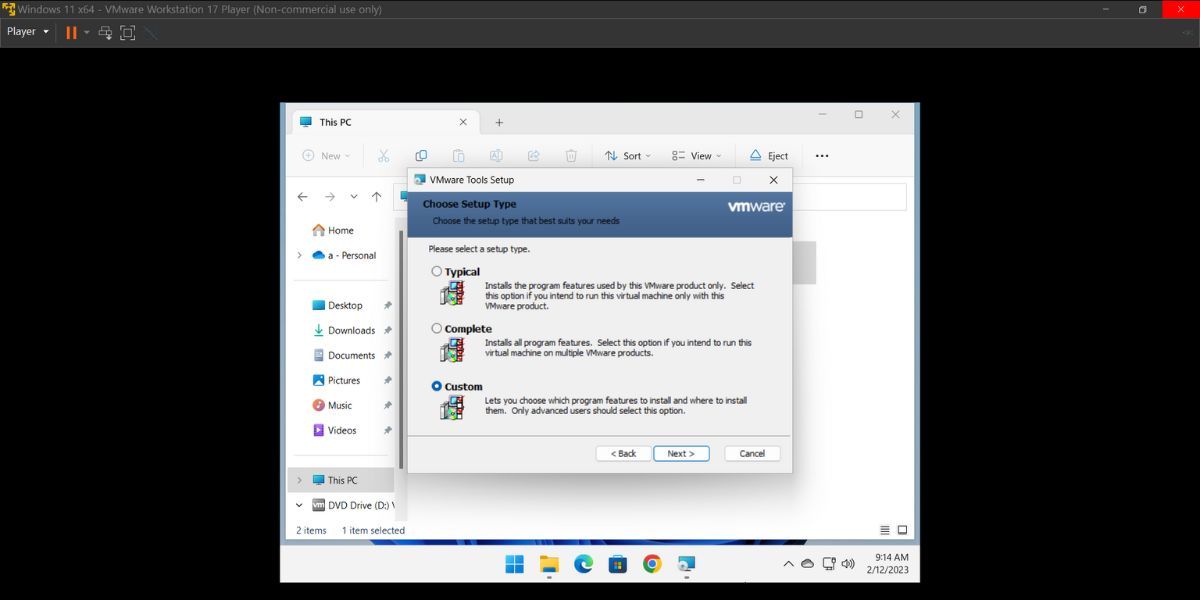
- In the VMware tools installation window, click on theNext button and select theComplete installation option.
- Then click on theInstall button. After the installation completes, click on theFinish button.
- Lastly, click on theYes button to restart the virtual machine to apply changes.


The Windows 11 virtual machine is ready to use. You can even run Windows features like Hyper V and Windows MDAG and Sandbox inside this machine.
Run Windows 11 on VMware Without Any Registry Hacks
With TMP emulation, there is no need for registry tweaking to disable secure boot and TPM requirements on Windows 11. All the features work fine, and you don’t need to switch to another hypervisor program. However, Oracle VirtualBox offers the same TPM virtualization and secure boot features.
- Title: Mastering Windows 11 Installation in VMWare 17 Player
- Author: David
- Created at : 2024-08-16 00:09:55
- Updated at : 2024-08-17 00:09:55
- Link: https://win11.techidaily.com/mastering-windows-11-installation-in-vmware-17-player/
- License: This work is licensed under CC BY-NC-SA 4.0.