Mastering Virtual Memory Expansion in Windows 11 Updates

Mastering Virtual Memory Expansion in Windows 11 Updates
Your computer slowing down isn’t a great feeling. Is it overheating? Is the CPU old? Or is it that you’ve run out of memory?
Running out of memory affects your system from top to bottom, making regular tasks suddenly feel like walking through treacle.
If that sounds like your Windows 11 installation, it’s time to check out your virtual memory settings to make sure your system can cope with demand. So, here’s how you change the virtual memory size on Windows 11, along with a few tips on boosting your system performance.
Disclaimer: This post includes affiliate links
If you click on a link and make a purchase, I may receive a commission at no extra cost to you.
What Is Virtual Memory?
We’vepreviously explained virtual memory in more detail, but here is an outline to bring you up to speed.
Your hard drive is where your operating system lives, as well as your photos, music, games, documents, and otherwise. Your RAM stores program-specific data. It is much faster but also more volatile, acting as a working storage area for the programs and files you have open.
So, what is virtual memory?
Well, if you use all the RAM available to your system, it will utilize virtual memory—also known as a swap or paging file—to provide a temporary expansion. Your system’s virtual memory does this using part of your hard-drive memory to expand your RAM effectively. So, this virtual memory is extremely useful. It allows your system to handle more data for more programs than previously available.
When your RAM runs low , your system will call upon the paging file to handle some of the extra data. However, as your hard drive or even solid-state drive is much slower than your RAM, system performance will take a hit.
Windows 11 Is Running Low on Virtual Memory
Now, the thing is, virtual memory has its own limits. It isn’t an infinite well of additional yet slower memory you can call upon. If you begin to run out of virtual memory, Windows 11 will display the following error message:
Your system is low on virtual memory. Windows is increasing the size of your virtual memory paging file. During this process, memory requests for some applications may be denied. For more information, see help.
Windows 11 will automatically manage your virtual memory, ensuring that the paging file has enough capacity to handle your system demands. However, you can also manually increase the size of your paging file on Windows 11 if you’re comfortable making decisions regarding how much RAM you have installed.
Windows sets the initial virtual memory paging file equal to the amount of installed RAM. The paging file is a minimum of 1.5 times and a maximum of three times your physical RAM. You can use the following system to calculate your Windows 11 paging file (using a system with 8GB installed as the example), providing you knowhow much RAM you have installed .
- Minimum : 1024_8_ 1.5=12288 [1GB RAM x Installed RAM x Minimum]
- Maximum : 1024_8_ 3=24576 [1GB RAM x Installed RAM x Maximum]
Still, both of these values are high.Microsoft recommends “3 × RAM or 4 GB, whichever is larger,” which will protect your system from instability when you do use your paging file. However, Windows’ automatic paging file management might decide otherwise, so it’s typically best to let the operating system figure things out for itself. For example, in the image below, you can see that on my Windows 10 machine with 32GB RAM installed, the paging file is automatically set at just under 7GB.
Furthermore, remember that these values take up space on your hard drive, as Windows allocates the overall paging file space in case it needs it.
How to Increase Virtual Memory Size on Windows 11
If you want to go ahead and manually alter the paging file size on Windows 11 to remove the virtual memory low message, here’s how you go about it.

- PressWindows key + I to open theSettings app.
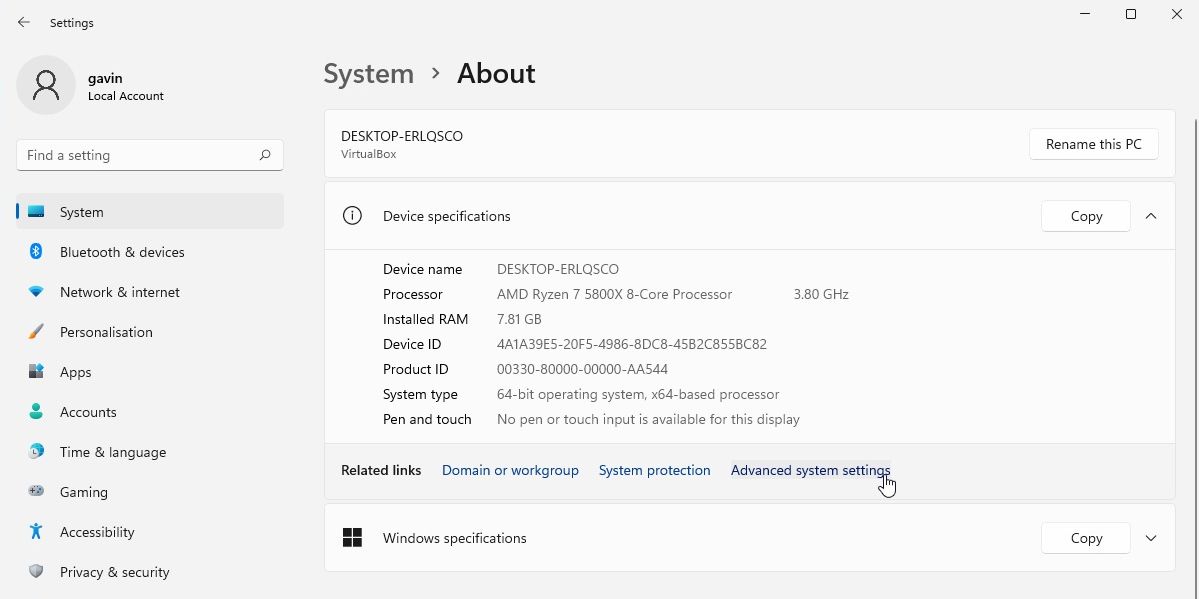
- Head toSystem > About .
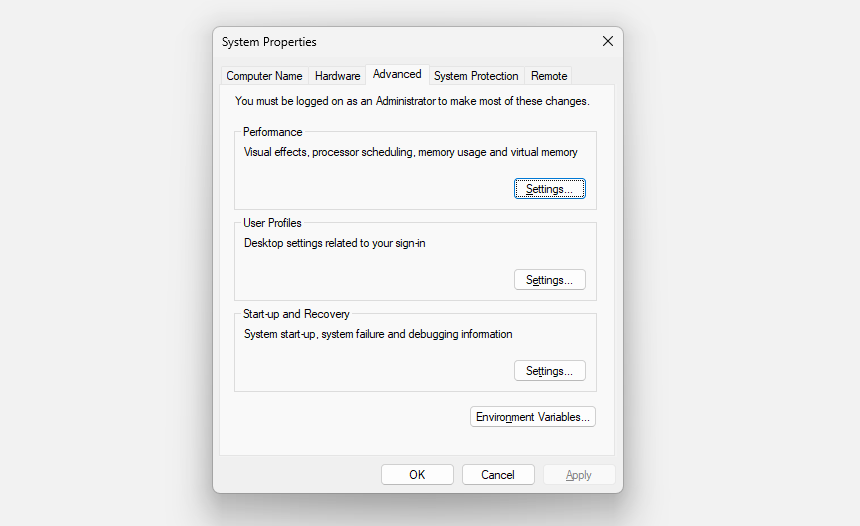
- SelectAdvanced system settings .
- UnderPerformance , selectSettings .
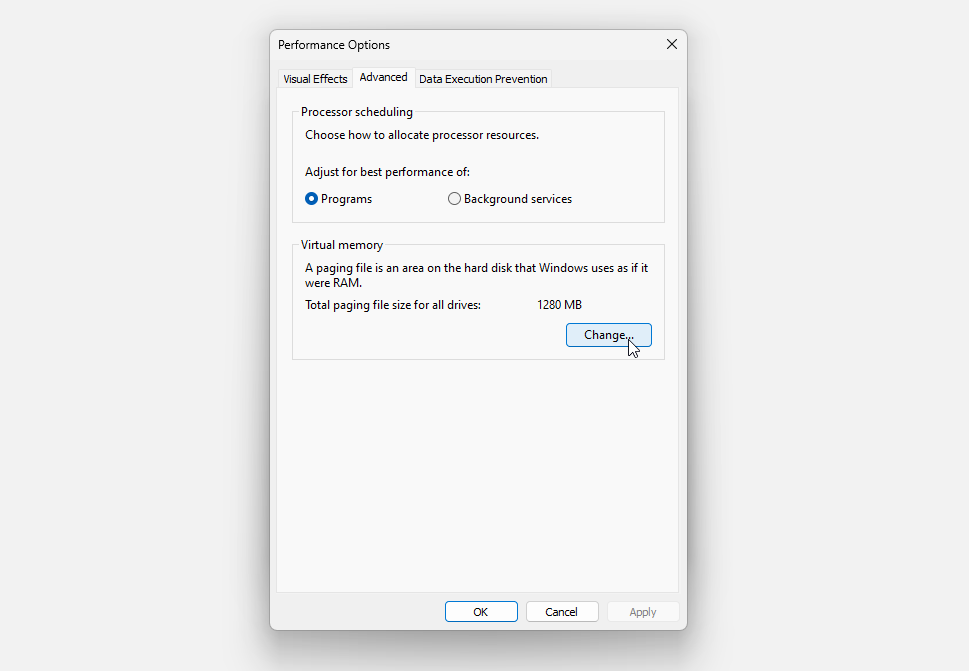
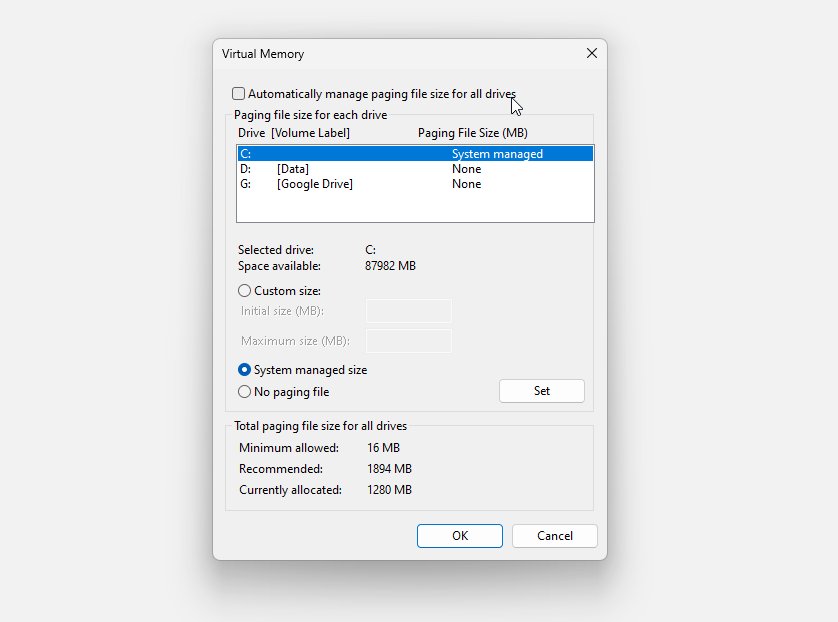
- Open theAdvanced tab. UnderVirtual memory , selectChange . Here are your Virtual Memory options.
- If you want to set custom virtual memory settings, you’ll have to uncheck the box toAutomatically manage paging file size for all drives . Once you clear the check box, the Virtual Memory options below will become accessible. SelectCustom Size, then input your desired virtual memory size and selectOK .


Close
Keep in mind the virtual memory management tips in the previous section. It might seem like drastically increasing your paging file is a great idea, but it’s almost guaranteed to cause system instability when you least expect it.
Install More RAM to Boost Your System Performance
Increasing your virtual memory size is a temporary fix and isn’t one you should rely on long-term. The only way to truly fix your low virtual memory issueis to install more RAM . The reason your system is turning to the paging file to begin with is that additional data is being palmed off.
The answer is to install more RAM, which in turn will give your whole system a boost as you’ll no longer run out of memory and have to use the slower paging file instead. It’s easier to install more RAM on a desktop computer than on a laptop, butupgrading the RAM on a laptop is possible . Unfortunately, if you don’t have any more RAM slots, have reached the maximum RAM capacity, or find that your laptop has soldered RAM, you’re flat out of luck.
You canattempt to free up more RAM , but ultimately, you’re probably going to need a new laptop.
Increasing the Windows 11 Paging File Size Is a Temporary Fix
Boosting the paging file size on Windows 11 or any operating system is a temporary fix. If you’re butting up against your memory limit frequently and your computer begins to slow to a crawl, there is only one true fix.
Also read:
- [New] 2024 Approved Selecting the Right Video Recorder for Teaching
- [New] 2024 Approved Sky Eyes on the Action DJi Phantom Pro VS GoPro Fusion
- [New] Access Unlimited MCB Theme Images
- [New] Journey to Joyrides Top 6 Essential MC House Plans for 2024
- [Updated] Best Practices Selecting Among Top 9 Free Logo Designers
- 6 Effective Strategies to Overcome the 'Inaccessible Boot Device' Error on Windows Server 2012 R2
- Alter PS5's Backdrop: How?
- Fixing Roblox Fatal App Failures in Windows
- Guide to Reinstating Deleted Windows Update Service
- How to Unlock Apple iPhone XR, Apples New iPhone
- Learn to Control RGB Lighting in Windows 11
- Mastering: Windows IP Retrieval via Command Line
- Unleashing Your Creative Potential: Using Paint Cocreator to Make AI Images on Windows 11
- Title: Mastering Virtual Memory Expansion in Windows 11 Updates
- Author: David
- Created at : 2024-10-20 04:45:01
- Updated at : 2024-10-26 21:34:40
- Link: https://win11.techidaily.com/mastering-virtual-memory-expansion-in-windows-11-updates/
- License: This work is licensed under CC BY-NC-SA 4.0.