How to Work Around Windows Defender Vulnerability Block

How to Work Around Windows Defender Vulnerability Block
You might wonder why Microsoft Defender blocks third-party antivirus software. Is it a strategy to force users to use built-in security tools? The answer is no. Microsoft Defender blocks third-party antivirus software because of conflicts between two different security solutions trying to perform similar tasks on your computer.
So how do you fix this? Let’s check it out.
Disclaimer: This post includes affiliate links
If you click on a link and make a purchase, I may receive a commission at no extra cost to you.
How to Fix Microsoft Defender Blocking Third-Party Antivirus Software
When you install a third-party antivirus program, Windows Defender may get automatically disabled. However, if you receive a notification or prompt stating that Microsoft Defender is blocking your third-party antivirus software, it means that both security solutions are active.
This may result in conflicts and compromise the overall protection of your system. If you encounter such an issue, here is what to do.
1. Disable Tamper Protection
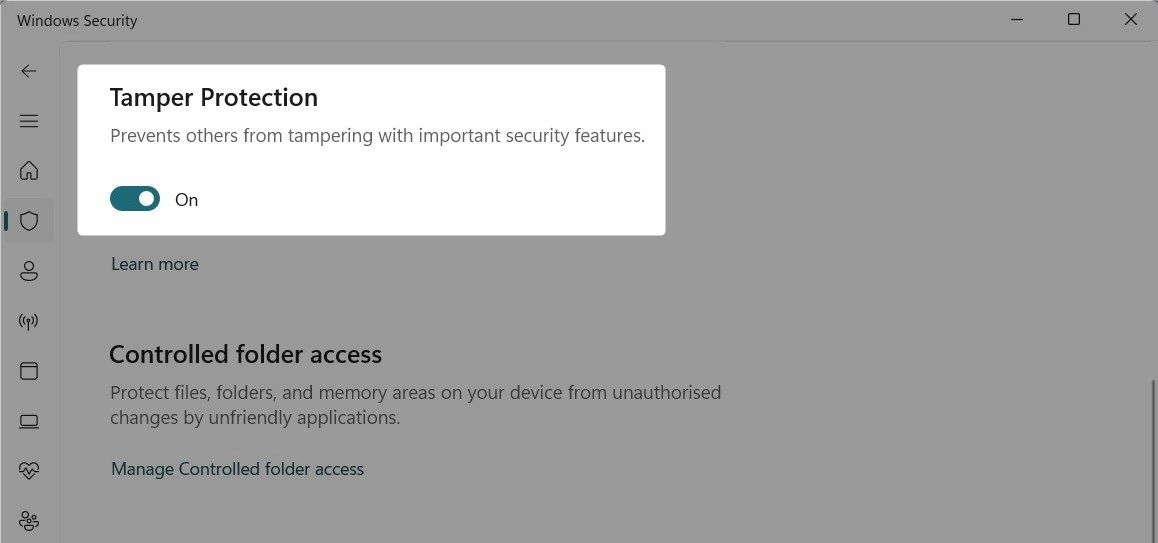
The first step to resolve this issue is to disable Tamper Protection in Microsoft Defender. This feature prevents malicious programs from changing security settings without your consent. To disable it, follow the below steps:
- Click on Start and type security in the search box. Select Windows Security from the results.
- In the Windows Security window, click on Virus & threat protection.
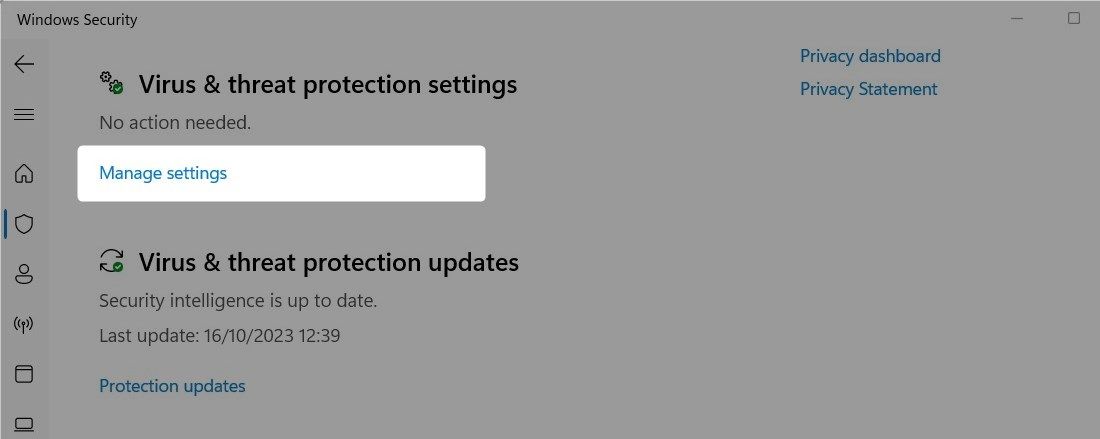
- Scroll down to Virus & threat protection settings and click on Manage settings.

- Next, toggle off the Tamper Protection switch. If prompted for confirmation, click Yes.

After disabling Tamper Protection, see if your third-party antivirus works.
2. Turn Off Microsoft Defender
As mentioned earlier, two active security solutions on your system may conflict. In this case, you can turn off Microsoft Defender temporarily and use your third-party antivirus software. Doing this will turn off all Microsoft Defender features, including real-time protection, cloud-delivered protection, and automatic sample submission. However, you can turn it back on when needed.
3. Add an Exclusion for the File to Windows Defender
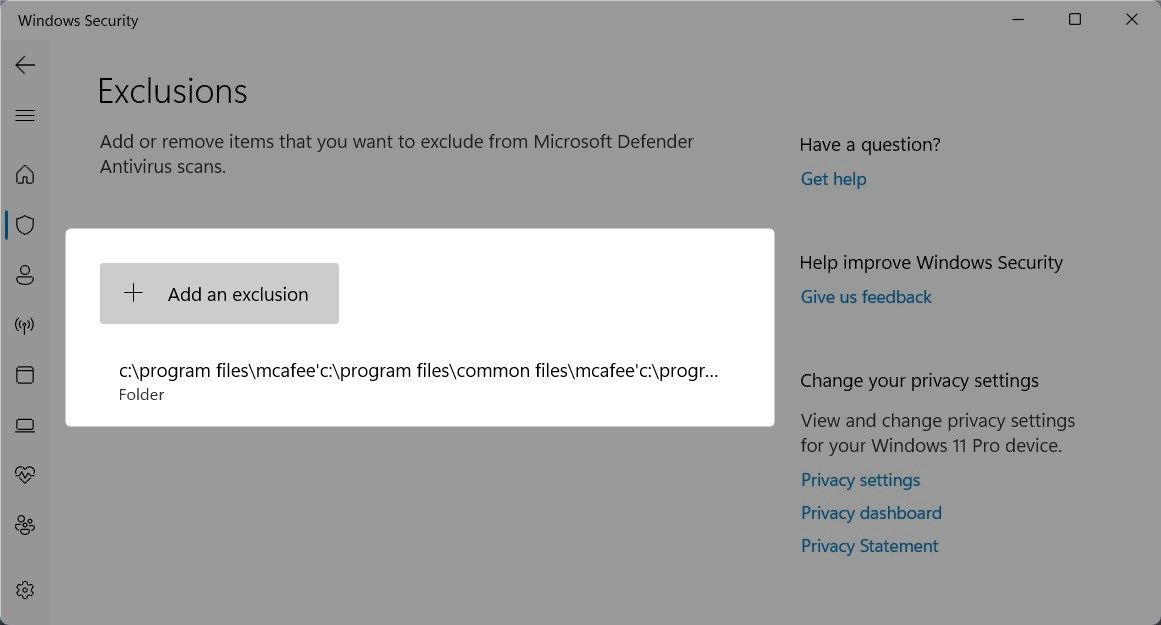
Another method is to add third-party antivirus to the exclusions list in Windows Defender. This will prevent Microsoft Defender from scanning and blocking the antivirus program. This method allows you to run both security tools simultaneously.
To add an exclusion, follow these steps:
- Press Win + I to open the Windows Settings app.
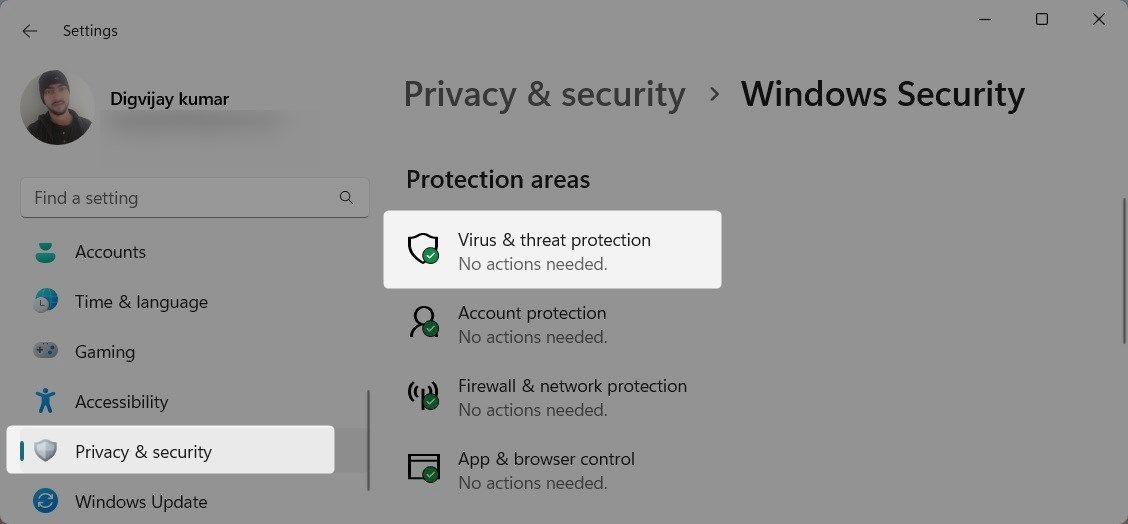
- In the left sidebar, you will find the Privacy & security option. Click on it.
- Next, click on Windows Security and open Virus & threat protection. This will take you to the Windows Security page.

- Under Virus & threat protection settings, click on Manage settings.

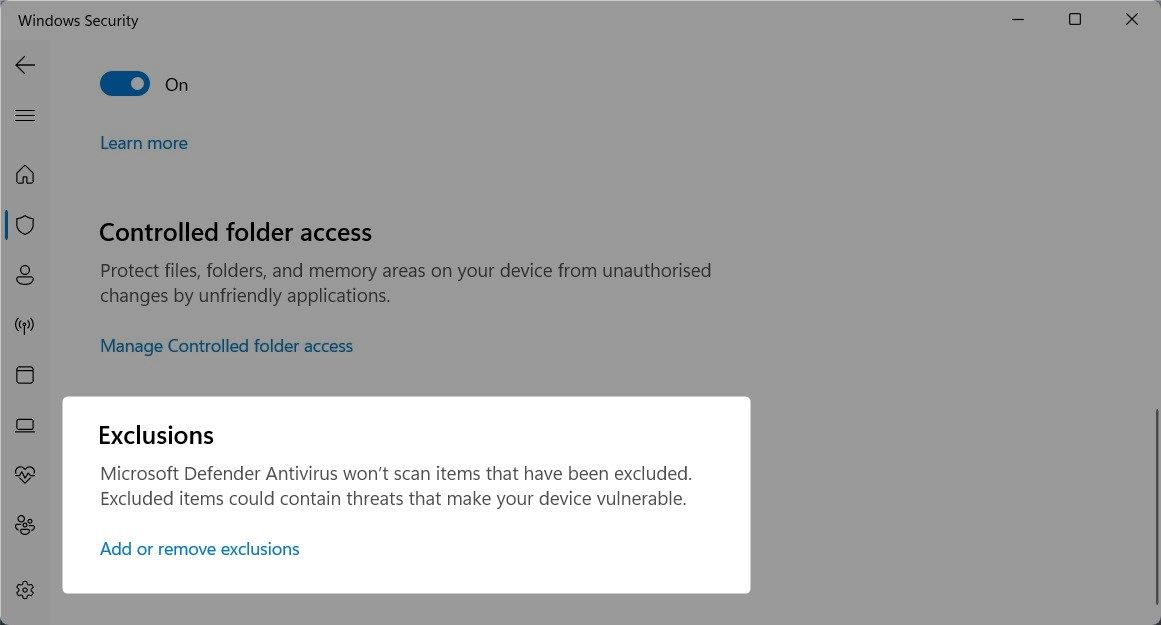
- Scroll down and you’ll find the Exclusions option. Click on Add or remove exclusions.

- If the UAC prompts you for permission, click Yes.
- Click on the Add an exclusion button and select Folder. In File Explorer, navigate to the folder where your third-party antivirus is installed.

- Select the file and click on Select Folder. You’ll see the folder added under the Exclusions section.
After adding the exclusion, close the settings window and restart your computer. Once the computer restarts, Microsoft Defender should stop blocking third-party antivirus programs.
4. Reinstall Your Third-Party Antivirus Software
If you’ve already installed a third-party antivirus program on your PC, there’s a chance that Microsoft Defender will suddenly decide that it dislikes the app. This usually happens if your third-party antivirus suite receives an update, or one of its files gets corrupted.
If adding exclusion or turning off Microsoft Defender doesn’t work, you might need to reinstall your third-party antivirus software. Doing so will reset any configurations that might conflict with Microsoft Defender.
To reinstall, uninstall the app using one of the many ways to uninstall software on Windows . After uninstalling, restart your computer.
Next, navigate to the official website and download the latest version. Once installed, restart your computer again. This should resolve any conflicts between Microsoft Defender and the third-party antivirus software.
Fix Microsoft Defender Blocking Your Third-Party Antivirus
Microsoft Defender is an essential security tool bundled with Windows. However, it may interfere with third-party antivirus software. Hopefully, one of these solutions has helped you resolve your problem.
So how do you fix this? Let’s check it out.
Also read:
- [Updated] 2024 Approved Achieve Financial Success with YouTube Ad Profit Techniques
- [Updated] Step-by-Step Guide to Initiating a TikTok Stream From Desktop
- Download & Install USB 3.0 Drivers on Windows PC
- Fix Your Game Launch Errors: A Step-by-Step Solution for Granblue Fantasy Relink Issue
- How to Change Google Play Location On Honor 90 Lite | Dr.fone
- How to Manipulate Windows GPU Priority Settings
- How To Securely Download And Install Corsair Void Pro Drivers on Windows - In Minutes
- In 2024, Change Location on Yik Yak For your Sony Xperia 5 V to Enjoy More Fun | Dr.fone
- In 2024, How to Change/Fake Your Tecno Spark 20C Location on Viber | Dr.fone
- In 2024, How To Fix OEM Unlock Missing on Nokia C22?
- In 2024, Light on Shadows Techniques for Depth in Illustrator
- Mastering Fresh Windows 11 Setup
- Overcoming DirectX Update Failure in Windows Systems
- Overcoming Insufficient Rights for Program Removal in Win 11
- Overcoming Permission Barriers in Windows Updates
- Resetting Inaccessible Pin Unlock Routine in Windows 11
- Resurrecting Hidden Wi-Fi in the Realm of Windows 11
- Techniques for Ascertaining Your PC's Intel Core Gen
- Turning Off Google Chrome Alerts, Windows Edition
- Title: How to Work Around Windows Defender Vulnerability Block
- Author: David
- Created at : 2024-09-25 00:31:13
- Updated at : 2024-09-28 21:55:01
- Link: https://win11.techidaily.com/how-to-work-around-windows-defender-vulnerability-block/
- License: This work is licensed under CC BY-NC-SA 4.0.
