How to Turn Off Hardware Scheduler for Graphics in WINOS

How to Turn Off Hardware Scheduler for Graphics in WINOS
If you were looking for new ways to get more out of your hardware, chances are you’ve enabled the Hardware accelerated GPU scheduling feature on your computer. While it’s supposed to improve your computer’s performance, it might have a negative effect, if your GPU is a bit older.
In this case, should you disable it? But how can you turn off Hardware accelerated GPU scheduling in Windows 10 and 11?
Disclaimer: This post includes affiliate links
If you click on a link and make a purchase, I may receive a commission at no extra cost to you.
What Is Hardware Accelerated GPU Scheduling?
Hardware-accelerated GPU scheduling is a feature designed to reduce the load on your CPU during intensive tasks. Usually, the CPU assigns the graphics-intensive data to the GPU, so games, media-playing apps, or editing software run smoothly. To do so, the CPU gathers, assigns, and sets the priority for each task so the GPU can render it.
When the hardware-accelerated GPU scheduling feature is enabled, the dedicated GPU-based scheduler will handle the high-priority tasks. This way, the CPU can execute more tasks in the same amount of time.
Should You Disable Hardware Accelerated GPU Scheduling?

Most of the time, GPU hardware scheduling is worth turning on in Windows , especially if your computer isn’t equipped with one of the latest GPU models. But enabling the GPU scheduling feature can also backfire, and have a negative impact on your computer’s performance. For example, on an older GPU, it might cause latency between the frames or even significant lag while gaming.
Also, GPU scheduling is known for causing conflict with Windows services, such as dxgmms2.sys, which helps render graphics, especially during gaming sessions. So, if you keep running into the dxgmms2.sys error in Windows 11 , you’ll have to disable the Hardware- accelerated GPU scheduling feature.
In addition to this, the feature might encounter compatibility issues with specific hardware or software. So, you have to turn off GPU scheduling to keep your computer running smoothly.
How to Disable Hardware Accelerated GPU Scheduling
If the cons outweigh the pros, it’s time to disable Windows GPU scheduling. We’ll walk you through two different methods, so you can choose the one that works best for you.
Disable Hardware Accelerated GPU Scheduling Through Windows Settings
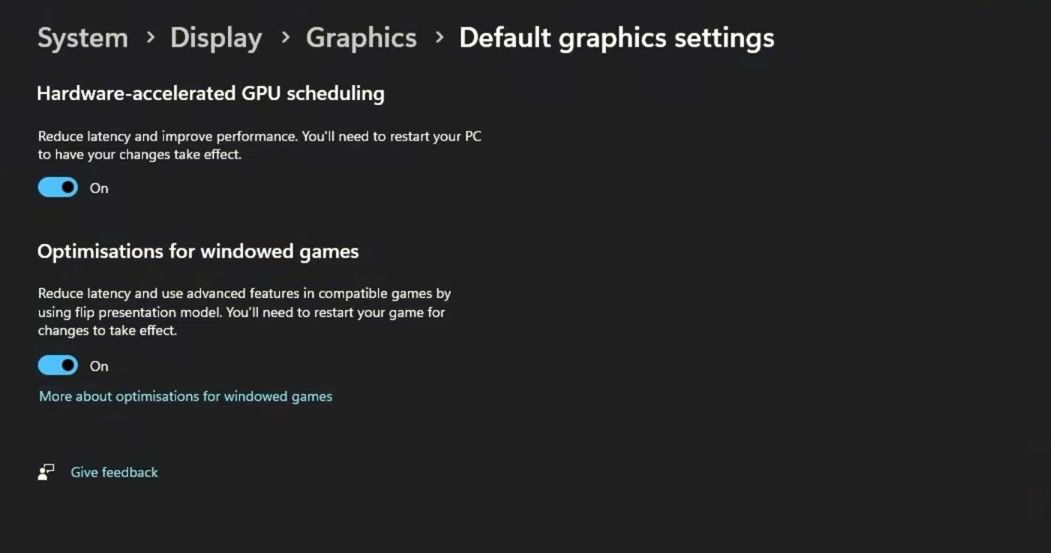
The easiest way to disable the Hardware Accelerated GPU Scheduling feature is through Windows Settings. Here’s how you can do it on a Windows 11 computer:
- Press Win + I to bring up the Settings menu.
- Go to System > Display.
- From the Related settings list, click on Graphics.
- Click Change default graphics settings.
- At the top of the page, turn off the toggle for Hardware-accelerated GPU scheduling.
- Reboot your system.

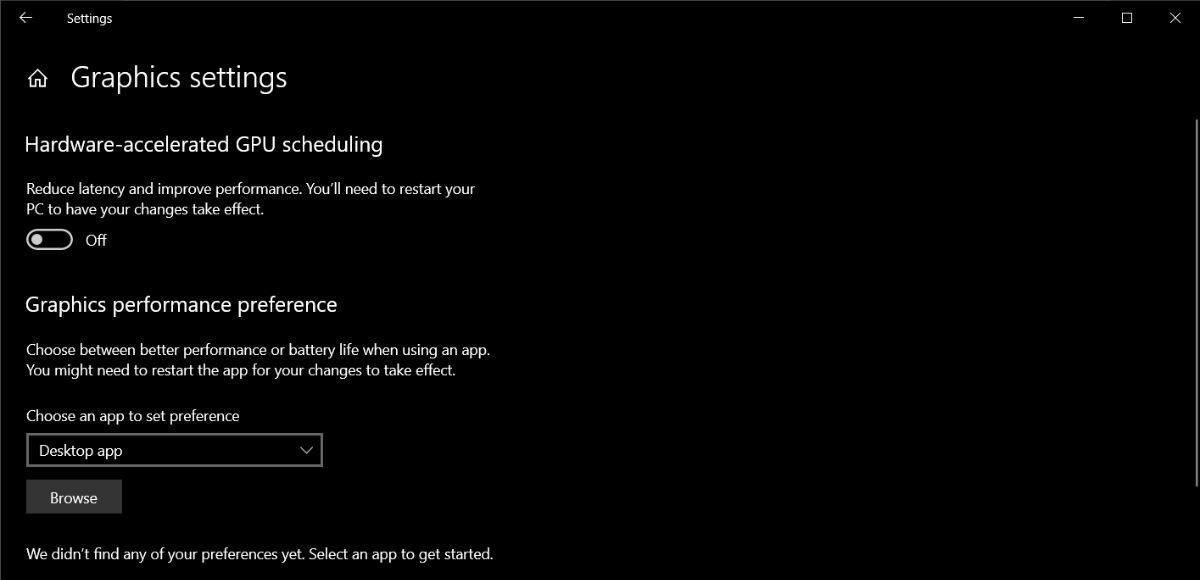
If you’re using Windows 10, here’s how you can disable the GPU hardware scheduling feature:
- Right-click the Start button and select Settings.
- Head to System > Display.
- From the Multiple Displays menu, click on Graphics settings.
- Turn off the toggle below Hardware-accelerated GPU scheduling.
- Restart your computer for the change to take place.

Disable Hardware Accelerated GPU Scheduling Through Windows Registry
If your graphics driver is outdated or corrupted, the hardware accelerated feature might be missing from the Settings menu. If you don’t have the time to replace or update the graphics driver right now, you can still disable hardware-accelerated GPU scheduling through Windows Registry.
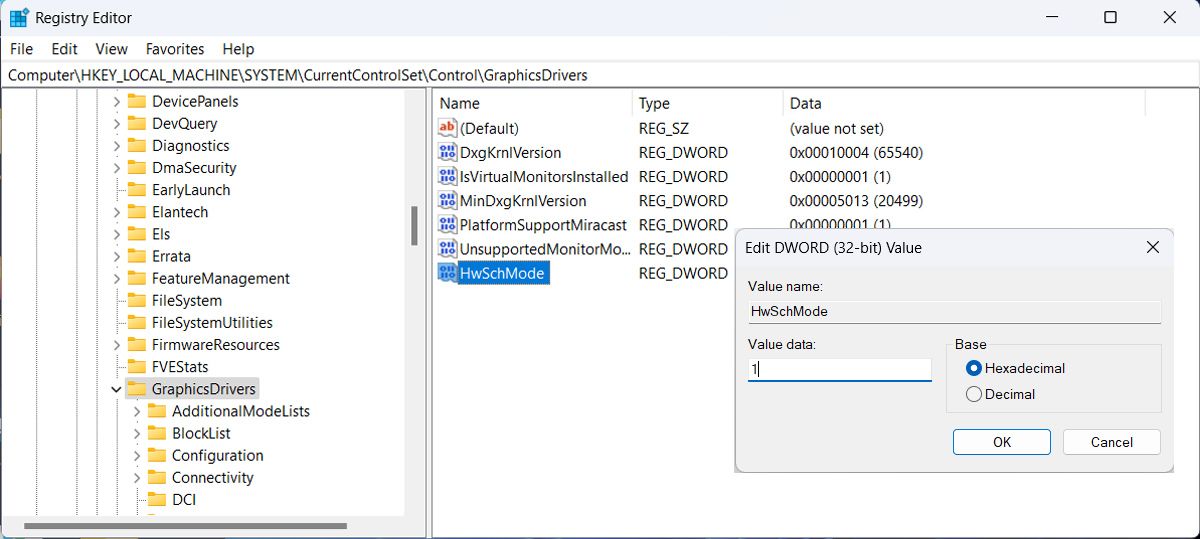
- Press Win + R to bring up a Run dialog.
- Type regedit and press Enter.
- In the Registry Editor window, head to HKEY_LOCAL_MACHINE > SYSTEM > CurrentControlSet > Control > GraphicsDrivers.
- In the right pane, open the HwSchMode value.
- Set Value data to 1.
- Click OK and restart your computer.

GPU Scheduling Is Good, but It’s Not Perfect
We’ve taken a look at how Hardware accelerated GPU scheduling works and when you should disable it. As we’ve mentioned, it may cause system issues, so it might be better to turn it off and look for alternatives. Fortunately, Windows comes with more built-in features to help you improve your gaming experience.
In this case, should you disable it? But how can you turn off Hardware accelerated GPU scheduling in Windows 10 and 11?
Also read:
- [New] Win 10'S Top 10 Video Cam Applications
- 2024 Approved Revolutionizing Screen Experience - LG's 2023 BP550
- Delving Into Self: How to Start Windows' Personalized Introspection Engine
- Effortless Disconnection: How To Detach a Microsoft Account From Windows 10 in Minutes
- In 2024, Mastering PIP Navigating Netflix's Floating Screen Functionality
- In 2024, Strategies for Effective Whiteboard Interaction During Online Engagement Across Multiple Systems
- Methods to Solve XP709 Error
- Overcoming Internet Disconnections: Keeping LeLë Online
- Overcoming Window's 10/11 Sound Flaw: Code 0Xd36b4
- Repairing Window Explorer Tab Disappearances
- Revolutionize Your Computer's Double-Clicking Technique
- The Role of a Chief Artificial Intelligence Officer – Steps to Achieve the Position
- Your Simple Route to YouTube's SRT Extraction
- Title: How to Turn Off Hardware Scheduler for Graphics in WINOS
- Author: David
- Created at : 2024-12-02 20:51:52
- Updated at : 2024-12-07 01:10:37
- Link: https://win11.techidaily.com/how-to-turn-off-hardware-scheduler-for-graphics-in-winos/
- License: This work is licensed under CC BY-NC-SA 4.0.