How to Fix the Microsoft Store Error 0X80072F30 on Windows

How to Fix the Microsoft Store Error 0X80072F30 on Windows
You can download and install a multitude of Windows 11/10 apps when you access Microsoft Store. However, some users can’t utilize MS Store because of a 0x80072F30 error. Those users see an error message that says “Check your connection… Code: 0x80072F30” whenever they open MS Store.
That error can arise even when there are no general internet connection issues for affected PCs. So, some users are a little baffled by it. However, you can resolve error 0x80072F30 in Windows 11 and 10 with these potential fixes.
1. Run the Troubleshooter for Windows Store Apps
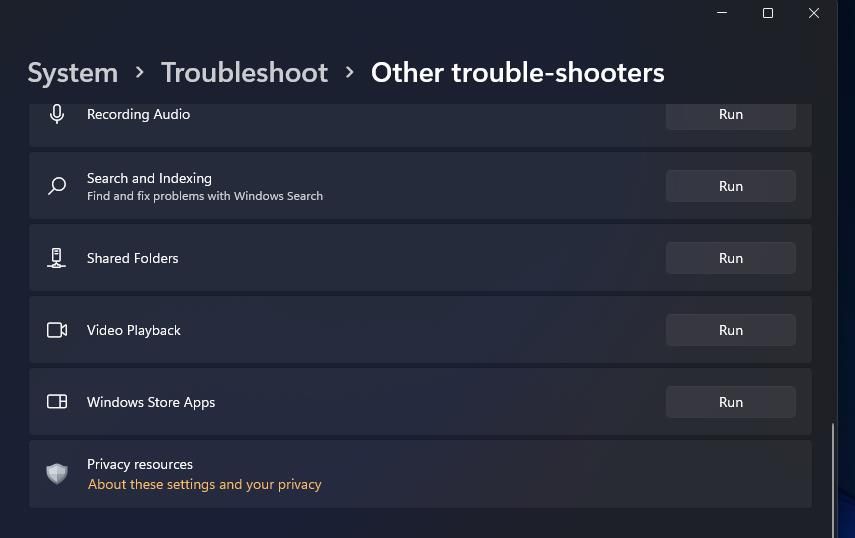
First, start by running the Windows Store Apps troubleshooter. That troubleshooter may not detect and address issues with MS Store, but it’s worth a try. You can launch that troubleshooting tool in Windows 11 like this:
- Open S e ttings with the app’s handyWin +I keyboard shortcut. See how to open Windows Settings for more handy methods.
- Next, click Settings’Troubleshoot navigation option in theSystem tab.

- ClickOther-troubleshooters to access Windows 11’s troubleshooting tools.
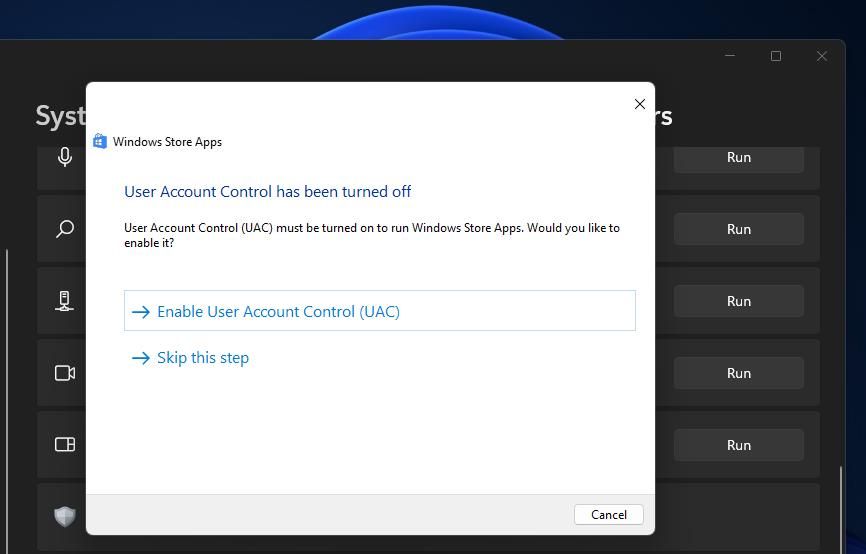
- Press Windows Store App’sRun button to see if that troubleshooter detects any issues.

- Apply any possible manual fixes the troubleshooter suggests.
Opening the same troubleshooting tools in Windows 10 is a little different. You’ll need to selectUpdate & Security >Troubleshoot in Windows 10’s Settings app. Then click theAdditional troubleshooters navigation link to reach the troubleshooting tools.
Some additional networking troubleshooters might also be useful for fixing error 0x80072F30 in some cases. The Network Adapter and Internet Connections troubleshooters are two available in Settings. So, select to run those troubleshooters as well.
2. Reset the Cache for Microsoft Store
Microsoft Store has a cache that stores accumulated data. Corrupted data in that cache can often cause MS Store errors to occur. So, maybe resetting that cache might help for resolving error 0x80072F30. This is how to reset MS Store’s cache:
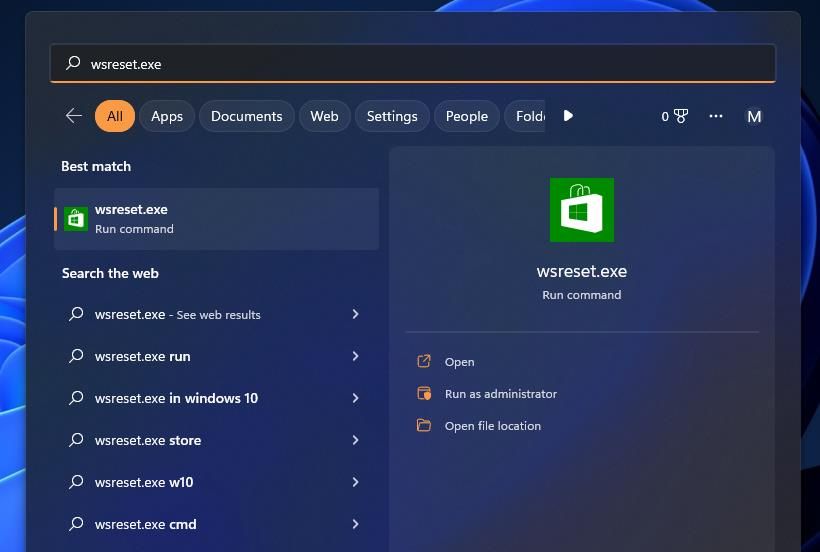
- Press theWin +S keyboard buttons simultaneously to access a search tool.
- Typewsreset.exe inside the text box to find that run command.

- Selectwsreset.exe to initiate the command.
- Restart Windows after resetting MS Store’s cache.
3. Check the Windows Update Service
Windows Update is a necessary background service for Microsoft Store. So, check that the Windows Update service is enabled and running. If it’s not running, set that service to automatic and start it as follows:
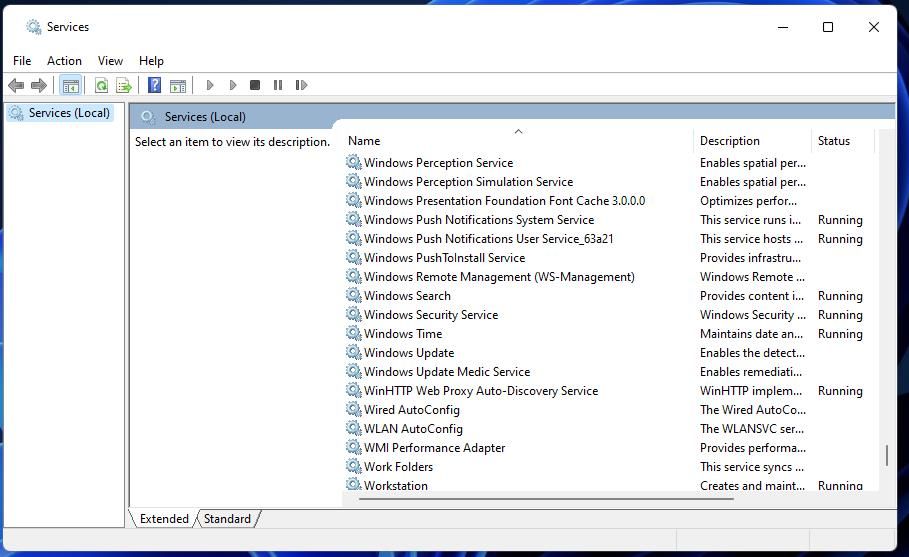
- Bring up the search tool in Windows 11 or 10, and input the keyword services there.
- SelectServices to access that app’s window.
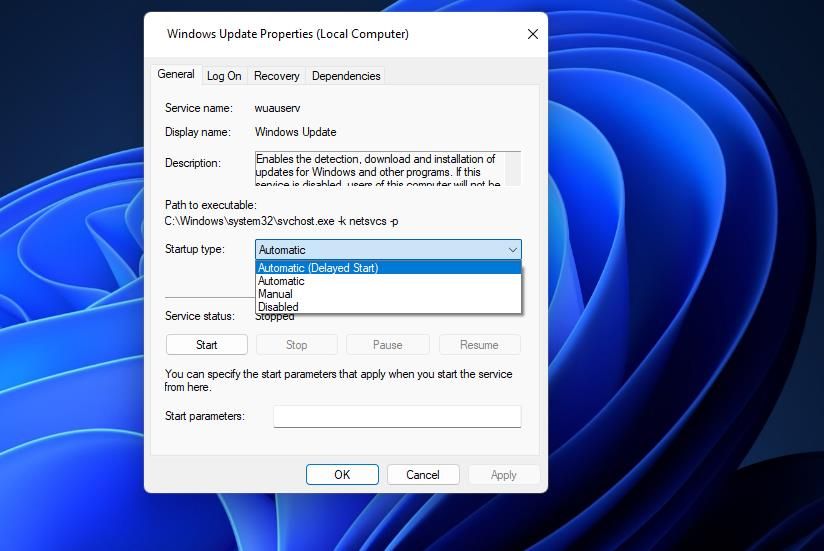
- Double-clickWindows Update to view its properties window.

- Select the service’sAutomatic option on theStartup drop-down if it’s not set to that already.

- Click the service’sStart option to run it.
- Remember to selectApply .
- SelectOK to close the Windows Update Properties window.
4. Check the Date & Time Settings on Your PC
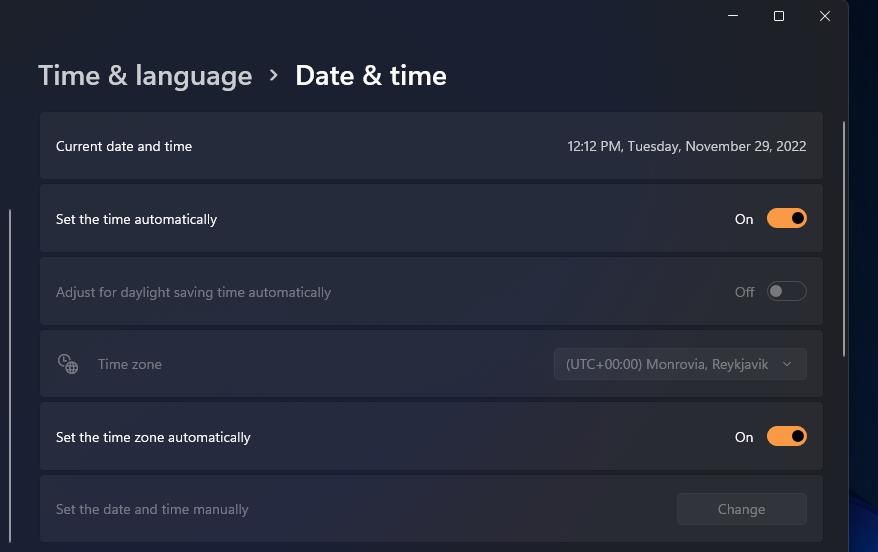
MS Store is an app for which correct time and date settings on your PC are important. Issues often occur when the MS Store app’s time is not in sync with that of your PC. You can check your PC’s date and time by glancing at its system tray clock. Follow these steps if it looks like you might need to readjust your PC’s time settings:
- Open the window for the Settings app.
- Click theTime & language tab or category inside Settings.
- Turn off theSet the time automatically option if enabled.

 With Screensaver Wonder you can easily make a screensaver from your own pictures and video files. Create screensavers for your own computer or create standalone, self-installing screensavers for easy sharing with your friends. Together with its sister product Screensaver Factory, Screensaver Wonder is one of the most popular screensaver software products in the world, helping thousands of users decorate their computer screens quickly and easily.
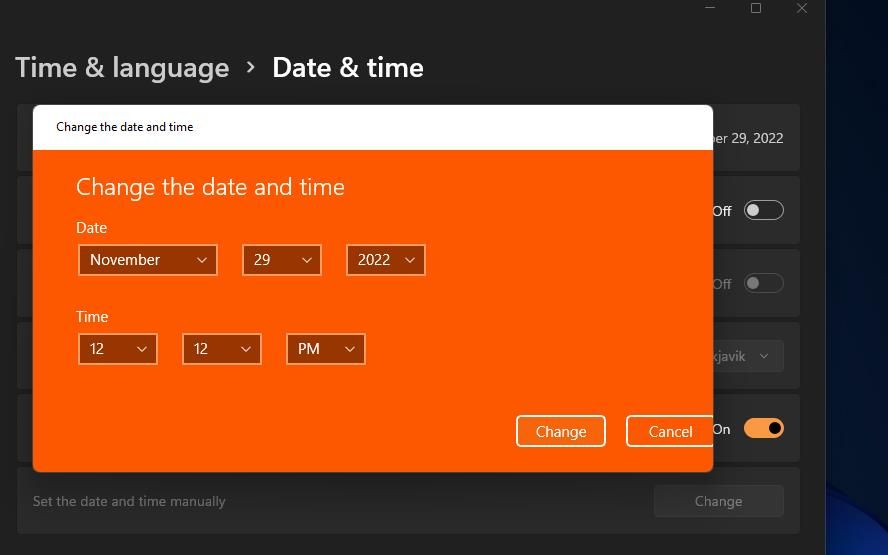
 - Select theChange option for manually setting the date and time.
- Input the correct time and date for the region your PC is set to. You can check the right time and date for your PC’s set region at the World Clock website.


- Then selectChange to set the new time.
- Also, make sure the time zone is set right by disabling theSet time zone automatically option and choosing an option on theTime Zone drop-down menu.
- Then select to restart Windows after correcting the time settings.
5. Turn Off Any Active Proxy Server Settings
A proxy server is an intermediary server through which data traffic flows when enabled on your PC. That can cause MS Store connection issues that only disabling a proxy will resolve. So, it could be the case a proxy server is causing error 0x80072F30 on your PC.
Even if you’re positive you’ve never enabled such a feature, check the proxy server setting like this:
- First, bring up the Run app launcher (pressing theWin +R key combo will launch it).
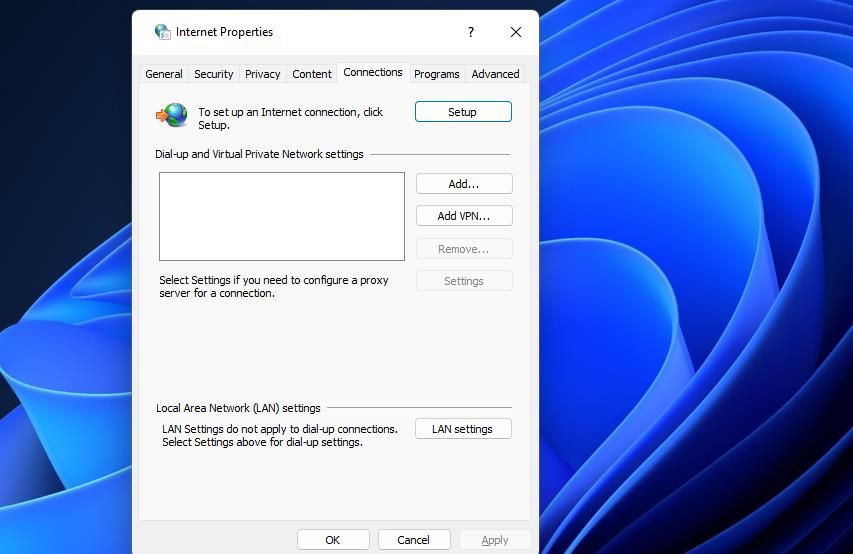
- Then typeinetcpl.cpl inside theOpen command box.
- ClickOK to view Internet Options.
- Select that window’sConnections tab.

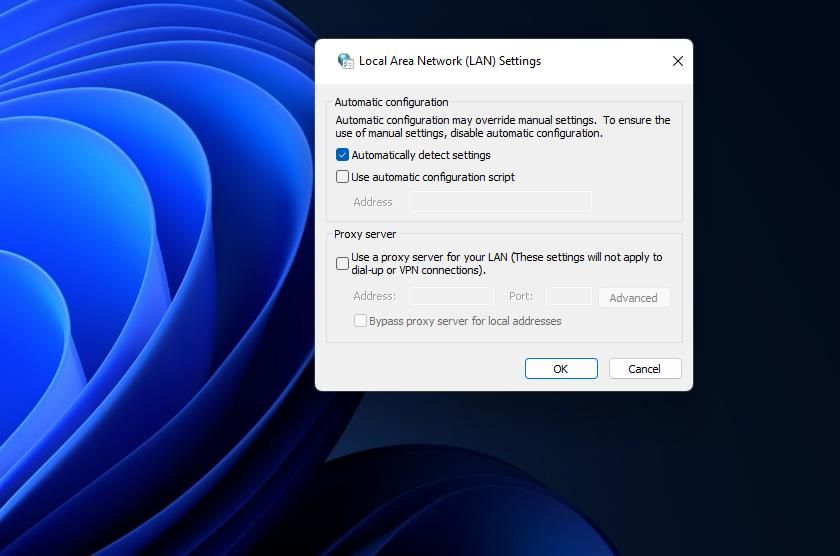
- Next, clickLAN settings to reach the proxy server option.
- Deselect (uncheck) the checkbox for theUse a proxy server for your LAN setting if enabled.

- ClickOK on the Local Area Network window.
6. Select the Automatic DNS Server and IP Address Options
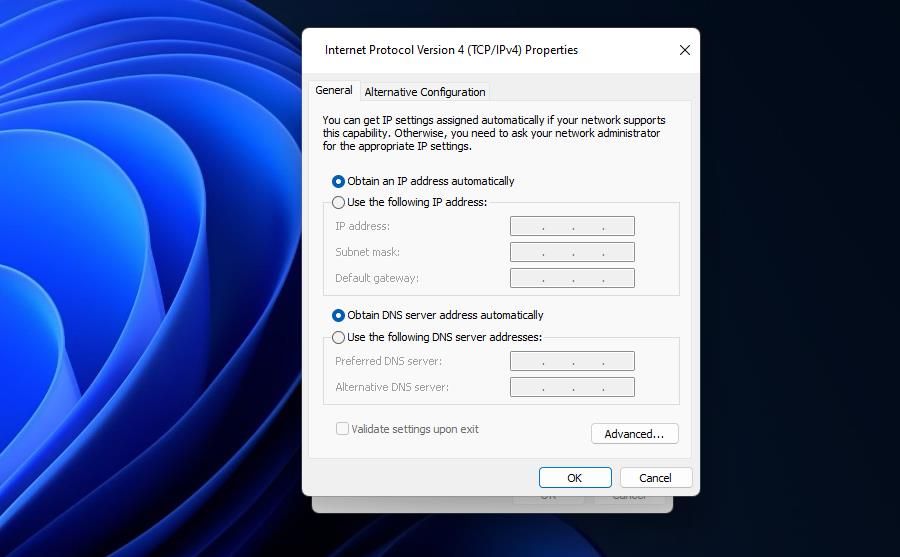
If you manually configured an IP address or DNS server, try switching to automatic IP and DNS settings. Some users who’ve resolved error 0x80072F30 have confirmed selecting options for automatically obtaining IP and DNS server addresses worked for them. This is how you can select those automatic address options in Windows 11/10:
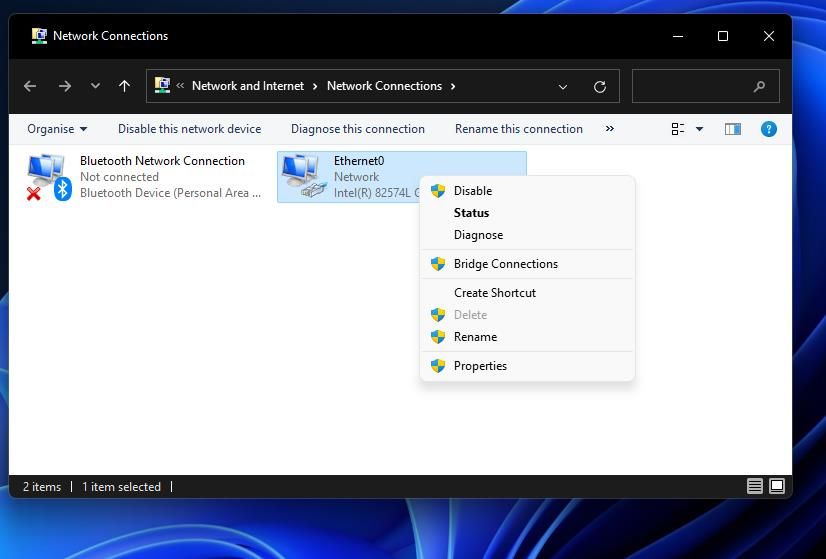
- First, type the keywordview network connections inside the Windows search tool.
- ClickView network connections in the search results.
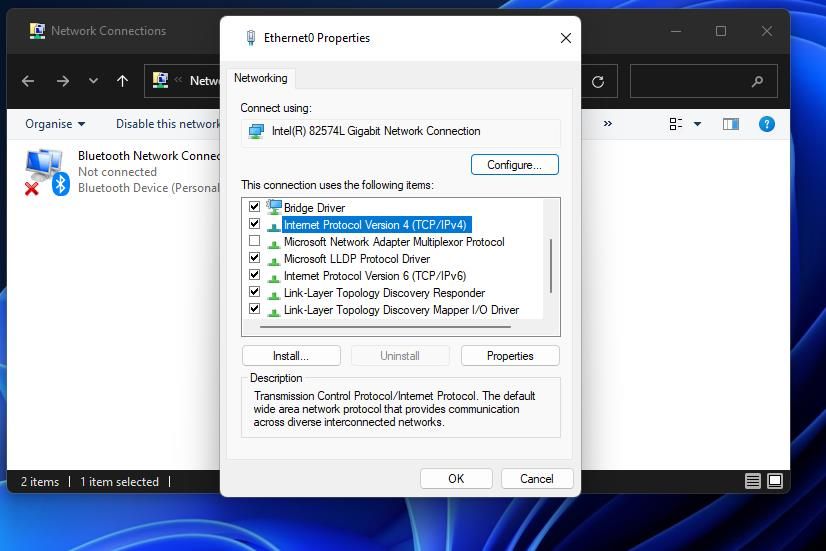
- Right-click your internet connection there and select itsProperties option.

- SelectInternet Protocol Version 4 , and click theProperties button.

- Then click theObtain an IP address automatically radio button to select that option.
- Select theObtain DNS server address automatically setting.


- ClickOK on the Internet Protocol window.
- SelectClose to exit theNetworking tab.
7. Reinstall the Microsoft Store App
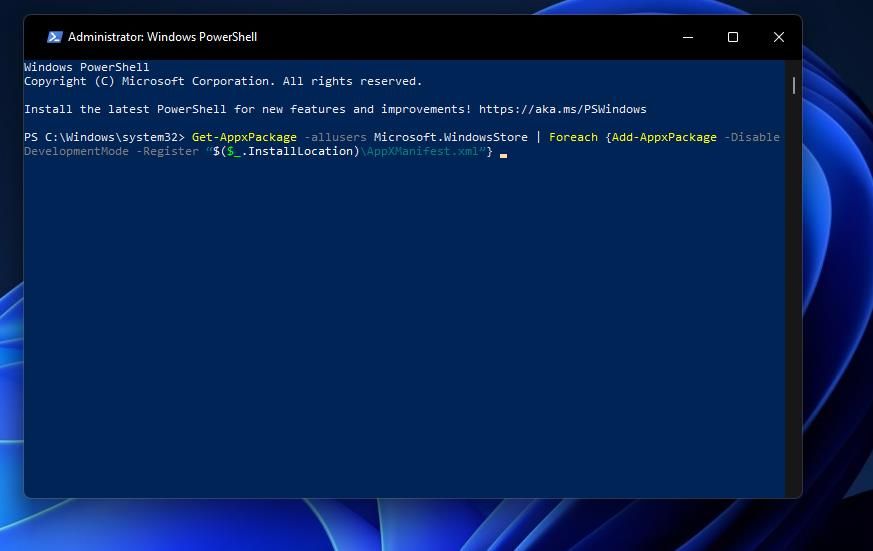
The final solution for error 0x80072F30 is to reinstall MS Store. You can’t reinstall Microsoft Store like a standard app. However, you can effectively reinstall Microsoft Store by executing a PowerShell command in the following steps:
- Click the search button (displayed with a magnifying glass icon) or box situated on your Windows 11 or 10 taskbar.
- EnterWindows Powershell to find that command-line shell app.
- Select theRun as administrator option for PowerShell inside the search tool.
- Then input this command for reinstalling the Microsoft Store:
Get-AppxPackage -allusers Microsoft.WindowsStore | Foreach {Add-AppxPackage -DisableDevelopmentMode -Register “$($_.InstallLocation)\AppXManifest.xml”}
- PressEnter to reinstall the Microsoft Store.
Install Apps From the Microsoft Store Again
One of the potential resolutions in this guide will likely resolve MS Store error 0x80072F30 on your Windows PC since they’ve worked for many other users. So, give them a try if you can’t utilize the Microsoft Store app because of that issue. Then you’ll hopefully be able to download and install apps from the big M’s storefront again.
- Title: How to Fix the Microsoft Store Error 0X80072F30 on Windows
- Author: David
- Created at : 2024-08-15 23:40:52
- Updated at : 2024-08-16 23:40:52
- Link: https://win11.techidaily.com/how-to-fix-the-microsoft-store-error-0x80072f30-on-windows/
- License: This work is licensed under CC BY-NC-SA 4.0.

 LYRX is an easy-to-use karaoke software with the professional features karaoke hosts need to perform with precision. LYRX is karaoke show hosting software that supports all standard karaoke file types as well as HD video formats, and it’s truly fun to use.
 With Screensaver Wonder you can easily make a screensaver from your own pictures and video files. Create screensavers for your own computer or create standalone, self-installing screensavers for easy sharing with your friends. Together with its sister product Screensaver Factory, Screensaver Wonder is one of the most popular screensaver software products in the world, helping thousands of users decorate their computer screens quickly and easily.

 The BootIt Collection covers multi-booting, partitioning, and disk imaging on traditional PC’s using the standard BIOS and newer PC’s using UEFI. The collection includes BootIt Bare Metal (BIBM) for standard BIOS systems and BootIt UEFI (BIU) for UEFI system.