Get Back What's Gone: Enhance Your Window's Functionality

Get Back What’s Gone: Enhance Your Window’s Functionality
The Enhancement tab in the audio device properties window can improve your system’s sound quality. But for many users, the Enhancement tab goes missing after upgrading to Windows 11.
As such, if you are also facing the same issue, we’ll share a few different fixes you can try when the Enhancement tab is missing in Windows 11.
Disclaimer: This post includes affiliate links
If you click on a link and make a purchase, I may receive a commission at no extra cost to you.
Why Is the Enhancement Tab Missing in Windows 11?
There are plenty of ways toimprove the audio and sound quality on a Windows 11 PC , but the Enhancement tab has been around long before Windows 11 was even announced.
The Enhancement tab is where you can configure sound settings like bass boost, virtual surround, loudness equalization, and more. However, if the Enhancement tab is not available on your Windows 11 PC, these can be the possible culprits behind it:
- You are using an outdated audio driver, or there’s corruption in the current driver update.
- Important audio services are not running in the background.
- A temporary glitch in the OS build you are using can also be the reason behind the issue.
Having known all the possible culprits behind the problem, let’s dive into solutions you can try in this situation.
1. Download the Latest Windows Update
Before getting into advanced troubleshooting, you must update Windows to eliminate the possibility of an outdated Windows causing the problem. To download the latest Windows update, open theSettings menu , and then chooseWindows Update from the left panel.
In the Windows Update section, click theCheck for updates button to allow Windows to look for any available updates. If any update is found, it will be automatically downloaded and installed on your computer.
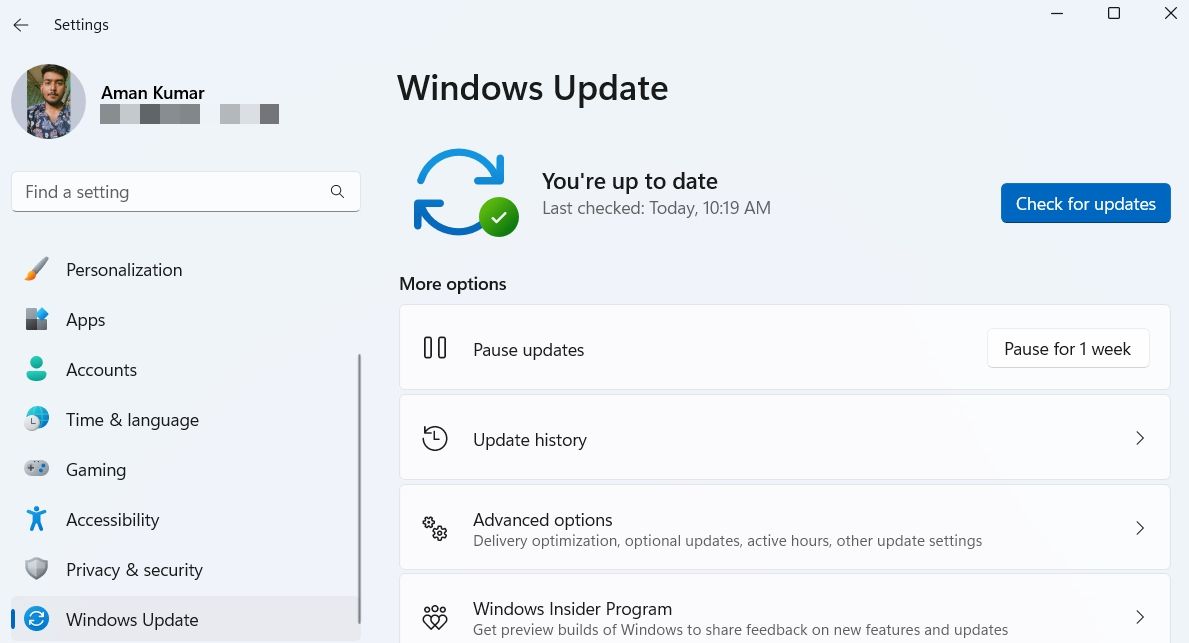
Once the update process is complete, restart your computer and check for the issue.
2. Use the Audio Troubleshooter
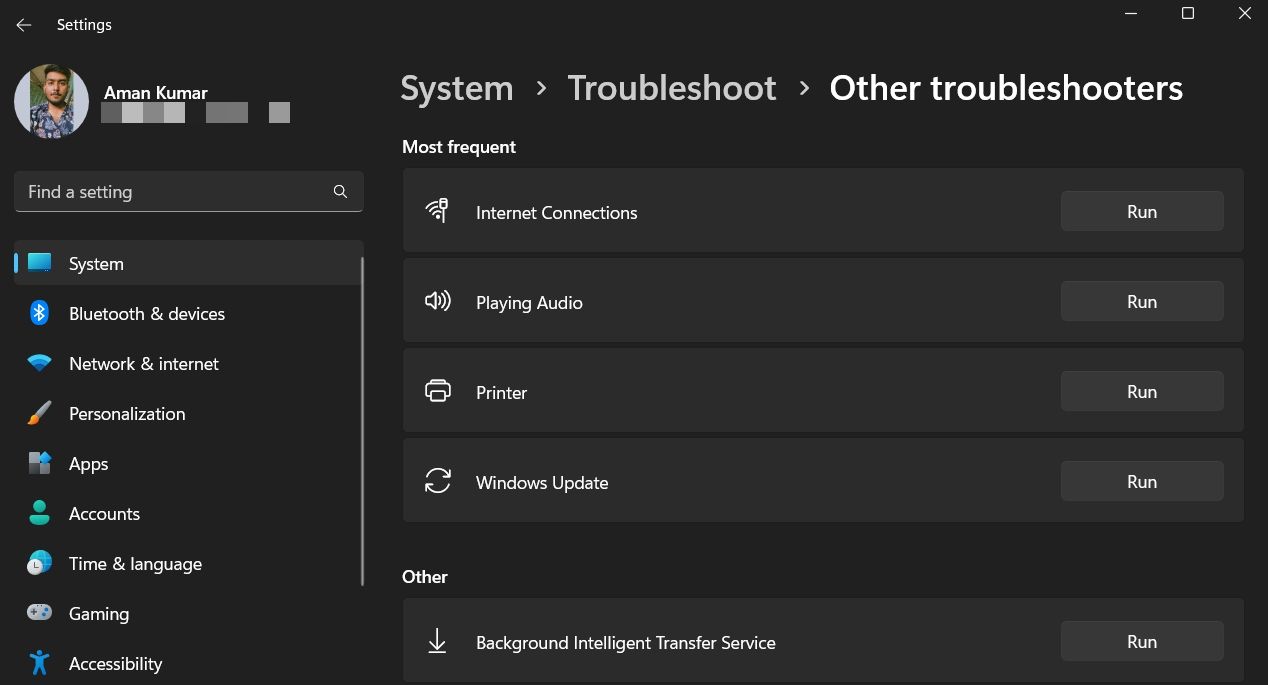
Windows 11 offers various troubleshooters that can come in handy in fixing different system issues. To eliminate sound issues, including the Enhancement tab missing problem, you can use the audio troubleshooter. Here’s how to use it:
- Open the Settings menu, and choose theTroubleshoot option in theSystem tab.
- SelectOther troubleshooters.
- Click theRun button next toPlaying audio.

- In the Troubleshooter window, select the audio device in which the Enhancement tab is missing, and clickNext.
The troubleshooter will scan the selected audio device and suggest fixes that will help you restore the Enhancement tab.
3. Reinstall the Audio Driver
Sometimes corruption in the current audio driver update can be the reason behind the problem at hand. The solution, in this case, is to reinstall the audio driver on your computer.
To do this in a system featuring a Conexant SmartAudio driver, follow the below steps:
- Launch theRun dialog box by pressing theWin + R hotkeys.
- TypeControl Panel in the Run dialog box and pressEnter .
- Once you’re in the Control Panel, selectPrograms and thenPrograms and Features.
- Look for and right-click on the Conexant SmartAudio program and chooseUninstall from the context menu.
Now, follow the on-screen instructions to complete the uninstallation process. After that, restart your computer and check for the problem.
If your computer has a Realtek audio driver, follow the below instructions to reinstall it:
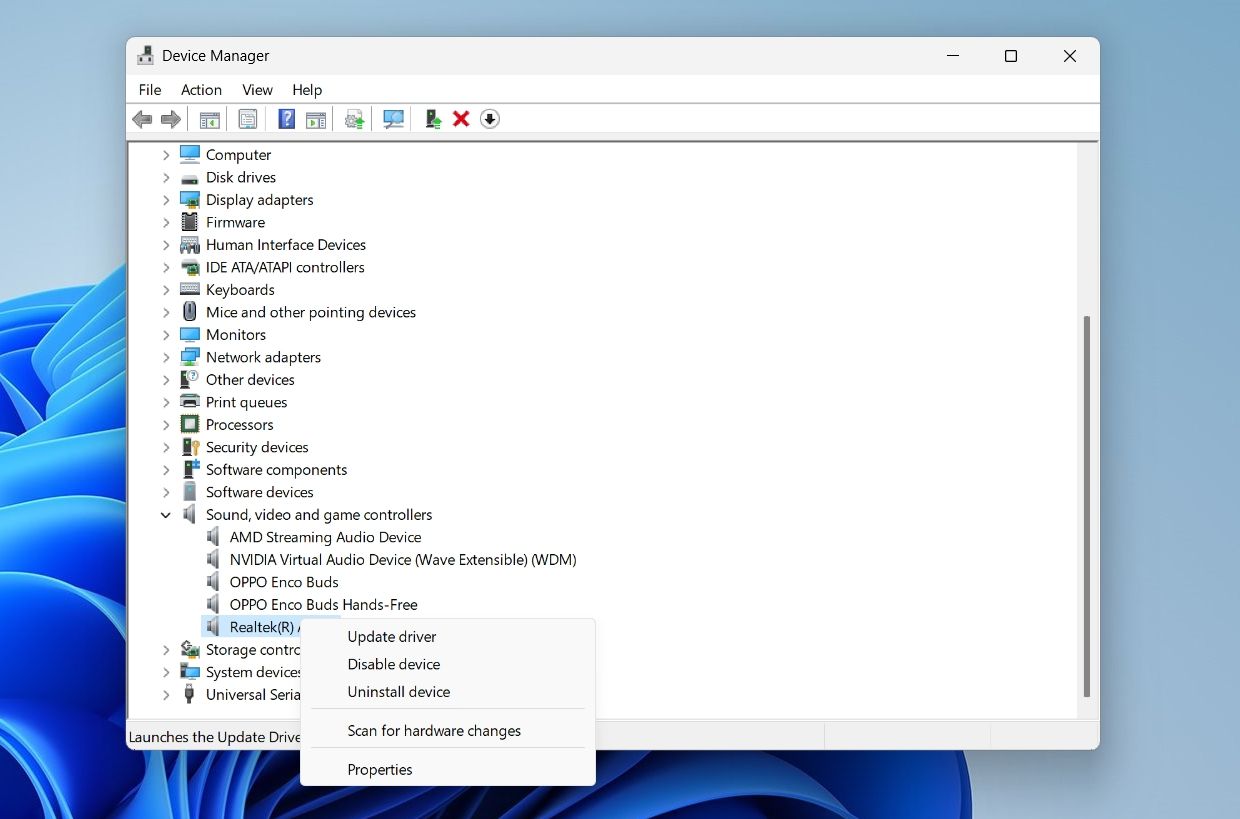
- Open theDevice Manager (seehow to open the Device Manager on Windows ), and double-click on theSound, video, and game controllers node to expand it.
- Right-click onRealtek® Audio and chooseDisable device.

- ClickYes to the confirmation box that crops up.
- Right-click on the Realtek® Audio again and chooseUpdate driver.
- Choose theBrowse my computers for driver option.
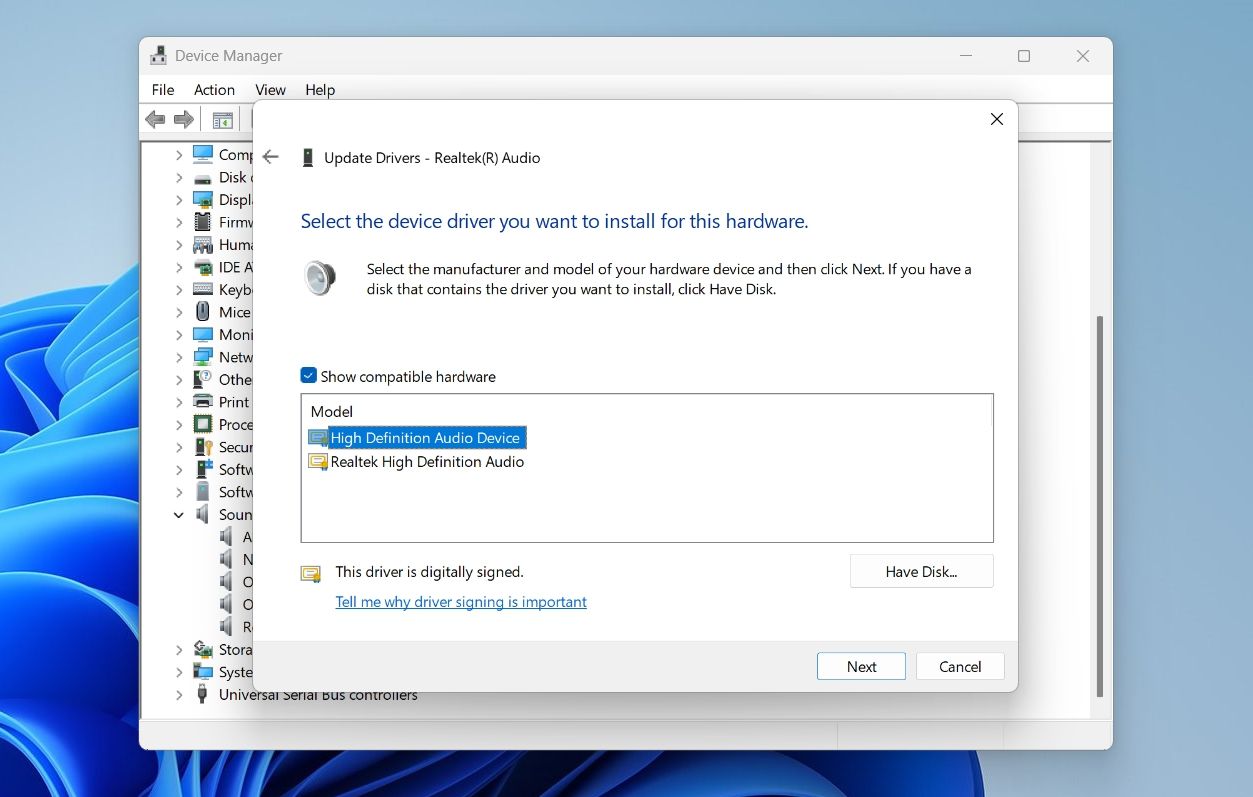
- Select the Let me pick from a list of available drivers on my computer .
- Check theShow compatible hardware box and choose theHigh Definition Audio Device option under theModel section.

- ClickNext.
- ClickYes to the Update Driver Warning that appears.
Windows will now install the driver on your computer. After the process is complete, reboot your computer and check if the Enhancement tab is back.
4. Enable All Important Audio Services
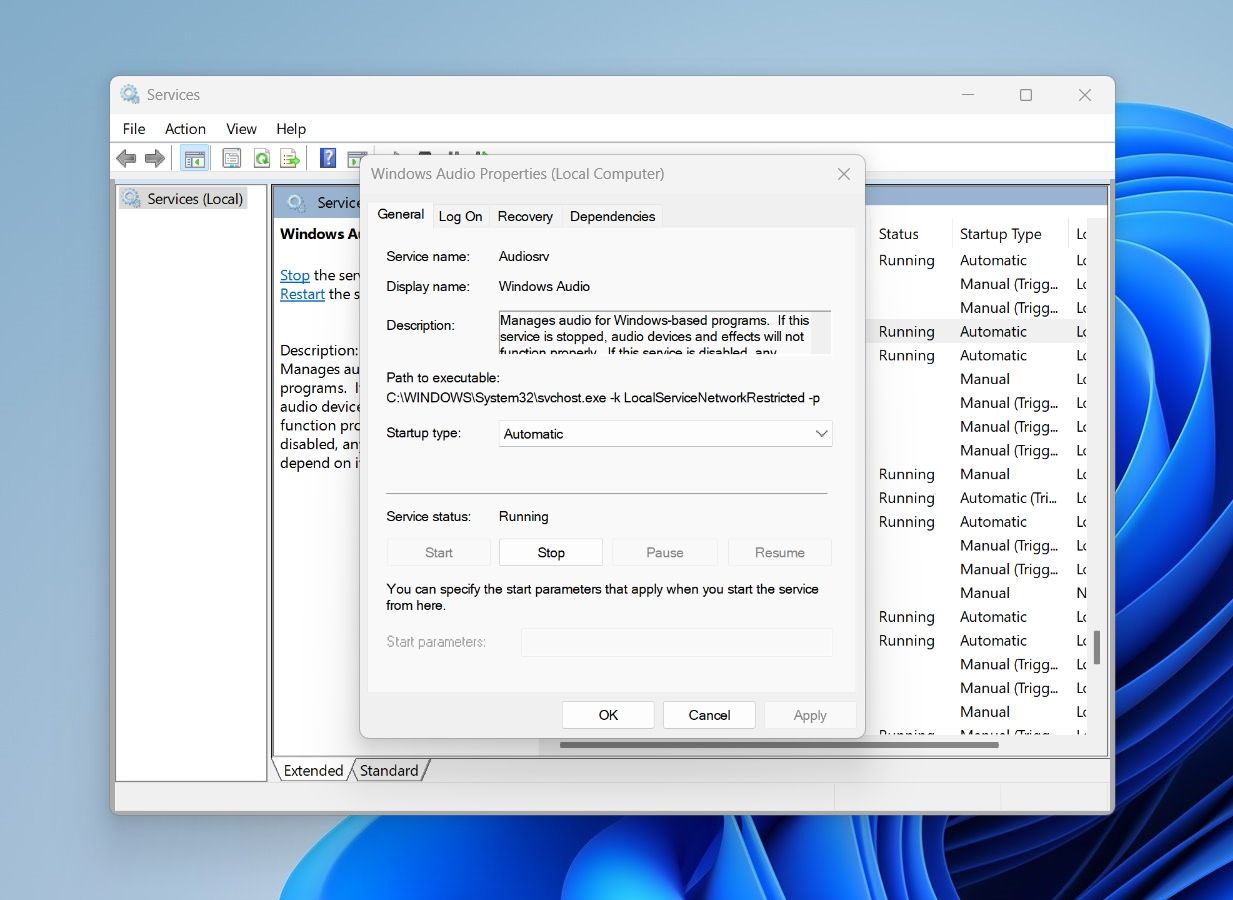
TheWindows Audio andWindows Audio Endpoint Builder are two important services that manage audio and all its related settings on Windows. If either of these services is disabled, your PC may run into audio issues, including a missing Enhancement tab.
To ensure both these services are running, follow the below instructions:
- Launch theStart Menu by pressing theWin key.
- In the search bar, typeServices and press Enter.
- In the Services window, search for and right-click on theWindows Audio service.
- ChooseProperties from the context menu.
- Check theService status. If it saysStopped, then it means that the service is not running.
- To enable the service, change theStartup type toAutomatic and click theStart button underService status .
- ClickApply and thenOK to save the changes.
Similarly, check the Windows Audio Endpoint Builder service status. If it is also disabled, enable it by following the above steps.
5. If All Else Fails, Reset Your Computer
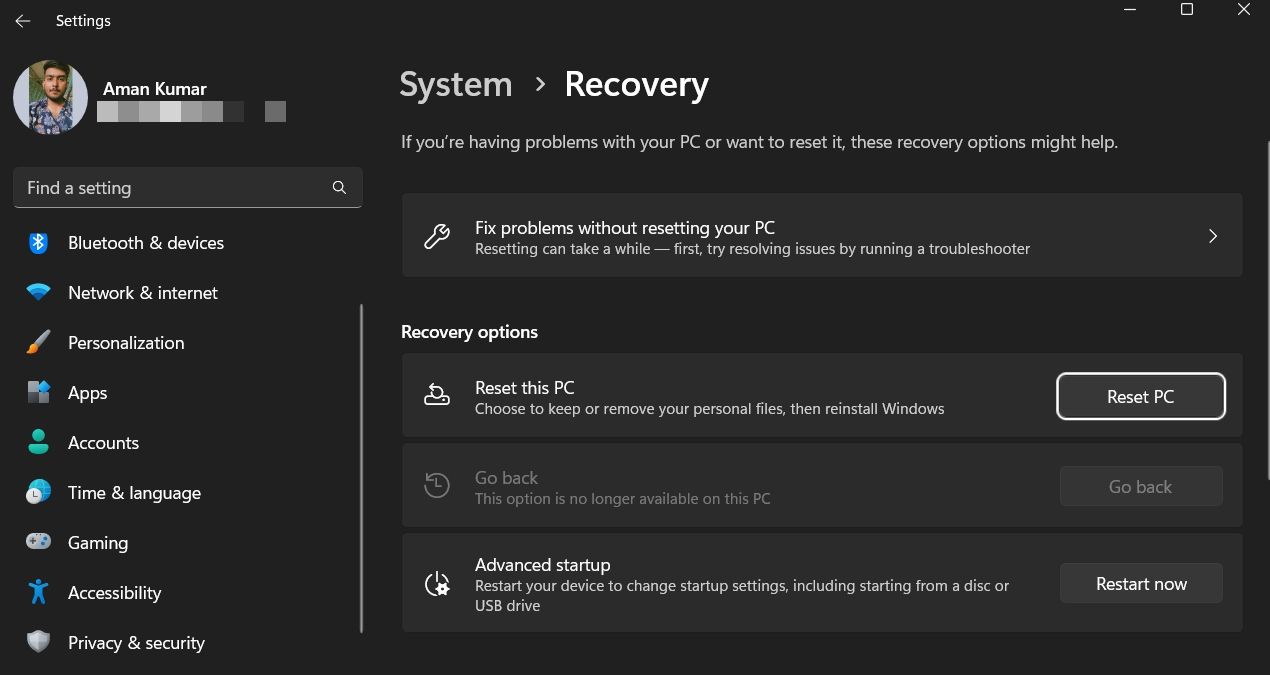
If you have tried all the above fixes and still the Enhancement tab is missing, it might be best to cut your losses and reset your Windows 11 PC.
There aremultiple ways to factory reset your Windows PC . TheKeep my files option can reinstall Windows without removing any of your personal files. You should stillback up your personal data to the cloud before doing this, though.
To perform a reset, open the Settings menu, and chooseRecovery in the System tab. Then, click theReset PC button next toReset this PC .
The Enhancement Tab in Windows 11, Restored
The unavailability of the Enhancement tab will cut you from configuring settings that will help you get better system sound. Hopefully, applying one or all of these solutions helped you restore the Enhancement app in Windows 11. But if nothing worked, hold out for the next major Windows 11 release, which should hopefully fix the issue.
Also read:
- [New] Foundations in Digital Visual Narratives
- [New] In 2024, InstantPodStreams A Step-by-Step Approach to Live Broadcasting
- [Updated] Backwards Play IPhone's Unique Reverse Feature
- [Updated] In 2024, Optimizing Video Playback Sizes on YouTube
- [Updated] Mastering the Art of Making Dormant Facebook Vids Pop Up Again
- 2024 Approved Creating Unique YouTube Music Mixtapes
- Curing DLL Missing Error: Rockalldll in Windows 10
- Fixing Microsoft App Store Glitch #0X80131500
- Free Up Local Drives in Win11: Ensuring File Safety Every Step of the Way (Max 156 Chars)
- In 2024, Unlocking the Power of Smart Lock A Beginners Guide for ZTE Blade A73 5G Users
- Maximize Screen Use with a 90-Degree Window Rotation Tutorial
- Peering Into Your Core: How to Launch Windows' Undisclosed Identity Analyzer
- Pro-Level Drone Racing Techniques & Quintessential FPVs
- Resolving Frozen Recycle Icon Status in Win11
- Siri's Speech Functionality: A Step-by-Step Guide to Screen-to-Speech Conversion for iOS/macOS Users
- Step-by-Step Guide: Effortless Cleaning Techniques for Your Flat Screen Television
- Temporary Profile Tricks for Uninterrupted Access
- The Next Generation of Windows: Microsoft’s AI Copilot Revolutionizes the Taskbar
- Win11: Simplifying File Server Connections
- Title: Get Back What's Gone: Enhance Your Window's Functionality
- Author: David
- Created at : 2024-12-20 17:08:56
- Updated at : 2024-12-22 16:29:38
- Link: https://win11.techidaily.com/get-back-whats-gone-enhance-your-windows-functionality/
- License: This work is licensed under CC BY-NC-SA 4.0.
