
Get a New Look for Windows: Three Clearing Ways

Get a New Look for Windows: Three Clearing Ways
When you change the wallpaper on your device, Windows stores a thumbnail of the recently used image in the “wallpaper history” section. Usually, this section contains around five images.
You might want to clear your wallpaper history for privacy purposes. For example, clearing wallpaper history prevents others from seeing the private images you’ve previously used as wallpapers. In this article, we’ll check out how to clear the Windows wallpaper history.
Disclaimer: This post includes affiliate links
If you click on a link and make a purchase, I may receive a commission at no extra cost to you.
How to View Your Wallpaper History on Windows
To view the five most recent pictures you’ve used as a background, simply follow these steps:
- Press Win + I to open the system settings.
- Click the Personalization option.
- Click the Background drop-down menu and select Picture. This should display the five pictures you’ve previously used as wallpapers.
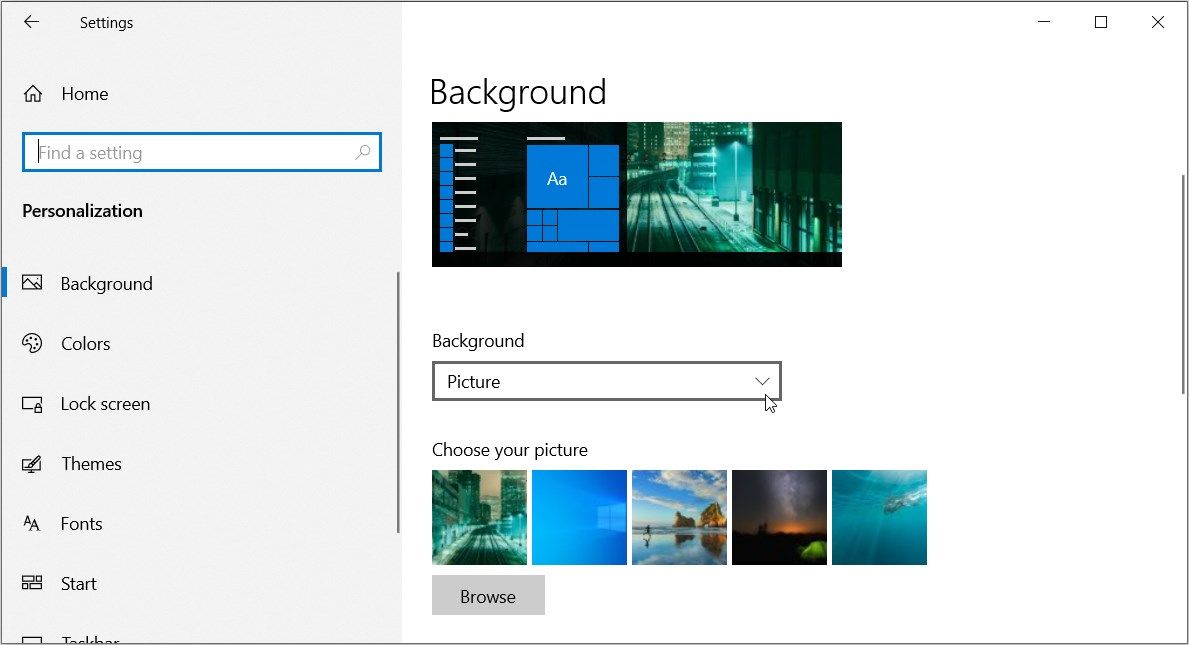
If there’s anything here you don’t want people to see, it’s time to clean out the wallpaper history.
1. How to Clear the Wallpaper History via the Registry Editor

The Registry Editor is a fantastic tool that allows you to configure some PC settings or troubleshoot system issues. But before you edit the Registry keys, always ensure to back up the Registry first. This will ensure that you have something to revert back to if something goes wrong.
Now, let’s explore how you can clear your wallpaper history using the Registry Editor:
- Type Registry Editor in the Start menu search bar.
- Right-click on the Best match result and select Run as administrator.
- Copy and paste the following command into the address bar:
Computer\HKEY_CURRENT_USER\Software\Microsoft\Windows\CurrentVersion\Explorer\Wallpapers
You should see the following five background history paths on the right-hand side:
- BackgroundHistoryPath0
- BackgroundHistoryPath1
- BackgroundHistoryPath2
- BackgroundHistoryPath3
- BackgroundHistoryPath4
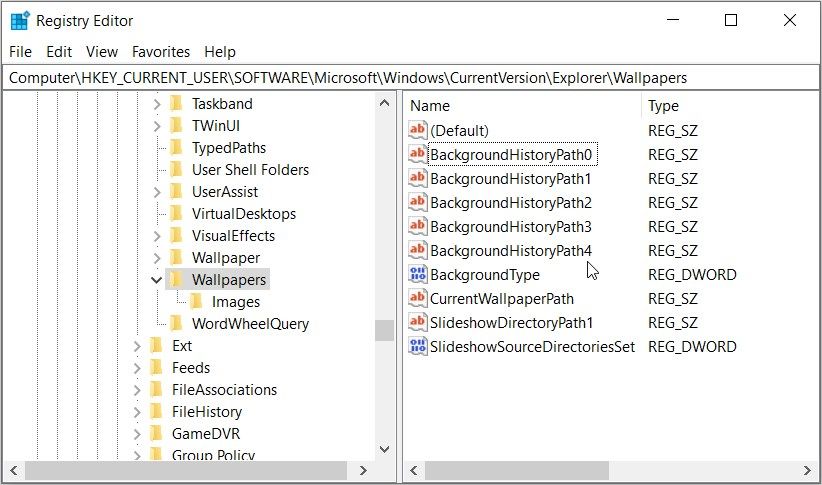
In this case, Path0 represents the first image, while Path4 represents the fifth image in the “wallpaper history” section.
If you’d like to remove the first image from your wallpaper history, right-click on the BackgroundHistoryPath0 option and select Delete. From there, apply the same steps to delete the other images from the “wallpaper history” section.
Want to delete all the images simultaneously? Click on the BackgroundHistoryPath0 option, press Shift, and then click on BackgroundHistoryPath4 (this will highlight all the options). From there, press the Delete button.
Finally, close the Registry Editor and restart your PC to save these changes.
2. Clear Wallpaper History By Using a Registry File

Editing Registry keys can often be a quite tedious task. If you’re looking for an easy way out, then create a Registry file .
Wondering how this works? A Registry file allows you to edit Registry keys with just a few clicks. In fact, you won’t even have to open the Registry Editor.
Now, let’s explore how you can create a Registry file that helps you clear your wallpaper history:
- Type Notepad in the Start menu search bar and select the Best match.
- Next, type the following command:
Windows Registry Editor Version 5.00[HKEY_CURRENT_USER\Software\Microsoft\Windows\CurrentVersion\Explorer\Wallpapers]”BackgroundHistoryPath0”=-“BackgroundHistoryPath1”=-“BackgroundHistoryPath2”=-“BackgroundHistoryPath3”=-“BackgroundHistoryPath4”=-
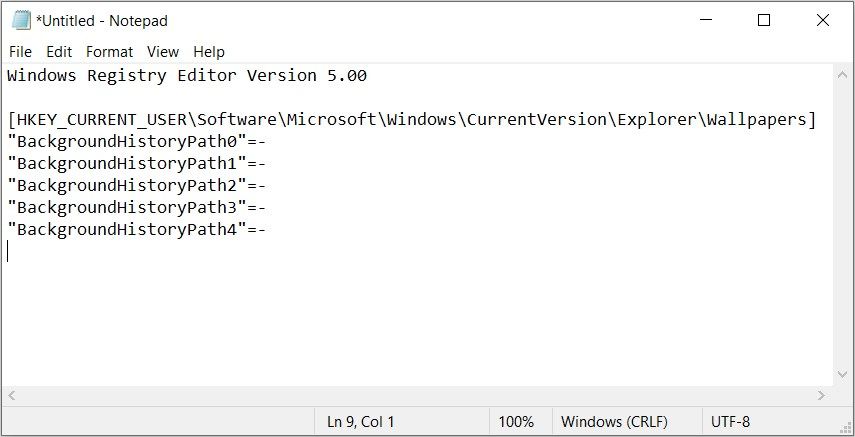
Now, navigate to the File tab and select the Save As option. Next, select the folder in which you’d like to save the file. From there, type ClearMyWallpaperHistory.reg in the File name section
To use the Registry file, simply double-click on it. This should automatically clear your wallpaper history.
3. Overwrite the Previous Wallpaper History
Struggling to clear your wallpaper history? Overwriting the Windows wallpaper history could help. To do that, you’d have to use five new different pictures—one at a time—as your background.
In this case, this will only show your most recently used pictures. That way, you can indirectly “clear” any sensitive images from the wallpaper history and only display what you’re comfortable with.
Here’s how to overwrite your wallpaper history:
- Press Win + I to open the system settings. Alternatively, check out the different ways to access the Windows system settings .
- Click the Personalization option.
- Click the Background drop-down menu and select Picture.
- Scroll down and click the Browse button. Finally, select a new image.
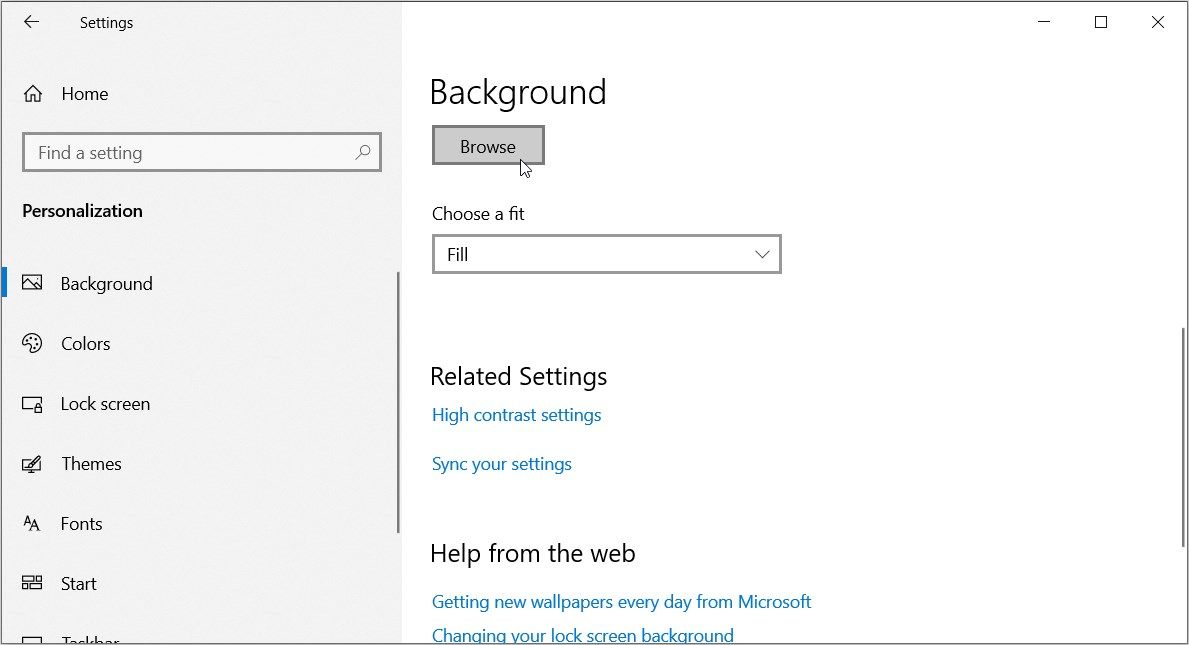
Repeat this process five times. From there, you should start seeing different images in the “wallpaper history” section.
Your Previous Wallpapers Are Nowhere to Be Found
Windows allows you to personalize your device to your liking. But then the system often keeps track of the changes you make on your PC. Fortunately, you can easily prevent others from seeing the changes you make on your device. For example, you can remove your wallpaper history using any of the methods we’ve covered.
Also read:
- [New] Cutting-Edge Strategies to Minimize Vids for Instagram on macOS for 2024
- [Updated] In 2024, Profound Analysis of MorphVOX Technology and Its Role in Audio Modification
- [Updated] PS5/Xbox Series X Top Gaming TVs Unveiled
- 2024 Approved Five Premier Extensions to Hoard FB Videos
- 無料で簡単なMP3へのSWFファイル変換 – 動画転送用Movaviソリューション
- CameraSection Breakdown Analysis
- Explore Overlooked Windows 11 Elements That Can Help
- Exploring FB Events as a Key Tool for Organizing Activities
- Exploring Windows Executable & Linker File Structure
- Inside the World of PC Parts & Devices – A Look with Tom's Hardware
- Managing System Resources for Effective Remote Device Operations
- Mastering Telnet Setup in Wins 10 & 11
- Mastering the iOS 18 Update: A Step-by-Step Guide to Personalizing Your iPhone's Control Center - Insights From ZDNet
- Overcome Key Missteps: A Comprehensive Guide to Rectify Windows Non-Working Shortcuts
- Rapid Text Entry: TypingAid for Speed Enthusiasts
- Remedy for Invisible HDD in PCs
- Restoring Functionality: The Search Bar Fix Guide in Windows 11
- Tailor Keyboard Funnels for Windows Programs
- Ultimate Guide: Correcting Animal's Eye Imperfections in Photography
- Title: Get a New Look for Windows: Three Clearing Ways
- Author: David
- Created at : 2025-02-25 17:46:34
- Updated at : 2025-03-04 21:13:05
- Link: https://win11.techidaily.com/get-a-new-look-for-windows-three-clearing-ways/
- License: This work is licensed under CC BY-NC-SA 4.0.