
From Vanished Panes to Visible Windows: Essential Steps for Recovering Hidden Screens (6 Ways)
From Vanished Panes to Visible Windows: Essential Steps for Recovering Hidden Screens (6 Ways)
It can be quite frustrating when suddenly one of your open windows decides to wander off the screen. Typically, when this happens, the window ends up partially or entirely out of the visible area, making it hard to interact with it.
However, the good news is that you can resolve this issue with just a few simple steps. In the following sections, we’ll explore various methods for bringing an off-screen window back into focus in both Windows 10 and 11.
What Is Causing the Window to Move Off-Screen?
If you’re experiencing the frustrating issue of windows moving off the screen in Windows, it can be attributed to several underlying causes. One common reason is changes in screen resolution, as an inaccurate resolution setting can cause windows to extend beyond the visible screen area.
This problem often also occurs when using multiple displays. If you’ve disconnected a second monitor without disabling the “extend display” feature, it can lead to window placement issues.
Other potential culprits include third-party software, particularly window management tools, which can disrupt window placement. Outdated or corrupt graphics drivers can also contribute to this problem. Additionally, unintentional use of keyboard shortcuts may affect the position and size of windows.
1. Use a Keyboard Shortcut
The easiest way to bring an off-screen window back into focus is with a simple keyboard trick. Just select the window or program that’s out of focus, hold down the Windows key, and use your keyboard’s arrow keys to snap the window to wherever you want on your screen. For example, if you press Win + Right arrow keys, the window will snap to the right side of your screen.
Alternatively, you can click on the off-screen window or use Alt + Tab to select it. Once it’s selected, do a Shift + Right-click on its taskbar icon. This will change the context menu and you’ll see a “Move” option. Choose Move and then use your arrow keys to bring the window back into focus.
2. Adjust the Display Resolution
When your monitor’s display resolution isn’t set to the recommended value, you might encounter a problem where the screen appears too small or stretched out. This happens because the operating system might incorrectly perceive the screen as larger or smaller than it actually is, leading to windows being partially or completely off-screen.
In some cases, this issue can be related to specific apps, like games and media applications. These apps can temporarily change the display resolution, and when you exit them, the resolution might not switch back to its previous setting correctly, resulting in windows being placed outside the visible screen area.
To fix these issues, you can manually adjust the display resolution to the recommended resolution and check if that helps.
Here is how you can do that:
- Press the Win + I keys together to open the Settings app.
- Choose System from the left pane and click on Display on the right side of the window.
- In the Scale & layout section, expand the dropdown for Display resolution and pick the option that says recommended.

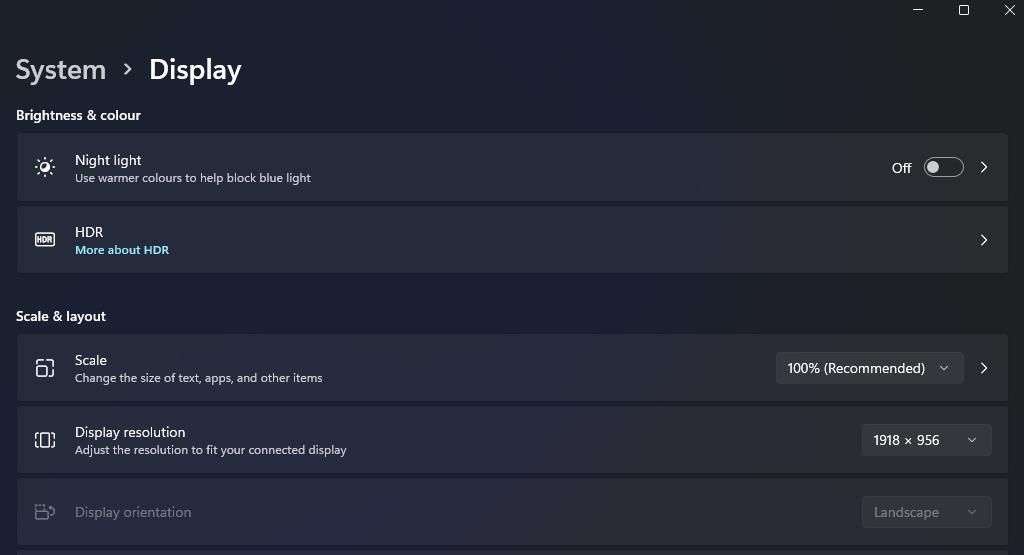
Hopefully, this will fix the problem in no time.

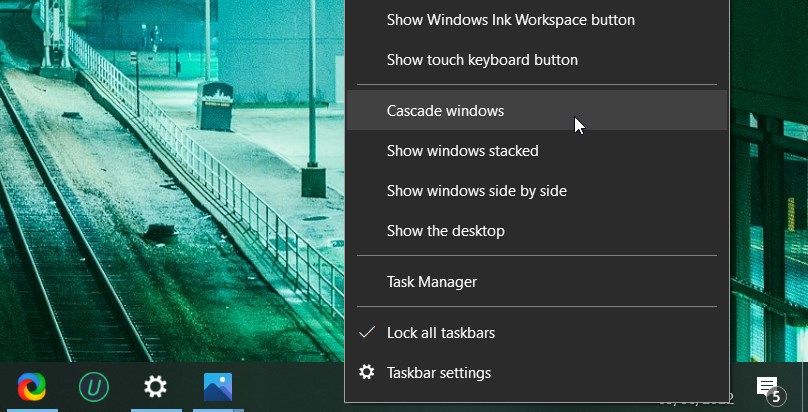
3. Use the Cascade Windows Feature
Another quick way to organize and reposition the open windows in Windows 10 is by using the Cascade Windows feature.
When you cascade windows, the operating system automatically arranges open windows so that they partially overlap and are visible on the screen, fixing the problem in the process.
Follow these steps to proceed:
- Press the Win + D keys together to minimize all windows.
- Right-click on the Windows taskbar and choose Cascade Windows from the context menu.
PearlMountain Image Converter
- Select the targeted window.
- Now, hold the Shift key while right-clicking on the targeted window.
- Select Move from the context menu and adjust the position of the screen using the arrow keys on your keyboard.
 PearlMountain Image Converter
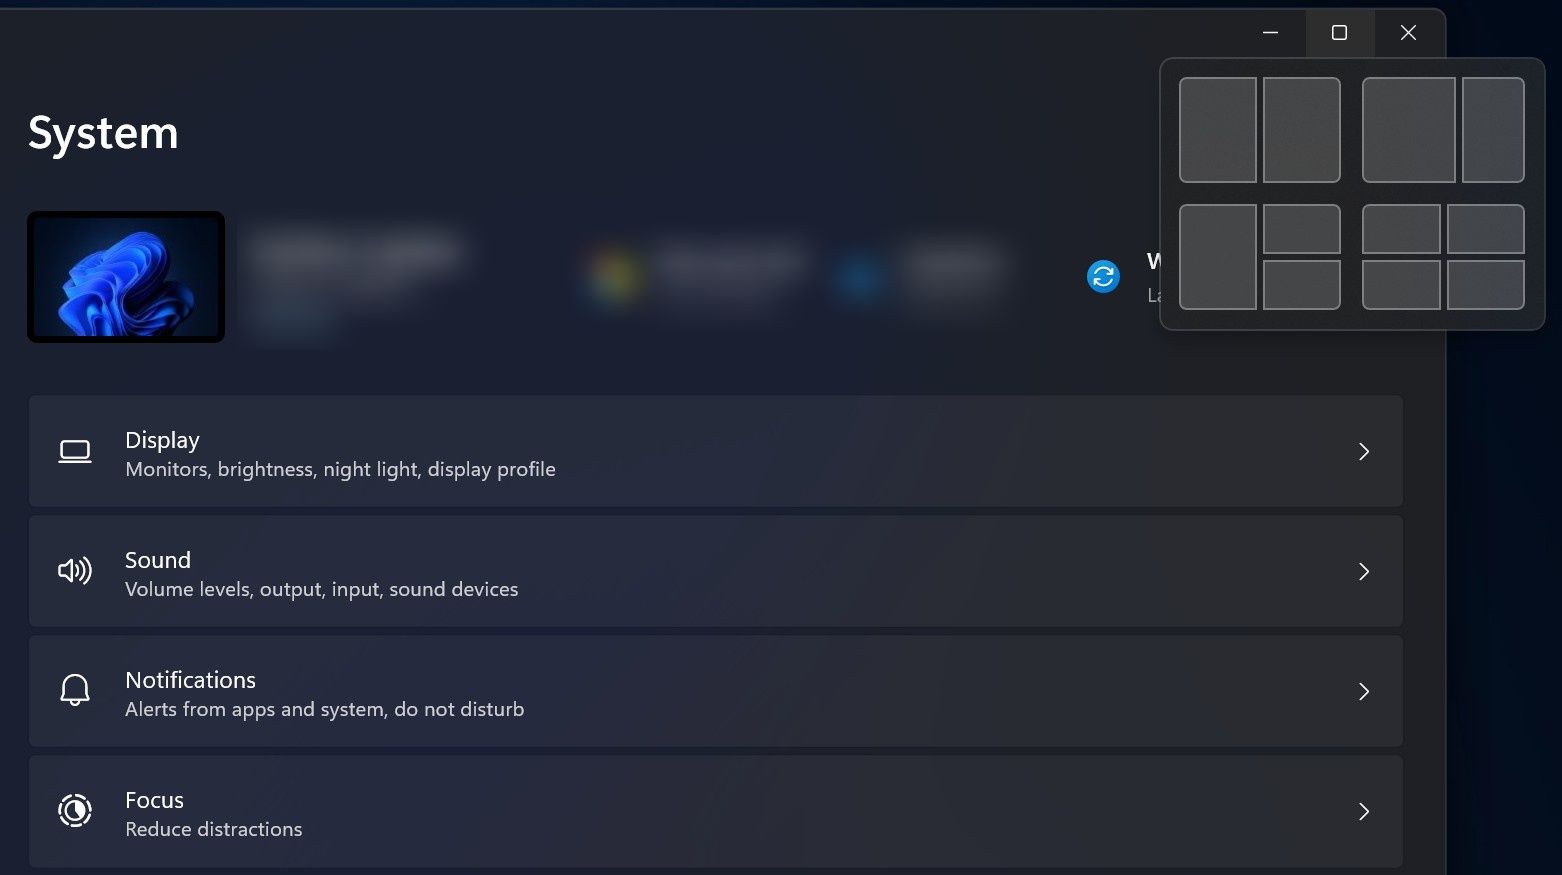
4. Use the Snap Layouts Feature
Windows’ snap layouts tool is a helpful feature that can allow you to manage and organize open windows on your desktop. Since it has predefined layouts, you can snap windows to specific areas of the screen with a simple drag-and-drop action.
Here is how to use this feature to move an off-screen window back to focus:
- Select the targeted window by either clicking on it or pressing the Alt + tab keys together.
- Press the Win + Z keys together to open the Snap layouts feature. It will be displayed in the top-right corner of your screen.
Allavsoft Batch Download Online Videos, Music Offline to MP4, MP3, MOV, etc format
- Choose where you want your screen to be by clicking on the area. This will snap the window to the place you have selected.
 Allavsoft Batch Download Online Videos, Music Offline to MP4, MP3, MOV, etc format
 5. Update Your Graphics Drivers
This is not one of the most common reasons behind the problem but in some cases, you might face the issue because of outdated graphics drivers in the system.
If you haven’t done a graphics driver update in a while, now would be a great time to perform one. If you’re not sure how to do that, check out how to update your graphics card drivers on Windows .

6. Check Your Multiple Monitors Setting
There is a right way to set multiple monitors . You must ensure that the display settings are properly configured in the Settings app and that the window isn’t mistakenly being dragged to the secondary monitor.
If you want to disconnect the second monitor, do so by first disabling the Extend these displays feature to prevent the issue at hand from occurring.

WPS Office Premium ( File Recovery, Photo Scanning, Convert PDF)–Yearly
Handle Off-Screen Windows Like a Pro
The steps mentioned above should assist you in quickly bringing the off-screen window back into focus. To prevent this issue from recurring, ensure your display settings are configured accurately and to keep your graphics drivers up to date.
However, the good news is that you can resolve this issue with just a few simple steps. In the following sections, we’ll explore various methods for bringing an off-screen window back into focus in both Windows 10 and 11.
- Title: From Vanished Panes to Visible Windows: Essential Steps for Recovering Hidden Screens (6 Ways)
- Author: David
- Created at : 2024-08-16 00:13:01
- Updated at : 2024-08-17 00:13:01
- Link: https://win11.techidaily.com/from-vanished-panes-to-visible-windows-essential-steps-for-recovering-hidden-screens-6-ways/
- License: This work is licensed under CC BY-NC-SA 4.0.