Fixing the Flux: Seven Tactics for OBS's Server Disconnect Issue

Fixing the Flux: Seven Tactics for OBS’s Server Disconnect Issue
OBS Studio is a perfect choice if you’re looking for an app to record or stream your screen. This free open-source application has plenty of configuration options that give you more control than other similar apps.
However, misconfigured in-app settings, outdated OS, and Windows Firewall are a few reasons why OBS Studio shows “Failed to connect to server” error. If you’ve run into the same problem, go through the listed solutions to resolve it quickly.
Disclaimer: This post includes affiliate links
If you click on a link and make a purchase, I may receive a commission at no extra cost to you.
What Causes “Failed to Connect to Server” Error in OBS Studio?
The “Failed to connect to server” is among the most common errors you will come across while streaming or recording in OBS studio. Some of the common culprits behind this error are:
- You’re using an incorrect software version.
- Windows Firewall is interfering and blocking the important services of the OBS Studio.
- You’re running OBS Studio without administrative privileges.
- The in-app settings are not compatible with your network settings.
Having identified the reasons behind the issue, let’s get into fixes that helped others users troubleshoot the problem.
1. Try Performing Basic Repairs
The first thing you must do to troubleshoot the problem is to restart OBS Studio. The best way is to close all the OBS Studio-related processes from the Task Manager. Then, start OBS Studio again and check if the problem continues.
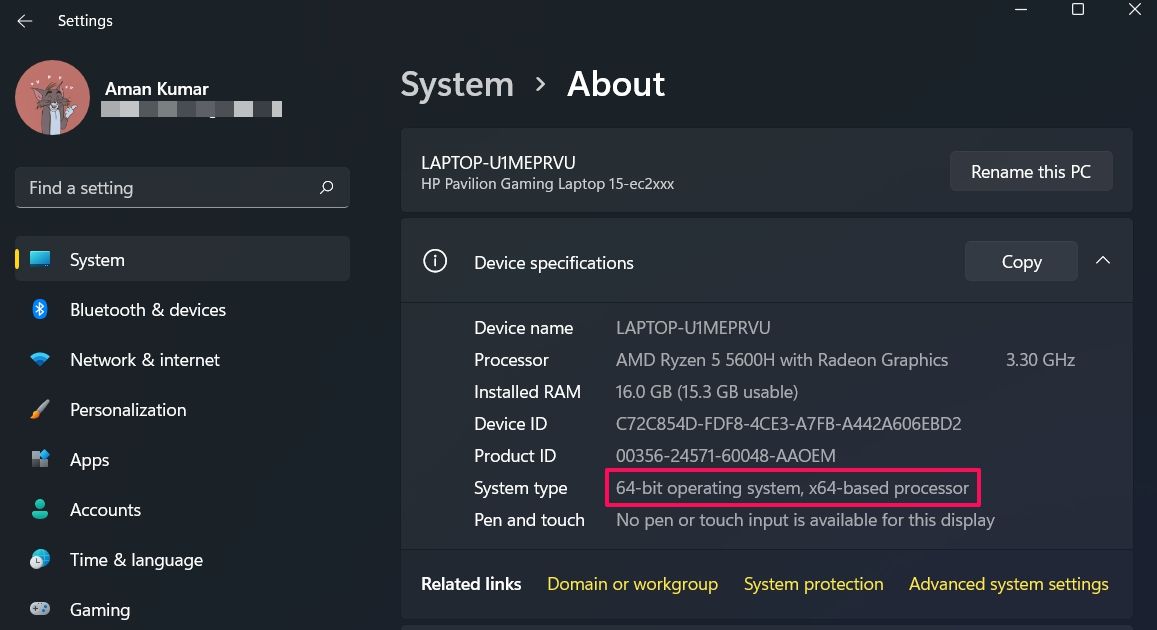
OBS Studio is available for both 32 and 64-bit computers. While you can install the 64-bit version on a 32-bit computer, it will create different issues if you try to run it.
Therefore, you must check the Windows version of your computer and install OBS Studio accordingly. To check the Windows version, follow the below instructions:
- Open theSettings menu by pressing theWin + I hotkeys.
- Head towardsSystem >About.

Under theDevice specifications section, check the value next to theSystem type.
The error message can also appear if you try to run OBS Studio without administrative privileges. To fix this, right-click the OBS Studio executable file and choose theRun as administrator option.
Lack of administrative privileges will cause different issues now and then. To avoid this, you must configure OBS Studio to always run as an administrator. Here’s how to do it:
- Right-click on the OBS Studio executable file and chooseProperties.
- Switch to theCompatibility tab and check theRun this program as an administrator option.
- ClickApply >OK to save the changes.
That’s it. Launch OBS Studio and check if the problem persists.
If you are also running one ofthe best OBS Studio alternatives on your PC, it can result in a software conflict. To stop this from happening, close all these apps and their background processes. You can also uninstall them if you use them sparingly.
2. Change the “Bind to IP” Option
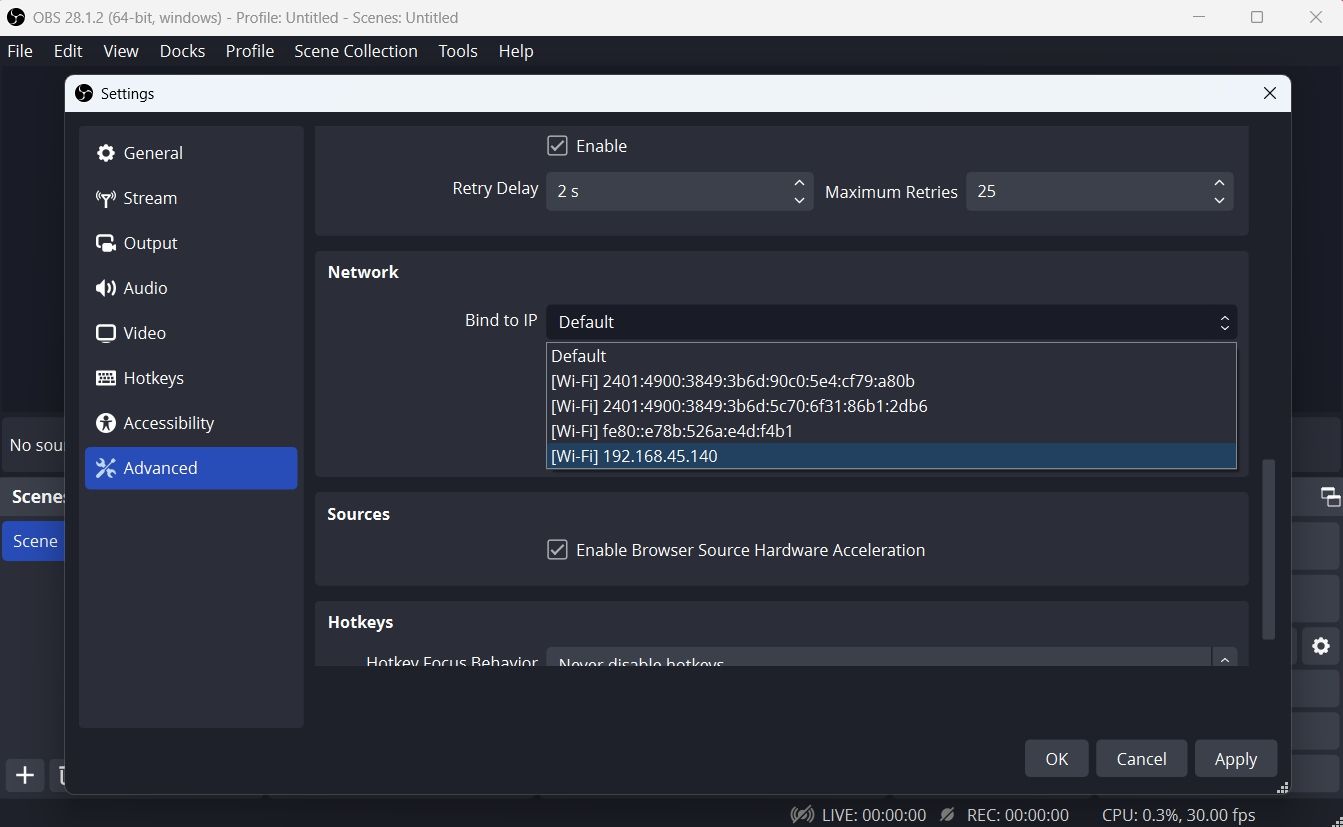
The “Failed to connect to server” error is likely to appear if the Bind to IP option is not correctly configured in OBS Studio. To fix this, you will have to change this option to the network connection name with the IP address. Here’s how to do it:
- Launch OBS Studio and chooseSettings under the Controls section.
- Select theAdvanced option in the left panel.
- Click thedrop-down icon next to theBind to IP option. It’ll be under theNetwork section.
- By default, this setting is set toDefault. You’ll have to choose the option that shows your connection name along with the IP address.

- Check theDynamically change bitrate to manage congestion option.
- ClickApply >OK to save the changes.
Relaunch OBS Studio and check for the problem.
3. Switch to a Different Stream Server
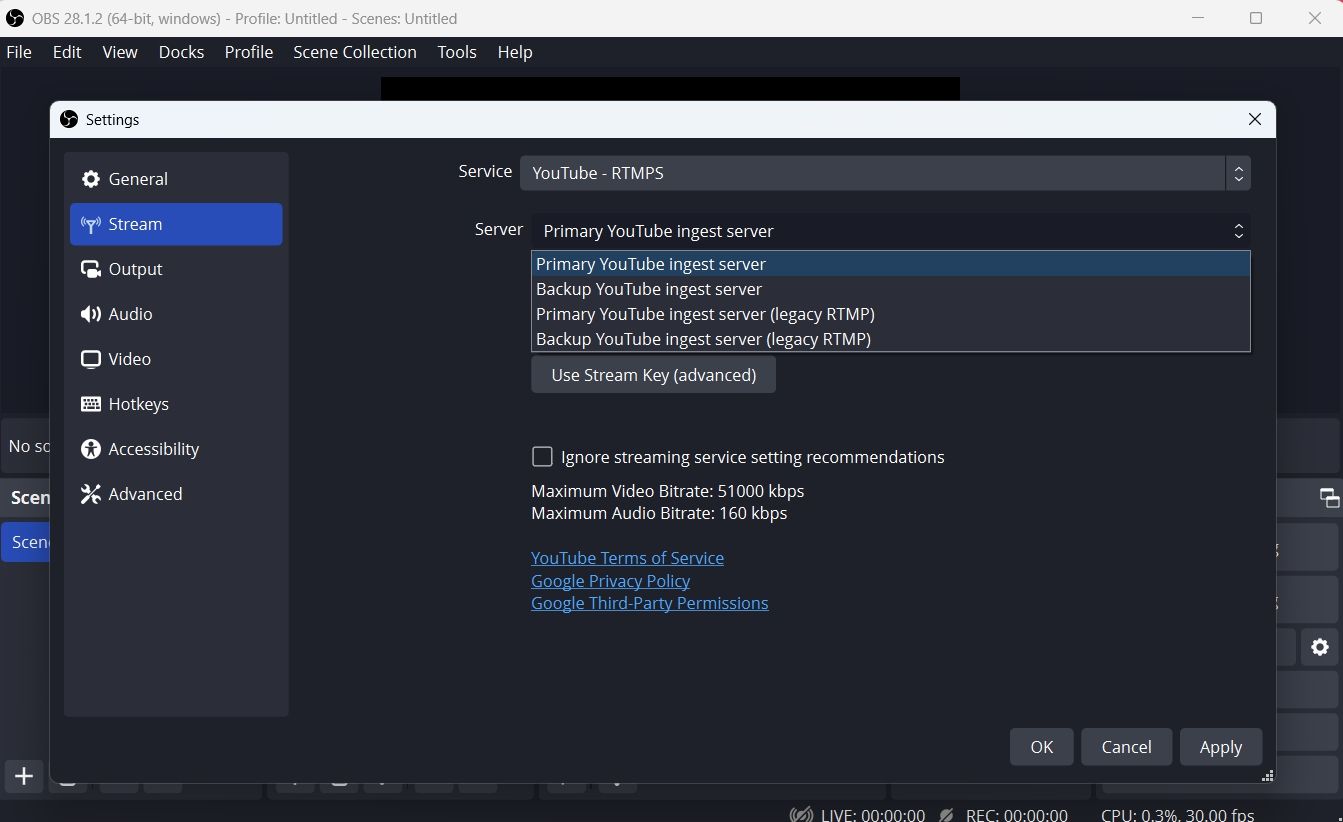
The error can appear if your current streaming server is overloaded. The solution, in this case, is to switch to a different stream server. You can do this by following the below steps:
- Open Settings in OBS Studio.
- Select theStream option in the left panel.
- Click thedrop-down icon next toServer, and select a different server from the menu that crops up.

- ClickApply >OK.
4. Check for Corruption Within the OBS Installation
OBS Studio’s files can get corrupted for various reasons, which can cause problems like this one. In this situation, you can do an integrity check to scan your OBS installation for corruption and redownload the broken and missing files.
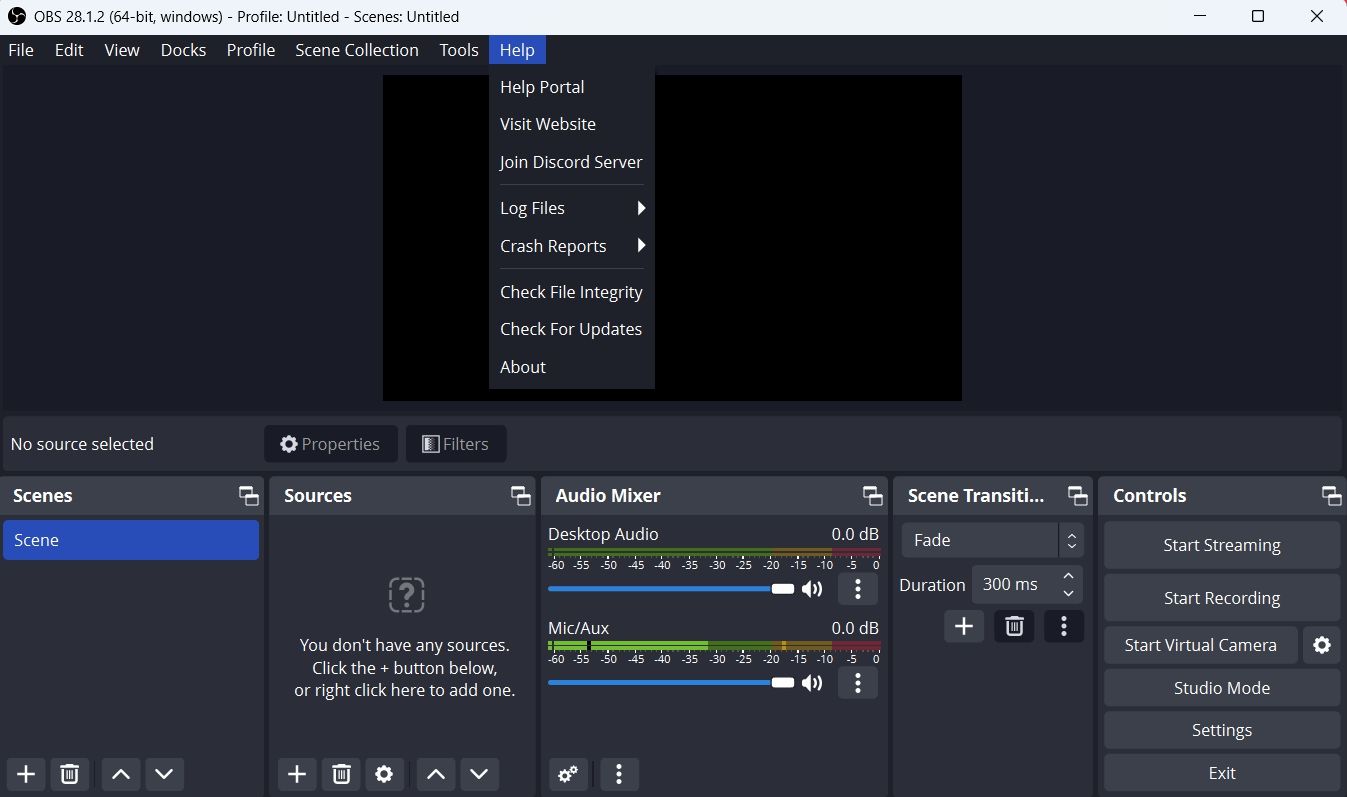
- Open OBS Studio and click theHelp option at the top.
- Choose theCheck File Integrity option from the menu that crops up.

- ClickYes to confirm your selection, and then clickYes again to the UAC that appears.
Wait until the process is complete. After that, relaunch OBS Studio and check if the issue continues.
5. Update OBS Studio
You can also try updating OBS Studio to fix the error. To do so, launch OBS Studio, clickHelp , and then selectCheck for updates . If any updates are available, they will be downloaded automatically.
6. Allow OBS Studio through Windows Firewall
If OBS Studio is blocked under the Windows Firewall setting, you are likely to see “Failed to connect to server” error. You’ll have to allow OBS Studio in the Windows Firewall settings as a solution. Here’s how to do it:
- Launch the Start Menu; typeAllow an app through Windows Firewall and press Enter.
- Click theChange Settings button.
- In theAllowed apps and features section, scroll down and locate the OBS Studio.
- Check both thePrivate andPublic boxes.
- Click OK.
That’s it. You will have to restart your computer (seethe different ways to restart your Windows computer ) for the changes to take effect.
7. Change the MTU Size
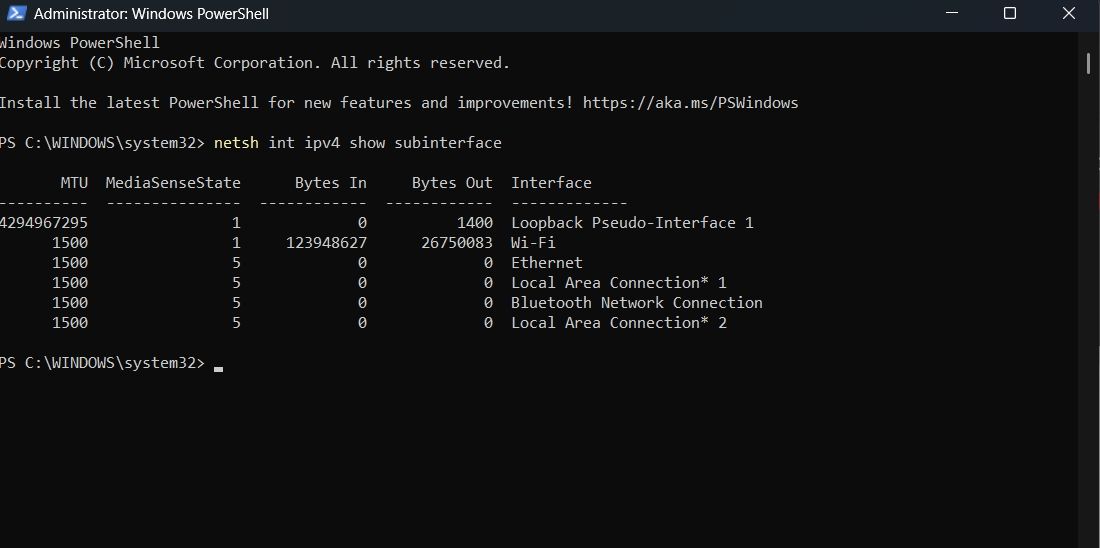
If you’re still facing the issue, you can try lowering the MTU (Maximum Transmission Unit) size. You can do this by following the below instructions:
- Open PowerShell as an administrator by pressingWin + S , typing “PowerShell”, then right-clicking the search result and selectingRun as administrator .
- Type the following command, and pressEnter :
netsh int ipv4 show subinterface - Note the name of your connection in theinterface column.

- Type the following command and press Enter.
netsh inteface ipv4 set subinterface <Your connection name> mtu=1400 store=persistent
The MTU size is now changed. Launch OBS Studio and check for the problem again.
OBS Studio “Failed to Connect to Server” Error Fixed
OBS Studio is everyone’s first choice to stream online, and there is a good reason behind it. But sometimes, misconfigured in-app settings can cause various issues, including the “Failed to connect to server” error. Fortunately, you can quickly troubleshoot this error by following the above fixes.
Also read:
- [New] In 2024, Binge-Watching to Billions Jake Paul's Video Venture
- A Perfect Guide To Remove or Disable Google Smart Lock On ZTE Nubia Flip 5G
- Deciphering Media Tool Code: WinError 0X8007043C
- Evaluating the Logitech C615 Webcam: Striking a Perfect Blend of Price and Quality
- FLV & VOBファイルの圧縮に特化したオンライン無料変換ツール - 動画編集天才Movavi
- New 2024 Approved Make Your Own Music Magic Top Lip Sync Video Creation Apps
- Simplified System Management Through Task Scheduler
- Streamlining Emails: Linking Gmail and Outlook in Windows
- Techniques to Replace Modern Text with Icons in Windows 11
- The Best Android Unlock Software For Vivo G2 Device Top 5 Picks to Remove Android Locks
- Wie Man Windows 8/8.1 Von Einer HDD Auf Ein SSD Überträgt - Schritt-Für-Schritt-Anleitung
- Title: Fixing the Flux: Seven Tactics for OBS's Server Disconnect Issue
- Author: David
- Created at : 2024-11-06 18:52:14
- Updated at : 2024-11-07 19:38:12
- Link: https://win11.techidaily.com/fixing-the-flux-seven-tactics-for-obss-server-disconnect-issue/
- License: This work is licensed under CC BY-NC-SA 4.0.
