
Fixing LSA Error on Windows Systems
Fixing LSA Error on Windows Systems
LSA protection is a vital security feature on Windows that prevents unauthorized access to system resources. However, corrupt system files or malware infections may lead to an error stating “this change requires you to restart your device”. This error persists even after enabling Local Security Authority (LSA) protection or restarting the computer.
It suggests an underlying problem that requires resolution to restore system security. If you have the same problem, these solutions might help.
What Causes the LSA Protection Error?
The exact cause of the “this change requires you to restart your device” error can vary, but it may be due to corrupted system files or malware infections. Malware can install malicious services and components that interfere with Windows’ smooth functioning, including disabling Local Security Authority (LSA) protection. It can also occur if antivirus software incorrectly removes system files and causes instability.
This error is usually triggered when Windows attempts to enable Local Security Authority (LSA) protection and fails. In some cases, the error may also appear after you enabled LSA protection and restarted your computer.

1. Restart Your PC
As the error message suggests, you first restart your Windows system. This minor step can fix several system-level errors and is worth a try. Restarting your computer involves shutting down all running programs and starting it up again.

2. Scan for Malicious Programs
If restarting the computer doesn’t solve the issue, check your system for malicious software. Malware infections may corrupt system files and prevent LSA protection from working.
To check if any malicious programs are on your system, do the following.
- Press Win + Q on your keyboard to open the Taskbar search window.
- Type Windows Security in the search bar and hit Enter.
- On the left pane of Windows Security, click the Virus & threat protection tab.
- Click Scan options on the right side of the screen.
- Select Full scan and click Scan now.
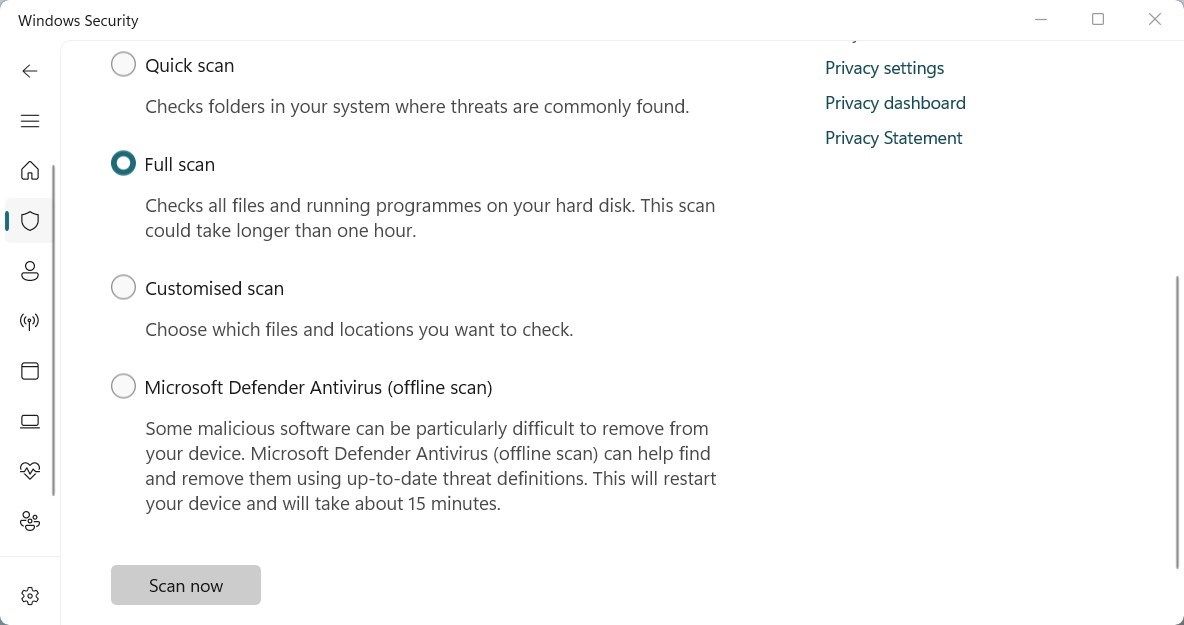
Now wait for the scan to finish. If malicious programs are detected, Windows Security will remove them from your system automatically.
3. Change the Group Policy Settings
If the above steps don’t help, you might need to configure LSA manually. It involves editing the Local Group Policy Editor and setting some specific settings. However, this tool only works with Windows 11 Professional and Enterprise editions.
So, if you’re running Windows Home Edition, you won’t have access to Local Group Policy. To make this work, enable the Local Group Policy Editor in Windows Home , then follow these steps:
- Press Win + R on your keyboard to open the Run dialogue box.
- Type gpedit.msc in the search box and hit Enter.
- In the Local Group Policy Editor, expand Computer Configuration on the left side.
- Then navigate to the following:
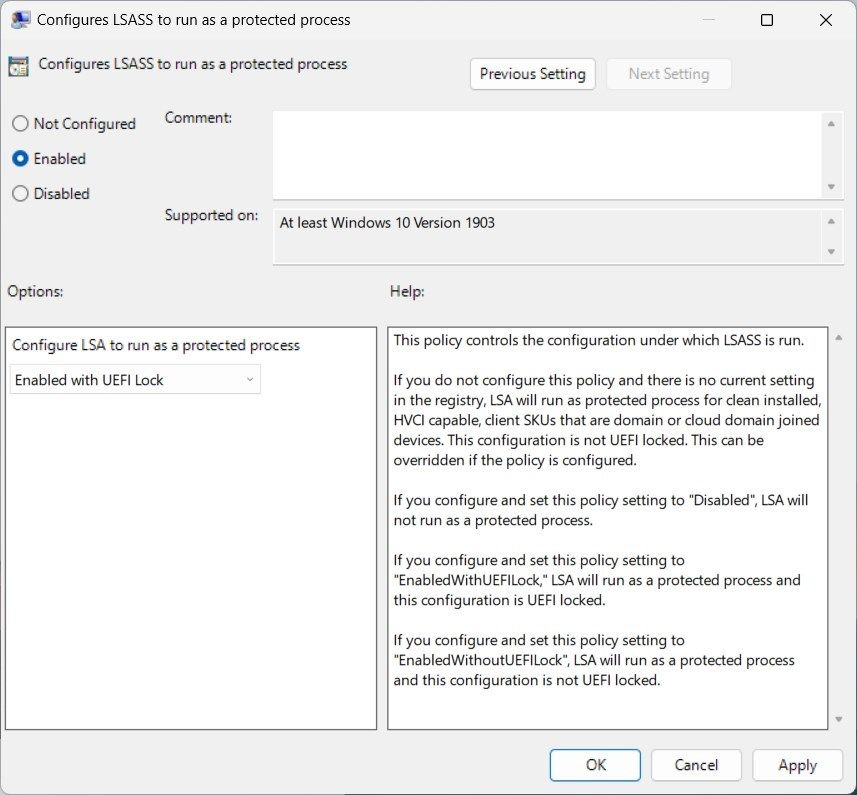
Administrative Templates > System > Local Security Authority - Double-click Configure LSASS to run as a protected process in the right pane.
- Now, in the window that appears, alter the settings from Not Configured to Enabled.
- Under the Options section, click the drop-down menu for Configure LSASS to run as a protected process and select Enabled with UEFI Lock.
- Now click Apply > OK to save the changes.

After making the above changes, restart your computer and check if the error is resolved.
## 4\. Tweak the Registry EditorIf you’re running Windows Home edition, you can tweak the Registry Editor to modify Local Security Authority protection values. The steps are pretty straightforward, but be aware that making incorrect changes to the registry can cause serious problems. To be safe, back up the Windows Registry data before making any changes.
- Press Win + R on your keyboard to open the Run command.
- Type regedit in the dialog box and press the Enter key.
- If UAC prompts appear on the screen, click Yes to grant permission.
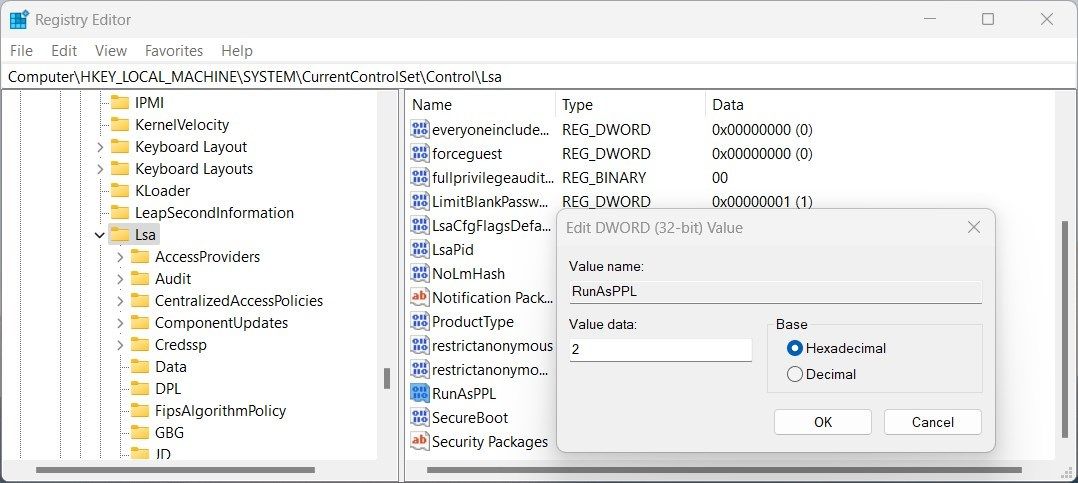
- In the Registry Editor window, navigate to the following location:
Computer\HKEY_LOCAL_MACHINE\SYSTEM\CurrentControlSet\Control\Lsa
You can also copy and paste the given path into the address bar at the top of the Registry window. Then, hit Enter to jump directly to the folder. - In the right pane, double-click on RunAsPPL to open Edit DWORD (32-bit) Value.
- Change the Value data from 0 to 2 and click OK.
- Similarly, find the RunAsPPLBoot key and set its value to 2.
If you don’t find the RunAsPPL and RunAsPPLBoot keys in the LSA folder, you’ll need to create them manually. To do this, right-click on the LSA folder and select New > DWORD (32-bit) Value. Name the new value RunAsPPL and set its value to 2. Then repeat this process for the RunAsPPLBoot key.
Once you’re done, close the Registry Editor and restart your computer. This should fix the problem.
5. Reset the Windows Security App
Windows Security is an integrated antivirus program built into the Windows OS. It’s responsible for scanning your system and removing malicious content. If there’s something wrong with the Windows Security app, it might trigger this error. To fix the issue, reset the app and see if it helps. Here’s how to do it:
- Press Win + I on your keyboard to open the system settings.
- Select Apps on the left side of the window.
- Click Installed apps in the right pane
- Scroll down the list of apps until you see Windows Security. You can also type Windows Security into the search bar to find it quickly.
- Now click the three dots icon and select Advanced options from the menu.
- On the next page, scroll down to the Reset section and click Reset.
- If the confirmation window pops up, click Reset to continue.

Wait for the reset process to finish and restart your computer. After restarting, check if the error is still present.
 PaperScan Professional: PaperScan Scanner Software is a powerful TWAIN & WIA scanning application centered on one idea: making document acquisition an unparalleled easy task for anyone.
6. Perform Some Generic Fixes
There are also some generic fixes to resolve the issue. First, run the System File Checker command to repair incorrect or damaged system files. You may also want to use the Deployment Image Servicing and Management tool to diagnose issues with local system images. If the problem persists, try updating Windows to the latest version to resolve any glitches or bugs.
Some antivirus and security programs can be too aggressive in protecting your system. They could prevent access to the LSA feature, leading to this problem. To be sure, you can temporarily disable your security software and check if it solves the issue.
## Fixing the LSA Protection Error on WindowsLocal Security Authority protection safeguards unauthorized access to system resources, such as passwords or other sensitive information. However, this feature might not work as expected due to LSA Protection Error. Thanks to the potential solutions discussed in this guide, solving the problem is easy.
It suggests an underlying problem that requires resolution to restore system security. If you have the same problem, these solutions might help.
- Title: Fixing LSA Error on Windows Systems
- Author: David
- Created at : 2024-08-16 00:35:29
- Updated at : 2024-08-17 00:35:29
- Link: https://win11.techidaily.com/fixing-lsa-error-on-windows-systems/
- License: This work is licensed under CC BY-NC-SA 4.0.