Fix Extra Screen Problems in Windows 11

Fix Extra Screen Problems in Windows 11
Professionals and gamers use second monitors to maximize productivity. It is useful for multitasking, screen sharing, and expanding your display space. However, sometimes Windows fails to detect or recognize the second monitor.
This guide explains how to fix the second monitor not being detected issue in Windows 11.
Disclaimer: This post includes affiliate links
If you click on a link and make a purchase, I may receive a commission at no extra cost to you.
Common Causes of Windows 11 Not Detecting Your Second Monitor
There are several common reasons why your computer is not detecting a second monitor:
- Display Settings: If your display settings don’t recognize multiple monitors, your second screen may not show up. It could be an update or a setting change.
- Faulty cables or ports: Hardware issues can also cause detection issues. So, if your video cables or ports are damaged or not properly connected, Windows might not recognize the second monitor.
- An outdated Graphics Driver: The second monitor may not work if the graphics driver on your computer is outdated or corrupted.
Now that you know what could cause your computer not to detect the second monitor, here are some ways to fix it.
How to Fix a Second Monitor Not Detected on Windows 11
Before getting into more complicated troubleshooting, try these quick and easy fixes. If any of these methods work, it’s probably just a hardware or setting issue.
- Unplug the second monitor video cables from the computer and plug them back in. Sometimes, a simple reconnection can fix the problem.
- Damaged cables or ports can prevent Windows from detecting your second monitor. Test with a different video cable or plug it into a different port on your computer.
- Restarting your computer can detect the second monitor. It’s a simple solution but effective.
- Turn off your second monitor, wait a few minutes, and then turn it back on. This can make Windows recognize it.
- DisplayPort and HDMI come in different versions. If your second monitor has an older version, it might not be compatible with your computer. Try a different cable or an adapter.
If you’ve tried these quick solutions and your second monitor is still not detected, check out these troubleshooting methods.
1. Check the Display Settings
As mentioned earlier, incorrect display settings can cause Windows not to recognize the second monitor. To check if this is the issue, follow these steps:
- Press Win + I on your keyboard to open the Settings app.
- From the left panel, navigate to System > Display.
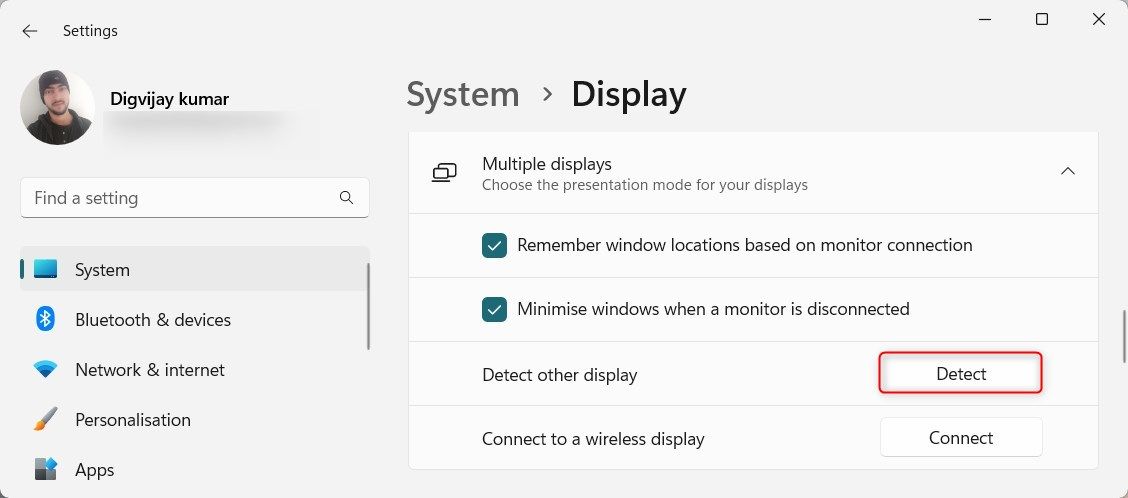
- Scroll down to Scale & layout and expand Multiple displays.
- Next, click on Detect.

- If your second monitor is detected, click on it and select Extend these displays from the drop-down menu.
If it shows a message saying, “We didn’t find another display”, it means Windows still does not recognize the second monitor. You can try the next method.
2. Update the Graphics Driver
Graphics drivers are software that communicates between your operating system and the graphics card. If it’s outdated or corrupted, it can cause issues with your second monitor. To solve this, update your graphics driver. Here’s how to do it:
There are two ways to update your graphics driver:
- Manually: Navigate to the manufacturer’s website and download the latest graphics driver for your specific model. Then, install it on your computer. You can also use Device Manager to update your drivers manually.
- Automatically: Use your GPU manufacturer’s tool to automatically scan for outdated drivers and update them with just a few clicks.
Here, we will show you how to do it using Device Manager:
- Right-click on the Start menu and select Device Manager.
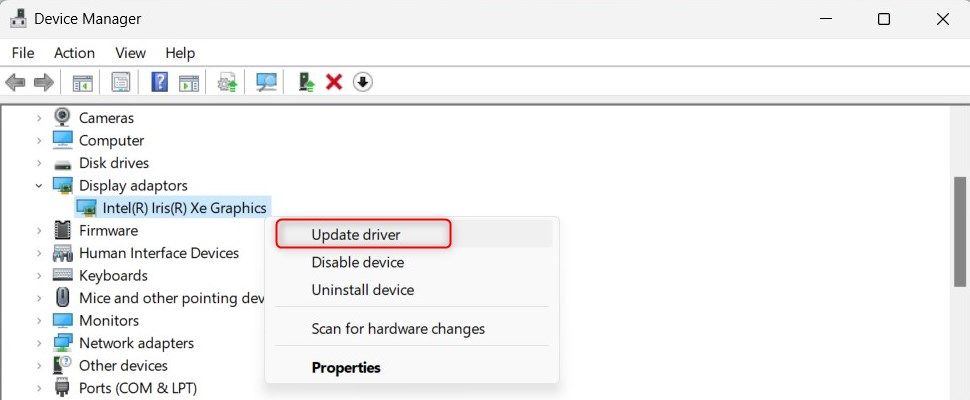
- Expand Display adaptors and right-click on your graphics card.
- Select Update driver in the context menu**.**

- Next, choose Search automatically for drivers. If Windows doesn’t find anything, click Search for updated drivers on Windows Update on the next screen.
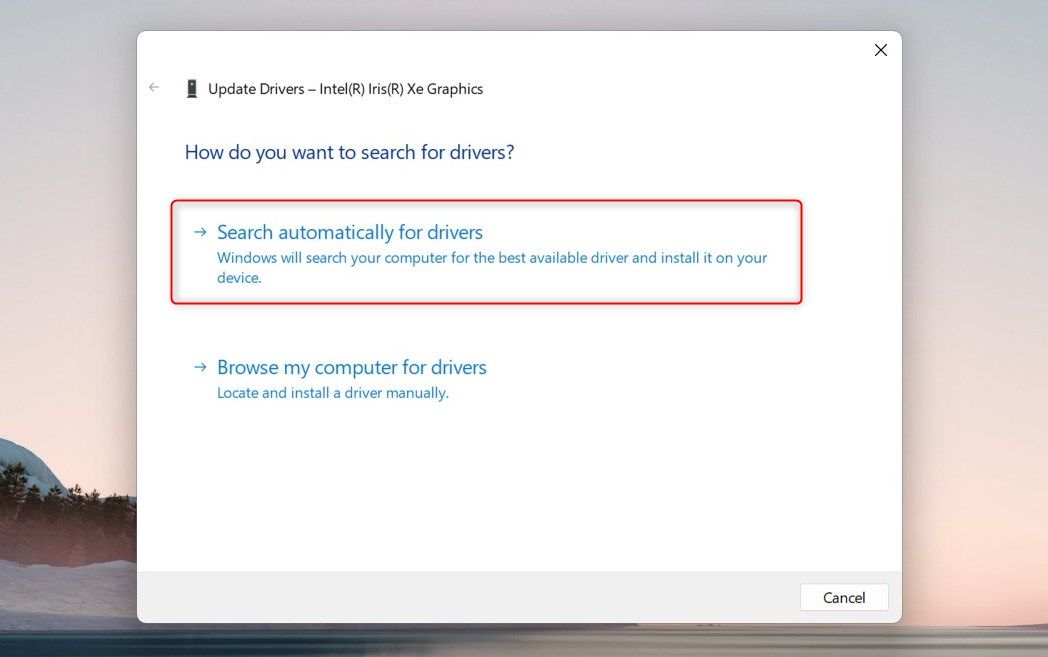
5. If it finds an update, follow the prompts to complete the process.
After updating, restart your computer and check if Windows detects your second monitor.
3. Reinstall the Graphics Driver
If updating the graphics driver didn’t solve the issue, try reinstalling it. This will remove any corrupted or incorrect files and install a fresh driver version. Here’s how:
- Again, open the Device Manager and expand Display adapters.
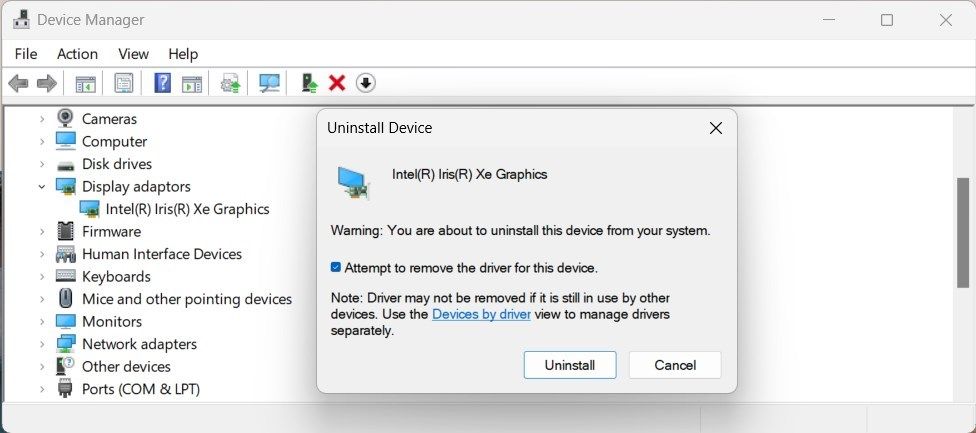
- Right-click on your graphics card and select Uninstall device.
- In the confirmation window that pops up, check the box next to Attempt to remove the driver for this device.

- Then, click on Uninstall.
Once the process is complete, restart your computer. Upon restarting, open Device Manager again and click the Action tab on the menu bar. Select Scan for hardware changes, and Windows will automatically reinstall the graphics driver.
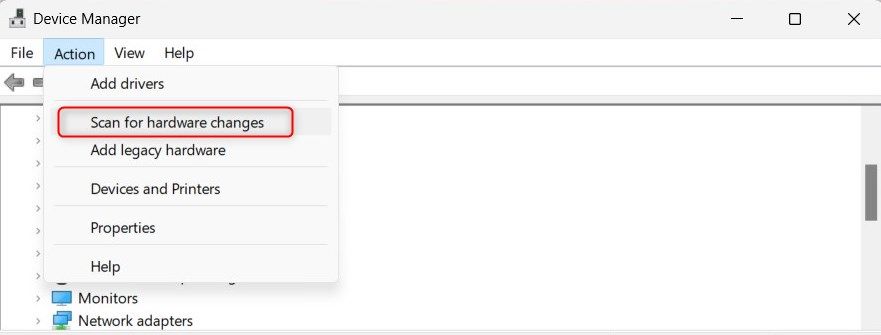
Check if your second monitor is now detected.
4. Toggle Between the Windows Project Modes
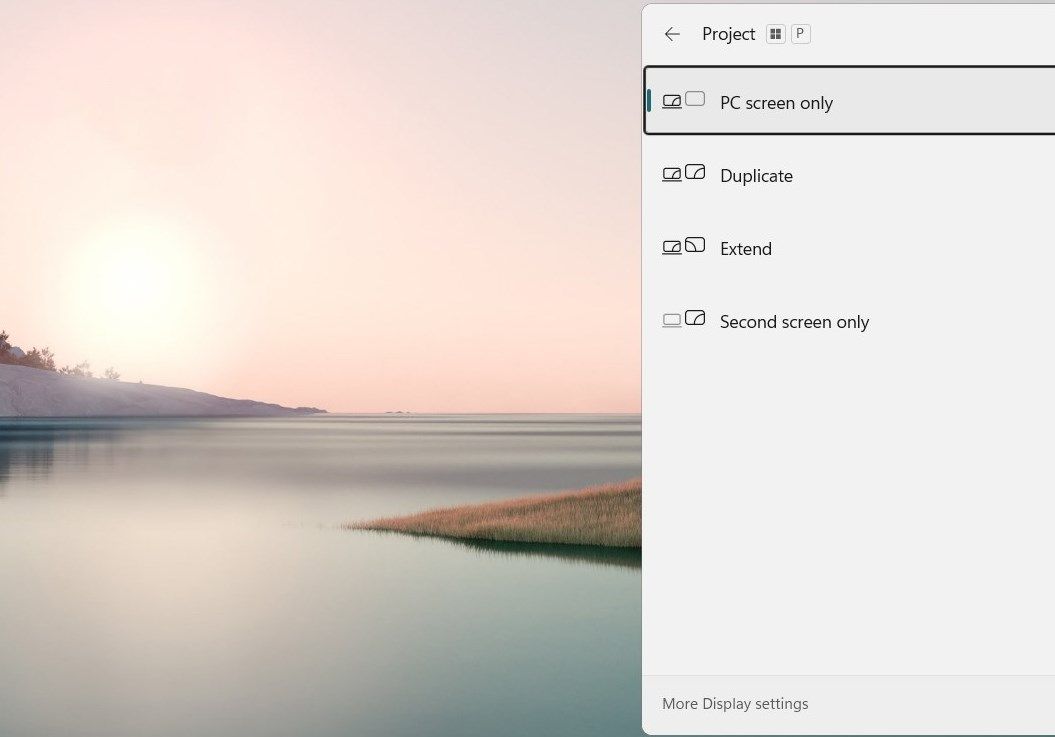
Windows offers a project mode feature that lets you choose how to display content on a second screen. It includes options like PC screen only, Duplicate, Extend, and Second screen only.
If Windows fails to detect your second monitor, try changing the project mode and seeing if it makes a difference. To toggle between project modes, follow these simple steps:
- Press the Win + P on your keyboard. This command launches the Project menu on the right side of your screen.
- The Project menu displays four options: PC screen only, Duplicate, Extend, and Second screen only.

- First, try selecting the Duplicate option. This will mirror your primary monitor to your second monitor.
- If the second monitor still isn’t detected, return to the same Project menu (Win + P) and select Extend. It would extend your desktop across both monitors.
- Try the Second screen only option if neither option works. This option will turn off your primary monitor and only display on your second monitor.
- After each selection, give your system a few seconds to adjust to the new settings. If the second monitor is detected at any stage, keep the settings as they are.
If none of these options work, the issue may not be with your project mode settings. In this case, continue troubleshooting with other methods.
Remember, when you switch between project modes, your screen may flicker. This is perfectly normal and nothing to worry about. It’s just your system adapting to the new settings.
5. Check the Refresh Rate for the Second Monitor
A refresh rate on a monitor is the number of times it updates with new images every second. If your second monitor has a different refresh rate than the first, Windows may not detect it. To make sure this isn’t the issue, follow these steps:
- Right-click on your desktop and select Display settings.
- The Settings menu opens with the System tab selected. On the right panel, click on Display settings.
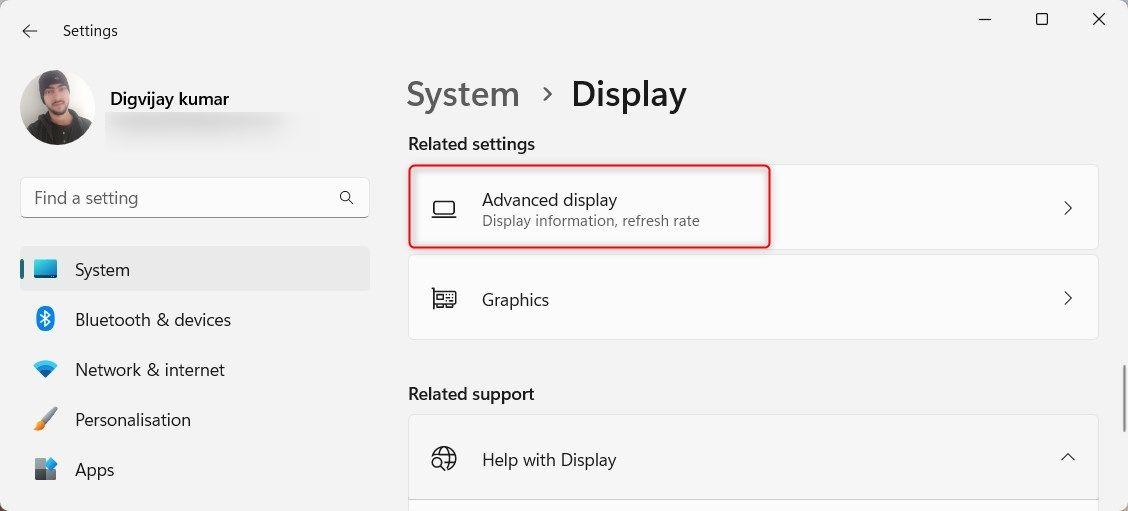
- Now scroll down to Related settings and click on Advanced display. This opens the Advanced display settings window.

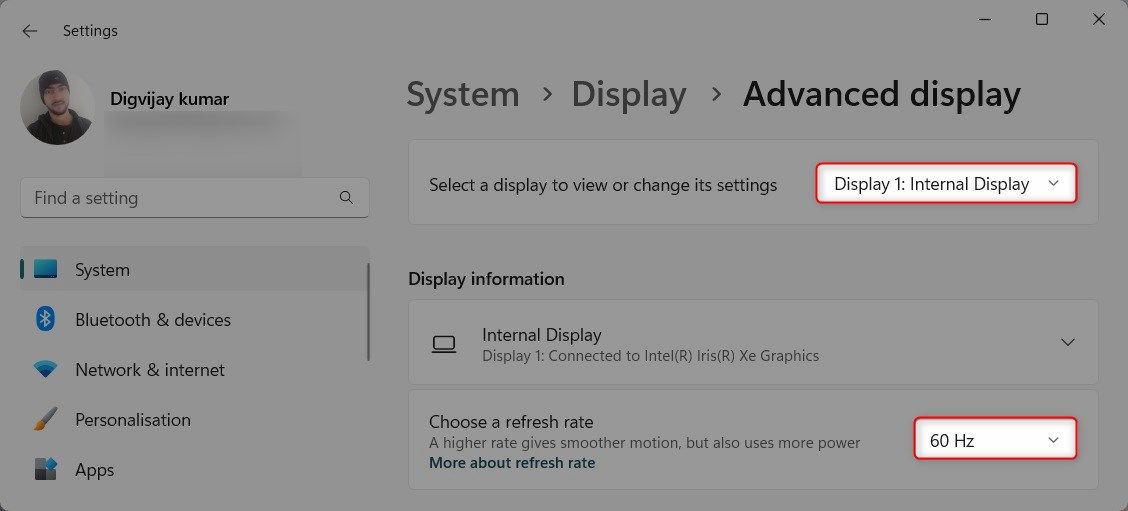
- At the top of the screen, choose the second monitor from the drop-down menu.
- Under Display information, check the refresh rate. Make sure it’s the same as your primary monitor.

- If not, click on the Choose a refresh rate drop-down menu and select a rate compatible with your second monitor.
Doing this may flicker the screen for a few seconds. If it doesn’t, click on Keep changes to continue. Once you finish that, Windows should pick up your second monitor.
Optimize Your Productivity With a Second Monitor on Windows 11
A dual-monitor setup significantly increases productivity and streamlines your work experience. However, Windows sometimes fails to detect the second monitor. This comprehensive guide delves into five different methods to resolve this problem. Give them a try and restore your second monitor’s functionality.
Professionals and gamers use second monitors to maximize productivity. It is useful for multitasking, screen sharing, and expanding your display space. However, sometimes Windows fails to detect or recognize the second monitor.
This guide explains how to fix the second monitor not being detected issue in Windows 11.
Also read:
- [New] Navigating YouTube's Subtitle System Download with Ease Using 3 Methods
- [New] Scour These 10 Vectors Websites for Exceptional Quality
- 2024 Approved Ultimate Action Camera Selection Under $100
- Examining the Importance of Sunlight Visibility in Modern Phones
- How To Make Invisible Wi-Fi Visible in Windows 11
- How to Restart and Rectify Non-Functional OBS on PC
- Improving Video Quality During iPhone Shoots for 2024
- iSpoofer is not working On Motorola Moto E13? Fixed | Dr.fone
- Master the Menus: Create a Fast Uninstall Route for Windows 10/11
- Resolving GeForce Now's Error Xc0f1103f on Windows 11
- Reversing the Disabled State on Windows 11 - Fix for Error Code 22
- Step-by-Step Guide to Setting Up & Controlling Microsoft Accounts for Household Use - ZDNet
- Streamline File Organization with Multiple Windows 11 Folders
- Tackling NVIDIA OpenGL Driver Failures in Win11
- Top 11 Easy Methods to Convert TS Files to MP4 on Any Platform - Windows, Mac & Web
- Troubleshoot Your iPhone Torch: A Guide with 12 Steps
- Turn Voice Into Written Words Immediately - Whisper's Secret
- Unveiling Instagram Reels 10 Surprising Insights
- Windows Server 2019 Traditional Boot Installation: How to Set Up and Modify Boot Options
- Title: Fix Extra Screen Problems in Windows 11
- Author: David
- Created at : 2024-11-26 21:10:34
- Updated at : 2024-11-27 19:19:45
- Link: https://win11.techidaily.com/fix-extra-screen-problems-in-windows-11/
- License: This work is licensed under CC BY-NC-SA 4.0.
